Aluminum - I think the stepdown is a bit much right?

Hey,

So after several days spent learning Fusion 360, this morning I was getting impatient and went trying to mill my first aluminum, in fact it is the first milling I’ve tried with the nomad.

About 15min later on the cut, the first stepdown happened ramping from the top to the bottom, and that was fuckingly loud, I didn’t wanted to break the endmill so I instantly stopped it as I was next to it vacuuming the chip away regularly.

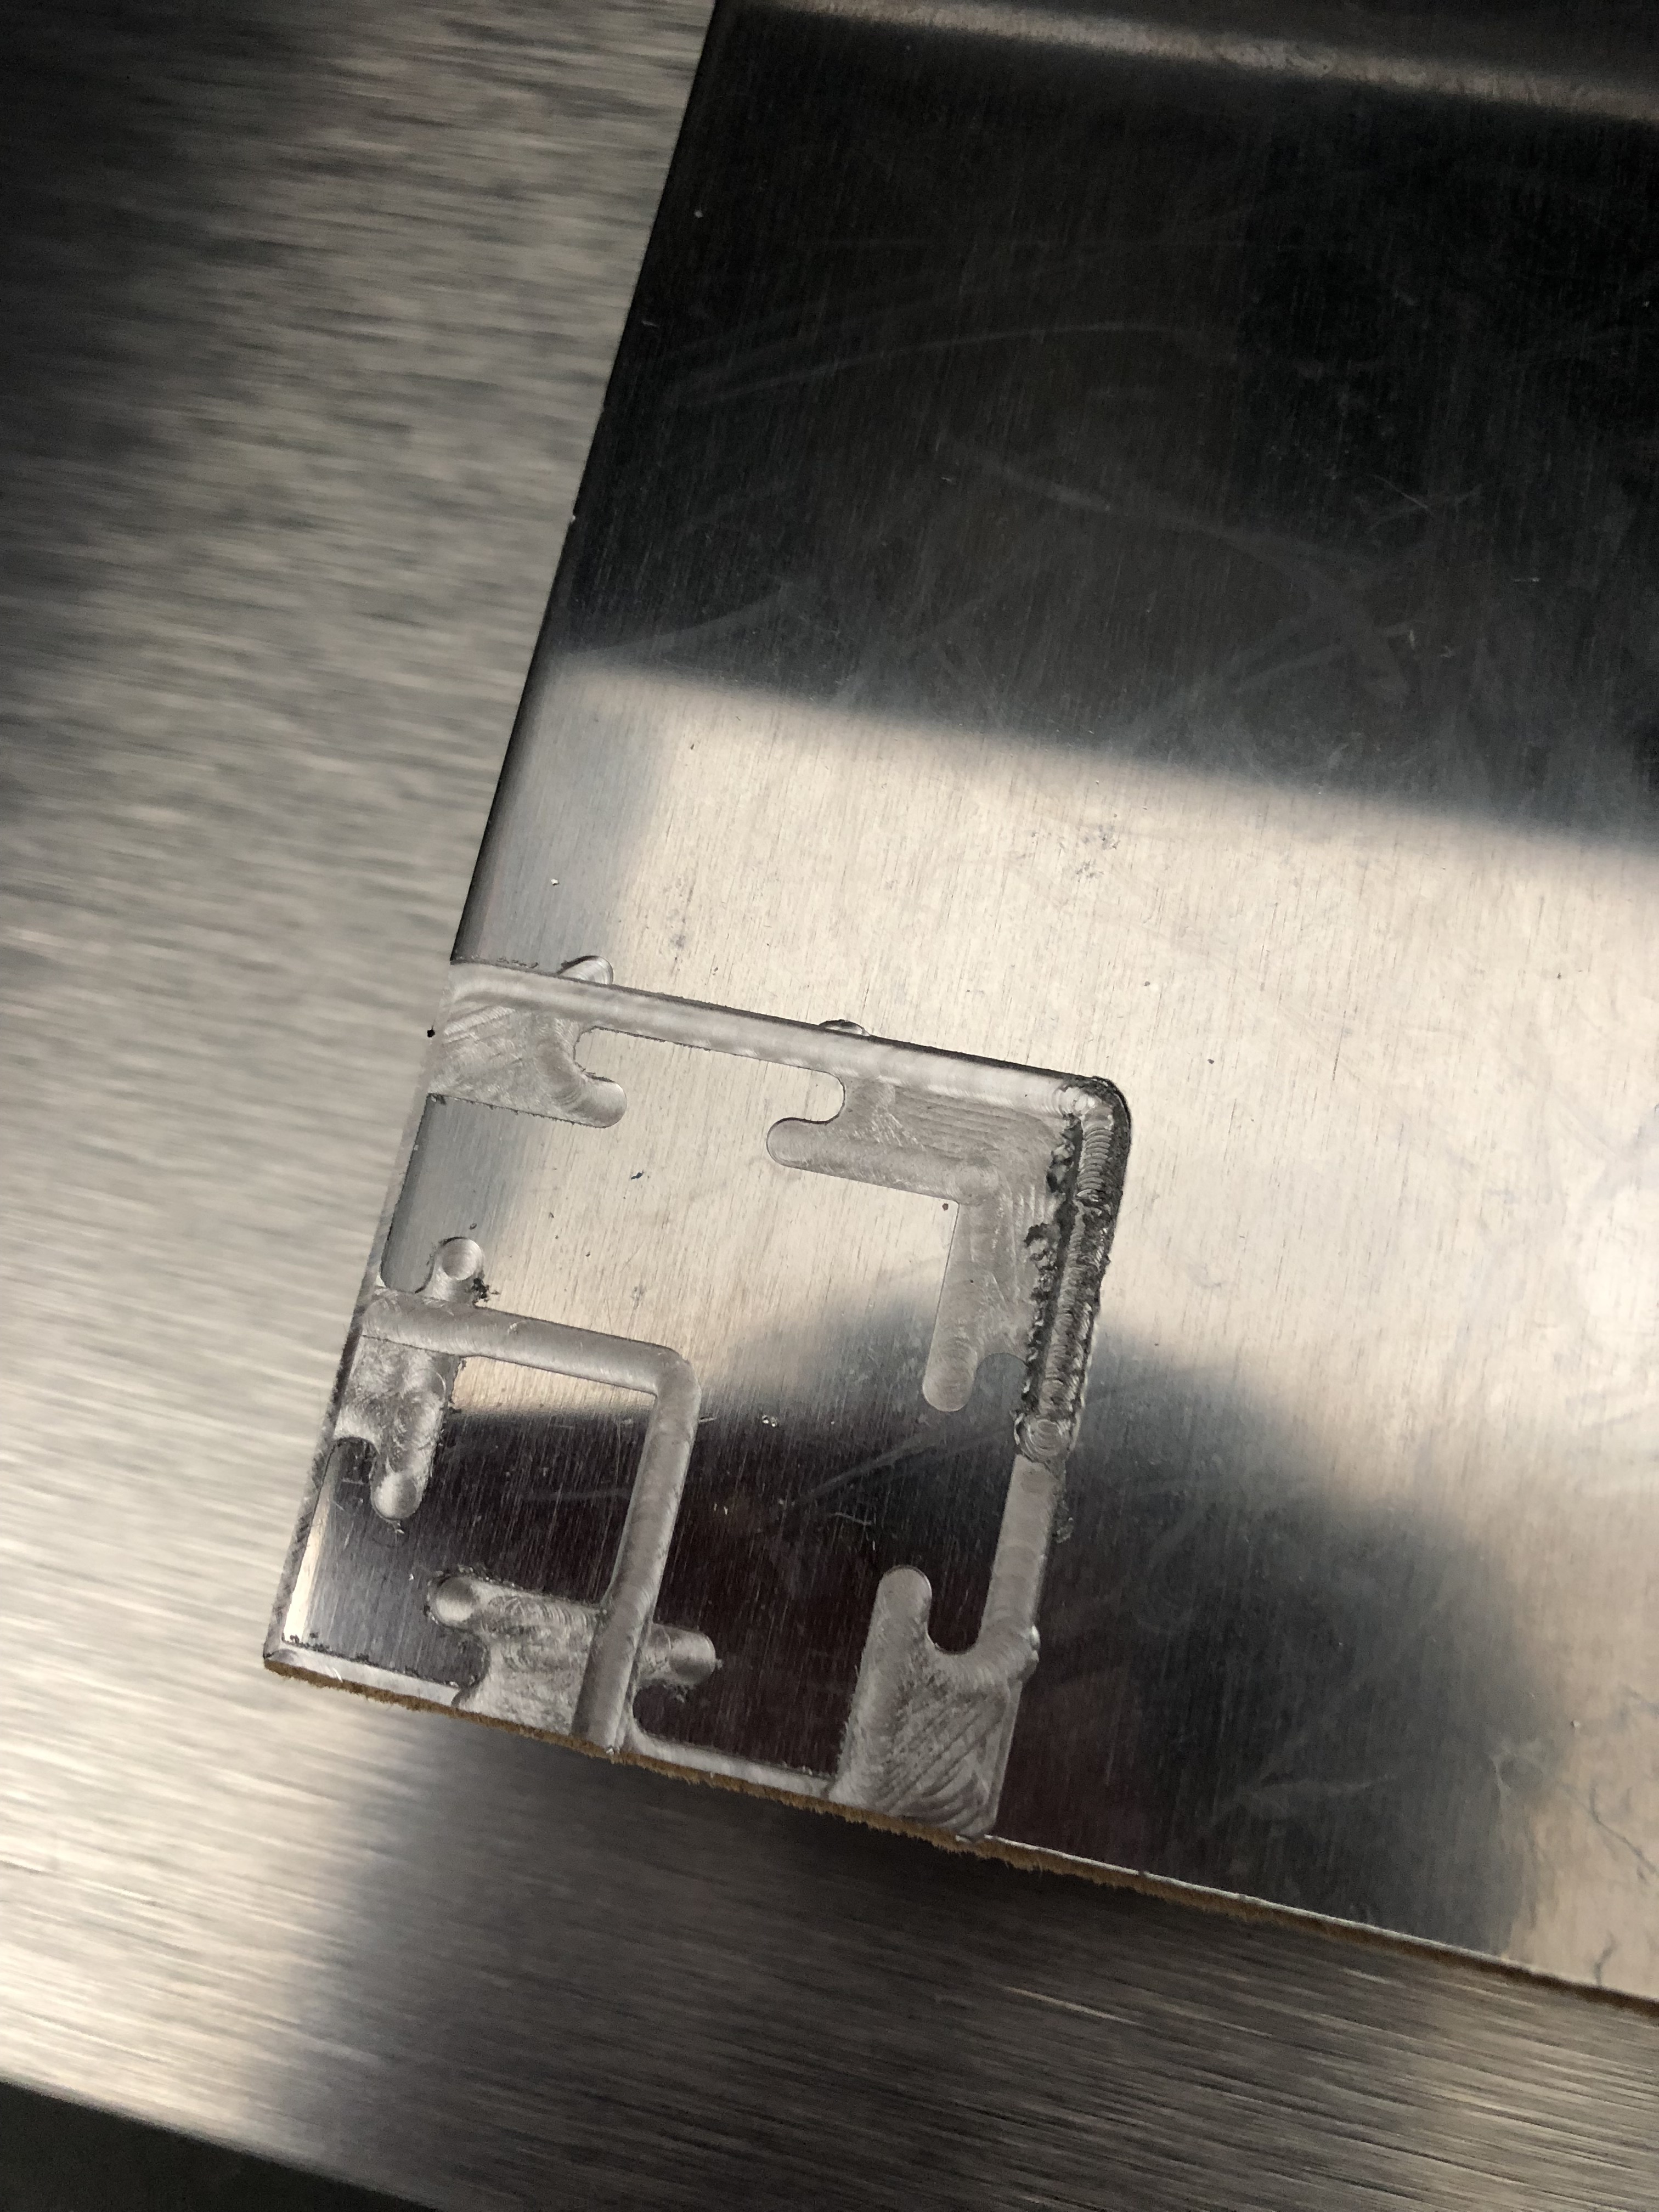
This seems a very rought stepdown, I guess I did well to stop it ?

Also, chips were rather small while the first pass was milled, sometimes there was none visible. So I’m not sure what to think about that, the Z was set just on top of the stock using the paper method so the height should be just right.

I’m more looking to get some advices regarding the settings I’m using:

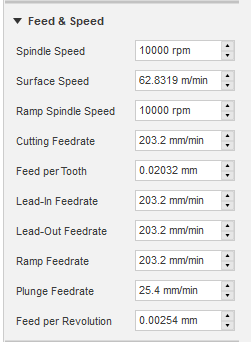
Endmill: 1 Flute, carbide micro-grain, 5mm cutting length (= stickout), 2mm cutting diameter, 3,17mm shank

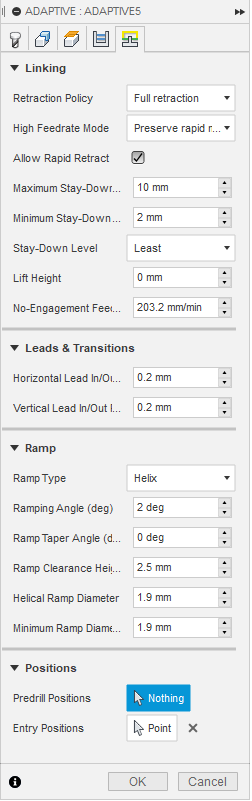
3D adaptive settings:

first


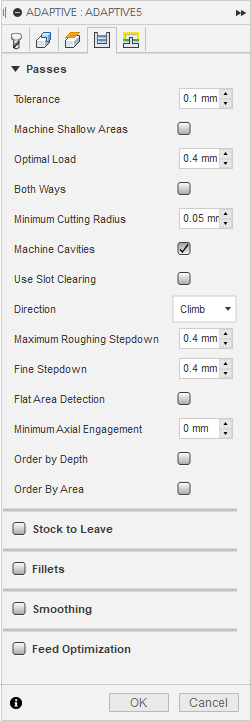
I’m not really sure what’s the difference between “Maximum Roughing Stepdown” and “Fine Stepdown” so I’ve set them equally.

Obviously I think the stepdown might be too much and most people recommend 0.25mm, but I’m unsure what you can expect from a single flute. I’ve read that single flute are much better on a low torque machine than multiple flutes one, but I guess it’s more about the feed than the stepdown.

Looking forward to some opinions!

Another thread here ( First aluminum fail, figuring out why - #10 by stutaylo ) pointed folks to:

I’d really recommend starting with something easier, like wood, to get the feel of what all the settings do, and how the machine reacts. Aluminum can be a challenge on any of our small machines (end mill makes a huge difference, as does getting the speeds and feeds just perfect on the nomad).

To answer your questions more directly…
Both stepdown and feedrate are really important to keep the load correct and the deflection down. Take out the endmill and look at it under magnification (a loupe, a decent magnifying glass…) and look at the cutting edges on the bottom and sides. From the look of the top right of your cuts either the endmill edges are broken, or they’ve got aluminum stuck to them.

2 Likes

Up and running! And good detail in your post. Alright - so @mikep is right, take a look at that tool and make sure it is still in one piece. It looks nasty in there. I am not the absolute last word on milling aluminum but I have done my fair share. Looking at the photo I do have a few … questions/comments.

(1) there are some odd excurions on the outside of the outer square toolpath (top left, top middle, lower right) which don’t look right to my eye - are they supposed to be there or is something odd going on?

(2) I don’t have scale in the photo, but is the toolpath wider than the 2mm endmill? If it isn’t you are doing slotting, which can be harder to get right, particularly on larger stedown.

(3) if you chose ‘Adaptive Clearing’ in F360 for your toolpath it ramps straight(basically slotting) between passes. I usually dial back my feed a bit on ramp.

(4) I use the same feed (203mm/min) at 0.25 stepdown for 6061 aluminum on a 2 flute of roughly equalvalent size with some success. It may imply you are going for too high a chip load?

Anyways, welcome to the ‘art’ of machining! It just gets better from here!

(5) if you want to dial it in run a series of straight slots through a test piece of aluminum at incrementing feed rates/stepdowns and that will give you a good idea on what that single flute end mill likes to do. An hour of Fusion360 practice and milling practice doing that will pay off!

Let us know how it goes!

Forgot to add - subtract the thickness of the paper when you zero the Z axis - from your description that first pass is not taking a full 0.4mm

I don’t have a loupe, but from touching it with my finger, it clearly isn’t as sharp as when it was new for sure. There were a little chip stuck in the flute which I removed, but honestly, I think the tool is still fine. The side are still as sharp, only the bottom took a hit, it could have been worst I guess.

  1. That’s true, it’s not supposed to be there. I’ve no idea as of yet how to contain the toolpath outside of the stock ONLY on the left side and bottom side because there is stock on the up side and right side.

  2. No it isn’t, I’m thinking about cutting the square out of the stock first with a slow stepdown using a contour toolpath and then run an adaptive after that to make the model

  3. Nice idea

  4. Yeah I just think I went too hard on the stepdown. I changed the helix ramping aswell to 1 so it’ll goes a bit softer

  5. That’s a good idea aswell, I’ve got the aluminum stock that came with the nomad that I haven’t used. Will probably do that.

Yeah but I have no interest at all in wood, I’ve got some interest in plastics but for now I’m most interested in what’s most difficult, ahah.

Putting the loupe on my buying list, thanks.

  1. When you select the region to machine, you can select specific edges with many strategies to change the edges that form the loops to guide the region. If your mode doesn’t have appropriate edges, add them. 90% of the work I do with Fusion or Inventor (similar CAM) is on an assembly or derived part, not the base part, so that I can add the features needed for machining, such as fixtures, extra stock, and control features. I would build a derived model with a piece of finish material about 1.5 tool diameters away on the top and right side, and use that for the cam. 1.5 tool diameters allows for a bit of chip clearance and allows the adaptive strategy to know there is solid stock there, not precut stock perimeter.

  2. Use a saw to cut the material slightly oversize, rather than machining from the plate. If this isn’t a production part, even a handheld hacksaw is faster on smaller machines, and cheaper than breaking a single tool. Contour toolpath will slot it and that is slow and hard on the tool. If you need to keep it attached to the larger piece for machining-- with tabs, for example–, add the cut to the model as a groove 1.5 times the tool diameter, use the bottom height setting to keep the tool from cutting through with an adaptive, then run the contour with tabs after. Or model the tabs directly so you can do the whole thing with the adaptive.

  3. If you are using single flute, reduce the feed. You chip is too heavy.

  4. IIRC, the stock that comes with the Nomad is aluminum clad plastic, not aluminum. It cuts quite easily.

Loupes and magnification:

Don’t cheap out too much and don’t go overboard on magnification. It is a lifetime tool (I have maybe a dozen in different configurations and powers). A $3 one distorts so much as to be useless, and too high a power often doesn’t let you see what you need to (you lose the forest for the trees…). A 5X is a good place to start for things like tool inspection and as a general purpose tool. (Note that the power of magnification is NOT the same number as on reading glasses/cheaters. 1.0DO (1.0 diopter) reading glasses provide a little magnification rather than none, and 4DO provide a fair bit (roughly doubling the apparent size of what you are looking at), but no where near 4X. It roughly doubles the apparent size. A 5X loupe is roughly 20DO)

I prefer Bausch and Lomb glass lens types that clip on to my glasses, but they cost a lot more than a decent handheld jewellers loupe (first one was picked up when I was in the semiconductor lab). Decent handheld ones, such as https://www.amazon.com/Bausch-Lomb-Watchmaker-Loupe-5x/dp/B000OVNM6Y/ref=sr_1_11?keywords=loupe&qid=1547985190&sr=8-11 are in the $US10 range. These days, there are fairly good USB/digital camera ‘microscopes’ that are pretty inexpensive. (Several reviews of the Mustool G600 have been positive).

3 Likes

Hey,

So, I ended up making a lots of test on a piece of Aluminum 6061-T6.

Before that, I installed a loc-line blowing compressed air from an aquarium pump to push the chips away, and I drilled a hole on the left side of the enclosure, screwed in an adaptator so I can plug the 50mm diameter hose of the Festool Midi.

The chips are then pushed on that side, it’s not perfect but I do like the negative pressure inside the enclosure, keeping the outside air relatively clean and avoiding mess getting piled up. I wasn’t feeling for a dust shoe, I need to keep accuracy so I need to avoid putting extra weight on the spindle, which may cause imbalance.

The bit that was used for the slotting fail in the first post is indeed dull. There is some very very little parts of Aluminum getting stuck on walls of the part being cut, it’s very small but once you have seen it you only see that.

I’ve tried facing the piece of Aluminum with that dulled endmill, and while I could get a very decent mirror finish-like, the cusps were visible, the vibration however were awfull, I wonder if that is because I was using wax to fixture the part, or if it is something else in cause. Feed rate was relatively slow, 250mm/m at 0.1mm finishing stepdown, below that the cusps were just too ugly, but it was just some experiments anyway. I’ve learn that single flute are best for material removal, not so much for finishing.

Facing seems difficult on the nomad, I’m not really confident about using a fly cutter, I’m gonna need to try things until I find something satistying.

I did buy a few cheap 4mm 2 flutes shank endmill on Ebay and I realized at that moment when I wanted to try them that I needed the right collets diameter for them, so I’m now waiting for two collets: 4mm and 6mm shank.

I’ll be trying a DLC coated endmill soon which has a 6mm shank diameter.

Bought them here, had to use a re-shipping compagny thought as they don’t ship outside of UK:
https://www.cutwel.co.uk/tool-holding/tool-holder-accessories/er-collets-er-collet-nuts-and-wrenches/er-collets/er11-high-precision-er-collet-5-micron-run-out

I bought a jeweller loupe, hopefully it’ll be good enough to check how much tools are dulled.

1 Like

Great progress! So it sounds like the aquarium pump air blast is sufficient to clear aluminum? Care to share pictures of this setup?

Seem to recall a couple of guys tried using a micromark fly cutter with some success on wax and hdpe but not sure anyone has tried on aluminum. May well be beyond the Nomad abilities but I salute any who would try!

I’ll be sharing some pictures tomorrow!

It’s nothing too crazy anyway, I’m using the AquaForte V60 pump which was already advised by some here, the fitting of the hose is the one sold by woodstock here:

It did cost me double to import it but I’ve spent so much at the moment I don’t even care anymore I just want the setup to be done and running like in my thoughts.

Yeah I feel like the pressure is way enough, the nozzle isn’t even the smallest one as I felt it was pushing a bit too much.

I’ll soon be trying a 3 flutes DLC coated endmill and chips are gonna get big, loads of them, I’m liking the negative pressure inside the enclosure, hopefully it will prevent chips storming, that’s what for I had this idea.

CNC machine aren’t cheap to get started, so many tools to buy here and there, I felt quite frustrated the past few weeks as I was waiting for all the side equipments to arrive.

Regarding a fly cutter, the micromark isn’t sold sharpened, I can’t sharpen it as I’m inside an appartment, iron dust is a no-go.

However, I found another fly cutter 25,4mm of diameter with a 1/4" shank with PCD insert, I was going to hit the buy button and try it right away, but then I remembered about a picture of a HAAS machine of a guy with the spindle snapped in half, he said he tried to run his fly cutter faster, that didn’t work out so well ahah. I don’t really want to risk it anymore since then ahah

1 Like

Facing on the nomad can be a little touch with large tools. The largest I would use would be a 1/4" endmill - i wouldn’t attempt a fly cutter.

1 Like

This topic was automatically closed 30 days after the last reply. New replies are no longer allowed.