Circle production

Hello,
I am working on my first project and I am struggling. All I want to do is create a bunch of circles from one piece of stock. Can anyone point me in the right direction on how to lay this out in carbide create. Is there some type of copy paste function. Not a whole lot out there to learn this stuff.

Thanks in advance

Donovan

You can control or command c to duplicate a selection. Setting the background grid increment to match the circle dimensions will help with placing them.

If you want to do a bunch of them, probably easier to use a more capable drawing program which has a step and repeat feature.

thanks. Looks like I would have to create a tool path for each circle as well

If you use Fusion 360, you can create one circle, one toolpath, and create a pattern.

Try drawing as many circles as you need and grouping them together as one tool path. (Draw one , then copy and recopy until you have what you want)

I made a large number of circular ‘pucks’ for a project I was working on. I used CC. Whatever you use to model your circles, you’ll want to make economical use of your stock. Common knowledge states that hexagonal packing is the ideal, however, that assumes an infinite plane. When you’ve got finite stock, and your circles are comparable in scale, other methods give higher density.

image
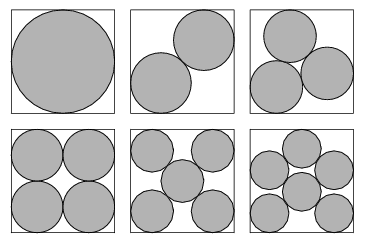
Here’s an example for optimal packing in a square. And here is a website that goes into incredible detail about the subject.

TL;DR If you think you can fit more than 10 circles in your stock, go for hexagonal packing, otherwise, go for square packing.

1 Like

That is what I am trying to do but cant figure out hoe to make them one tool path

To cut as one path (more or less):

  • Place the circles — ensure that they are greater than 1 endmill diameter apart — probably easiest way to do that is to draw two nested circles, then delete the outer one after everything is placed
  • Offset each circle by ~1.5 endmill diameters
  • select all the offset circles and union them
  • EDIT: select everything (the unioned offset circles and the originals)
  • assign a pocket toolpath which cuts down to tab height
  • select each circle and create toolpaths which cut them out from tab height down and include tabs

thanks for the reply. Forgive my ignorance but doesn’t a pocket remove everything but the circle? seems like a lot of extra cutting if that’s the case. None the less I will give it a try.

Missed a step:

  • select everything (the unioned offset circles and the originals)

adding it in now.

You would only have to cut a pocket if you wanted to leave a circular depression. Other wise, if you want a disc, cut on the outside. If you want to leave a hole, cut on the inside.

  1. draw circles 2) go to tool paths and select all circles with rubber band box - left click. 3) set parameters for tool path and OK (see simulation for 1 tool path ). If I knew how to send screen shots I would. If there’s a way, let me know.

going to give it a try now. thanks

Thank you that is exactly the info I needed. I worked great

Glad to hear it. If you are doing a lot of 2.5D work, CC is a very capable piece of software. The biggest problem is the lack of instructions and info. I had to play around a lot but the more I learned, the more I liked it. I don’t bother with my ViaCad on most of what I do because CC is quicker and easier and all I really need is a G-code file to plug into my off-line controller. I watch this post regularly so if you need info on CC I might be able to help.

This topic was automatically closed 30 days after the last reply. New replies are no longer allowed.