I’m trying to use the 3D adaptive clearing feature in Fusion for the first time but am having some trouble understanding what all of the parameters mean. I’m planning to use the carbide3d 1/8in end mill to clear some walnut and I’m not sure how to set the “Optimal Load” and “Maximum Roughing Stepdown” settings.
I’ve compared my attempt to the traditional pocketing approach where I use a stepover of 0.1in and a stepdown of 0.032in. The total time estimate using the traditional approach is about 40% of the machining time calculated from the adaptive strategy so I must be doing something wrong. The adaptive also has a lot of rapid movements. If anyone has had a successful experience using this adaptive strategy, I’d appreciate some pointers!
Optimal load is the depth of pass the software should shoot for on each “scoop” into the material. It should be no more than 40% of the diameter of the cutter, and frequently should be less when in harder materials as you don’t want to overload the spindle or the axis motors and stall or skip steps.
Maximum roughing step-down is how deep you want to be making lateral clearing passes in the material, and should be as high up the flutes of your tool as you have spindle power and rigidity in the machine to push the tool. In our case, it’s not a whole lot, so you probably want to shoot for no more than 0.25", for a 2x depth to diameter ratio.
The general rule with adaptive clearing is you want to take deep, fairly light, but fast passes. Adaptive clearing feed rates can be MUCH faster than traditional path ones because the cutter is never going to have a huge spike in load at hard corners.
To resolve the rapids you want to increase the “stay down” percentage on the last tab of parameters where your feed-in and retraction options are. It’ll take longer to calculate, but save a lot of machining time. You can also decrease your lift-height so that when it does pick up, it only picks up high enough to barely clear the part, as long as you don’t need it to clear other fixturing or anything around the work piece. You can also increase the non-contact feed-rate to ~60ips without issue with the machine, so when it does pick-up, it’s booking it.
If you want to post some screenshots of your part and settings, I can try to give you further pointers. Depending on what kind of shape/volume you’re trying to cut, there may be some things to turn on/off that you might otherwise not be thinking about.
To highlight the key factor: the strategy maintains constant tool load, If you set it up for 40% engagement, it maintains it. Standard clearing strategies will bury the tool in corners which leads to breakage and spindle overload.
The intent is that you can run fast and deep: use the full length of the tool at the maximum engagement that it can handle and fast feed, with little risk of tool breakage. This, overall leads to shorter cutting times, as, for example, rather than taking 0.5mm cuts, you can use the full 10mm cutting depth of the tool.You also get increased tool life as the load is spread to the whole cutting edge rather than just the 0.5mm at the tip.
If you are doing things that can’t take advantage of this, there is no benefit, and machining time will be longer than conventional. For example, yesterday I ran a large pocket 0.4mm deep (0.2 time tool diameter) to position some work. Half the time conventional pocketing to what adaptive would be. Last month I ran a bunch of micrometer cases with complex pockets and finger holes to about 15mm deep (4X tool diameter, 13mm flute). Ran it in a single pass to tool max depth and single finish with adaptive on a Nomad. Took about half the time of conventional pocketing, without bogging the spindle or breaking the tool.
Speedups can come from faster tool moves, reducing the retract height, longer stay down, changing the plunge parameters (to reduce cutting air, especially after the first pass, where the default is use original stock to determine where cutting is going on), allowing it to leave more stock for finish passes (set depths for courser steps on sloped surfaces), and a few other things as well.
There are a number of videos and documents on autodesk’s website that go into the details of adaptive clearing and the things you can do to take advantage of it.
Thanks for the feedback guys. I think I understand the parameters better now. Are you using g-wizard to decide what the cut width should be given the large stepdown depths that are being targeted? I’m planning to use the carbide3d 1/8" flat end cutter to rough some walnut using adaptive clearing. If I choose the parameters below, g-wizard says that I’m okay. Does this seem like I’m in the right ballpark?
Cutter Diameter: 0.125" Depth of Cut: 0.25" Width of Cut: 0.015" Speed: 9200 rpm Feed: 50 ipm
This is a feed in the ballpark of 0.0026"/tooth, and a chip thickness of less than 0.001". For harder woods, this is a good place to start. You may find you can run a higher feed rate. Not a bad depth of cut to start with, and you might find that you can increase the engagement a good bit over the 0.015". Higher engagement has advantages, to a point, since wear and drag is roughly proportional to the circumference of the engaged part of the tool, while deflection and load on the drives is roughly proportional to the depth of radial engagement, for a given axial depth.
In general, I would avoid less than 10% of tool diameter engaged (too much rub, to little cut, to thin a chip at entry of the cutting edge), and shoot for about 20%, NEVER exceeding 50% with a deep strategy. Run the spindle as fast as I can, set the feed for chip thickness, and depth of cut as deep as practical. Facing is different, since the depth of cut is small.
I don’t use Gwizard. I have always used calculators/sliderules from to tooling manufacturers for making these decisions, and presently use a calculator from Helical Solutions (covers modern tooling, unlike the older ones I have)
You might find their website very useful (or another manufacturers) for information of getting the most out of your tooling.
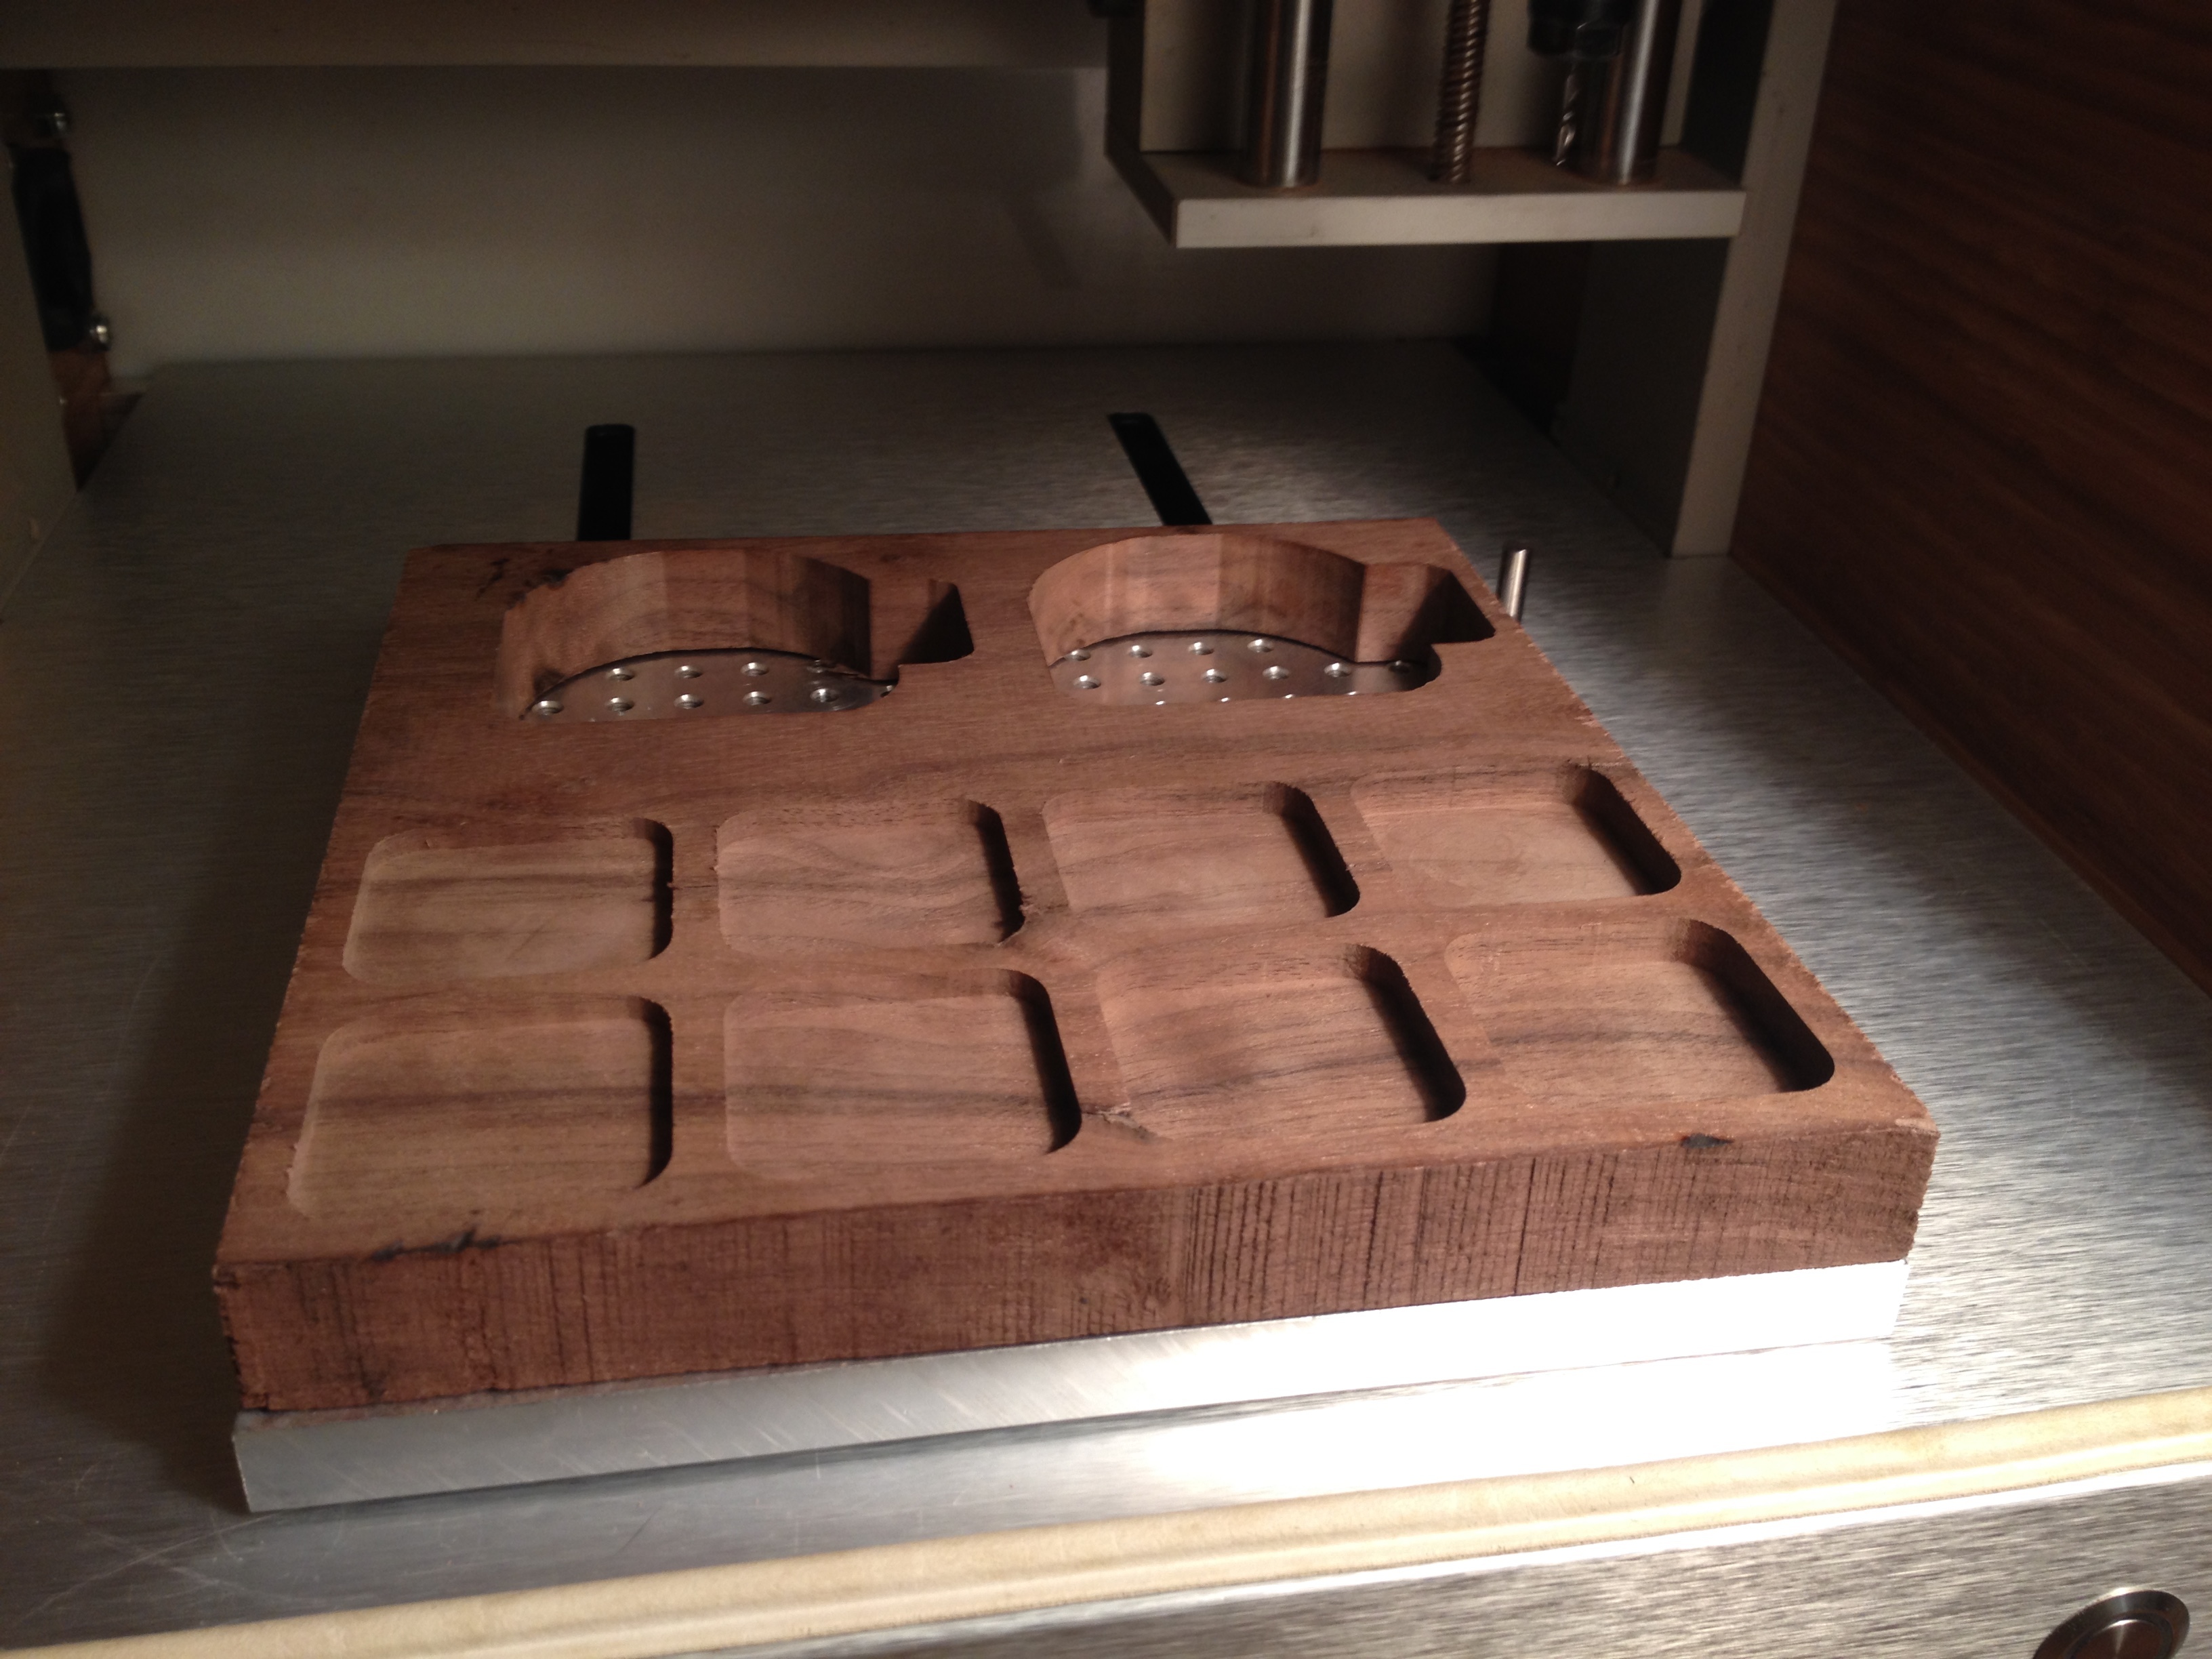
Wow, I did a quick adaptive pocket clearing test after work today and I’m blown away. I ran the nomad at four different depths in walnut while holding the other parameters the same, first climb then conventional. The cuts were done at 70 ipm with a 1/8" carbide end mill at 9200rpm and 0.025" stepover.
The pocket depths from the left are 0.15", 0.20", 0.25" and 0.3" deep and were cut at full depth.
While it was very loud, the tool did not break and the spindle didn’t stall on any of the cuts. I noticed that conventional milling reduced the noise a bit but created more high pitched squealing so I’m not sure if it was an improvement. I have a theory that a 1/4" end mill can be used on the Nomad using this strategy which will reduce the tool deflection (and maybe the noise?). I ordered one and will be running through the same test tomorrow with the larger tool. Thanks for all the advice guys; now I need to build a sound reducing enclosure…
Don’t use adaptive with conventional. The tool is more likely to rub and heat up. On the nomad, 1/4" tooling won’'t get you as deep, since the tool takes twice the torque (very roughly) of the 1/8" tool, but you may find that there are benefits. I’m curious, as I have not use 1/4" in this machine, though I have been tempted to try 1/4" Atrax burr cutters just to see what they can do in a machine rather than handheld.
Edit: Whoops… The feed/speed sliderule calculator I have been using is from Niagra Cutter, not Helical. Didn’t have it in my hand yesterday. The software I use on occasion is from Helical
I’ve just completed the test with the 1/4" cutter using the same parameters as above and it did finish successfully without stalling the spindle. I think the major problem with 1/4" cutters in the Nomad is stalling during a straight plunge due to the entire surface area of the tip becoming suddenly engaged.
Using a helical plunge ramp, it was no problem to quickly cut to max depth but I did see some chatter in the corners of the 0.3" deep pocket at 70ipm. It seems to me that the limiting factor of using a 1/8" cutter isn’t the Nomad’s horsepower but the deflection of the cutter when cutting deep pockets. There may be a combination of deeper cuts at a reduced feedrate where the 1/4" cutter comes out ahead. Seems like a strong possibility in softwoods but I’ll have to run a few more tests in Walnut to see if there is a better combination.
Hi @Remmy, on this topic, if I put your numbers into G-Wizard, it gives me a very high deflection rate, and shows me using more than double the horsepower the Nomad has to offer. Is there some setting I haven’t chosen to make it understand that I’m doing adaptive machining? Any suggestions?
Hi Joshua,
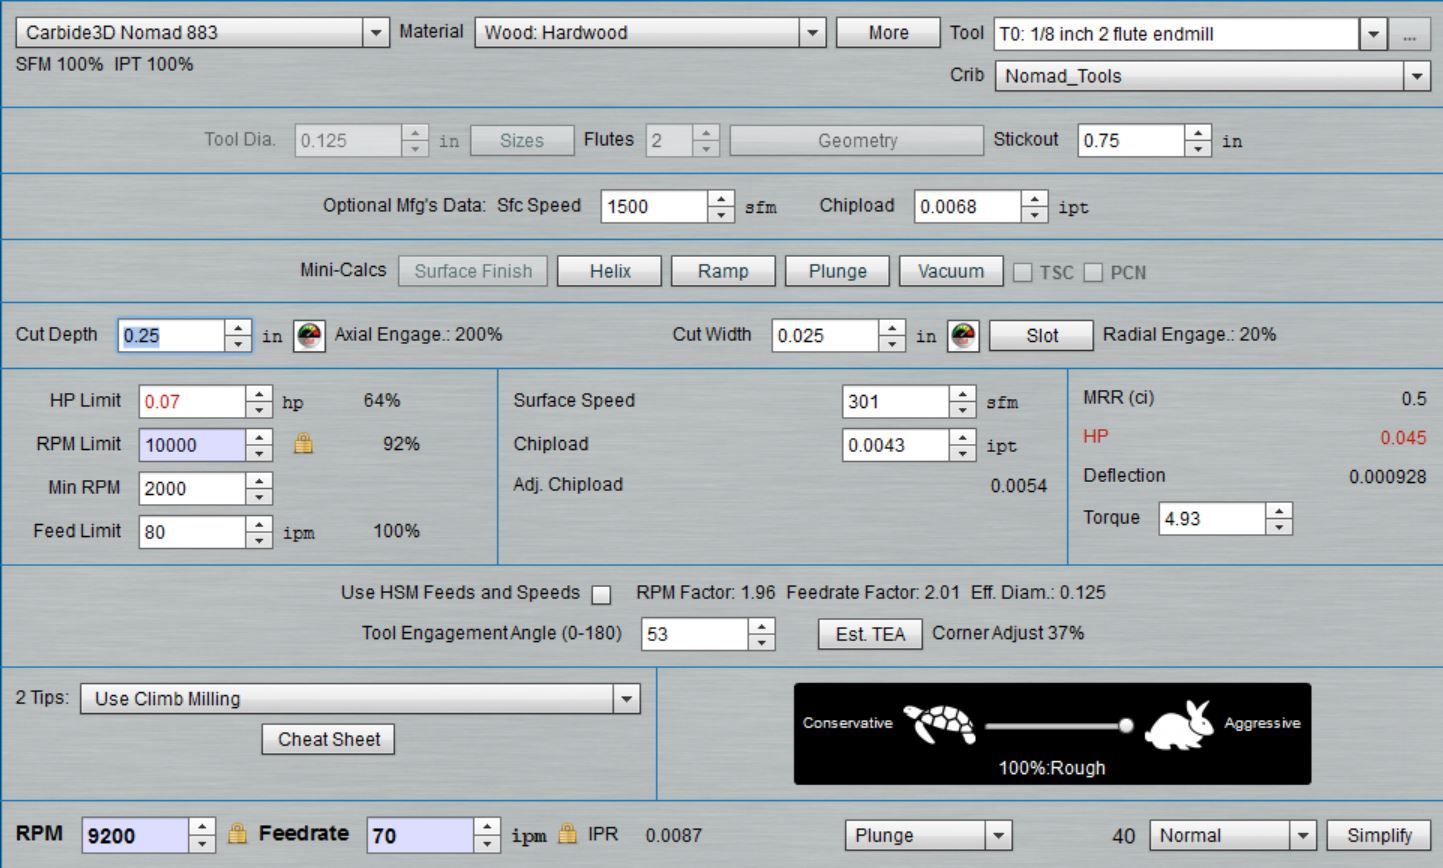
Did you set the material to hardwood, the tool material to carbide and the stick out to 0.75"? These parameters can have a large effect on the results if you forget to set them (as I often do). I don’t pay too much attention to the HP warning as long as it’s below 0.07 and use deflection as a better indication of performance. I put the numbers for the 0.25" deep cut into G-wizard and posted a screenshot below. Also keep in mind that you can plunge a lot faster than the published carbide3d number if you use a helical ramp.