Ray,
Can you post some additional information? What Software did you to generate your tool path? Are you familiar with setting your X,Y and Z ?
This might help:
Ray,
Can you post some additional information? What Software did you to generate your tool path? Are you familiar with setting your X,Y and Z ?
This might help:
Yes I did set stock size, and zero all axes. I used the generate auto tool path in meshcam.
Can you post your GCode?
Also What does this mean? Is it cutting anything, spindle on?, program runs? etc.
Thanks for the reply. If you look at the picture, the generated cut lines do not cut to the bottom of my stock. It is not cutting the circumphrence of the bottom most half of the part.
Yup, it looks like your Z is not going low enough.
What is the stock size?
What is the depth of cut in your program (Max negative Z value)
Post your GCode if you can’t read it.
Rich I think you’re right. I may not have changed my depth of cut to match my stock thickness. I will have to check later.
In the toolpath parameters screen which looks like this:
In the top left, select “Machine whole Stock”
Also make sure your max depth setting is accurate.
If you upload Your MeshCAM file - which is a .MCF format, we can check further.
Thats a lot of material to remove, you may be able to accomplish this in Carbide Create as well.
What material are you cutting?
You may want to experiment with the Renshape?
Do you plan on leaving a thin skin of material at the bottom to keep the button from coming free?
Thanks for the reply, Apollo. And, thanks for answering all of my questions over the phone.
I noticed this issue only occurred with the “generate auto toolpath”. If I manually create tool path, it does not seem to be an issue.
Tried to run this file, and it rammed the cutter to the center of the work piece, which was my zero.
bb button bottom.nc (44.9 KB)
Well, I got it sorted out. I am on my fifth try getting the two sided job to align perfectly. I am using oak wood, and only one side is two sides are nice and straight. I am putting the straight edge along the back of the bed using it as a fence. I zero to the center of my stock, do side one, and flip along x. I have tried both checking, and correcting zero if necessary, and not. It always ends up slightly off. The button is 15 or so mm in diameter and both the top and bottom need to be cut.
Ray, I looked at your code your first pass with the 1/8 end lill is at 5mm deep…so, it is doing exactly what you programed it to do
Rich, I’ve run the setup in meshcam the same way several times, and it’s tried to do that twice. I’m not sure what I’ve missed, and the preview doesn’t show the first roughing pass at 5mm.
Here is the part I am trying to machine. This project was a big motivator for buying a desktop machine. I have tried this for the past 9 hours, and can not get the alignment of top and bottom correct. I am off about 1 to 2 mm. If someone could try this part, or recommend how to two side mill this, it would be greatly appreciated.
bb_button.stl (39.5 KB)
How are you registering the flip?
My suggestion would be to use or make something like to Nomad Flip Jig - Carbide 3D
Previous discussion
Ray,
Yes there is learning curve to any new hobby/tool, and a CNC machine does require maybe a little more, but we’re here to help.
So I’m a little confused, sorry. I though you could not get the program to run, but now I think you have finished the first side and are working on the second side. Yay, progress. Are you using the Carbide3D flip Jig?
Easy easy part, but double sided machine for a first part can be challenging. Where are you located?
Thanks for the reply, @RichCournoyer. I am located in south east WI. Part of the difficulty, I think, is how small the part is. It is only ~13mm (going by memory) in diameter. It looks like you may have scaled it by a factor of 10. For all intensive purposes, I should be able to mill this from a 22x22mm pen blank, once I get it right. Due to the small size, I have not bothered with my flip jig. It could be done, centering x and z in the jig, I suppose. The jig is very nice, but IMO seems a bit of a crutch for what I am attempting to do. I want to learn a proper way, not saying the flip jig is not.
I am using 3.5" x 1/4" thick oak project board. So, when I cut it, only two sides have a nice, “factory” edge if you will. That edge I am putting along the back of the table, and using it as a “fence.” I am drawing two diagnal lines and using the center as zero, both in meshcam and carbide software. Before cutting the second side, I return to zero, but do not reset the zero. At that point zero looks to be pretty close, but hard to tell exactly, of corse. I end up 1mm or so off.
EDIT:
I feel that the flip jig will be partly the same issue. The small blank will need to be perfectly centered in the flip jig, at least around the x axis. This is easy with the carbide 3d 3x5 hdpe blanks. It may be worth the shot, however I am hoping for a quicker, carpet tape to bed method. Maybe I am wrong.
Ray,
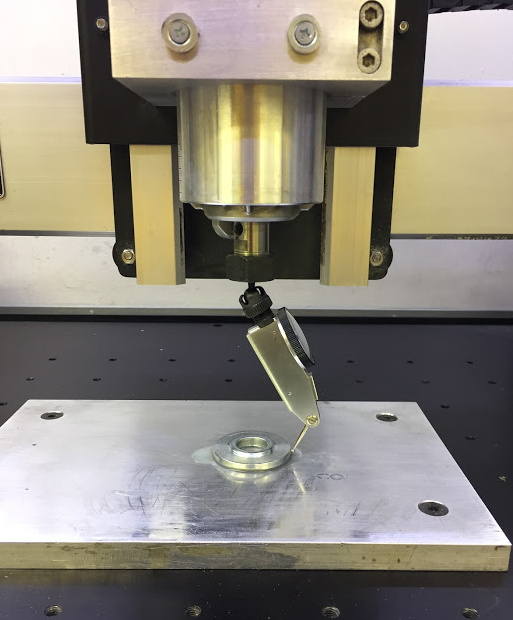
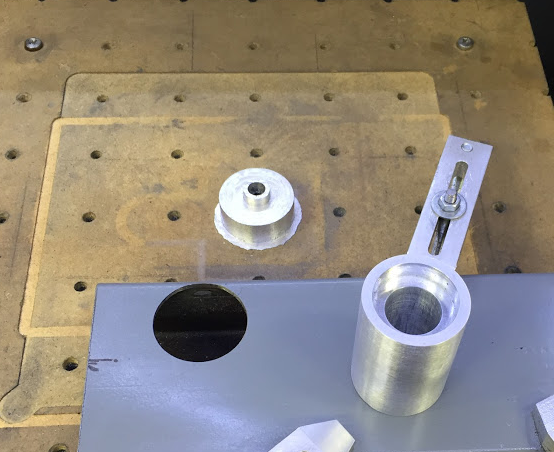
I agree with you. I don’t have a flip jig, and don’t ever see myself buying one. I do a LOT of two sided machining, but as a 40+ year machinist, I go about it old school, I indicate the part, to become perfectly aligned OR is I am making more then 2, I set up a jig or stops to make the second side setup faster. Here are two examples that I have recently used. (Indicator and Jig (plug))
PS the part opened at 133mm, I did not scale it. (odd)
Maybe this will help inspire you to finding the perfect 2nd side machining alignment.
I am trying a different, larger project with the flip jig right now. I think the key here is to use the rapid move to center in the jog tab, and then ONLY adjust x and z, leaving y alone, since the machine is telling you the exact center of x. This way, when the jig is flipped, it rotates perfectly 180 degrees around x.
EDIT:
I have noticed everyone flips the whole jig around X. I have about a 1/8" gap between my stock and the clamping screws in the side of the frame. In this circumstance, would it not be correct to flip the work in the jig, rather than the whole jig? By flipping the jig, the gap moves from the front of the machine, or x axis, to the back.
I have cut some brass shims to center the work in the jig around the X axis. Maybe I should try that tomorrow.
Ray,
See my PM…