How to build a 99% efficient Cyclone Dust Collector

This applies more to the SO3 than the Nomad since the SO3 can fill up a shop vac in a relatively short time. However, a smaller version would be helpful for the Nomad also…

Benefits:

  1. The 5 gallon bucket is very easy to empty
  2. You can see when the bucket is getting full
  3. Your vacuum filter will last 50x as long before it needs to be cleaned or replaced
  4. Its more fun to make chips when you can watch them spin in circles around a translucent bucket :wink:

Video of the cyclone in action here https://youtu.be/_v9nCau8m-s

WARNING: A cyclone is very good at removing particles 5 microns and larger which are the ones you can see. Cyclones are terrible at removing particles less than 0.5 microns… and these are the ones that get deep into your lungs and cause long term heart and lung issues over time… So, never use a cyclone without a good (80% or better for 1 micron or smaller particles) filter on your vacuum or dust collector downstream.

If you aren’t familiar with how cyclones work the vacuum cleaner attaches to the top center and pulls air up the center of the clear cylindrical tube. This causes a vacuum vortex to form in the clear cylinder which pulls air in from the hose attached to the side of the cylinder (you sweep up your mess with this hose). The debris enters the cylinder and spins at a high velocity and moves down to the bottom at the same time, emptying the debris into the bucket. The air in the bucket is also spinning which keeps the heavier particle trapped near the outside diameter because of centrifugal forces. The air returns up the center and to the vacuum cleaner through the center tube at the top of the cylinder. Its not exactly intuitive to understand at first but after you see some illustrations on YouTube you can get a good feel for how everything works, if you care to.

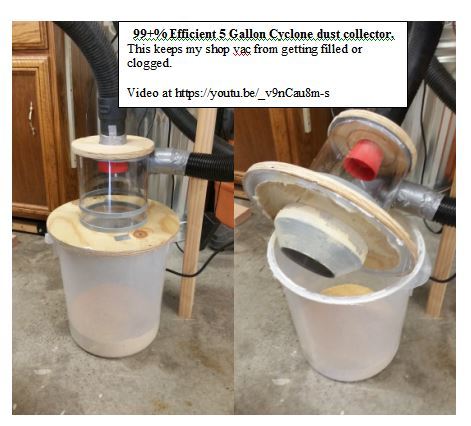
I made this cyclone using a 22 quart translucent bucket from Amazon ($12) http://www.amazon.com/Rubbermaid-Commercial-Products-FG572824CLR-Container/dp/B00237S2IU?ie=UTF8&psc=1&redirect=true&ref_=oh_aui_detailpage_o09_s00

The two boards are 3/4" plywood. MDF or anything will work. I just had some ply laying around so that’s what I used. The bottom board has a 7" diameter hole cut in the center and a dado cut around the bottom side that aligns it to the top of the bucket. I spread caulk in the dado and put it on the bucket to form a shape that allows it to seal from the vacuum pressure created when operating (I.E. no latches required if you aren’t going to move it around). My caulk seal was sloppy and could be done much better but it works so I didn’t redo it.

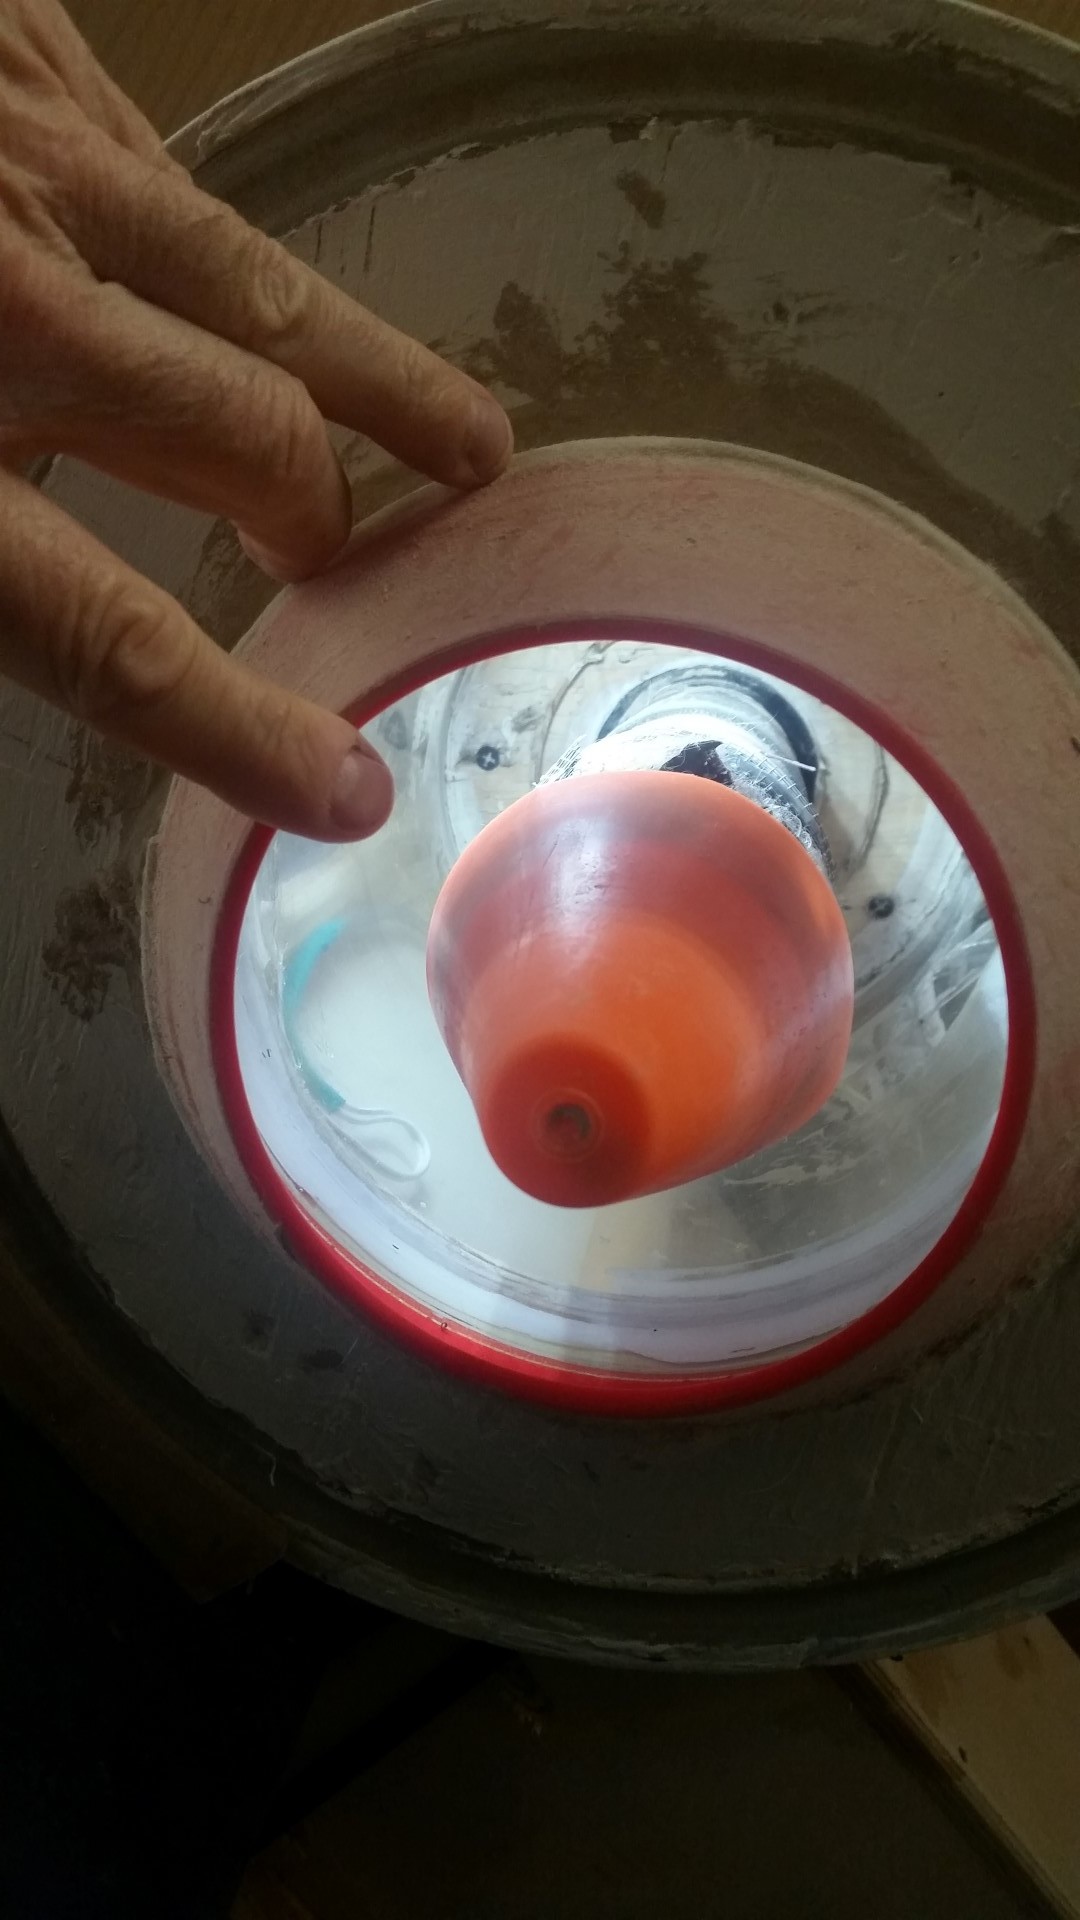
The clear tube is a sheet of 0.070" thick polycarbonate. It inserts into a groove in the grey 3D printed cone shown under it. I solvent bonded them together. The gray rings help the Polycarb tube stay somewhat round but they don’t work very well. I should have used a thinner material for the cyclinder which would have made it MUCH easier to work with. The top wood plate has a 3/8" circular pocket to hold the top of the Polycarbonate round. I expected to have to make changes to this design so I just duct taped everything together. However, it works so well i’ll probably just leave it alone and focus on more important things.

The red vacuum port at the center top is a 3D printed part that includes air straightening vanes inside to help reduce pressure losses. Its also a " bell" shape which may or may not make it more effective.

The piece that mounts the vacuum hose to the side of the Polycarbonate cylinder is another 3D printed part but it wasn’t very strong and didn’t transition well so I ended up using a LOT of duct tape there. I think a 3D milled assembly would work much better there. Feel free to post better designs here. I encourage collaboration to make these designs better for all of us.

.STL files attached CYCLONE SYSTEM STL FILES.zip (1.2 MB)

I suggest NOT using the Inlet Port design and use 0.030" thick PETG for the vertical clear tube. The “Tube Ring” is designed so that two of them can be printed at once.

3 Likes

Nice DIY job.

I bought a Dust Deputy and mounted it to a bucket.

Works great and they aren’t that expensive.

1 Like

Cool! Are you familiar with a related design - a Thien?

http://www.jpthien.com/cy.htm

http://www.madebymikal.com/building-a-thien-baffle

mark

Yeah, but they are less than 99+% efficient. My design is sort of a hybrid between a true cyclone and a Thien separator.

1 Like

I have a Dust Deputy (the smallest one). Its about the same efficiency but it reduces your vacuum by about 3x as much as this design. Its also about a foot taller. I think I paid around $60 for mine. I made this from scraps I had around the garage and some 3D printed parts. I saved $60 if you don’t count the hours (too many) that I spent designing, building and testing this one :wink:

The Dust Deputy cyclones work very well and are easy to implement. I’d recommend one to anyone who doesn’t want to make something themselves. When I tested my Dust Deputy it was a little less efficient than this one and this one was a little less efficient than my Dyson vacuum cleaner.

3 Likes

Yeah, but they are less than 99+% efficient. My design is sort of a hybrid between a true cyclone and a Thien separator.

Really, really nice work. The low cost, hybridization, and lack of vacuum loss is a really important development!

mark

Efficiency is kind of hard to characterize without very controlled tests so I would have to run a controlled particle through all of the cyclones to be sure of the relative effectiveness. Cyclone designs also differ in efficiency from one particle size (equivalent aerodynamic diameter) and mass so one may be more efficient for one particle size and another for another particle size. The good news is that once you get over 99% you don’t have to empty your vac for a really long time or clean the filter for quite a while.

Efficiency numbers are a little non-intuitive since a 99.0% efficient system passes 10x more stuff than a 99.9% efficient system… I.E. bags fill up 10x as fast with 99.0% vs. 99.9% efficiency. The numbers past the decimal point really make a huge difference over time.

My test method (posted it in the OP) for this one is somewhat crude but it gives a good ballpark #.

1 Like

I attached .STL files to the OP in case anyone is interested. If you don’t have a 3D printer you can get a free electronic estimate for 3D printed parts at my printing hub here… https://www.3dhubs.com/louisville/hubs/mastermind-product

Or, there may be a printing hub somewhere near where you live. Its a lot cheaper than going through the commercial printing services.

I made this cyclone even better by putting an upside down cone on the vacuum tube (center top). I cut some holes in the cone and hot glued screen on them so the dust that comes up to the vacuum tube is deflected back out into the cyclonic air and only the air can make the turn into the tube. It increased efficiency even more. I can post a pic if anyone wants more details.

I’m interested. Also, roughly what’s the cost to 3D print a unit ?

Seth, you can have the 3D plastic parts printed at any 3DHubs.com hub. You can upload the .STL files and the hub will generate a free automated quote to print them. My hub is here… https://www.3dhubs.com/louisville/hubs/mastermind-product

With that said, I think you can build this system without any of the 3D printed parts. Here’s a picture of the latest configuration for mine…

I just cut off the top of a small 10" tall plastic cone and hot glued it to the bottom of a cup. The cup has cutouts around its diameter that have screen hot glued to let air flow through but not larger chips or particles.

If you look at the bagless vacuum cleaners at a department store you’ll see how it all works. I’m essentially imitating the first stage of those vacuum cleaners. The debris comes in along the outside of a cylinder and spirals around keeping the heavy particles pressed against the outside. The air then moves up the center and enters the screened walls of the cup up to the vacuum port in the center top.

I know its probably too complicated to understand without more pictures. If you google “cyclone vacuum” in YouTube you’ll find quite a few different designs. I’ve tried several of them and this one seems to work the best.

Just using a Dust Deputy cyclone on a 5 gallon bucket is even more efficient than this design but its more top heavy and restricts airflow quite a bit more. But, you can find them for $35 on Alibaba so if you don’t want to make your own then buying one of those is a pretty easy solution.

I’ve found if you switch to a bag and remove your filter it last for a while

Bags fill up very quickly if you use your router much. You can pay for the cost of buying a cyclone with the money you save on bags.

However, it’s best to use a bag AND a filter in the vac so your filtration is very good.

2 Likes

Yeah, I get a week or two out of a bag. My problem is space… I have a full metal shop and now I’m getting into wood. My walls are closing in real quick lol

I can relate to that ;-). You can mount the cyclone and bucket on the wall or from the ceiling near your router and just disconnect the shop vac from it when you use the vac somewhere else.

1 Like

Tony, did you ever gen up sketchup diagrams for this? For that matter, are you still using it?

Cheers

Brent, I don’t use Sketchup but the design is relatively easy to replicate. The Thien design is well documented and is probably about the same efficiency as this one. More about that here http://www.jpthien.com/cy.htm

I hope that helps. I have a lot more dust collection information here https://www.shophacks.com/dust-collection-and-air-filtration.html

1 Like

Hi there community,

I want to build a cyclone ventilation system using a 55 gal plastic barrel and a 10 inch duct fan which supposedly moves about 1000 cfm. I bought it from a guy on Craigslist so we’ll see. It’s going to be outside because my studio is itty bitty. Thus, I want to put the fan inside the barrel because that’s the simplest way to protect it from the elements. So the question is, is there a minimum vertical distance between the fan inlet and the bottom of the barrel for the cyclone to happen effectively? Also, the fan inlet is about 6 inches in diameter and all the examples I’ve seen online have 3 inchish pipes connecting the top of the dust collection vessel with the source of the suction. Do you all think that would cause a problem? I’m thinking about putting a shelf inside the barrel near the top for the fan to rest on. That way I could reduce the fan inlet if needed. But still would need to know what the vertical distance needs to be…

Thanks!