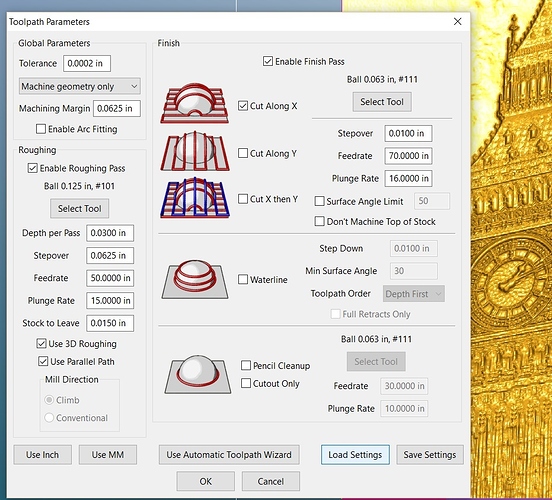
On the pieces I make, I mill .2" into a .25" thick piece.
So, leave 0.050" thickness for “white”, and leave .25" for “black”?
That’s what I do.
When I import the preprocessed black and white photo into MeshCAM, I specify the size of the image by only setting the DPI and letting it calculate the width and height. And I specify the Depth to be .2". after it does its thing, I then go back and set the size of my stock to .25" thick with 0" margin on top.
I have never seen Candlestone bend, how much clamping pressure are you applying?
Well, I was trying not to apply much – the bare minimum that would keep it snugged. But after a fair amount of the bulk of the Candlestone was gone, the stock always started bowing up in the middle.
Would anyone mind sharing your Nomad settings for candlestone for 1/8, 1/16 and 1/32" inch ball end mills? Thx.
My .tps file attached above is for roughing with an 1/8" ball end mill and finishing with at 1/16" ball end cutter in the candlestone material. It has given me good results and is a balance between resolution and machining time.
Remmy… thanks for the reply but I’m not sure what to do with the .tps file. It appears to be a whole lot of files but I’ve never heard of .tps before. Can you help me with more info?
Thanks,
Tony
The tps file holds all of the toolpath information for speeds, feeds, tool sizes and depth of cut etc information in MeshCAM. If you open the toolpath parameters dialog box and click on “Load Settings”, you can import this file to load all of the info needed to cut your lithophanes.
Even with that, the RPM for each pass has to be given.
mark
For candlestone, I use 9000 RPM
Thanks guys!
This line gets this post to the required 20 characters 
This is making me want to order My Shapeoko XXL now!
I know nothing about CNC routers yet, does the machine stop automatically and request a tool change when smaller ones are needed or do you have to do it in stages with separate files per size like one for roughing, one for more detail then one for fine detail?
Some communication / control programs will recognize tool change commands in a G-code file and move the machine so that one may power off the router and change out the endmill, then resume cutting. I believe Carbide Motion has this facility which it inherits from the Nomad.
Most users just break up toolpaths into sets based on endmills into separate files.
With the Nomad, you have the advantage that the machine knows how to measure the tool after the change so that you keep the same Z zero. Perhaps when Carbide3D releases the z-probe plate, it will prompt you to place the plate after changing the end mill.
Hi all, I got some Candlestone recently and was planning to do the same. However I couldn’t seem to get Meshcam to generate the toolpath - it just shows 0 minutes for machining time and a file with no actual tool movement. I was using the tps file provided in the thread. I am not sure what I am missing here.
I am new to MeshCAM, and I have only used Inventor HSM before. Maybe is there another way to generate the toolpath also?
Thanks for the help.
