What if you filled the top torsion box with cement along with the bottom box (shelf)? Would that mass absorb the bulk of the resonances and for only a few bucks? Or even spray foam but the cement would provide both mass and weight which are both anti-resonance compatible? I love the dedication for completeness in your design effort and your inclination that a design can always be improved and accessorized. Why have a computer if all you do is play games on it, major kudos to you. Hope you the best in all you do. My machine sits on a poured concrete work bench and I think it is much quieter than any of the videos I’ve seen, One more question: What if you added a piece of sheet rubber (shower pan liner at Home Depot) between the parts before joining, decoupling the joint members to eliminate frequency transmission through the frame members and also MLV between the plywood and frame members. I made my own MLV using alum flashing and this sheet rubber, it was helpful and added about 20 decibles reduction to my enclosure. See how that works in your analysis efforts, I;d love to see those results. Terrific job with the modeling. Jude
What a way to show off! and I love it! Congratulations on the Shapeoko, and thanks for whetting my appetite on what F360 can do-with someone who knows how to direct/ask it for it! I am just starting with it…not overwhelmed, but excited! Way back when, I went to Milpitas as a dealer for Autocad 10, but other than file extensions, there ain’t a whole lot I recognize!
Can’t wait to see what you do!
You can have that again pretty cheap and easy! https://youtu.be/ORJ-Q3TFW5o
Thats a good idea.
I watched a 12 hr video of a guy turning a cheapo drill press into a mill by filling the column up with concrete.
Thats not all he did to it, but the concrete worked.
I used to rent DIY, and machining videos from Smartflix, but I guess they’re gone, now ![]()
Dang! I was going to learn some more stuff someday!
This was a most awesome wright up on the resonance issues.
Thats Great software.
Rigidity, mass and cubic inches,…there are no substitutes!
Hands down the most comprehensive and thorough Shapeoko table design ever (that I have seen)… F360 has been on my radar for months and your write up illustrates just how incredibly power it is.
I have a newly acquired 3D printer, so it’s time to roll-up sleeves and get to it. Thanks for sharing this great write up and design, and I’m looking forward to future updates.
I’m an engineer as well, and outside of the torsion box that’s a very similar setup to mine. 2x4" frame, 3/4" plywood top and shelf, 4x4" legs. I have a single 2x4" runner down the middle (no torsion box, but it’s pretty quiet as-is. I could always throw more wood at it?), and my machine sits on 3/4" of foam with no leveling feet. I shimmed up the end plates to match the height of the straps, but on a 16" SO3 those don’t matter the same way. For the bucket you show in your images I actually cut a round hole in the bottom shelf to hold it so I would have clearance for my Dust Deputy and hose connections:
In same thread above look at what Jude did with his standard 16" SO3, it’s pretty slick!
Dan
Ohh there’s the hook!!! Thanks Dan, I’m caught, hook line & sinker… now I have to build a new stand for mine just to prove to me that I can do it better than last time. I got everything I need except the time and space. Maybe “Yoman” can help me with the " time & space " part, not to be too treky.
I’ll see about rounding up my spare portable hole and sending it to you…there is more than enough time and space in it! Lots of cool fresh water too, but it’s dehydrated!
Appreciate the kind words. On the concrete, actually,I hadn’t - I had ruled out concrete or steel to not violate the mobility requirement. That being said, it’ll be on casters - it’s not like I’ll have to lift it, right?
Think I’ll run another couple sims with portland cement fill and marine-grade expanding foam fill. Should be interesting - thanks pushing fourth the idea!
I do intend on topping the bench with 1/8" or 1/4" medium durometer neoprene rubber (McMaster sells it by the foot), although I hadn’t thought that dampers between the members would be much use on something of this scale. Sounds like another sim is needed - it might not be possible/accurate since I don’t think rubber behaves linearly, but it’s worth a shot.
Thanks - F360 is great. Wasn’t a big fan of it at first, but the more I use it I appreciate what they’re doing at Autodesk. I think the jointing method could be a bit more intuitive, but it makes sense of you don’t overthink it. I always thought Solidworks or Inventor was like legos for adults, but I think F360 nailed the lego part with their top-down design philosophy. The whole t-spline thing to me is foreign, but the potential to create some really organic shapes are endless.
Thanks for the link. I hadn’t seen that one but have seen another few with guys using HSM techniques on the Shapeoko. That was one of the selling points for me. I’m a huge fan of full-depth cutting when feasible.[quote=“YoMan, post:5, topic:5839, full:true”]
What a way to show off! and I love it! Congratulations on the Shapeoko, and thanks for whetting my appetite on what F360 can do-with someone who knows how to direct/ask it for it! I am just starting with it…not overwhelmed, but excited! Way back when, I went to Milpitas as a dealer for Autocad 10, but other than file extensions, there ain’t a whole lot I recognize!
Can’t wait to see what you do!
Which one did you get? I’ve been on the fence whether or not I would get much use out of one.
I have this idea that I may mess around with - if I have the enclosure on it air tight, then bore large holes on the sides and fill with PVC. Run some hoses into a manifold straight to the vortex/vacuum setup. Compressed air would chip-clear and push everything to the sides where the vacuum would evacuate.
This is definitely a round two sort of deal! I like his setup - wish I had that much space.
here’s my next stand,
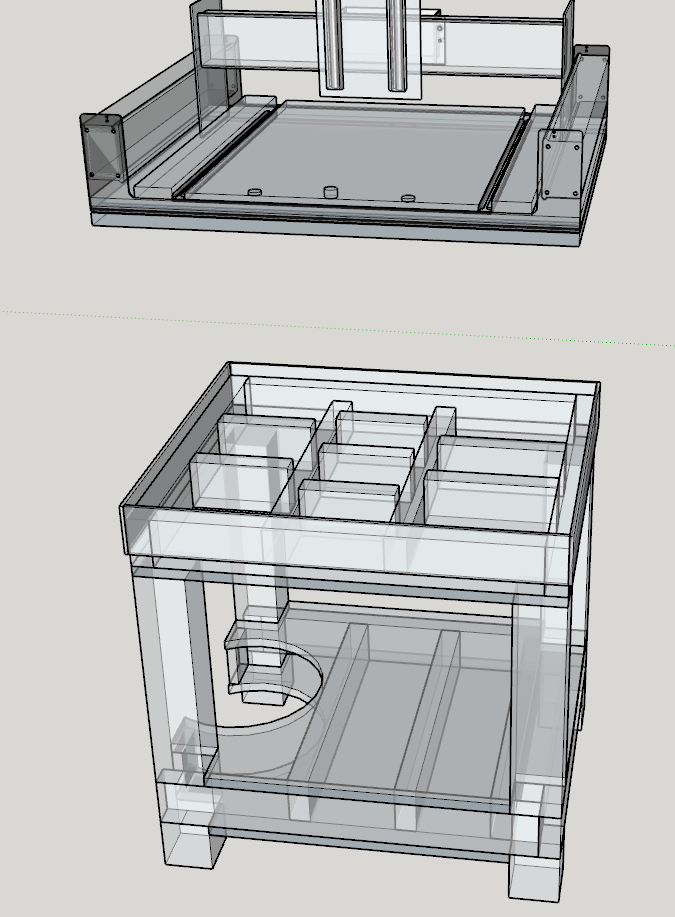
I like self leveling cement in the top than It’ll be level for the shapeoko 3 to sit on, which is on it’s own 3/4" base. I did find my homemade MLV to work for sound reduction, before 101 d’s and after 81 d’s. So i’ll have it under the machine’s base on top of the SLC and also above the shelf’s concrete, yes both filled w/ concrete. I love overkill. Will need the BIG casters. there is a “lip” around the top exterior for the SLC to flow up to than I’ll remove the lip. Like the hole for the bucket at the edge not the middle, more room for the drawer case. and vacuum can get to it from the side. probably my contorted “thein” separator. Love to see the sim’s results. Thanks, who does sims for a stand??? We do, or YOU do, but glad you do! Oh yeah, there’s lots of comments about the dirchlet effect in here, “drum effect” vibration occelation or resonancability or something like that, cross members unevenly spaced and multiples are the best. Search dirchlet (sp?) in the forum. Jude ps homemade MLV is aluminum flashing w shower pan liner glued to it on both sides, (had leftovers of both). also I had the neoprene rubber under my machine and the pem nuts on the botton did not sink into it evenly, and when I removed the neoprene I did not hear any difference, so I doubt it was worth having in the 1st place, just my opinion.
Love it LOL, my Dad always saved an empty box in the garage, Mom would ask what;s in there, He’d tell her it’s full of post holes and maybe she can sell them to her friends.
If you’re referring to my setup, be careful what you wish for… my shop is 9ft X 15ft with 14 machines in it, 2 people can fit in there if the door is open, but I don;t invite anyone in my work shop anyways. It works for me fine, but I have to use every inch of every horizontal surface, above, under and hanging off the side. the bench top machines are under the table saw and I sit to use them (folding chair). Thanks though, Jude
I was a Kickstarter backer for the Robo R2. I’ve only run test prints, but so far it’s been an outstanding user experience. I didn’t want to do a lot of fiddling with my first printer and extruder. The only issue I’ve had is the touch screen sensitivity (or lack thereof I should say). I’m gonna reach out to their tech folks and see what they suggest.
Very nice–opens my eyes what can be done. For many years, sand was used to deaden load speaker enclosures, and today shot is used for dead blow hammers. Just a thought.
Very cool Jim! I built my first 3D printer from a kit (Rostock Max V2), then later picked up a ready made printer from Microcenter and kinda always wished I’d gone the other way. There was just that much more learning curve, not knowing if the print settings were wrong or if I built the machine wrong. It worked out in the end, but it was a bit of a headache.
Dan
Lead shot has gotten a lot more expensive than you would think…
[quote=“grumpa, post:16, topic:5839, full:true”]
here’s my next stand,
Love to see the sim’s results. Thanks, who does sims for a stand??? We do, or YOU do, but glad you do! [/quote]
Been busy the past couple weeks - I like the design - send me a STEP or Sketchup file and I should be able to make something work.