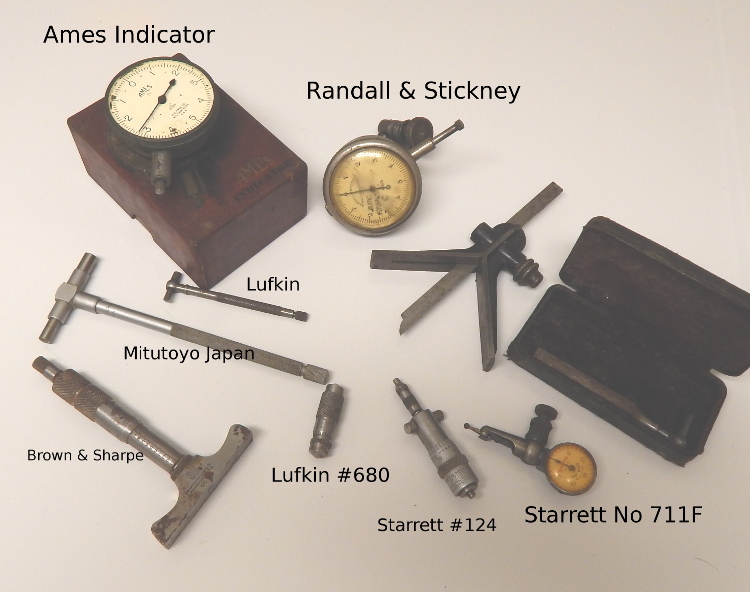
Nice collection for a variety of tasks. Very nice. Cherish these, as some of them (like the Lufkin 680) are among the nicest tools you will ever use, and all are quality tools.
The 711 Last word is a lifetime tool. Handy for a lot of things in tight places, but not my go to indicator, though I have 3 (4? 5?) of them.
The 680 should have 5 or 6 extensions to go with it. The end caps unscrew and are replaced with the appropriate extension for the measurement being made. It is a 2" to either 8" or 12" (depending on which kit, the A or the B) or longer (with other accessories) inside mic. They are primarily useful for measuring inside a cylindrical bore. You select the appropriate range, and rock it in across the diameter adjusting until a light drag is felt. If it is in good shape, it is an awesome tool. I prefer the feel of the Lufkin to the starrett equivalent, and in fact sold my Starrett a few years ago. They two brands have interchangeable accessories.
The 124 also should have some number of other rods. They unlock using a collet arrangement. The 1/2" spacer is there, which is needed, since the head only has 1/2" travel, and the rods are in 1" increments. Other, earlier, versions used a 1/2" and a 1" spacer, and the rods were by 1-1/2". Use is the same as the tubular Lufkin, but the setup is, obviously, different. It is not my preferred inside mic for feel, but I have a set (5 rods for 2-8") for when I need to get into tight grooves.
The telescoping gauges are handy (I use them a lot in several styes), though they require a lot of practice since they are ALL about the feel. They are transfer tools, and are for transferring an inside measurement to be read using an outside tool, like a standard micrometer caliper.
The B&S depth mic is one of my favourite to use for Imperial measure. The B&S ratchet is a soft touch, and very consistent compared to some other makes. Setting the zero is fairly easy. Changing the rod for other depth ranges (by 1") requires unscrewing the back cap of the thimble (the ratchet assembly is the small diameter at the end, followed by the back cap to the line about 12mm from the start of the full diameter part). Again, there should be several (2 to 11) more rods for this tool. There are several different editions over the years with the same model number, and they take different rods. The most interesting set I have came with several rods of the wrong diameter, and several rods of the wrong length, and no rod that was for that iteration of the tool. A bit of horse trading later, and I have a really useful tool. I have the metric version, as well, and it is by far my preferred depth mic.
The Ames indicator is a decent tool and repairable. Reads to 0.0001" (0.0025mm), and accurate to roughly +/- the same over the short range. Ames is still around, and they have always been pretty rugged units, in my experience. Cleaning can do a lot, and the last time I had a major job done on an older one, parts were available (10 or more years ago). I don’t know Randal&Stickney. DO NOT get into these without doing research first. They are built like a watch, and you may find ruby bearings and fine hairsprings. They get oiled like a watch. They often have pretensioning setups that are finicky. Even if they only need cleaning, it is a job for a pro.
The centering head is quite handy tool, as well.