Something is not right…
Do you not have a CAD program?
Hmmm…
Something is not right…
Do you not have a CAD program?
Hmmm…
@mbellon Yes, I use OnShape (love it). For the surfacing job I seriously just opened a new project, made it a 8x8 square, saved it as a DXF and imported it into MeshCAM. It looks fine in MeshCAM, dimensions are good, etc…but it doesn’t export the G-Code as expected. I won’t be able to try your STL this evening but will try to do that tomorrow. Thanks!
Maybe I missed it somewhere, but I’m wondering why using a (micro) fly-cutter hasn’t been mentioned. These are just about ideal for a surfacing operation. The cutters have shanks that will fit the collets that are supported and the tool end is usually 1"-1.25". This yields MUCH faster surfacing times and almost no tooling marks on the board (if any). Plus, with the larger size of the tool, you can extend your reach further from the shaft center point and avoid the tricky limit switch and zeroing issues.
Just thought I’d throw that out there.
Maybe I missed it somewhere, but I’m wondering why using a (micro) fly-cutter hasn’t been mentioned.
The only micro fly cutter I know of that a Nomad can use is unsharpened. Most people cannot sharpen one themselves (it is still taught in machining school but sharpening is rarely used now a days. Sadly, this has become a specialty) and machine shops charge a fortune since there is no initial sharpening. I investigated this - including getting quotes - and was disappointed.
Fly cutters put considerable forces on a spindle due to their asymmetric design. I’m shy to try, at any expense, with a spindle as small as the Nomad. That said, they produce some of the best surface finishes possible. I would argue even better than a face mill… and a HUGE amount cheaper too!
They rarely come with shanks less than 5/8" and only the unsharpened one at 0.125" could be found. If there is one out there with a 0.25" shank, please let me know.
Yes, I know how to make one. I would need some Tormach time and I’ve been crazy busy.
HEY! Maybe we can get @Randy to go into the Nomad 0.25" shank face cutter business (he has a Tormach)!
There are spoiler board tools. Those are the ones that are from 1" up to 4". I have one of the smallest - certainly not micro - one and the Nomad is “so so” driving it. The spindle just doesn’t much power/torque, the tool has considerable mass and moment of inertia, and the results were not acceptable to me.
I haven’t had the time to do a proper evaluation and report the results. There may be a good soultion that produces good results but my initial experiments did not go well. I can say that I suspect a good outcome is possible. If people really want this I can shelve what I’m doing and try things out.
When small, they aren’t expensive… but they have to work. An SO3 could easily use a 2.5" one with no problem.
I have an Amana Tool RC-2243 spoiler board tool. Amana is a known, quality tool provider. The knives are even replicable. It requires a 0.25" collet.
Also, anyone using a spoiler board tool better have a dust head, a dust separator, and a dust collector. if the exhaust air is dumps where humans are there better be a 0.3 micron HEPA filter. The dust and particles generated by these tools is… insane… and they are done really fast too (when they work).
mark
This is the one I have and the one I was thinking of for this application.
This is the one I have and the one I was thinking off for this application.
… minds think alike? ![]()
I would need to buy some MDF and try things out. The MDF I have in stock is 0.125". I need the 0.5" stuff so I can really have a go at it testing different depths.
I’ve got the enclosure and air handling that can do the tests safely.
mark
To level my board I setup a face milling run with a flat model 430x430 and used a bottom clearing bit 6mm shank/25mm cutting area,dont use endmills,look at the woodworking router bit selection.

Run it slow tho.
This is better as you can have full size flat stock with 15mm of edge for bolt thru workpiece holding. You can get much larger ones but balance is…not ideal. The added bonus is that you can trim your Z Axis very well as you will have an excellent representation of skew from any ridging that appears,the wider cut foot print giving a wider skew distance.
I use this little guy on mdf and wax; but I take it very slow due to forces generated - so the speed ends up not being any better than a smaller (i.e. 6mm) flat endmill, but the finish is nice with less ridges.
Warren.
I use the micromark for facing acrylic and renshape on the Nomad. It leaves a fantastic surface finish. I am concerned about the intermittent off axis load it puts on the spindle so I take it slow and am conservative with the depth of cut.
Mark’s point about sharpening the tool is a good one. It’s easy to say, “just use a grinder”, but wrapping your head around all the relative angles is tough for a newbie. You-tube and google are your friend but as you stand there in front of the grinder it gets kinda boggling. I have been assured by a couple of grizzled machinists that hang out at Tech shop that it is a skill well worth having so I plug away. I was able to get a cutter that works just using a grinder and a diamond sharpening stick.
Now let’s see about that Amana thing with the inserts…
Three hours of being linked here and it has gone out of stock. Clearly we are all sitting around waiting for the ball to drop (or box to ship). Since we can’t do anything to make the machines arrive, we’re gathering up all the accouterments in anticipation.
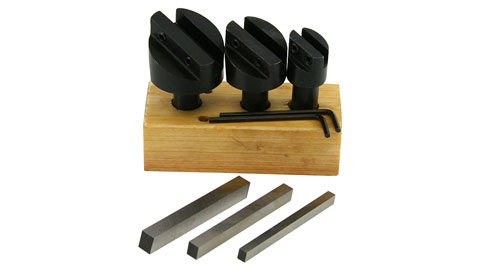
Well, I did also buy one of the “32428 - TTS® SuperFly™ Cutter Kits” from Tormach. It was $118. Of course I did also buy the accessory to drive it (a new 440). 
Warren
Kind of extravagant buying a Tormach just for surfacing your spoilboard 
I’ve spent a disturbing percentage of the cost of your 440 on converting my vertical mill to CNC, although I may be going overboard using servos instead of steppers. I almost wish I had gone your route, but hindsight is always 20/20, and I’m not quite up to spending at your stratospheric level  .
.
Nice toy though, I’m mildly (significantly) jealous.
I feel your pain.
If I could offer one possible way to take the “bite” out of buying a new 440… do what I did and also buy a SlantPro lathe at the same time.
With all the lathe tooling and accessories, the 440 looks almost free by comparison 
The other thing that is nice is they show up packed in nice wooden crates, and so you have lots of material to make signs that say “Will mill for food”.
Cheers!
Just got an email from Little Machine Shop about their special of the week. Since it was appropriate to this topic, I thought I’d pass it along: http://www.littlemachineshop.com/special?Source=SOTW
Mine is on the way.
Just got an email from Little Machine Shop about their special of the week. Since it was appropriate to this topic, I thought I’d pass it along: Special of the Week - LittleMachineShop.com
Excellent for the SO3. Alas, too big - shank wise - for the Nomad.
For surface finish I’ll take a fly cutter over surface mill any day.
mark
Now let’s see about that Amana thing with the inserts…
If one has an SO3 and the budget, I would look at the related models that have a larger diameter and shank. My analysis says that one that is 2.5" in diameter will work really well in an SO3.
mark
When I surfaced my mdf spoil board on SO3 w/ 3/4" straight router bit I had slight ridging only between 12:30 and 2:15 as on a clockface. How does one corolate the ridge pattern to what vertical is skewed ? I actually sanded the ridges off in 5 seconds but I know I’m off . I didn’t want to just play with the Z axis plate and router mount and really screw it up. I guess the “excellent representation of skew” I can see, but how does the wedge pattern of ridges tell me which direction ? need more coffeee. thanks didn’t realize his reply was from a year ago, bummer…
You can tell from looking at the cut, but that only really gets you to knowing which direction, not how much, and it’s a lot of trial and error. Look up mill tramming on youtube. There are a lot of examples of doing it with an indicator and special tools, but the same general process basically work with a properly shaped stiff wire stuck in the collet (I’ve seen the video, can’t seem to find it right now). Once you’ve seen how it’s done with an indicator/holder, should get you going in the right direction.
I just got a dial indicator from H F but it is only .02 in precision. Granted thats better than my eyesight, thanks Mike I’ll give youtube a look. I haven’t looked for “mill tramming” dang that terminology. As I’ve said to others “you (I) can do it”
