I got my Shapeoko 3 used, I purchased it from the father of the original owner (who has moved out of state).
It was assembled and kinda abused so I’ve been taking my time tuning it up a bit.
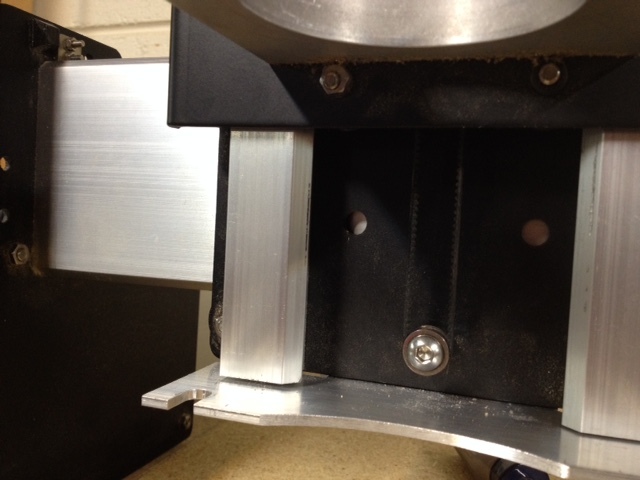
One thing that I observed was that the z-axis extrusions have some scratches on the surfaces on which the Delrin wheels ride.
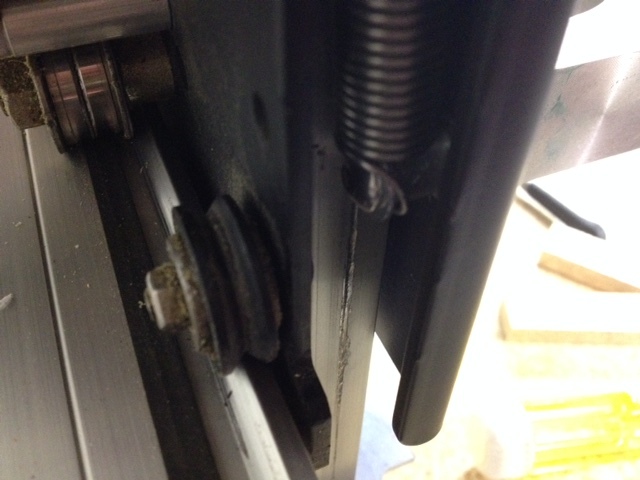
I also observed that when the unit was assembled, the left spring was attached to the router plate in such a way that the end of the spring was grinding into the left z-axis extrusion when the z would move up/down.
I took the router plate off last night and observed a decent amount of aluminum shavings on the wheels. I had purchased the maintenance kit so I had spare wheels on hand.
I did some research and found some users had added washers in front of the spring spacers (those 3/8" by 3/8" aluminum spacers for the springs) and instead of capturing the springs between the screw and the spacer, allow the spring to wrap around the spacer.
I actually used two washers, one in front of the spacer and one behind. I wasn’t sure if the springs might slide around on the spacers and didn’t want them hitting the plate and scratching it up (now that I’ve made the change, this doesn’t seem to be a problem).
Anyway, in moving the z up and down a bunch of times manually and by CarbideMotion, it appears that the spring stays well clear of the z-axis extrusion (about .01"). I have z-axis extrusion replacements (THANK YOU CARBIDE 3D!) but I haven’t used them yet, I wanted to make sure my approach was sound so I don’t get the new ones all scratched up.
I assume that the aluminum scratching off the left z-axis extrusion was finding its way onto the wheels and then at some point the previous owner may have had a crash or jammed the machine somehow and resorted to force to free things up, which cause the aluminum to scratch the z-axis extrusion on the inside.
Here is a pic on the spring-side of the left z-axis extrusion. This was caused entirely by the end of the spring grinding against the aluminum.
A little hard to see but you can see the wear on the wheel surfaces of the z-axis extrusions. The rear sides (can’t see in the pic) are substantially worse). I have replacements that I will install soon once I’m sure I have the springs worked out.
Here is a pic of how the springs are arranged now. Instead of capturing the end of the spring between the screw head and the spacer, the end of the spring now wraps around both the top and bottom spacers. I’ve added #10 washers in front and behind the spacers. The front washer prevents the springs from sliding off, the rear spring was for protection of the powder coating in the event the spring slide back and forth on the spacers.
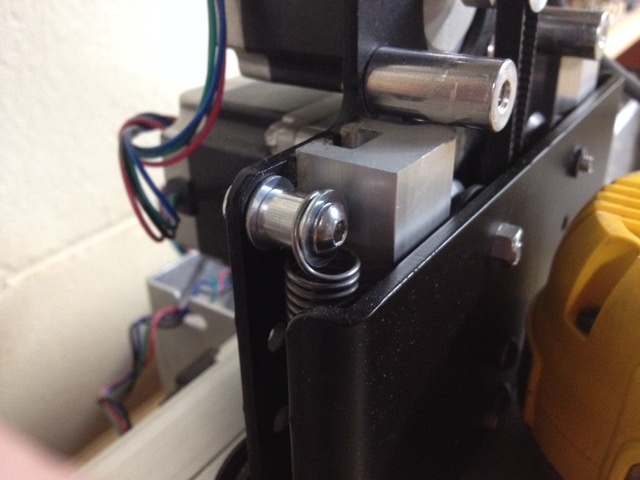
AT LEAST WITH MY SPRINGS, it turns out best to keep the ends of the springs pointing towards the z-axis extrusions. I had figured pointing them in the other direction would provide the greatest clearance between the springs and the extrusions, but due to the way the ends are formed, the opposite seems to be the case.