I’ll have to try it and let you know.
1 Like
When you do, get a video. I think you may be pushing the depth, but I’m not sure why it’s so patterned. You typically wouldn’t gain steps back after you lose them, but you might be having a hard time retracting too.
Are you sure your waste board isn’t sagging? Or maybe your stock is lifting slightly? Sure looks like what I was experiencing early on before ditching my leveling feet, and no amount of tramming the wasteboard is going to fix flex. Try moving the router to the middle of your wasteboard. Lower Z till the end mill is almost touching the wasteboard. Apply a little pressure by hand to the middle of the wasteboard. Is it moving? Usually doesn’t take much pressure to move it 1/8” or so. If that’s all good, maybe check your clamping? Something is moving, I doubt lost steps would somehow fix themselves between cuts, then unfix themselves on the opposite side of the cut. Also check Z axis pulley setscrews if you haven’t already.
Dan
1 Like
@neilferreri - Oh, different type of ‘pocket’. I think I can visualize that. So, I’d cut a path around the whole perimeter of my G (in this case), but leave a small width of material between the edge of my perimeter and the edge where my shape starts? Then, make a second pass taking off just the extra thickness that was left around the edge of my shape? And for objects like my circles I’d do the same thing but in reverse?
I’m not too familiar with losing steps. I do understand that if the whole thing gets bumped or stuck that it won’t correct itself the way we wish it did. How would mine me losing steps?
As I mentioned earlier somewhere, I use GWizard to get all my feeds/speeds. And I back off of its suggestions slightly each time. If my current settings are still overall too aggressive then I’m either consulting the wrong source or am using it wrong or something.
@DanoInTx - There is a bit of sag seen in the two MDF pieces that make up the bottom of the XXL table. I have another piece of 3/4" MDF in the middle that is larger that my 16"x32" plywood stock. Last night I trammed the surface and checked all the leveling and so forth. There’s no flexing that I can see.
My clamping is actually some furniture grade bolts going into threaded inserts. Pretty solid.
I’m not 100% sure which “set screws” you’re referring to, but last night i realigned the silver metal piece that holds the router. Means i had to remove that whole from panel and redo the z-axis belt and tension.
But flexing in my surface would not likely account for the consistency and “pattern” of my issue. At least I don’t think it would. If it was random, spotty, occasional, then probably it would account for it. but as i said, i just realigned and squared everything best I know how. and it did not phase this issue at all. agreed, very weird.
The thing is the sag that I saw on mine tended to follow a pattern similar to yours. I can’t explain the exact forces or why cuts in certain directions make it happen like that, it just looks very similar to what I was experiencing before going on my leveling crusade. I have a fairly long forum post about this from over a year ago if you have time for some “light reading”, haha!!!
The set screws I’m talking about are the ones on the pulley for your Z axis stepper motor. If those are loose you’ll get all sorts of inconsistencies in Z travel, which could also cause this. I think these are now installed before the kit is shipped to you. It’s definitely worth loosening them, apply blue loctite (242/243) and reinstalling. Also worth checking that all of your V wheels are adjusted properly. Basic mechanical checklist stuff. Make sure when the machine is on, that if you grab the router you can’t move anything easily, steppers should be locked. Shake it a little, see if you feel anything moving. Really thinking you have something mechanically wrong here, either flex or something loose.
Dan
3 Likes
@DanoInTx - You provided a lot of good advice and basic housekeeping stuff that I don’t do. I should. Thank you. And I definitely do not doubt your previous experience at all. Sorry if it seems I’m discounting it in any way. My situation looks and sounds like yours it seems. But here’s the kicker I can’t get past. As shown in an earlier this string - I showed the actual result of my first cut after all of the updates. In that job, I reversed the climb/conventional on just one of the outside lines of a G. The result, it completely and perfectly flipped where the cut and not cut portions were for the G whose cut direction changed. It left roughly the same amount of fully cut and non-cut out material. Changing the cut direction flipped the outcome, mirror image. That is what leads me away from the idea of it being mechanical. However, i’m no way an expert here.
Looking at your last cut it is definitely something wrong with your Z Axis. It could be the mount or more likely the aluminum block that holds the router.
If it was a bed issue it would only be on one side of the cut. Since it’s constant across the job the Z axis is not square.
2 Likes
Hey Brian, no worries, my feelings don’t get hurt easily. I still stand by one thing though, “something” is moving. Either wasteboard flex, loose v wheel, loose pulley set screws, local highly focused earthquake.
Dan
3 Likes
@TK-422 - Chris, Your thoughts do give me one more option. It’s possible the entire center column that houses the z-axis elements and router could be rocking left/right. That would indicate loose v-wheel as @DanoInTx just mentioned. I’ll check them.
The aluminum block holding the router - I just reset and leveled it to my spoilboard before running my last test that you see above. Hopefully that’s not the issue. z-belt seems nice at tight, “guitar string tight” as Will said. Maybe there is a screw or fastener I’m missing?
Either way, I still wonder how all this accounts for the router cutting down past the bottom of my stock on one side, then leaving slightly more than onion skin on the other… of every separate object. I had another thought - most every uncut portion starts after a tab. I use 3D tabs. Anyone have reason to believe this is the cause? I’ll remove to test but thought I’d ask. Thanks!!
2 Likes
@DanoInTx - Good, glad we cleared that up.
I mentioned in reply above to someone else that I’m wondering about the whole column that houses the z-axis and router. maybe a v-wheel on there or some other stabilizing element I’ve overlooked. i don’t know all my features and parts as well as a should now that I’m playing the role of CNC mechanic.
I’m in TX as well… not many big quakes here. But I lived out in Southern California for 9 years and I think ever CNC owner there has a legit reason to blame job malfunctions to angrily shifting tectonic plates. ha!
1 Like
I’ve been in Fort Worth for 18 years, but originally from San Francisco Bay area, I’ve been through several;-)
Easiest/quickest way to check for something loose is to power up the machine without router running), grab hold of the router and shake it firmly, likely you’ll be able to feel if anything is loose and track it down from there. The steppers should lock it all in place (unless you shake it like a gorilla).
What part of Texas are you in?
Dan
2 Likes
@DanoInTx - Dallas (Allen specifically). I was just in FW at the Lumber Co of FW.
I did turn it on, tried moving along X, Y and Z. None move in that regard. However, the whole z-axis tower moves slightly, rocking up and back, or down and back. The pivot point seems to be the v-wheels on top and bottom of the x-axis beam. Right now, I’m tightening bolts, but not sure how any of them will stop the movement. I’ll see if the v-wheels tighten. They are engaged with the gantry, but still rock slightly forward/backward. I suspect that the uncut portions occur due to pressure occurring upon the z-tower when moving forward/backward along y-axis. It does not really happen when machine moves only along x-axis.
@WillAdams - I did on the z-axis, but I just went through and did the others as well. I followed the recommendation on your link. Found that the y-axis bottom v-wheels were all loose. And it is while moving along y-axis that the fully cut and not fully cut portions occur.
I’ve made many adjustments to the machine now so it seems time for a test. Thanks!
2 Likes
Coolness, sounds like you may have found your issue. Be sure and report your findings here so others can follow your path.
Lumber Co of Fort Worth? I’ve never been there or even knew it existed. Will have to check it out!
I’m actually in Haslet, right at the edge of Tarrant and Denton county. I actually pay property taxes to both. If you go about 10 miles straight West from Texas Motor Speedway then you’re in my garage, haha! Good to have another ShapeOKO user close by.
Dan
1 Like
Dan, no solution yet.
Lumber Co of FW is neat. Only been once. You actually get to go into the clean warehouse and see everything. They do have some hardwood as well, long and thin pieces mostly. but some are rough cut. Good prices. Really nice staff.
I’ve only been as far West as the Speedway, but I get the general area you’re in. Not crazy far away. Contact me whenever at brian@woodengenuity.com
UPDATE: Many changes have been made to machine and program settings on my cuts.No change in outcome. See photo.
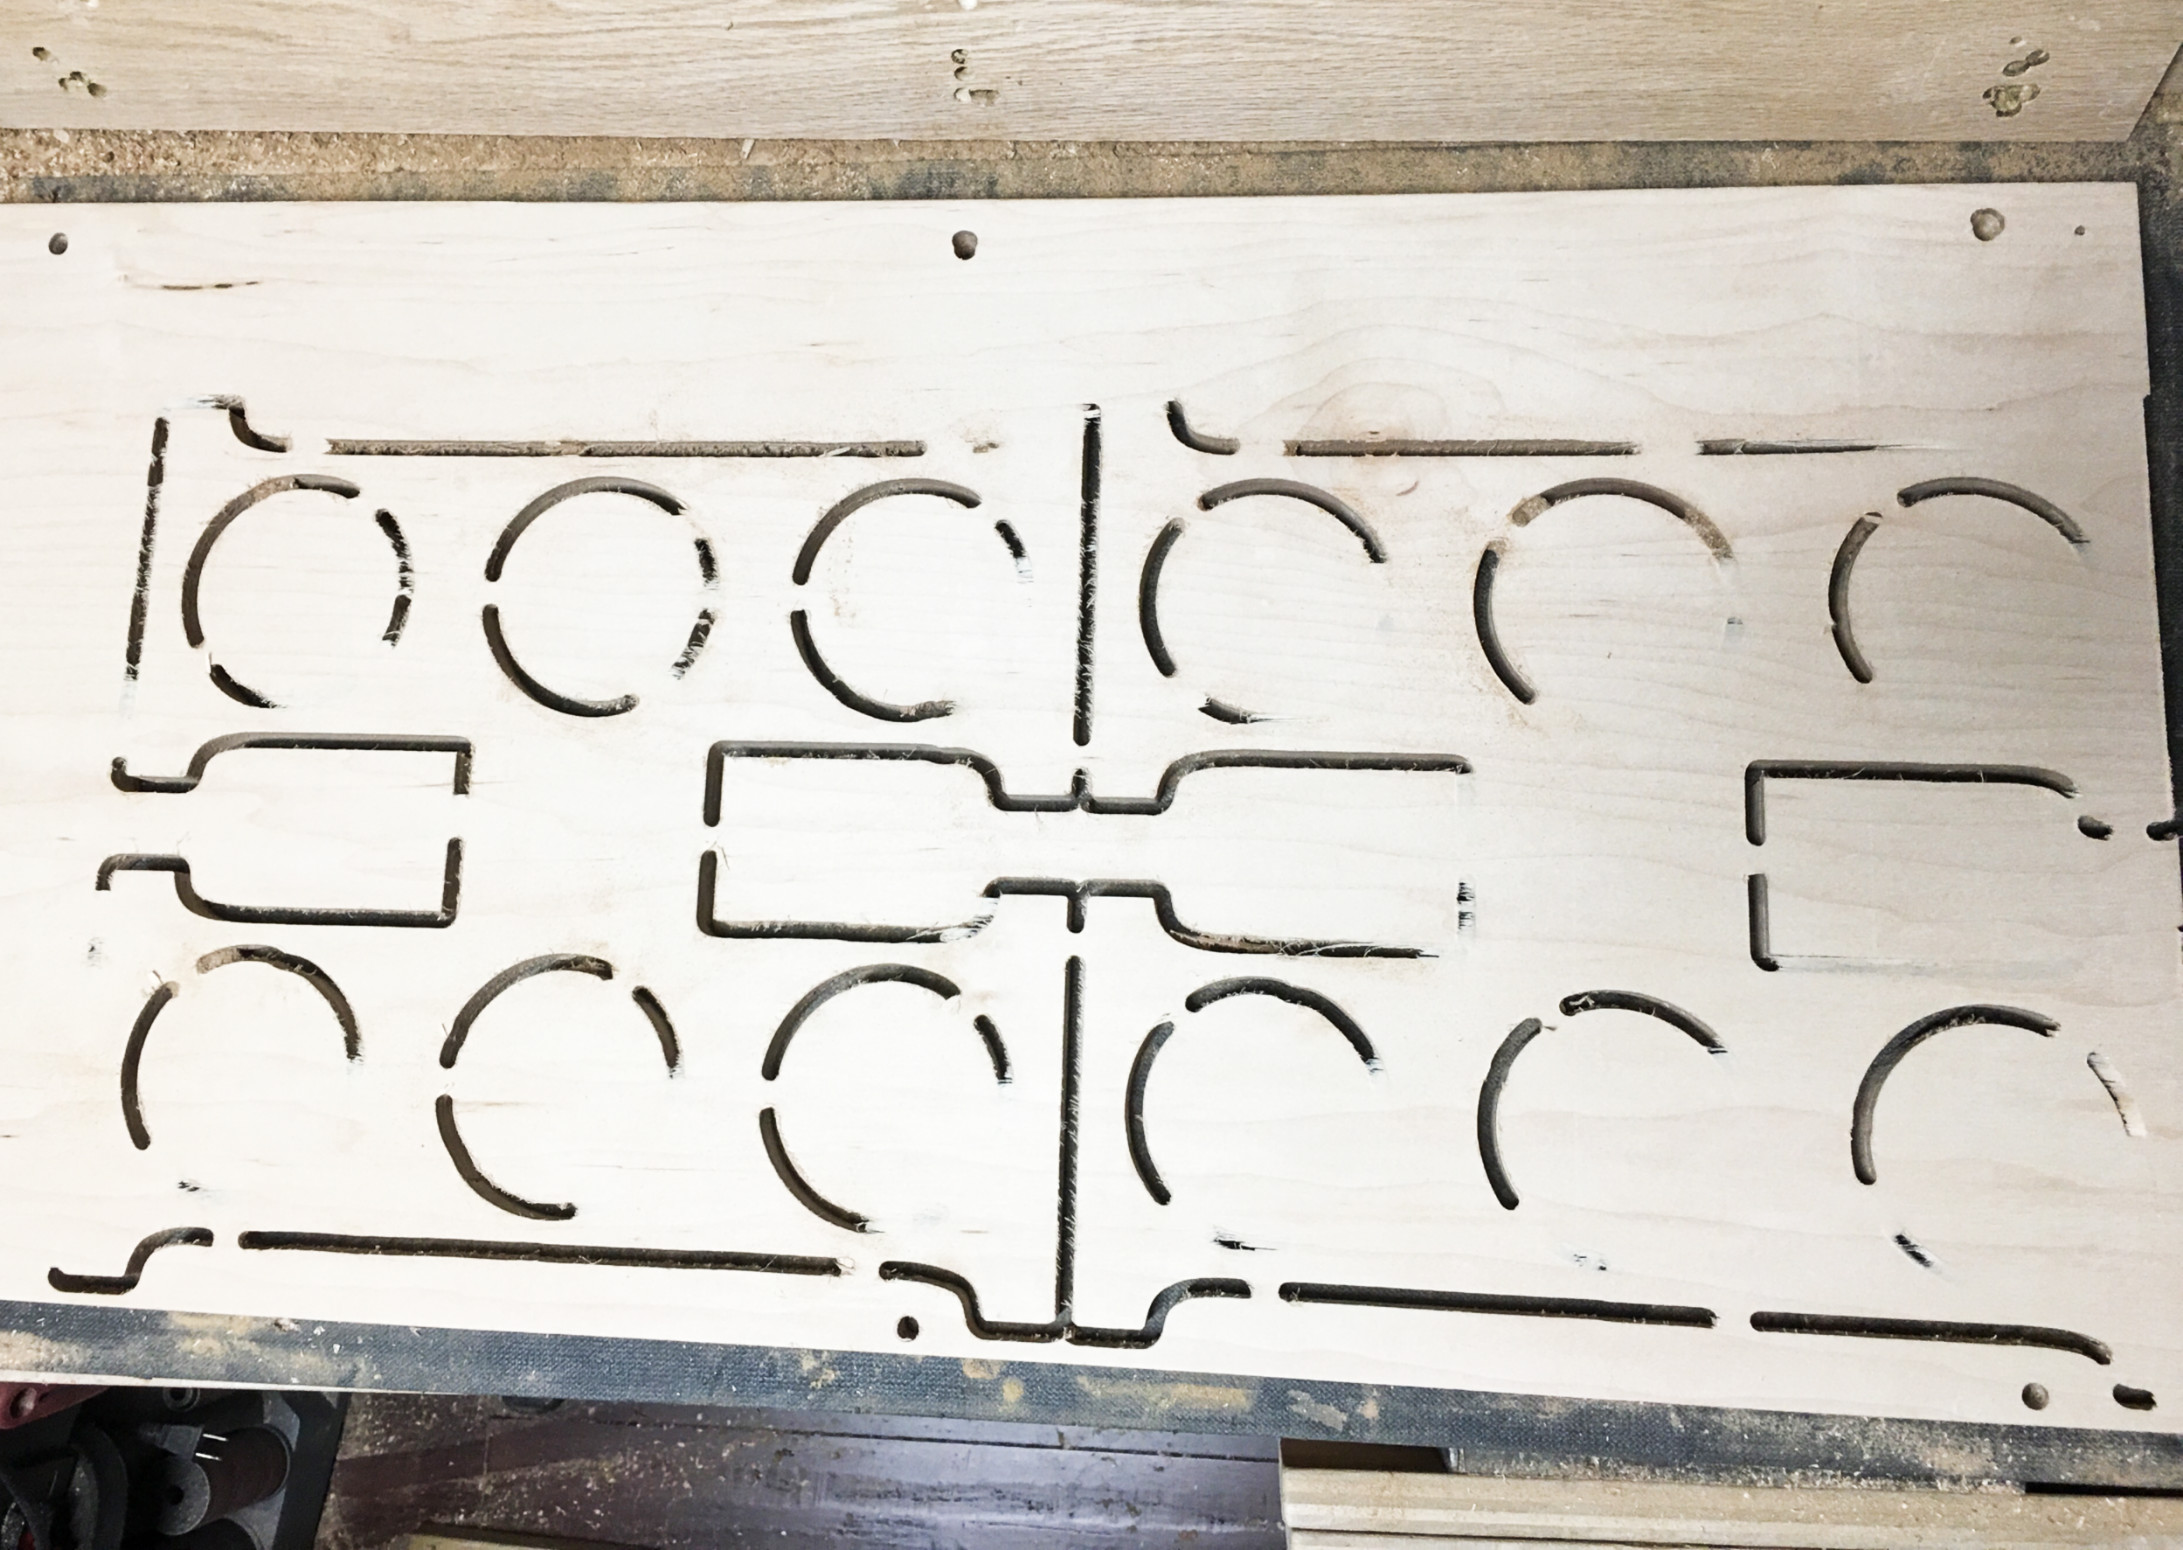
Okay team, what else have I overlooked? My z-axis tower rocks up/down slightly, but the “play” seems to come from the v-wheels and that appears unavoidable. They all engage and have been tightened. Hey must have some freedom otherwise they won’t turn. Nothing else seems to move or be loose.
@WillAdams - I know I’ve not tried your pocketing option, but it’s because it would double all my cuts. Meaning more time and more wear on bits. What I could do is try it on one or two shapes instead of the entire file.
The example in your link you recommend the offset distance to be:
I’m not using aluminum, rather a special plywood. I use GWizard so I do have a chipload number shown, is that what I’d use? My bit diameter is .24-ish.
Could I simply make a pocket cut that is .2 or so inside the desired cut path? Then run the cut for the full depth at desired cut path?
Still trying to take .25" per pass?
2 Likes