XXL Limit Switches and drag chains

Two anomalies so far in XXL limit switch installation, both related to cable drag chains. Could be idiosyncrasies of how I did the drag chains I suppose:

Screw for Z-axis limit switch is too short to go through the drag chain bracket. Will have to acquire a longer screw (10-24 x 1/2 instead of supplied 10-24 x 1/4):

Also, mounting X-homing switch outside the plate as per instructions interferes with the drag chain. Bending drag chain bracket sufficiently to avoid interference causes drag chain to drop behind gantry instead of riding on it.

I mounted mine inside the plate as shown. This results in the switch activating against the belt bracket, shown in the close up. Hopefully this wonā€™t matter: on the XXL, one millimeter of X out of 800+ probably wonā€™t affect any of my projects.

Have you used the homing yet? Was there any interference with it not hitting the switch?

The assembly guide shows the x-homing switch on the inside as you have doneā€¦ I also mounted it this way and have the same issue with the switch hitting the belt bracket. Iā€™ll try and run the homing today when I get off work to test if there is any issues.

Worst case it doesnā€™t trigger, Best case we lose 1 mm of cut area.

So far homing seems to work. I (from memory, not in front of the machine as I post) set several GRBL parameters ā€“ turn on homing, hard limits, soft limits enabled and specified. Also changed the values for table size in Carbide Motion under Settings, and turned on the homing switches for Shapeoko there. I used 845 for max X and 925 for max Y I believe (both in GRBL and in the $1000-whatever parameters in CMā€™s Settings tab). Default position after CM homing is just a bit to the left of zero, I havenā€™t bothered to figure out where to change that ā€“ it is probably obvious but not a priority.

I have not yet calibrated or even properly squared the machine, but CM seems to work just like on my Nomad now. Homes automatically when you first select ā€œJogā€, fast moves to all the various positions with no problem, etc. Ran Hello World again successfully.

Homing itself seems to ā€œgive upā€ significantly more than 1mm on each axis, more like 5mm or so by eyeball,

That is the homing pull off offset. the default seems to be 5mm. It can be changed.
$27=1.000 (homing pull-off, mm)

1 Like

Thanks, that makes sense. It shouldnā€™t matter in the X and Y directions but I can see wanting to tweak a few extra millimeters out of Z in certain situations.

Regarding the too short screw, I was able to swap an existing screw. The screw on the opposite corner (the lower screw on the other side of the stepper motor as shown in the picture) was long enough and a short screw fit in its place.

I had the same issue; I havenā€™t glued down the drag chains yet and am waiting to see if thereā€™s an official response to my support request. I moved the switch to the inside (the assembly instructions explicitly state the switch is on the outside) and see the same issue with it triggering on the belt clip.

1 Like

I wrecked my switch, possibly because of it hitting the belt bracket, but I canā€™t conclusively say that. I moved it to the outside, and moved the chain out slightly to accommodate. I double sided tape at the end, and then also at the middle where it is still stationary when the X carriage is all the way to the left. Physically everything works, I have a different issue with homing but thatā€™s another thread.

I upgraded my S03 to an XXL Monday and Tuesday evening. The first time I homed it, the drag chain got in the way and stopped the x from moving far enough to engage the limit switch. Iā€™ll be making some adjustments, also. Shorter standoffs might work without moving the switch to the inside. I used the double-sided tape on the drag chain, let it sit for 30 minutes and it popped off immediately when it felt any tension. Iā€™ll probably try some higher quality doublesided tape first but I suspect Iā€™m going to have to drill a hole in the extrusions and screw it in. By the way, Carbide folks, at age 65 I found some frustration in trying to work with those tiny screws and nuts used to hold the fixed side of the drag chain to the brackets. This was just the kind of bolt/nut that was going to fall out of my fingers while I fumbled with it in an awkward position and go somewhere under the bench never to be seen again. It was easier to remove the brackets, bolt the drag chain to them and then put the brackets back onā€¦at least I was dealing with larger bolts in a less contorted position.

This might work for your drag chain issue.
I taped down the drag chain. Figured out where it doesnā€™t bend while SO3 is running.
Removed a top link in the drag chain.
Carefully moved cables and wires aside.
Drilled a small whole through a bottom link.
Used a tiny nail set to mark location through the whole in the link on the x extrusion/carriage.
Untaped the drag chain and moved it aside.
Drilled and tapped a tiny whole at nail set dent.
Replaced drag chain, lined up whole, and taped back down the drag chain.
Made a slight countersink feature in the drilled link.
Then screwed through the related bottom link on the drag chain. It doesnā€™t take a huge machine screw to accomplish this, and only about 15 minutes to complete the task once you have the tap and correct screws. Maybe you can get a tiny washer too, but if you counter sink the whole in the link, then you wonā€™t need it. I donā€™t remember the exact specs off hand.

1 Like

Jeezus this is frustrating! I have the same issue with the drag chain! Why is it so hard to update the docs with proper instructions? Drilling and tapping should not be required on this!

Did you get an official response??

Not really, but I didnā€™t pursue it, either.

I ended up taping down the chain after moving the switch to the inside, and havenā€™t had any major issues, although Iā€™ve noted it often hangs during the X homing about 5in from where the switch is triggered. Power-cycling fixes that.

Also managed to route the router or cable in such a way it gets hung up on the left Y rail when towards the front left of the machine :confused: That oneā€™s on me.

it often hangs during the X homing about 5in from where the switch is triggered. Power-cycling fixes that.

Reason: The homing cycle times out - if your machine is say in the extreme front left corner, it may not make it back to the home position before the timing cycle runs out.

Solution 1: Click MDI, type $H then click send, this will restart the homing cycle. If you are in CM4, just click ā€˜initialize machineā€™ again.


Regarding the interference: there isnā€™t a silver bullet to the interference, it could be several different factors. Iā€™ll list them off here, and we can use this as a troubleshooting list.

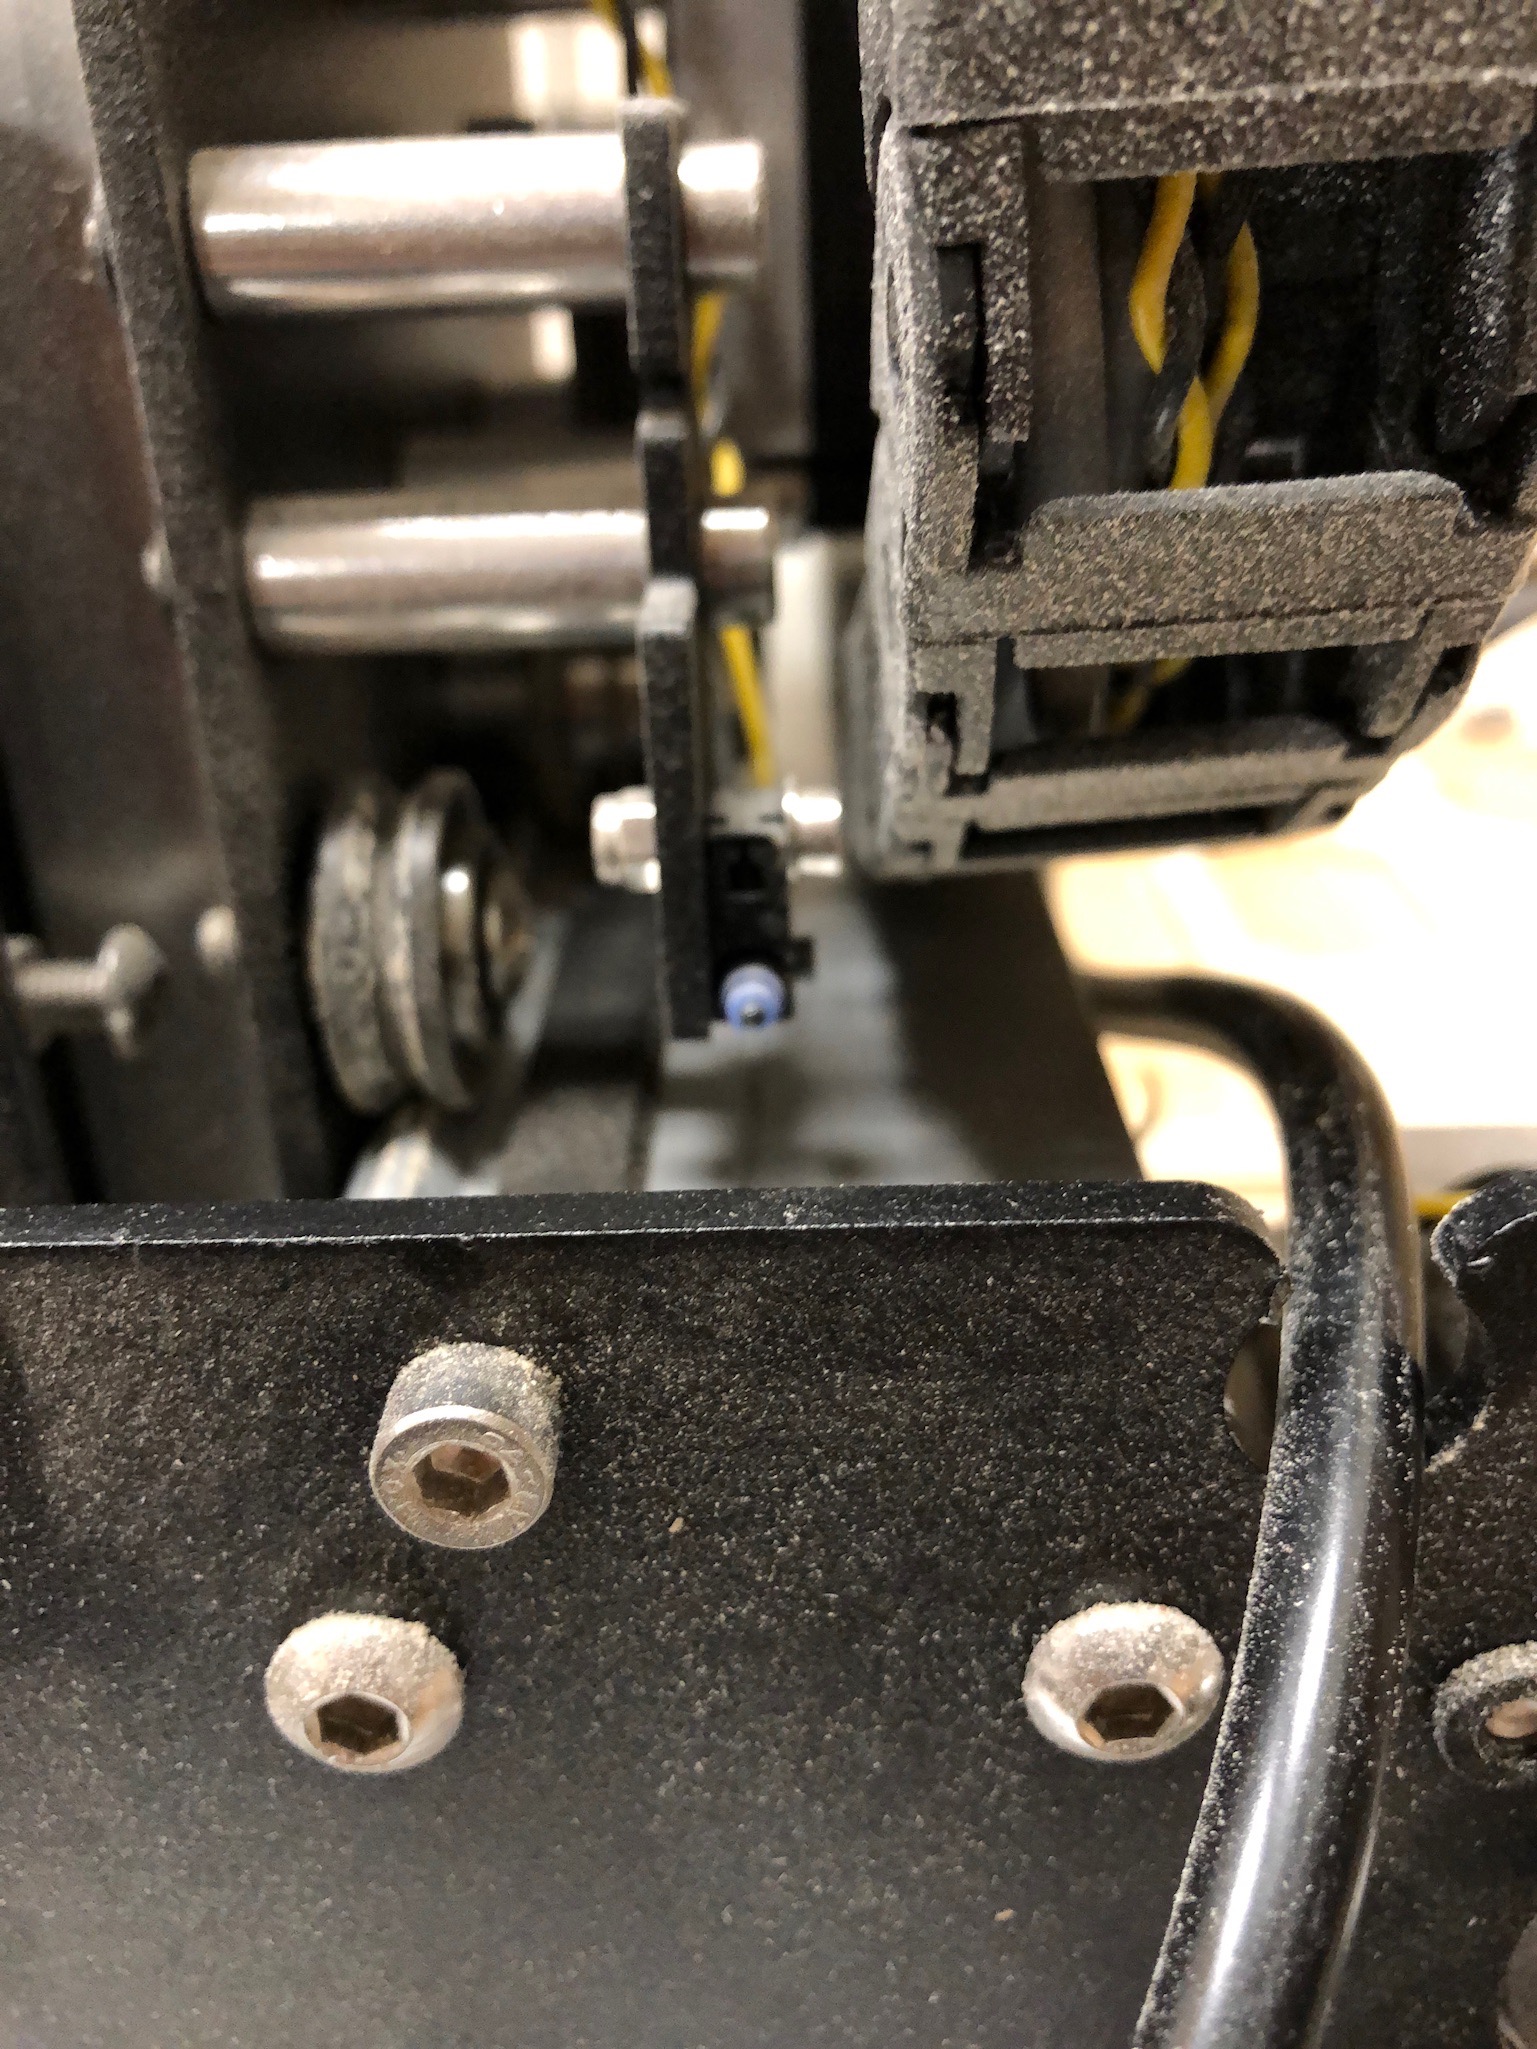
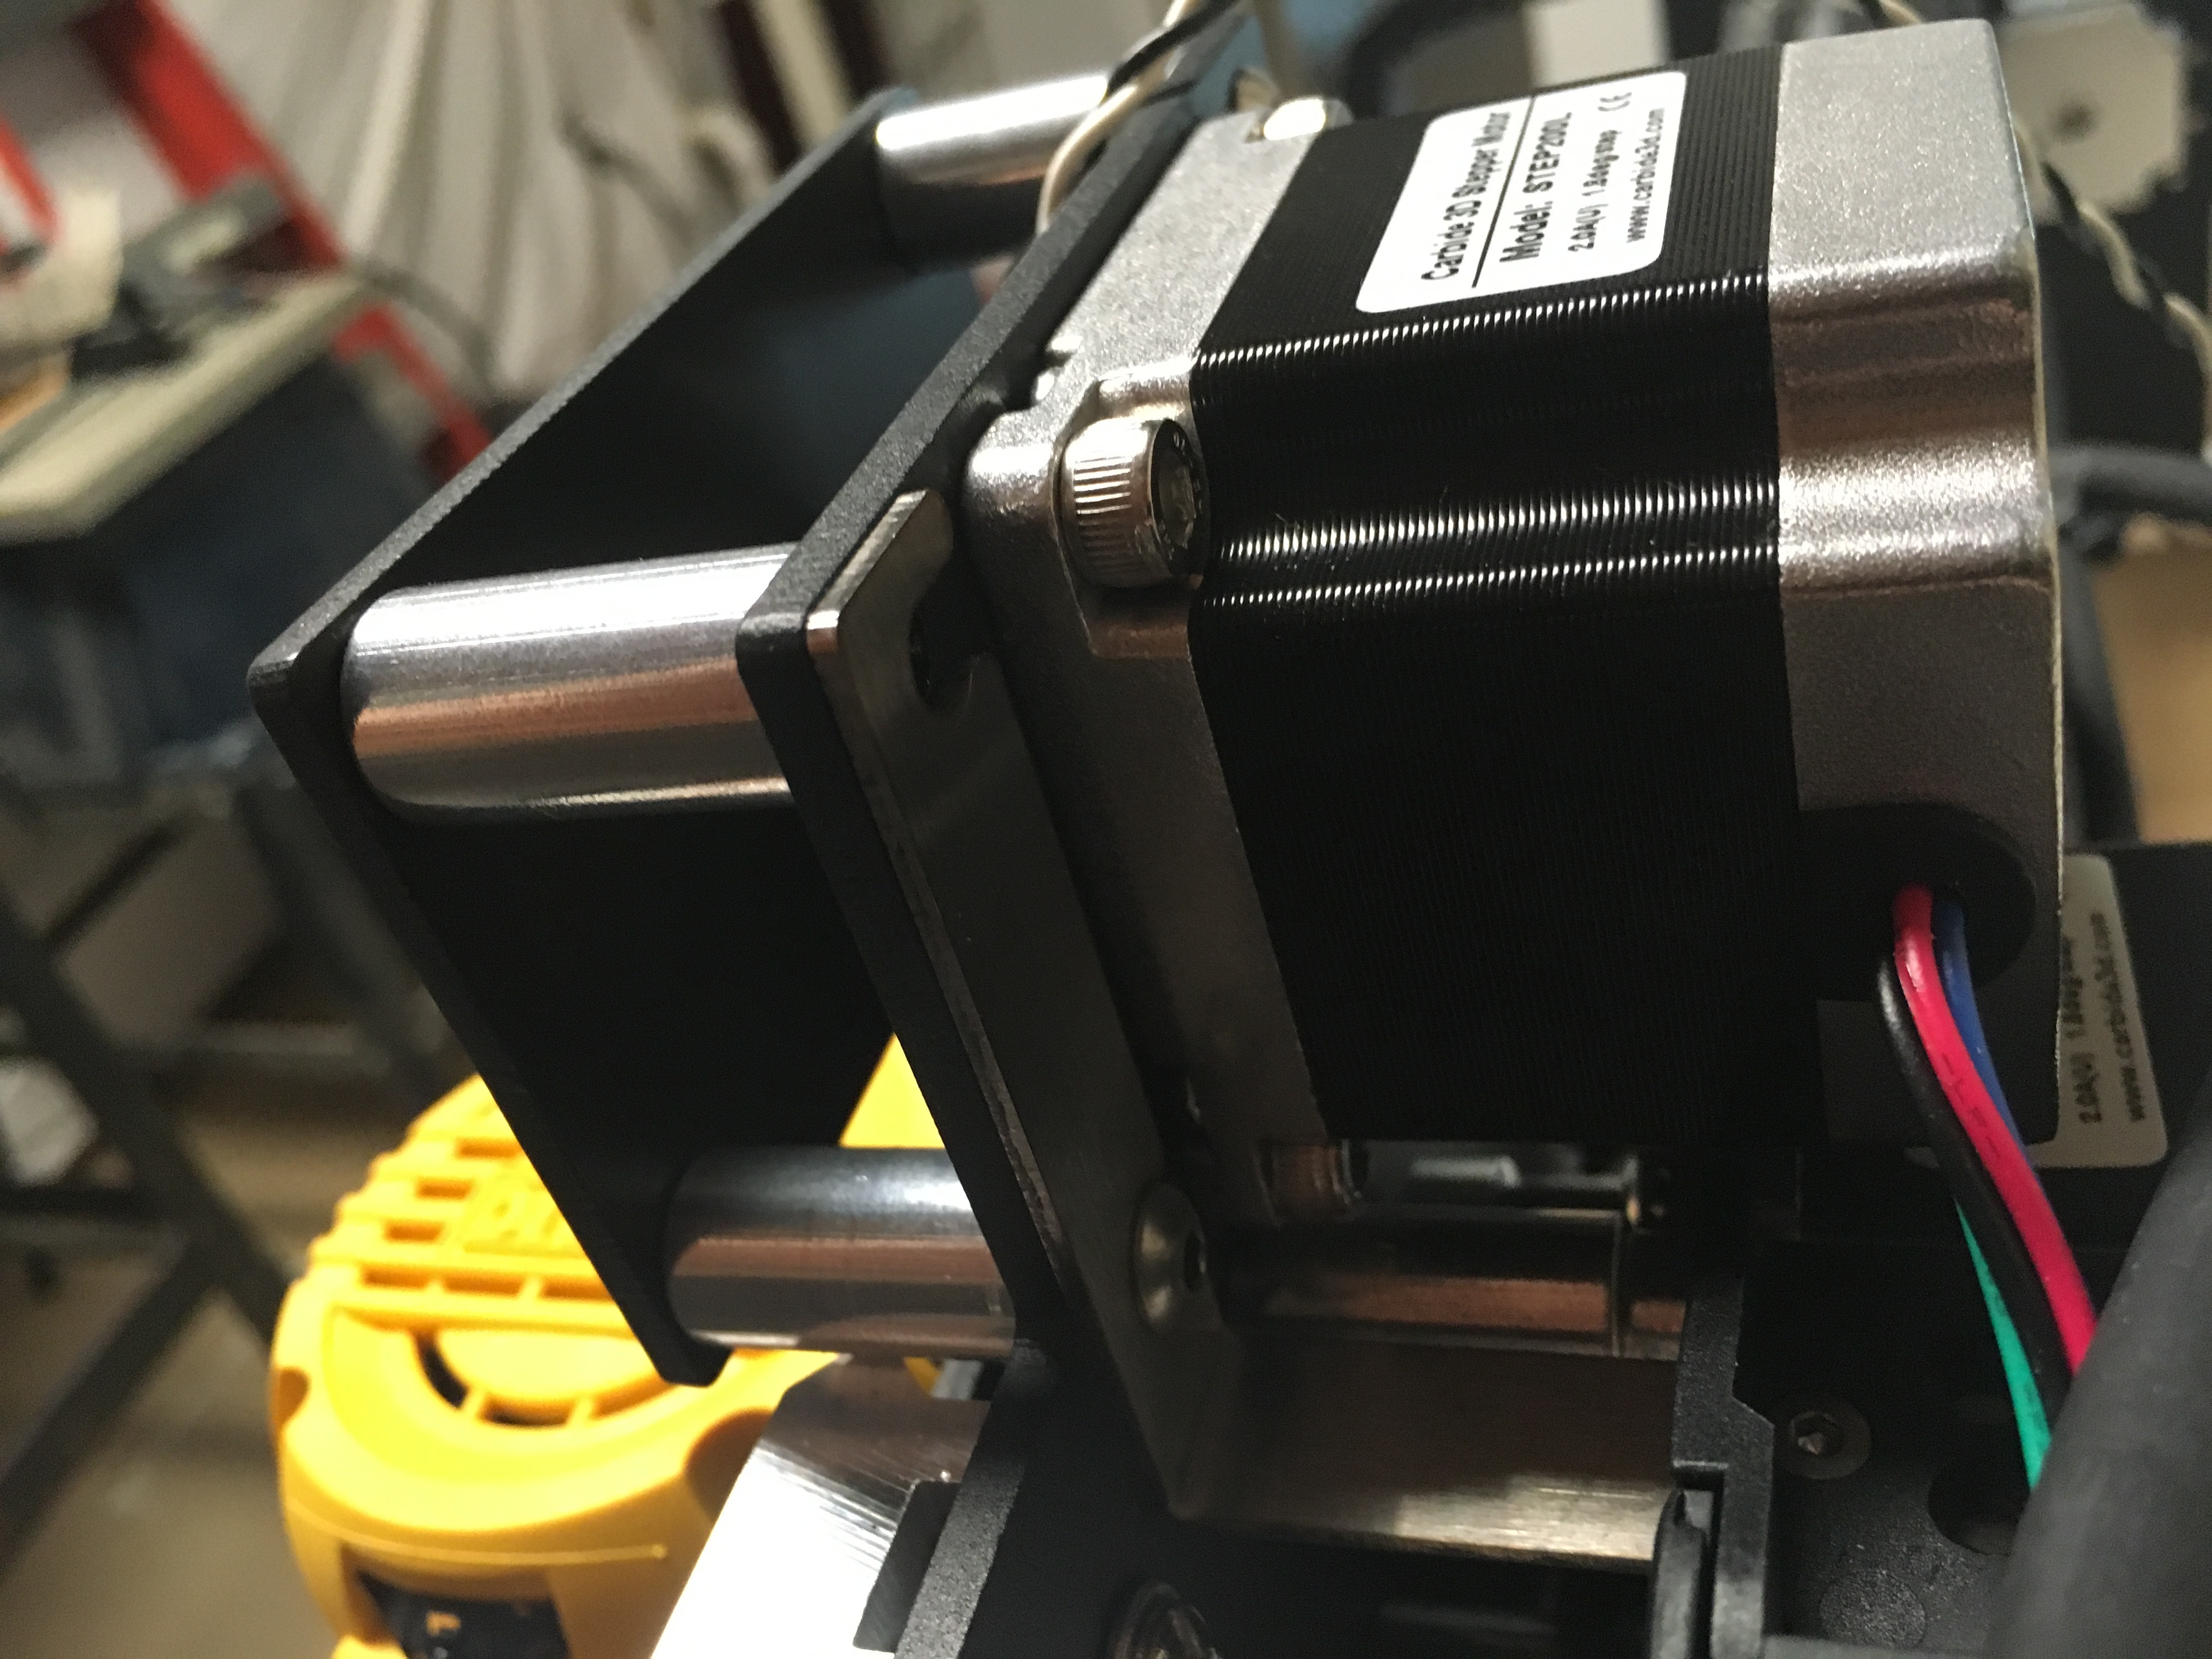
1.) The switch is on the wrong side of the plate. This should be less of an issue now that we pre-mount the switches to the plates during the pre-assembly of the wiring harness. Here is a picture for reference of a correctly mounted plate.

Solution: Move the switch to the other side of the plate. Make sure the screw head is on the opposite of the plate as the switch.

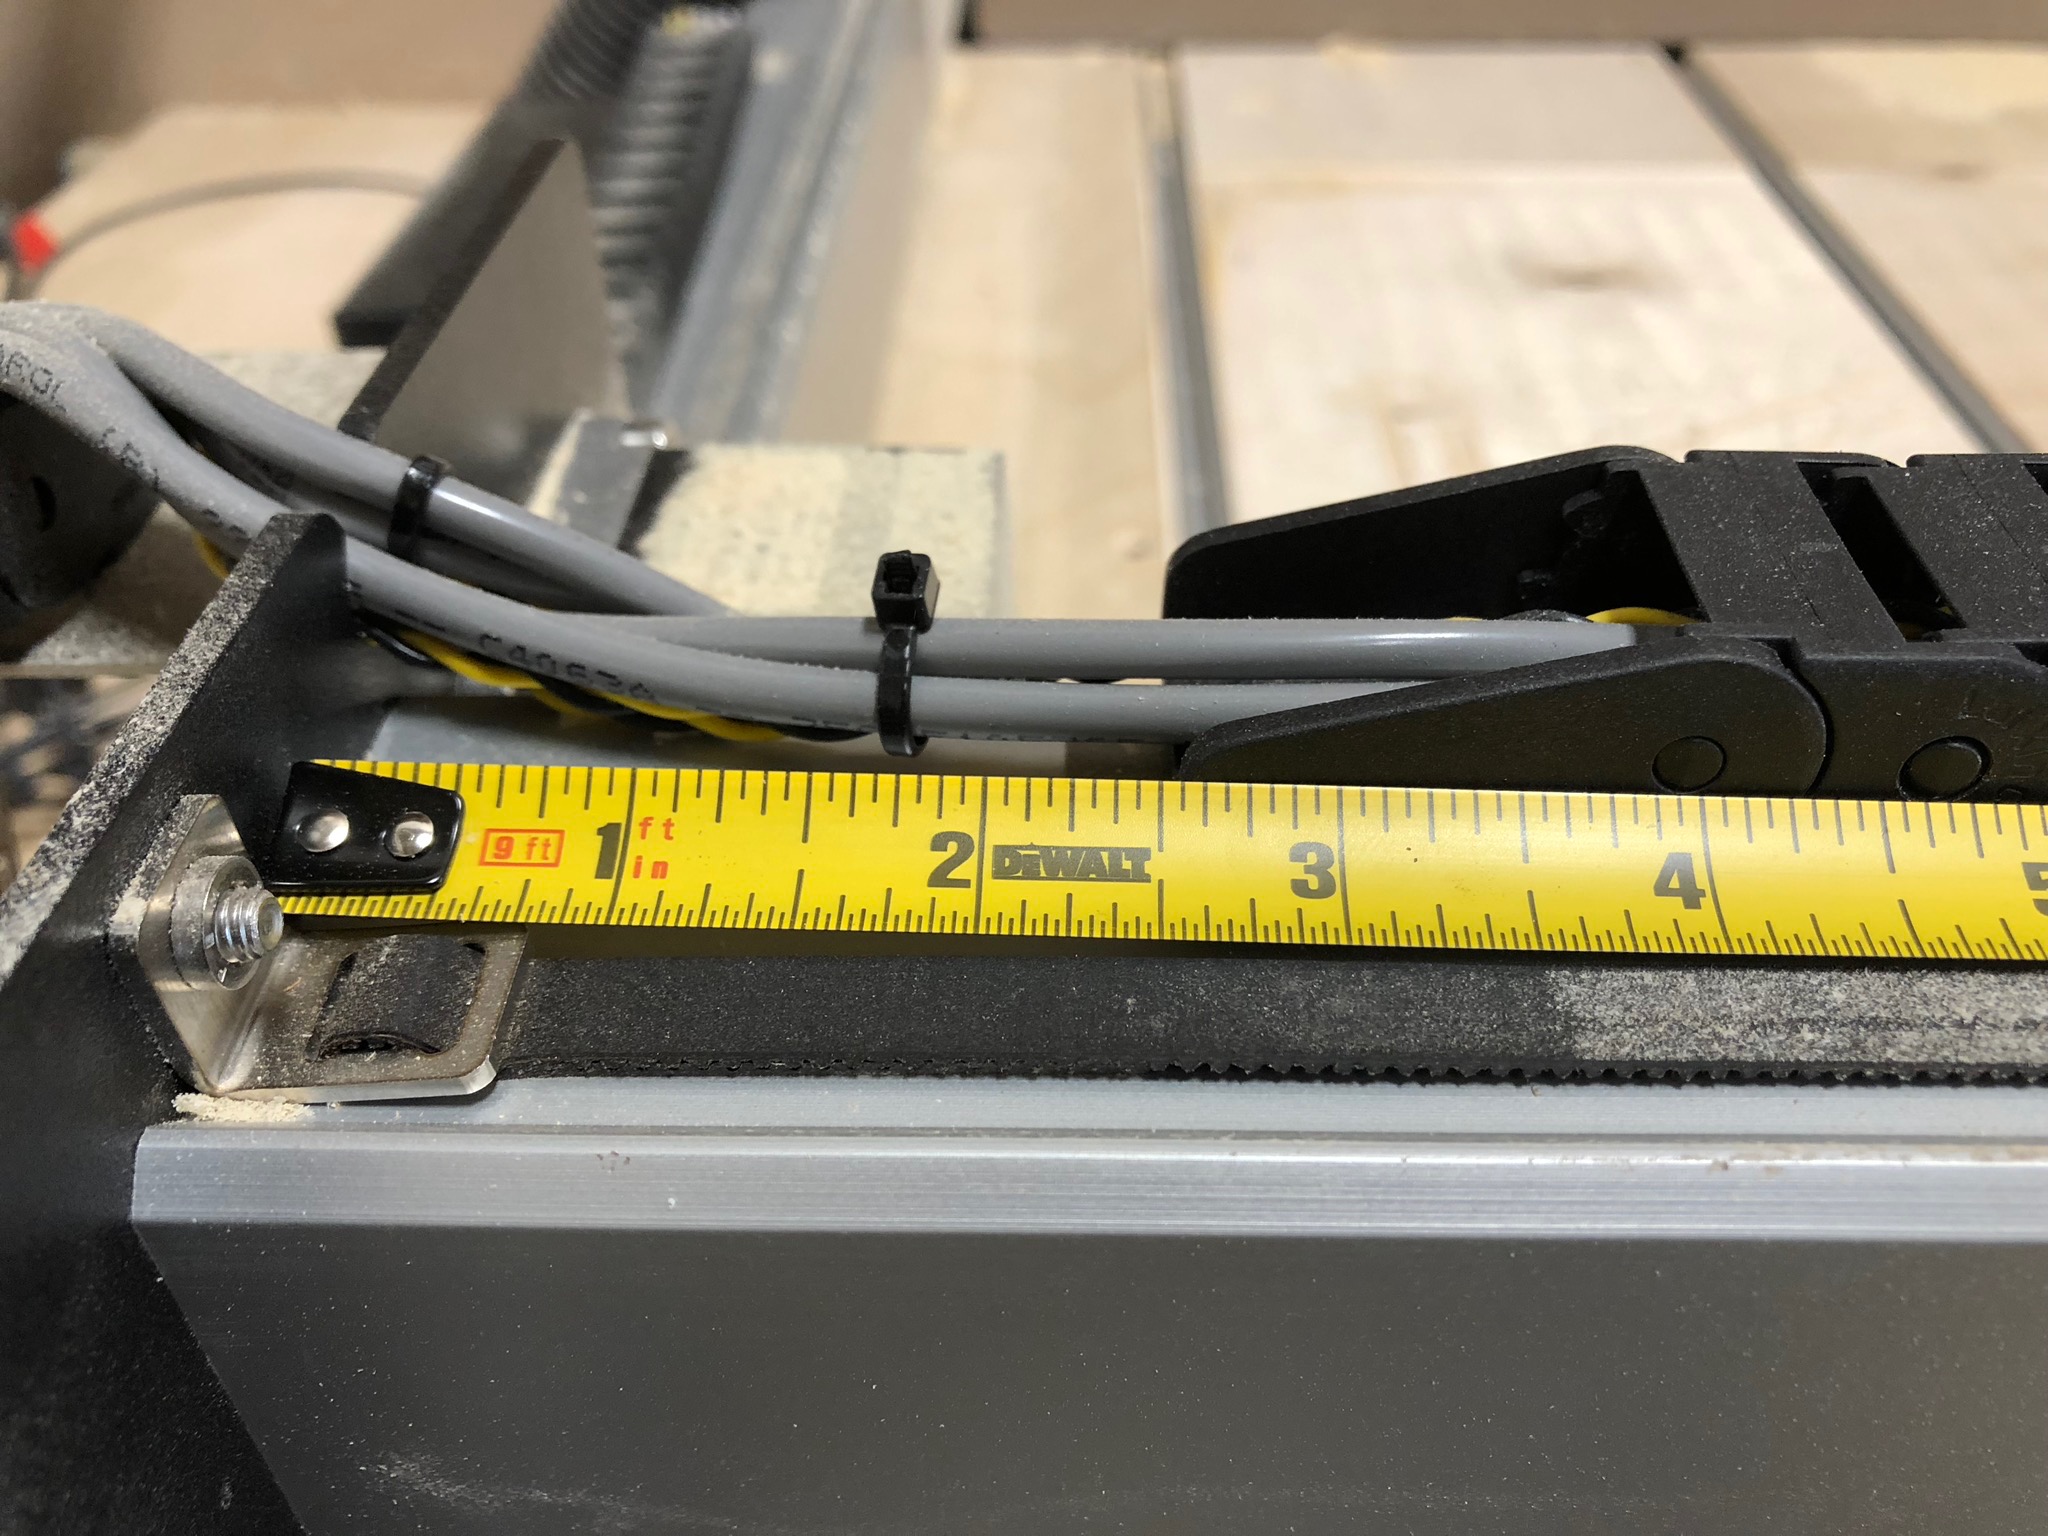
2.) The drag chain is too tight. That is, the spot where the drag chain end is taped to the extrusion is too close to the Y-left plate. For reference, the drag chain should be about 2.5" away from the left Y plate.

Solution: Adjust the end of the drag chain to be further away from the Y-Axis left plate.

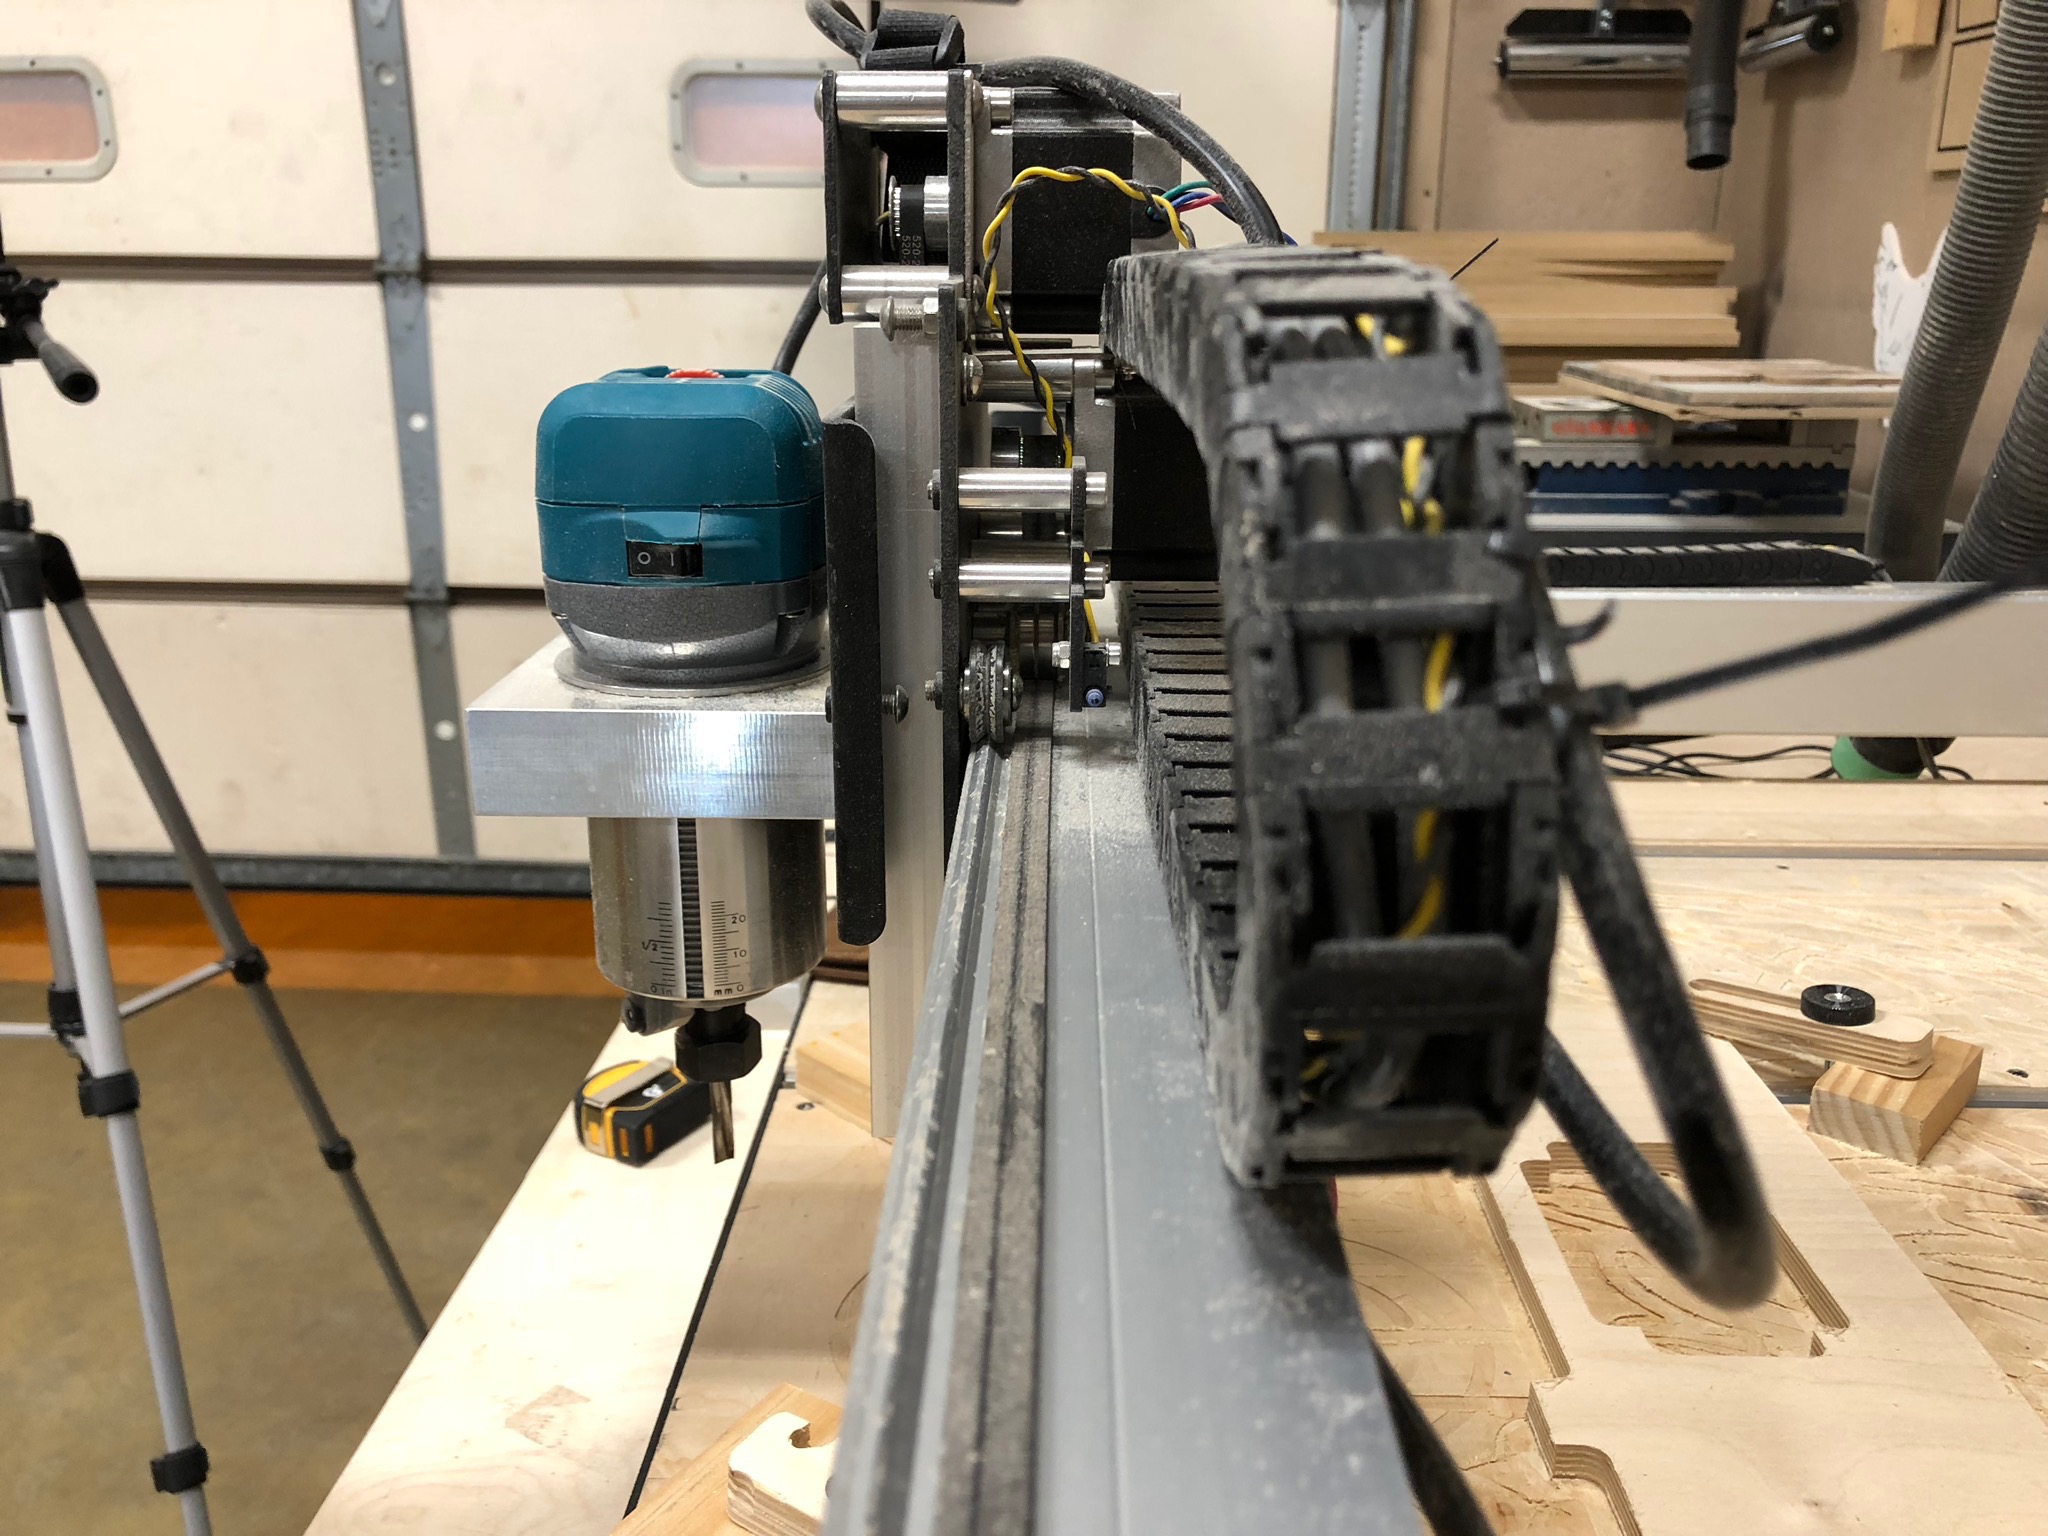
3.) The drag chain is at an angle towards the front of the machine. This will cause the screw head of the limit switch to interfere with the drag chain as it gets close to the Y-Right plate.

Solution: Adjust the drag chain so it is running perpendicular to the X-axis rail. You can even cheat this so itā€™s running away from the rail towards the back slightly.

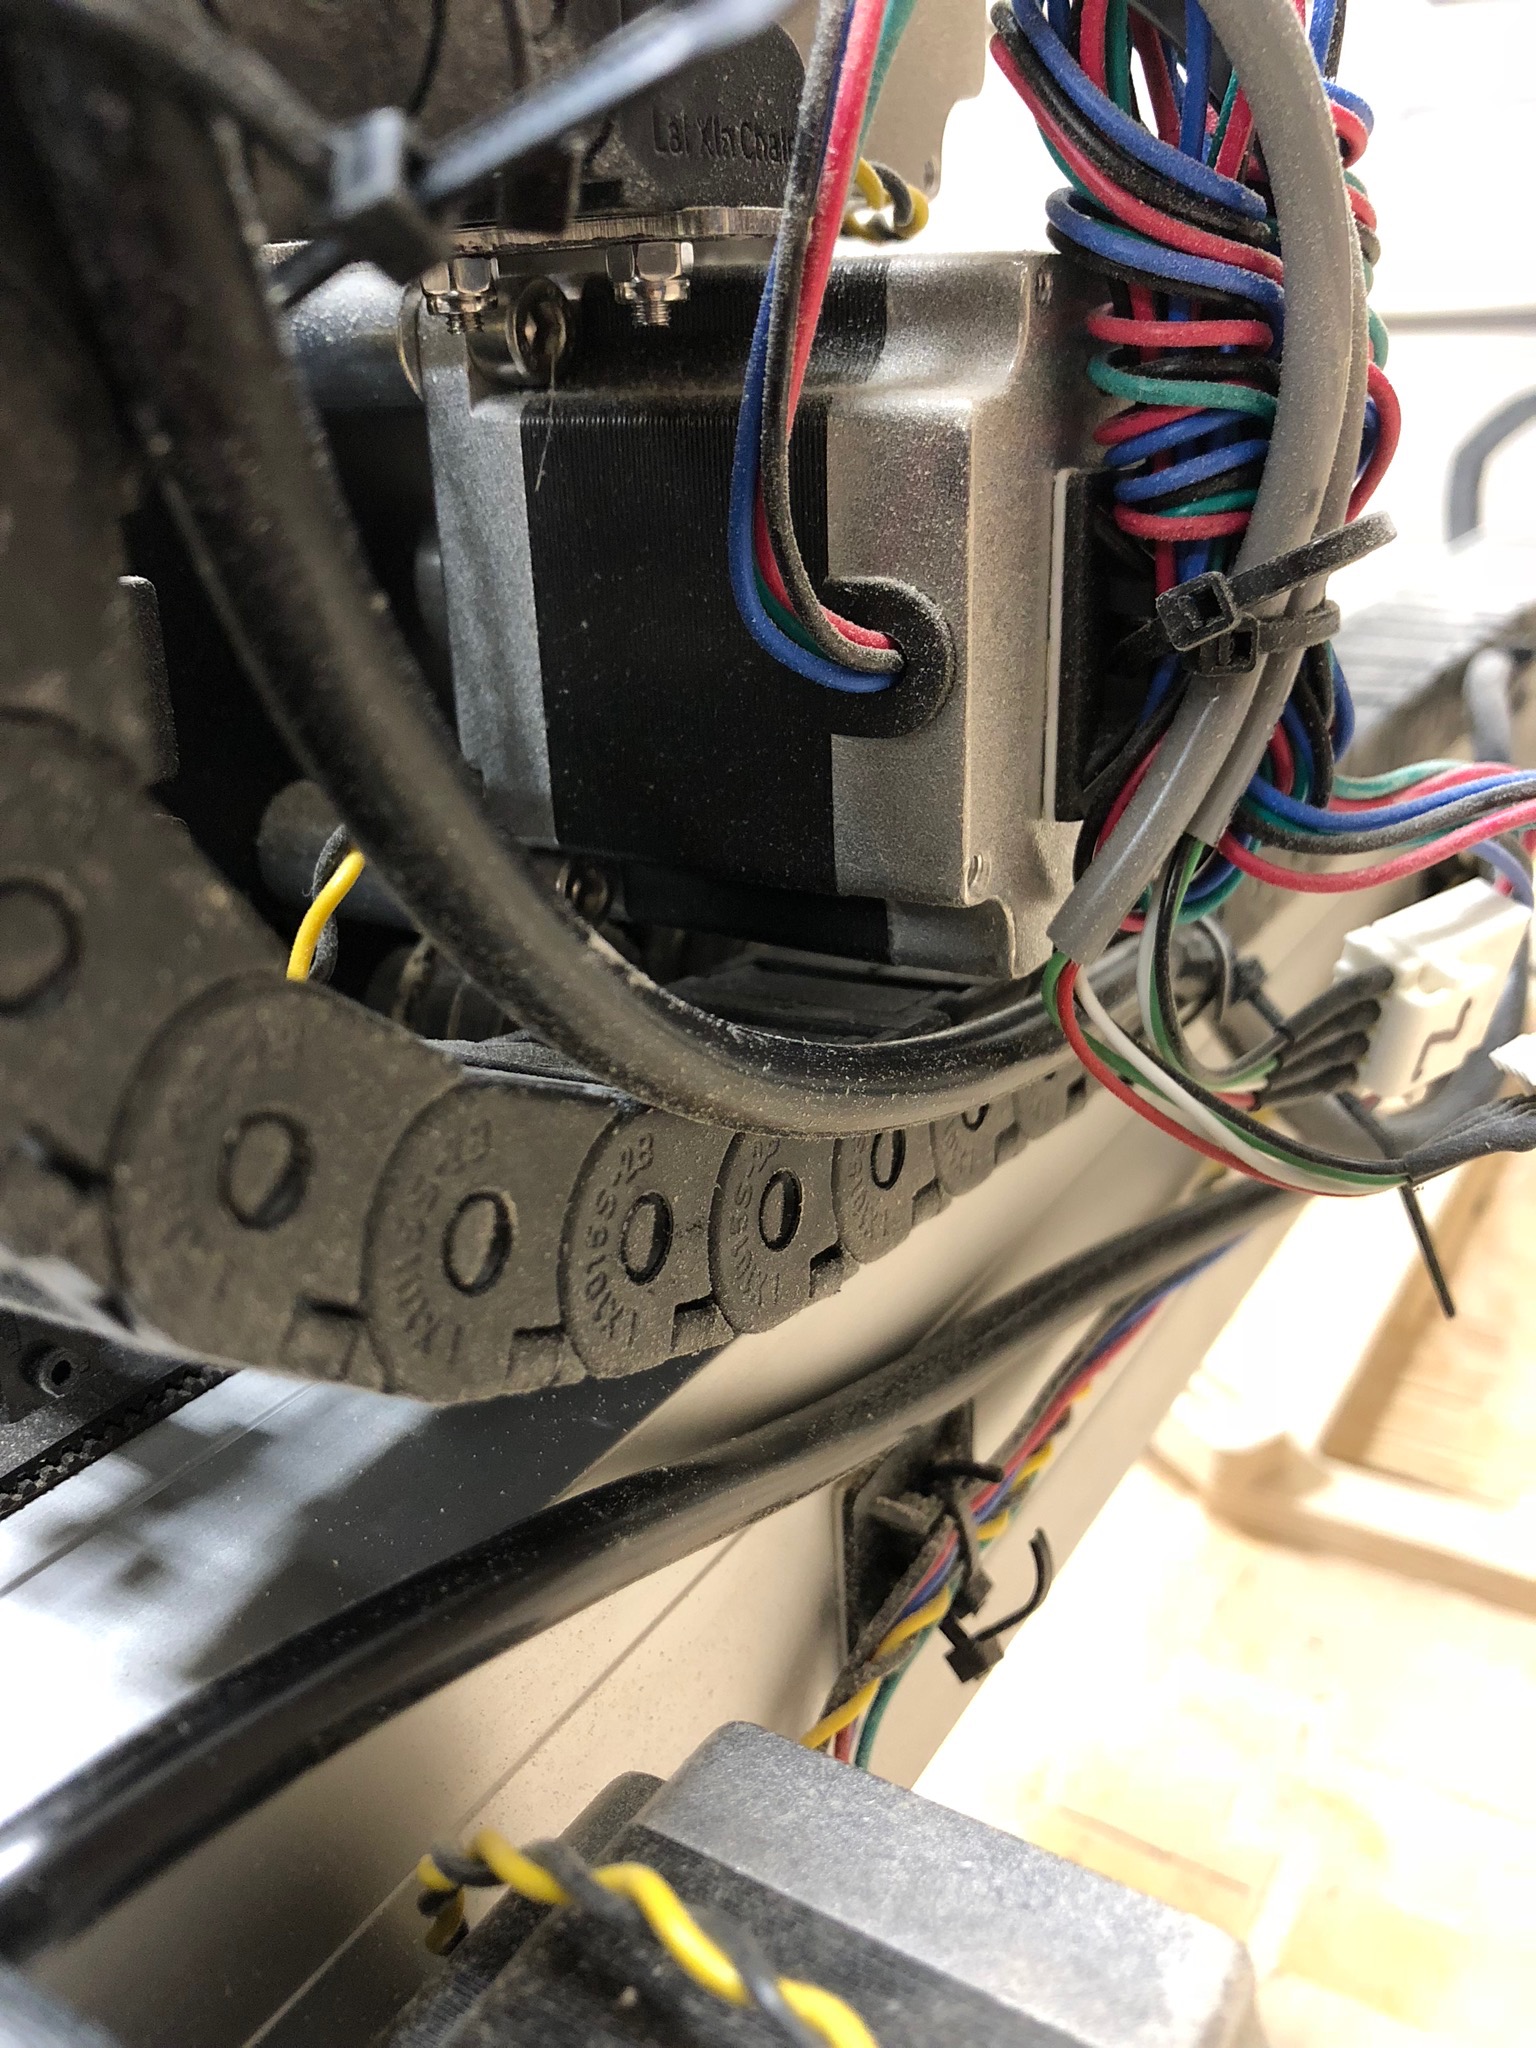
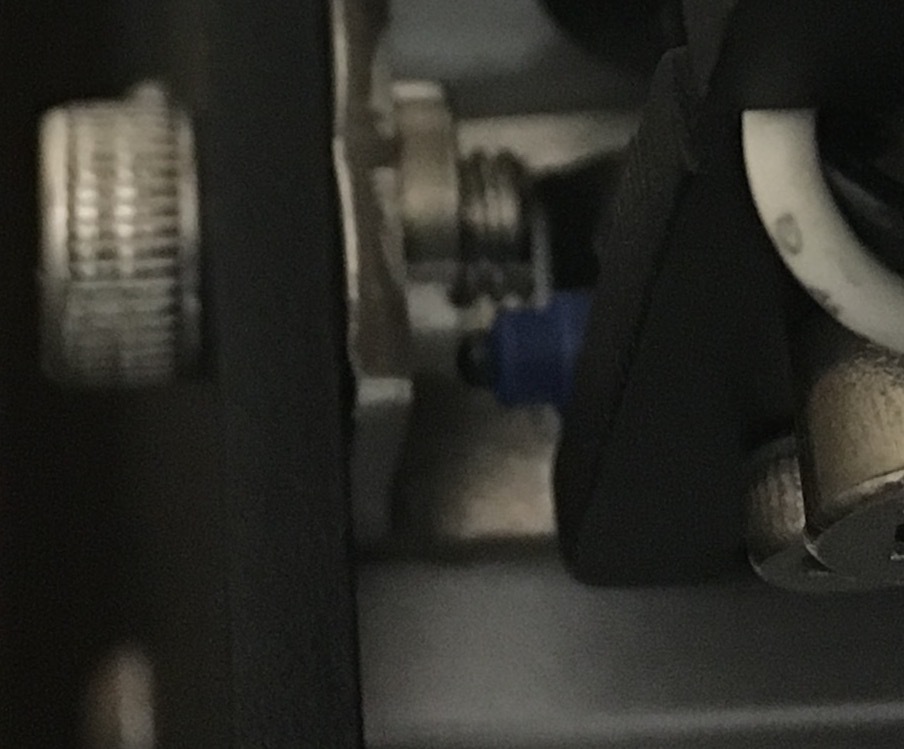
4.) The power cable for the trim router is binding between the X stepper motor and the inside of the drag chain. Hereā€™s a photo showing such a scenario.

Solution: Secure the router power cord to a better location on the drag chain. With the power to the machine off, slowly slide the X/Z left to right to ensure the interference has been removed.

Hope that helps, if anyone wants to see more specific angles, let me know.

_Edit: More ā€˜officialā€™ docs article can be found here: http://docs.carbide3d.com/software-faq/x-limit-switch-failure/_

-Edward

3 Likes