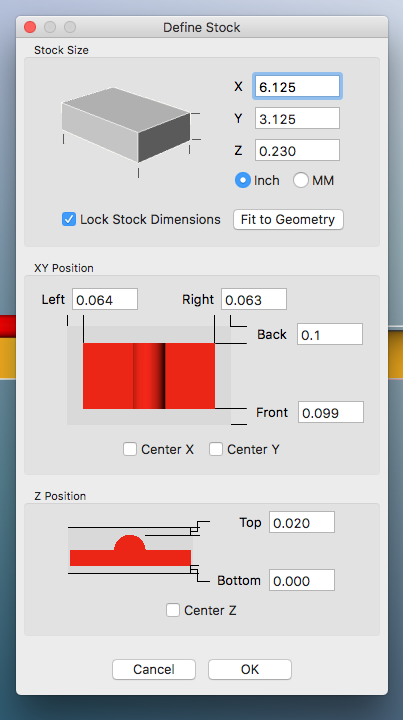
When defining my stock, I lock stock dimensions and then usually set my Z position to 0 as shown in the image below. You can see the Z top position is at .02. It seems like the default is .01 for top and bottom Z.
I guess I am wondering if I am setting this correctly?
@abrackney, MeshCAM defaults to “shrink-wrapping” stock to the geometery, and centering the geometry in the stock, if you define stock larger than the geometry.
At that point it’s up to you as to where to place the geometry in the stock. You’ll uncheck Center Z as you’ve done, but you decide whether you want the geometry flush with the top or bottom face of the stock. There isn’t really a correct or incorrect thing to do, just matching your design intent.
If your table or spoilboard is very flat and level, you might want to place your geometry flush with the bottom of the stock, and then MeshCAM will level the top of your geometry accurately with respect to the bottom face. Acrylic sheet, for example, has loose thickness tolerance and if you want a part with accurate thickness you’ll need to machine one surface. And that convieniently is the top surface, so you’d set the stock just as you have.
Thanks Randy! I think I understand a little better now. So the one issue I seem to have some inconsistency with it cutting through the bottom of my stock. I basically just want to barely break through. I am setting my z position to 0 like in the image I posted…I place my geometry flush with the bottom of stock. My stock is just slightly thicker than my geometry. Everything seems to machine fine, but I end up with about .01-.02 of a paper thin skin around my part. It could be I am zeroing off on my machine a little bit maybe? I do the paper under the cutter head trick and it seems to work ok.
Is there a trick getting the cutter to just barely break through my stock bottom?
Adam, your spoilboard needs to be very flat and level with respect to the X-Y motion. On my Nomad I skimmed the spoilboard very slightly to level it. In that case, when I fasten down stock that is even of variable thickness, I know that the bottom surface is at least level. This is where putting the Machine Zero at the bottom of the stock is best. Zero your cutter in Z on the spoilboard, and set Max Depth to be .01" or whatever above the bottom of the stock. Or if you are using supports, leave Max Depth at its default at the bottom of the stock, and put wide but thin supports around the perimeter at the bottom of the geometry. When you define the stock, make the bottom margin 0. That will be the best you can do.
Typically what I want to do to just barely break through is define my stock as slightly thicker than it actually is. E.g. for a 0.25 inch thick stock, I’ll make the depth of cut (or thickness of stock) around 0.26 inch depending on how flat i trust my stock to be. Since you say you have a 0.01 inch or 0.02 inch thin skin, i’d suggest making your stock 0.02 inches thicker.
You can also just set the z zero slightly lower as long as your bit, feeds & speeds can handle cutting the additional material in the first pass.
Now if your only doing 1 sided carving this is great, but when you get into flipping things you could end up overcutting the middle.
Also, I’ve found measurements need to be pretty exact… meaning even though it’s 1/4 inch MDF, it may actually be 0.26 inches thick. so if I specify 0.25 depth of cut (stock thickness) i’m left with 0.01 inches of material.
Is the paper thin skin consistent around the entire part? if not your spoil board may not be ‘level’ to the x/y axis. Search ‘surface waste board’ or ‘surface spoil board’ for more information.
Thanks for help! I actually tried adding on the .01 extra thickness to my stock and worked great. Cut right thru to my holding tape but not into the spoilboard. Thanks!
To add to this, a pair of calipers to measure the actual material you’re going to use is in my opinion essential. Sighting a ruler just isn’t good enough for consistent results. Doesn’t need to be an expensive caliper for this. There is a difference between a $30 caliper and a (genuine) $100 caliper, but it might not matter to you. Buy plenty of batteries ahead of time because cheap calipers go through batteries a lot faster than you would think they would. AvE has a great cheap vs. good video here: