I really liked the ebonized look, except I found it difficult to get down into the open grain of the wood — my solution then was to use shoe polish, but subsequently spraying that with laquer resulted in a more delicate finish than I prefer.
In retrospect a better solution would have been to follow up the ebonizing solution with a dark stain which would get into the open pores.
I need to make a new case, but still deciding about materials and so forth — it’s also a bit challenging since I want it to accommodate all the possible variations I can put together now:
56" bow made from A-handle and #1 limbs
60" bow made from B-handle and #1 limbs
60" bow made from A-handle and #3 limbs
64" bow made from B-handle and #3 limbs
(and my cheaping out and not being able to justify buying Macassar Ebony for the case when it was recently on sale at Woodcraft — probably I’ll use bamboo flooring as a more affordable/sustainable option)
That does sound like quite the design challenge. Please keep us posted! I have spent afternoons playing with other coloring/finishing methods but I keep coming back to “custom” stain mixes and properly applied polys and lacquers due to my comfort/experience and ease of applying them.
Finishing is quite the art/science — I tend to stick to the traditional stuff (ebonizing, walnut oil, bee’s wax, spray lacquer) — there was a nice writeup I found on the basic principles which I came across ages ago which I’ve always regretted not capturing into the wiki.
I really want to try some walnut oil (off to amazon I go). From the pictures I have seen, it looks like it leaves a beautiful finish if the project is sanded well enough. (I guess that applies to any finish, really)
Edit: trying to avoid unnecessary “Bumps”. I love Mirka Abranet products for sanding bare wood up to high grit levels. Kinda pricy, but they last a long time and allow good removal of the dust as you work.
Actually, I just use walnut oil from the grocery store. For sanding I have a micro-mesh pack (which I need to supplement with a second which I can dedicate to wood).
I have been meaning to try the Mahoney’s product though, and there’s a “Walrus Oil” finish I’ve been curious about as well.
Great links Will thank you! I was all oh wow im getting some Bruso stainless steel parts, then I saw the price and said nawww… 175 for a single 5 inch hinge!
Yeah, I thought about mentioning Brusso, but I’ve never been able to bring myself to buy any — that’s a big part of why I want to start making my own (though at the prices of nickel silver these days, there’s not much savings).
It would take a very long post to explain exactly how my CNC hobby came to be, and how it kind of haphazardly crashed itself into my carpentry/woodworking business. To keep it short, a little bit of both. But the demand for the stuff coming off my CNC is growing quickly and I hope to have another machine up and running here soon enough.
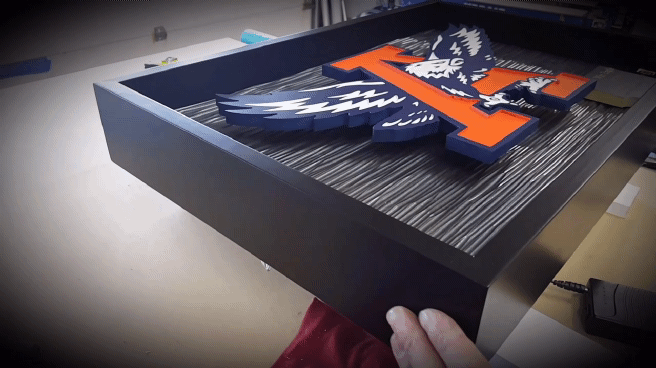
The backlit sign is made completely of wood. The eagle was masked and painted. The rabbets and switch pocket for the frame were cut with the shapeoko, along with the standoffs. I would usually cut the rabbet on my router table, but it is less than safe and I value my fingers more than 15 minutes of my time. I glued small threaded inserts into the bottom of the standoffs which were then glued and tacked to the back of the eagle. I drilled slighlty oversized holes through the back board matching the placement of the threaded inserts in the standoffs and used corresponding screws to secure the eagle in place. I did this to maintain serviceability just in case of any failure, whether it be an LED strip or my wiring connections.
I had just been messing with some ttp223 modules about a week ago to use for a similar reason on a student’s project. Did you use a similar module? Did you have to pocket out a space for it?
I didn’t use anything that involved. Just a simple touch switch made for 12-24v RV lighting. I found it on amazon. The listing claims it will detect your finger/hand through 1.25" of wood. In reality, reliable function starts to get “iffy” around .75" or so. I cut a pocket in the frame leaving about .2" of material between the switch and outer surface of the frame. If you look closely at the last picture of my first post you can see it on the lower right side.