Hey all. Ive been running the Shapeoko Pro XXL machine through my macOS for a while with no issues. Received it less than a month ago.
Today i tried running the machine through an older windows PC, and when i tried to initialize it, the bitsetter probing cycle failed. Message says: “Probing Cycle failed”. I switched back to my new MacBook and got the same error which didn’t exist beforehand.
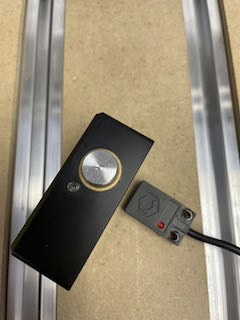
The red light on the bitsetter stays on and doesn’t turn off
While probing, the spindle goes down in the z axis for about an inch, and then stops.
In settings, it says that grbl active pins are “PROBE”
I’ve reattached all the wires and everything is still connected how it was before when the machine was working fine.
Unsure where to go from here and would appreciate any and all help
Sent the email. I have a project I need to get done in a couple days so hoping we can resolve this issue by then - do you know if I can just get on a call with someone on the technical side to troubleshoot tomorrow?
I was in this position last month where I thought I couldn’t get a job done because it had to be done on the Shapeoko (3, no bitsetter or runner) because of the size and I was used to being prompted to change bits on the Nomad for more complex jobs. I didn’t think to just run each tool path as a separate file.
I have an issue with cold temperatures. When it is lower than about 45 or 50 degs the light on my bitsetter stays on and it doesn’t work. When the temps return to a civil level, the light goes out and it functions fine. I guess the shapeoko doesn’t want me to be uncomfortable in my shop.
Please let us know about this at support@carbide3d.com — pretty sure the temperature range for the switches should be wide enough that most folks wouldn’t be willing to work on the machines at the extremes.
I am also having this issue - but on a brand new machine (ShapeOko Pro XL). The light is always on. After the request for tool change, the axis will center over the button. The z-axis starts to travel downward but stops after 1 or 2" of travel. I also receive the same error “Probing Cycle Failed”.
Wiring is backwards on the bit setter. Switch the blue and black wires on the connector at the bit setter. Easiest way is to just file off the little tab that only allows the plug to go in one way and flip the connector over.
To test the bit setter
Open Carbide Motion
Click on Connect to Cutter
Click on Settings
Look on the bottom of the screen where it says no active pins
Press the bit setter button and the “No Active Pins” should change to “Probe”.
If it doesn’t the wiring is incorrect on the bit setter.
I had the same issue with mine and i had to switch the two wires connected to the bit setter.
Either switch the wires or just file off the small tab on the bit setter connector and just flip the connecter over
I had the same issue - essentially the sensor inside the bit setter is too high and is always triggered (light on), assuming the button is not stuck in the depressed condition. We fixed it by taking the bit setter off the machine and taking it apart. Inside you will see a proximity sensor mounted with two screws and locknuts (a little difficult to remove). We sanded the bottom of the sensor a little to make it sit a little lower in the housing and the reassembled. The fix takes about 30 minutes. Reverse wiring will not cause this issue (confirmed by testing).
You can also test the bit setter wire by pulling the excess out of the frame and connecting it temporarily to the Z-Axis proximity sensor (leaving the other end on the board connected to the bit setter input). Trigger the z-axis sensor with a screwdriver and you should see a blue light on the board. This is quick way to confirm that you board is working and the wire is in good order.