I build cabinets and my typical door size is 12" wide and 32" tall. This led me to choose the SO3 XXL as my choice of machine.
Having assembled my machine I have started to look at the ways I will set up my jigs/waste board and alignment guides to make quick work of repeatedly placing board because with my cabinets, I have two doors and when all is said and done… I need to make sure the designs line up when the two doors are attached to the cabinet box.
So… I am on the waste board portion of my journey right now. I have cut a second piece of MDF 39"x39" and placed it down on the stock MDF surface. I have marked out the X axis extent of travel and I am going to secure the edges with screws without much more than just slight countersinking since I know the machine can’t cut out past these marks I made. I’ll do the same along the back end. Then form the front and along the cuttable area, I will be sure to countersink screws at least 3/8". So far, so good I think.
Where I am confusing myself and I really want to get this right the first time is how I want to set up to run my jobs. Obviously, I want to place my door blanks on the wasteboard so it is square to the Spindle travel along X/Y axis. Best way to do this seems to be to mill a 1/4" groove that will be used as a guide to line up two edges of my blanks… So far, seems about right.
But, since I have to OVERHANG my blanks in order to utilize the full capacity of the machine it seems that working my preferred zero point of the lower left might not be the best choice since I would need a 3rd piece of MDF which could overhang. Maybe I am better going with the stock home position and setting my projects up that way?
I am not too crazy about that though because the way I set my machine up, the back edge ( which is the stock Zero point ) is against a basement wall and that means everything will run upside down to my view of the machine… if that makes sense to you from the way I am looking at it?
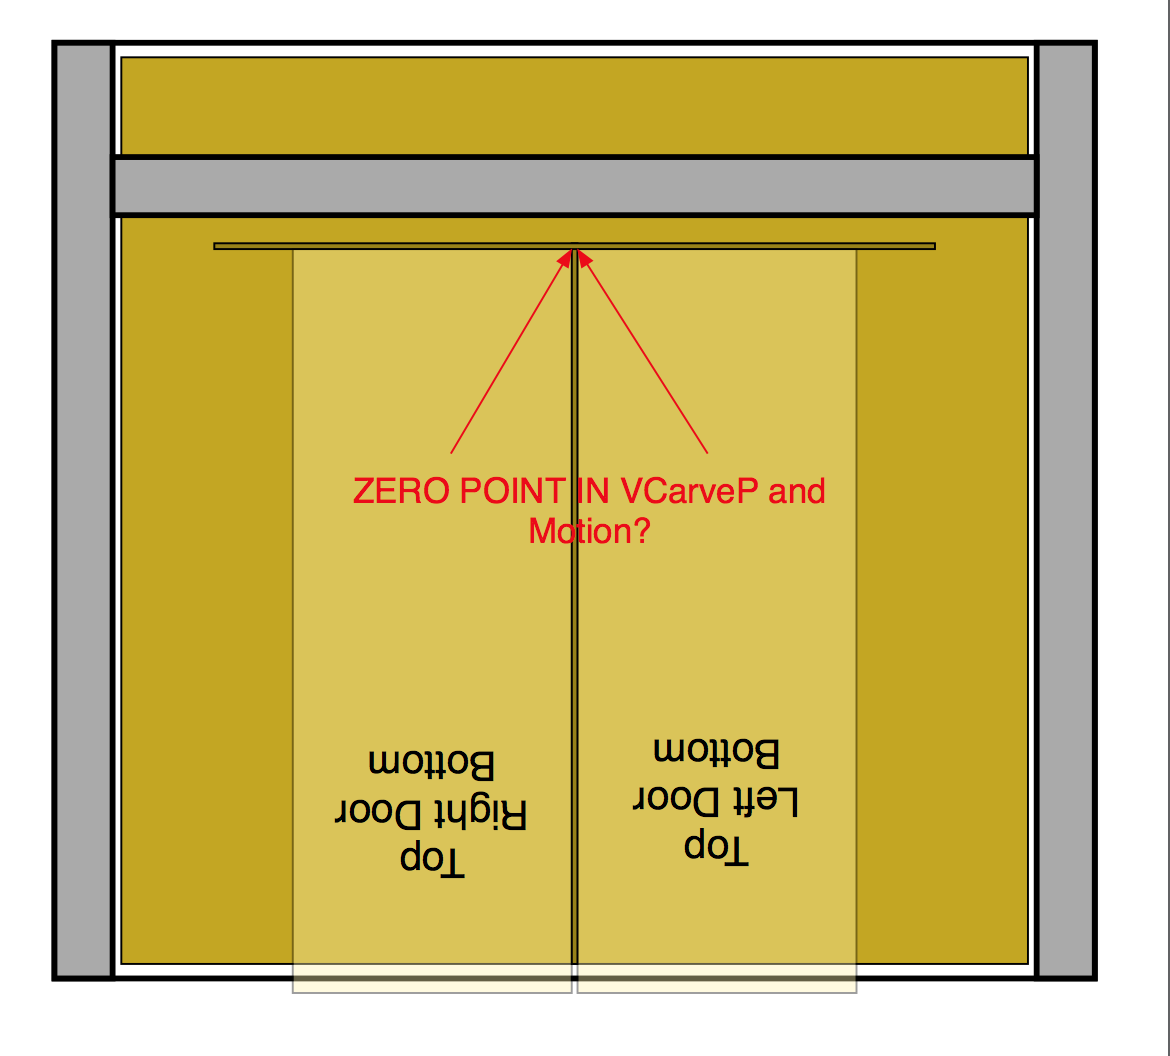
Maybe I would be better served setting my guides in the CENTER of the wast board ( like above ) since there is plenty of room for the 12" width and then setting my projects up as indicated in this next image…
Idea seems sound from a jig perspective, but I don’t think you are correct that things will run upside down. You should be able to set the zero point in VCarve in the top center of your design and everything should appear right side up to you as you are facing the machine. If you are doing two identical doors, you can just have the same design as a repeated image in VCarve and do it all at once with the same zero start point.
However, I would recommend personally a separate zero for each door. If your doors are not precisely aligned in your jig, you could wind up with one slightly off from the other.
Also, how are you planning on work holding your door blanks in place? And you are going to want to surface the entire portion of your supplementary wasteboard or it won’t be level. For this reason, many folks opt for a second wasteboard which is small enough for you to cut the entire surface, sort of like an island.
Idea seems sound from a jig perspective, but I don’t think you are correct that things will run upside down. You should be able to set the zero point in VCarve in the top center of your design and everything should appear right side up to you as you are facing the machine. If you are doing two identical doors, you can just have the same design as a repeated image in VCarve and do it all at once with the same zero start point.
Looking at the job setup screen it looks like the options are Top Left/Right, dead center and Bottom Left/Right as the zero point in VcarveP - I am only getting started so I might be wrong but this is what I see available on the Job SetUp Screen
It occurred to me that this would likely be the way I set this up. I generally have always made my blanks oversized and then trimmed them down on the shop saws.
Initially, I was going to use screws as I test out a few files where I am lining up the elements across a set of doors… The cabinet doors don’t feature a full design on each door but rather the full design is split across the set of doors.
I might pickup another sheet of MDF but 1/2 and make an island like you mention. I thought that if I level the surface of the max cutting area I would be fine. I do understand there will essentially be a shallow pocket in the 39x39 waste board, along the X axis and at the back of the Y axis… Maybe that is not the best idea for some reason?
For workholding, screws will work very well, as long as they are outside the path of the mill, and of course outside the area that will be the finished door. I will check what VCarve says, but I believe you can utilize any of the four corners or center of your design. However, you can use the Offset function in that same job setup screen to achieve a top / bottom edge center zero. More here in the manual: https://docs.vectric.com/docs/V9.0/VCarveDesktop/ENU/Help/Drawing/uiSheetForm/Job%20Setup.html
I wouldn’t say that your wasteboard idea is really right or wrong, but it might be easier to have the “island” board setup so that once you surface it, the XY plane of your wasteboard will be perfectly parallel to your machine’s X-Y travel plane. If these two planes are misaligned, and you don’t shim your work piece from the bottom, you will run into problems for example in Vcarving or relief carving because you won’t get consistent depths of cut because of the variance in height across your work piece.
I would think it would be easier for alignment to use some wood blocks as stops (as opposed to the alignment groove idea) screwed to your wasteboard so that you can align your workpiece the same every time, similar to how you would make a jig in other general woodworking applications. That way, once you have all your setup complete and tested, you can slap a work piece in place, use the same zero (assuming work piece boards are same thickness and dimensions), and repeat the job. Or run a left half, then right half design. Or run all your lefts, and then all your rights. The key idea is repeatability.
Thank you for the link on using the offset. Lot’s of things I have to think about now that my previous machine ( Carvewright ) just automatically did for me. Before I go through the trouble leveling the current waste board, I am going to run a few tests just splitting some text and simple vector shapes across some MDF blanks to make sure I am getting all the “zero” references correct between VCarve and CM. I already got some unexpected results tip the reference grooves I carved across the X/Y axis centers.