Need some help. Today I wanted ton engrave a design on a box top. I decided to run a test on scrap 1st to see how it would look. The test piece of wood was the same dimensions as the box top and I had the piece centered in carbide motion. I set it to run and it engraved on the centre of the X axis but was 1/16 inch of an inch out on the Y axis. What do I need to do to correct that? Any help is appreciated.
How did you set zero?
I find the most accurate way to set zero for center is to use a V endmill.
For this sort of work where dimensions/placement are critical I usually secure a bit of sacrificial stock (or a layer of my spoilboard) and route out a pocket matching the part I want to cut, place the piece in the pocket and secure it, then cut.
I use the bit setter. I also set it manually using a 1/16 inch bit as I thought my bit setter may have misfunctioned. same result both ways.
I am relatively new to this. perhaps my home settings are not right? don’t know how to do that. also when I initialize the machine it goes to the back right hand corner and grinds loudly for a second or two before moving slightly and the grinding stops. it then comes to the front center for installation of a bit.
check that a " v-wheel" is not hitting a belt clip and that the belt is cog in cog at the clip.
That noise might be from the idler pulley climbing on a mis-stacked belt, or a v-wheel colliding with a belt clip.
or a limit switch
1 Like
How did you position the BitZero for center?
I placed the bitzero on the lower left hand corner of the wood. Then probed for x,y,and z.
If you are experiencing grinding you need to look for mechanical problems. As mentioned the belt tension clips can be in the way of a v wheel or maybe a router power cord can get caught between the bracket and home position. Turn your Shapeoko off and manually move your X and Y directions fully from end to end. Move slowly because EMF is generated by the stepper motors if you move too fast. Depending on what type of Z carriage you have you can move the belt driven one fully up and down. If you have Z-plus and/or HDZ it is not likely you have a bind on those but you can try to turn the ball screw to see if there is any binding. V-wheels, stepper motor pullys are the main culprits. Clean your v wheels with a stuff nylon brush and clean the alum extrustions with a 3m finishing pad the white (fine).
-
The belt tension brackets have to be held in place with a pair of pliers as you tighten up the allen screw, If you just tighten them up without holding them they will twist from the torque of the screw.
-
If you need to adjust your v wheels then use an allen and a wrench. Loosen the allen and turn the wrench to tighten/loosen the v wheel. When you get the v wheel where it just does not move with finger pressure, hold the wrench steady and tighten the allen screw. If you only tighten the screw and not hold the eccentric nut it will move and you will either have a wheel that is too tight or too loose.
1 Like
-
just to double-check, that “grinding” sound you hear when homing, has it always been there ? I wonder if it could just be the normal sound of homing (which has the steppers move a bit differently than when jogging, so it does sound different). I don’t think the homing would succeed if it really grinded against one of the rail stops due to a mechanical problem (which would mean the limit switch did not trigger or was never reached, which…would end up with “homing failed” error). It if does grind, that’s a mechanical issue to be checked, but it won’t affect the probing sequence anyway, those are separate things.
-
what type of endmill did you have in the router when you probe XYZ and the result was 1/16" off ? Some endmills (e.g. O-flute) have a such a geometry that depending on how the endmill is oriented, a slightly different part of the endmill contacts with the probe first, and impacts the measurement.
1 Like
Thanks for the directions.
Can one rehome the machine?
Yes, you can re-home by sending “$H” command through the MDI interface.
This is almost never required though, but can be useful for testing.
1 Like
Can you walk me through this or give me directions on written steps for me to follow? Thanks
You mean to force a re-homing ?
I’m happy to help any way I can, but it may also be more useful for you to contact support@carbide3d.com so that someone can take care of your problem and follow-up, and maybe chat with you about it. Just mentioning this as I live in a very different timezone (France…) so I may not be able to respond later today.
Anyway, if you want to try re-homing (you did not tell why you would like to try this?), you can either:
- turn the machine off and back on, and click “Initialize” in CM, this essentially homes the machine.
- or if you don’t want to turn off the machine, in Carbide Motion go to the “MDI” tab, there is an input line there, type $H and hit “Send”, and the machine should home (again)
1 Like
Thank you. I will heed your instructions and contact support. Appreciate your help.
Any mechanical or homing issues aside;
If you’re trying to engrave or machine something centered on a piece of material, I’d suggest setting your zero to the center of that job, not the bottom left.
I just get a steel rule and align it diagonally corner to corner and mark the middle, on both sets of corner will give you a perfect center, then using a V-bit or your smallest endmill zero the machine on that point.
I find using a corner to zero doesn’t often result in a perfectly centered job
1 Like
Excellent info. Thank you. So when I set the center I set x,y and z to zero?
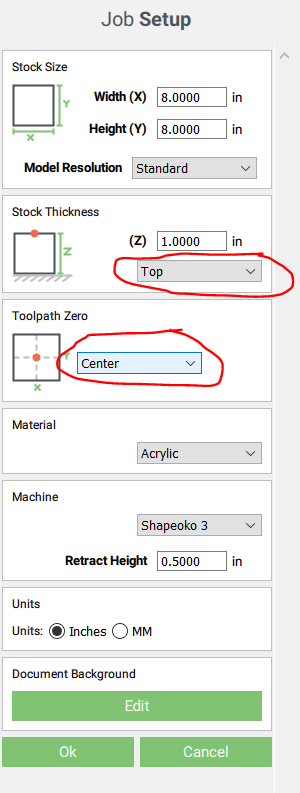
When I am setting zero this way, ensure that in the job setup you have selected ‘Center’ on the XY, and ‘Top’ on the Z as below
When you turn your machine on to do the job, let it home as per normal in the corner, then jog it to the center of your material, and slowly jog it down until the tip of the V-bit is just off the material, maybe 1/32 or 1/16.
Align it as best you can by eye with the X you drew across the diagonals on the material.
When it’s aligned, zero the X and Y in Carbide Motion - don’t zero the Z axis yet.
To Zero your Z, either slowly jog down and use a piece of paper to zero on the top of the material, or use your BitZero to only probe for Z height, you won’t want to redo the X and Y
As a general rule if I am engraving or doing a feature on the top of the material I zero to the top, and If I’m cutting all the way through to the wasteboard, I set my zero to the wasteboard, this avoids leaving uncut material on the job, or cutting into the wasteboard if I’ve measured my stock incorrectly
1 Like
This topic was automatically closed 30 days after the last reply. New replies are no longer allowed.