Can the Nomad 883 Handle This?

Hello All,
So a bit new to the milling arena. I have been stuck in the 3d printing world for sometime, using a From 1+ SLA printer. Over the summer I decided I wanted to design a wrist watch and create an actual prototype. I am a hobbyist metalsmith and do quite a bit of casting so I decided to print all the parts of the watch (keep in mind I am just talking about the watch body parts not the actual movement…going to be using a quartz movement that i will insert into watch on assembly)
The prints came out great cosmetically but from an accuracy standpoint the parts fitting together was an issue.
I ran across the Nomad and I wanted to know from the community if it could handle milling the watch parts in brass?
Specifically the Watch casing? I have enclosed an pdf of my specs.

My other question is if I use a flip sided jig to mill the watch case can I get it to tap the holes in the sides as well?

need some insiteFRYE0018.pdf (189.4 KB)

Not going to speak to the machining, but was curious what material(s) you were planning on using.

Milling out of wax and then casting?

No wanted to do a light metal…aluminum or brass and then powder coat

The short answer to this is yes, ‘Nomad can make that’.

But it comes with a catch. Here are some details.

If the question is can the nomad handle this, in terms of accuracy, rigidity, and performance - yes. Assuming the materials you are planning to use are compatible materials (i.e. not steel).

More generally - nearly any design can be made on a 3axis machine. The more important question is if you can figure out how to fixture the material to accommodate the multiple operations you’ll need to create the shape.

Looking at your PDF, I think this could be done. It wouldn’t be easy, but it’s not an impossible design, and I think with enough thought and trial and error you could come up with a way to hold everything where you need to hold it. In fact, with the existing fixturing options we have (flip jig and vice), it may be easier to do this on a Nomad compared to doing it on another machine.

Nomad doesn’t do rigid taping, but thread milling should be no problem.

-Edward

Hi Edward,
This helps alot! I was planning on doing the cut in brass. Not doing steel. The thought process of holding the part for milling I’m ok with the challenge, I just want to make sure the machine itself could handle the load.

Agree with everything edwardford said. This is very doable on the Nomad… but it is going to take some serious noodling first.

This is a nice job for a 5 axis machine, especially if one wants the best possible finish in the least amount of time. Since we’re not going to have one of those we need to get very creative.

Repeat after me… fixturing is the religion on CNC. :slight_smile:

Never do something manually more than once. Think about machining a jig to speed things up the next time. You’re going to be learning and prototyping so there will be several of these in a series.

This is off the cuff thinking but I hope it illustrates how one can think about approaching a complex machining job.

If I’m reading the CAD correct there is a hole in the center of the case that goes clear through. If that is correct, that is how I would deal with this. I would start by machining from the top. Flip and clamp from the side and machine from the bottom to free the case. Now I would machine a jig to clamp through the hole in the middle.

From there one can rotate and clamp the case from any direction and machine all of the sides and holes. Several flips and rotations - depending on the finish you’re looking for - but you can get what you want nicely.

mbellon,
brilliant thought!!! I totally can envision that but should I be intimidated by it…meaning is it a bit ambitious for a beginner on this machine?

There is nothing intimidating if you can visualize doing it - you’ve already solved a large part of the problem!

Learning to machine is skill - it takes time to learn. You should always work a problem a little bit above what you’re comfortable with until the problems you’re solving provide practical solutions to your necessities.

I’ve been doing this for a long time so I’ve acquired the skill. Even so, I would talk with the CAD designer and ensure I understood the piece well before seriously thinking about the CAM and fixturing. I’m pretty sure I have it right but would review - several times - before diving in. Even with experience I will review with others with experience to obtain a good result quickly and efficiently. Perhaps one or more alternatives will appear in the collective imagination.

Yes, the Nomad can do this. it can do this with accuracy and precision on the order of ± 0.002 or so.

I certainly wouldn’t start trying to learn/do CNC with this part! That said, you could get there very quickly if you’re so motivated. I would advocate machining some simple parts in wood and plastic first, then some AL and brass. Learn to do flip jig projects. Work your way up. This not rocket science but any means, but it is a non-trivial new set of things to learn.

I’ve taught CNC and machining and seen motivated student grab onto things in weeks. Learning to think in machining fixtures, jigs and such comes with experience. You seek Yoda. :smile:

Since you’re Nomad would take 10-12 weeks to come in that would perfect time to learn CAM/CNC, at least on paper, and start thinking about jigs and fixtures. It’s largely about how to minimize the number of moves/rotations while securely holding a piece.

If you’re the studious type, check out Smid’s CNC Programming Handbook. You can learn a great deal about CNC - read G code - from this book.

I’m sure there are plenty of people here - myself included - that can help you work you want through until this part becomes reality.

:clap: :clap: :clap: :clap: :clap: :clap: On my way to becoming a CNC Jedi…Thanks for that!!! I’ll keep you up on progress!!!

@brucewayne, I notice that that only 4 of the holes are orthogonal (green outline) and four are tilted (orange outline) in one plane (say, X-Z) and one is at in the X-Y plane (red outline). You can tap drill for the green holes in the normal 2-sided setup, but you’ll need to fixture and tilt the rawstock in different directions for the tilted holes (and parenthetically you will need to hand-tap all the threads since they are tiny…).

Flip-jig holding will allow you to do the top-down machining from the top and bottom sides but you’ll need to do individual setups for all the from-the-side and angled cuts, not to mention the stem hole which is from the side.

I have done workpieces with MeshCAM as two double-sided jobs–one for machining from top and bottom, one for machining from left and right sides. That is with the part “picture-framed” in the raw stock with supports, same as you’d be doing with the flip jig. But angled setups are always a challenge becuase you need to establish both location and angle references. You’ll definitely want to do all the angled geometry while the part is still in the rawstock to preserve the reference surfaces.

@randy…question…If I changed all my holes/threading to go up and down vs at an angle would that make it easier you think?

IMHO orthogonal geometry is always easiest to machine because it can be done in the same setup. And with the tapped holes coming from top/bottom that would make it easier to use a tap guide (tapping block etc.). But I wouldn’t scare you away from the angled setups either since they are just drilling (and spot face on the stem hole). And as @mbellon said, fixturing is everything in CNC and this would be a good learning experience for that too.

There is an excellent post over on CNCZone about setup for machining a watch case from billet:

http://www.cnczone.com/forums/tormach-personal-cnc-mill/128923-tormach-2.html#post955484

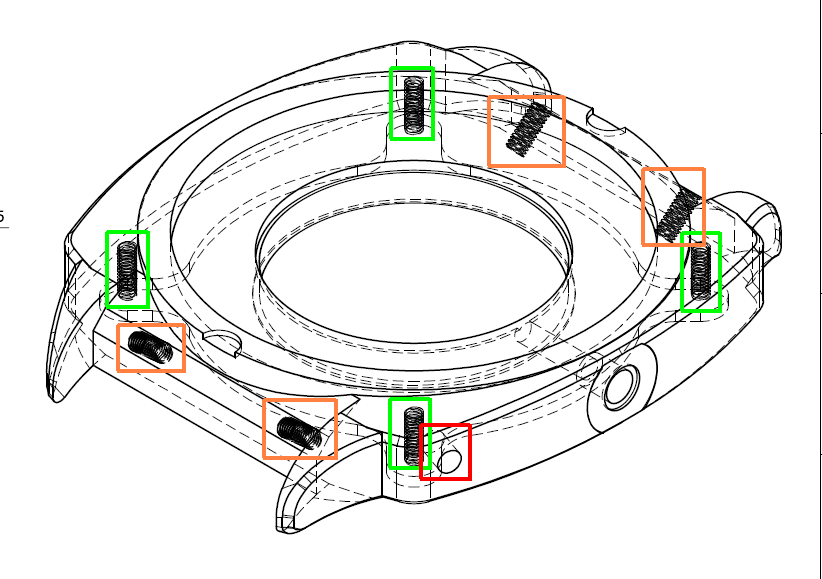
Notice that my immediate comment was to use a 5 axis machine? All those angles and faces could be done with little human interaction.

None of this is difficult for an experienced machinist. Today, the machinist would say do this on a 5 axis machine! If you force the issue, we go back to the old school - 3 axis and jigs - and work the problem. You can do this… but you need to approach this as a learning process, starting simple and working your way up.

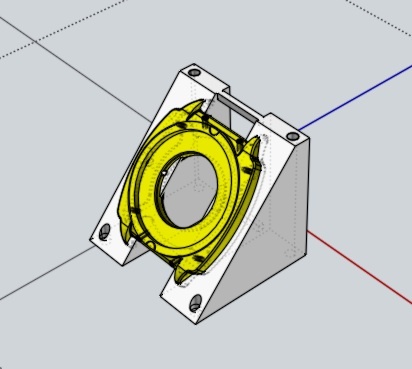
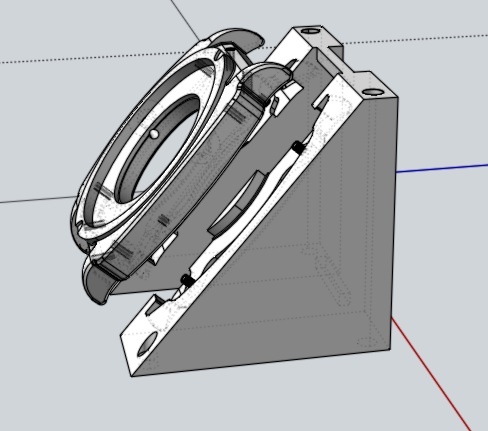
Certainly, there would several jigs necessary to make this part on a 3 axis machine. Nothing too tough but definitely a lot of noodling. This is a fine challenge! Look what I did! And I can make any number of them you want now with little work!

The number of jigs for this part is not large - I count 3 (or 4) - and one of them is the standard vise.

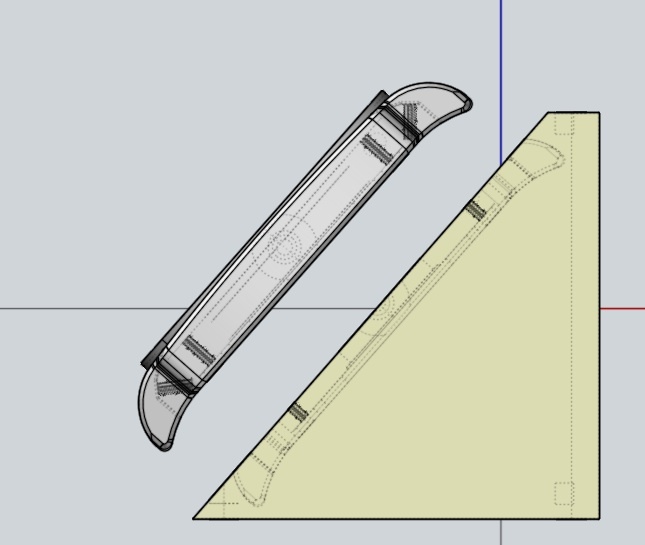
With a few changes you could machine this part using a flip jig. But…

One machines to obtain a part. A part must fit the required geometry - shape - and meet the finish requirements. Using a flip jig will require construction tabs - parts of the stock which connect the work piece to the stock to keep it in place. After the cutting is done, the tabs are removed by grinding/cutting/routing. For a watch this would be OK for an early prototype but probably not for a finished piece. One wants that really nice look…

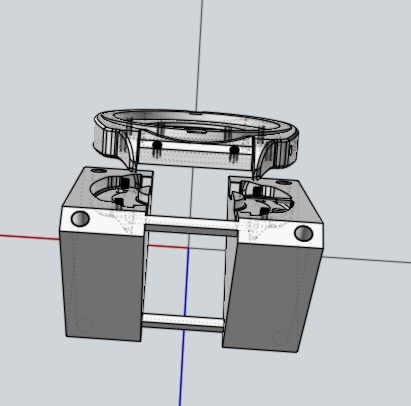
I would certainly not drop the design present. I would simplify it for flip work and make it that way - learn - before going to the final thing that would need several jigs and such. Live with the rough finish but look what you’ve learned!

Machining for the man body has other challenges. We do to often machine with elementals - pure elements - we machine with alloys (mixtures of elements) that have acceptable properties.

Brass is copper mixed with zinc. Bronze - for reference - is copper mixed with tin and in the proper ratio approaches steel in strength. Modern, commercial brass is often more than the basics - other things in the mix. Brass and bronze are naturally corrosion resistant which is why they are often used for boat/ship fittings.

When we speak of aluminum we’re not (commonly) speaking of the element (Al) but alloys. Alloys have identifiers (e.g. 6061, 6075, 1xxx steel, 3xx stainless steel, etc.) which tell us how to look up their properties.

This becomes important when dealing with the oils, salts, acids and other things that the human body generates on the skin. Even with an alloy, ions of the metals within migrate. Copper turns the human skin green, probably an unacceptable property of a watch. I would research brass and find out if there is a brass alloy that is acceptable for touching the human body.

The Nomad is not set up to formally drill or tap. Certainly we can make holes of specific diameters but this done has via milling with a square end end mill (machine tool) rather than a formal drill. IMHO don’t try to tap with the Nomad, I would do it by hand. Easy to learn and to do.

By-the-by billet is a chunk of metal - one single cast piece of material. Properly made billet yields very nice machining properties and final product.

This would definitely be a lot of fun to figure out how to do with MeshCAM!

I have access to fancier CAM tools (SharpCAM for 3 axis, BobCAD-CAM for 3, 4, and 5 axis) so I would approach the CAM aspect differently than I would with MeshCAM. I have owner and used MeshCAM in the past and have immense respect for it. I plan to use it on my Nomad - for the parts that are appropriate.

You an do this brucewayne! There is a fair amount to learn but it is easily incremental and each step builds directly on the previous steps. Learning to think in fixtures and jigs takes a bit extra - but that is why one uses forums and email. Ask people who can help! Learn!

Would this be an idea for a jig? Just wonder…mind is racing thinking

1 Like

That’s the idea!

You need a way to affix the unit to the jig but once that is done, something like this would be used to machine to two surfaces and the 4 holes. Details of how to hold the jig to be bed are left to be done. Having a sea of holes bed would make that easy.

With this type of jig one can do the one side, rotate the piece and do the other side.

In my mind the jig was solid with a threaded hole centered on the hole in the piece. A plate is machined that the bolt goes through that would catch the piece and hold it in place. This is diddle detail however.

Think on a jig one must thing about how the piece attaches to it and how the jig attaches to the bed too. This is a literal, mold type jig. In real production, the jig can be much simpler. The critical point here is that you’ve grabbed the idea of creating a jig to get the optimal angle.

EXCELLENT!

As long as the watch body is still embedded in the rawstock with supports, it is self-fixturing as is. Just set the whole block up at the correct angle, indicate off the “top” and “side” corners and offset to the hole locations and drill. That is the beauty of “picture framing” in an accurately measured rawstock (actually for double-side machining the rawstock must be accurately measured and set up on the machine accurately in the first place - CLARIFICATION when the stock is held in a vise, like all the 2-sided machining I have done with MeshCAM). no need for a separately-made fixure at all.

Randy is correct the construction tabs do work well and are easy - but they have to be cut/ground/routed off and that often does not lead to a near perfect mirror finish. For initial prototypes certainly construction tabs make sense - much less work.

However, if you’re going for that near perfect mirror face, that sensual Apple machined finish on their metal parts, one has to machine each face directly, in the optimal manner. The end mill must approach the face in an optimal manner. In two sided machining with a flip jig the sides of the piece do not come off with as fine a finish as the top/bottom - the end mill is not approach the surface optimally.

For many objects the finish is less of an issue or is “good enough”. With show pieces like a watch, the human eye is remarkably sensitive to finish and I would expect (know from experience) that the finish would not be as fine as one would expect/like. Obviously, YMMV (expectations, good enough, not likely to look closely, etc.).

Agree with you both…I just need a machine i can start cutting with!!! super stoked to start!

I would try to make a jig that takes an earlier form for your object to drill the oblique taps. Think about making some holes to align to them to a flat embossed profile. after these are drilled, you can mill all the details. That’s how I’d tackle this.