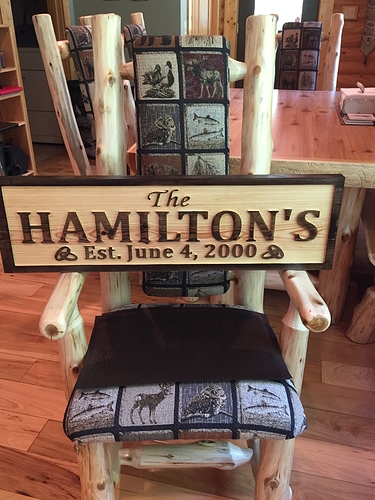
30” X 9”
0.063 cutter for the wedding bands
0.125 cutter fo the rest
Very nice work Richard. I hope to be able to produce something that nice one day. Good job!
Thanks!
Fun part has become the designing part,
Watching it come to life as it cuts away.
Can you post the files for this. Would like to add this to my list of projects
I’ll try to get them posted over the weekend.
Were you able to post the files some where.
Jeff
No not yet, when I can get back to my shop I’ll be sure to post if I can.
Have you been able to post the files yet.
Jeff
Man…that’s nice! Interestingly enough, I’m in the process of designing a plaque for a Hamilton family. It won’t be as big as this one though! I hope mine comes out half as good as yours did!
Question…Did you stain the board first and then carve it?
Wow I posted this awhile ago…lol
But yes I cut it to size. Sanded & stained first with dark walnut.
The board is a solid southern pine board.
It’s also run through my planer to ensure it’s flat and the thickness I wanted😉
I’m a noob. I just got my XXL in January and have been on this forum almost daily since. Not sure why I just saw the post yesterday. Another question…I seem to get some undesired, random ‘chip outs’ (or whatever they’re called) on some letters when I carve on pine. What were your feed and step over settings or any other tips you might be able to share?
Pine wants really sharp tooling and you’ll want to leave a roughing clearance and sneak up on the final dimension, possibly spraying with a fixative to harden it, and making the finishing pass with a HSS (sharper than carbide) endmill.
You took me kinda swift there Will. I’m still wet behind the CNC ears. (LOL) I get the sharp tool part. Fixative…would that be polyurethane or something similar? Roughing clearance…might that be a setting in VCarve pro?
Yes, acrylic or some other sort of clear spray which will harden the wood fibers.
Roughing clearance / finishing pass should be a setting in Vectric — using a downcut endmill may help.
Your sign looks good. Pine is subject to chipping because it is soft. The router exerts a great deal of force on the wood. Some other species will chip but Oak and Maple may chip out less. The grain direction has a lot to do with it. Since you cannot really control grain direction when cutting a sign you may always get a small amount of chip out. You can try as Will Adams suggested putting some sort of finish on the pine before cutting. You could try MinWax Pre Stain Conditioner or an oil based poly with a few coats before cutting. The oil based finishes penetrate deeper than water based and do not raise the grain like polycrilic does. If you are going to fill some designs with epoxy you should always finish with dewaxed shellac (Zinnser Universal Sanding Sealer) to keep epoxy and/or paint from seeping into the wood and bleeding out. Acrylic paint can seep into the wood as well and the seal coat stops that from happening. Finishing is more time consuming than the designing and cutting of a project. Usually people are in a rush to finish a project and short cut the finishing process.
When you make things that are displayed in your own home your eye will always go to any mistakes or boo boos you made. The general public will not notice and you should not mention your mistakes when showing your work to friends and family. You will always go right to it but they will not. Many makers are hyper critical of their own work. Enjoy it and the meaning it has to you and your family.
