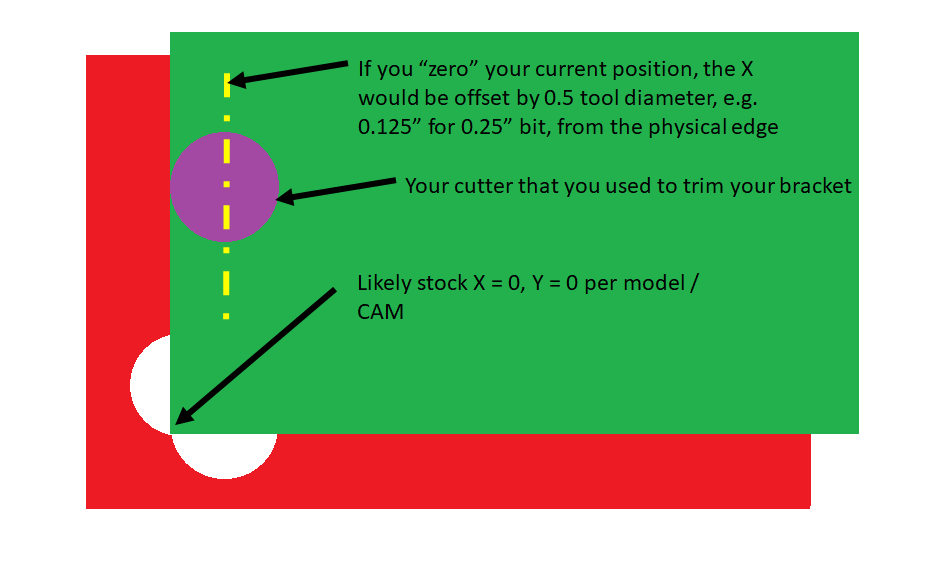
I installed a new fence on my shapeoko, to set jobs in the SW rapid position. After I installed the slightly oversized fence I positioned the router in the SW corner and manually carved the X and Y axis’s.
However, I’ve noticed when I carve a job now the design is shifted to the right by .125+”.
When I start a job I position the material in the corner of my fence, clamp it down, move the spindle to the rapid start SW position, set the Z axis and run the job.
Am I missing something? This one has me stumped and I’d imagine I am overthinking the issue and there is a really simple fix I have overlooked. Any help is greatly appreciated!
So what is the common solution? Offset every job I machine by 1/2 the diameter of the cutter being used? That seems inefficient at best. I mistakenly presumed the vcarve software would be smart enough to compensate for this.
For the past few years I have machined from the center until installing this new fence in the hopes of speeding up production.
If you probe the X and Y each time with say a 1/4" bit, you can for instance:
Go to jog machine, move X until it just touches the X stop, zero the the X
Back off the X and jog the machine until it touches the Y stop, zero the Y.
Go to X = -0.125 and Y = -0.125 and zero the X and Y again.
If you don’t probe each time and trust your “rapid to last”, then click that button, shift to (X = -0.125 and Y = -0.125), and zero those new X and Y. Your future runs then would all use the new zero.
As an aside, I think you can just change the values in the Set Zero X and Y windows without actually travelling to that location. For instance, if you are currently X = 0, and you type in 0.125 into the white box, I think it does take that value.
That’s where I’m at with it I think. Just wanted to make sure I wasn’t missing some random setting in vcarve or something equally simple. Thanks for the help
Wouldn’t that only work for one size bit?
If you take a 1/8th inch from the fence for the offset of a .25" bit, how would you set x-y when using a 1/8th bit ? or a 1 inch flattener ?
Maybe you can set your x-y to the fence before you mount the material?
Did you carve these on the line? or allow for an inside offset?
You should have rapided to the sw position, then (after verifying the bit size) manually jogged into the position that is equal to half the bit diameter?
If you make the fence so the corner is at the desired zero position, SW, then SW followed by zero X/Y will put zero at the right place for the fence regardless of bit size.
I had to get out of the mindset of what size bit/end mill was being used. Centering the spindle over the x and y axis on the fence/material corner is all that should matter, if I’m thinking straight again….
I remounted my fence and manually moved spindle .125” effectively centering the spindle over the x and y of the fence, since I was using a .25” end mill. Then manually ran it down both x and y. Now when I use the rapid position to SW (lower left corner) the end mills are centered over the corner of the material.
Originally I simply mounted the fence, positioned the bit on the rapid position and ran the EM (end mill) up x and y. This wasn’t the center of the spindle, it was the edge of the EM which was throwing off my signs. This never matter before because I always used the center of the material aligned with the center of the bit.
It is a painful process teaching an old dog new tricks sometimes.
Thanks everyone for helping me think through my oversight.