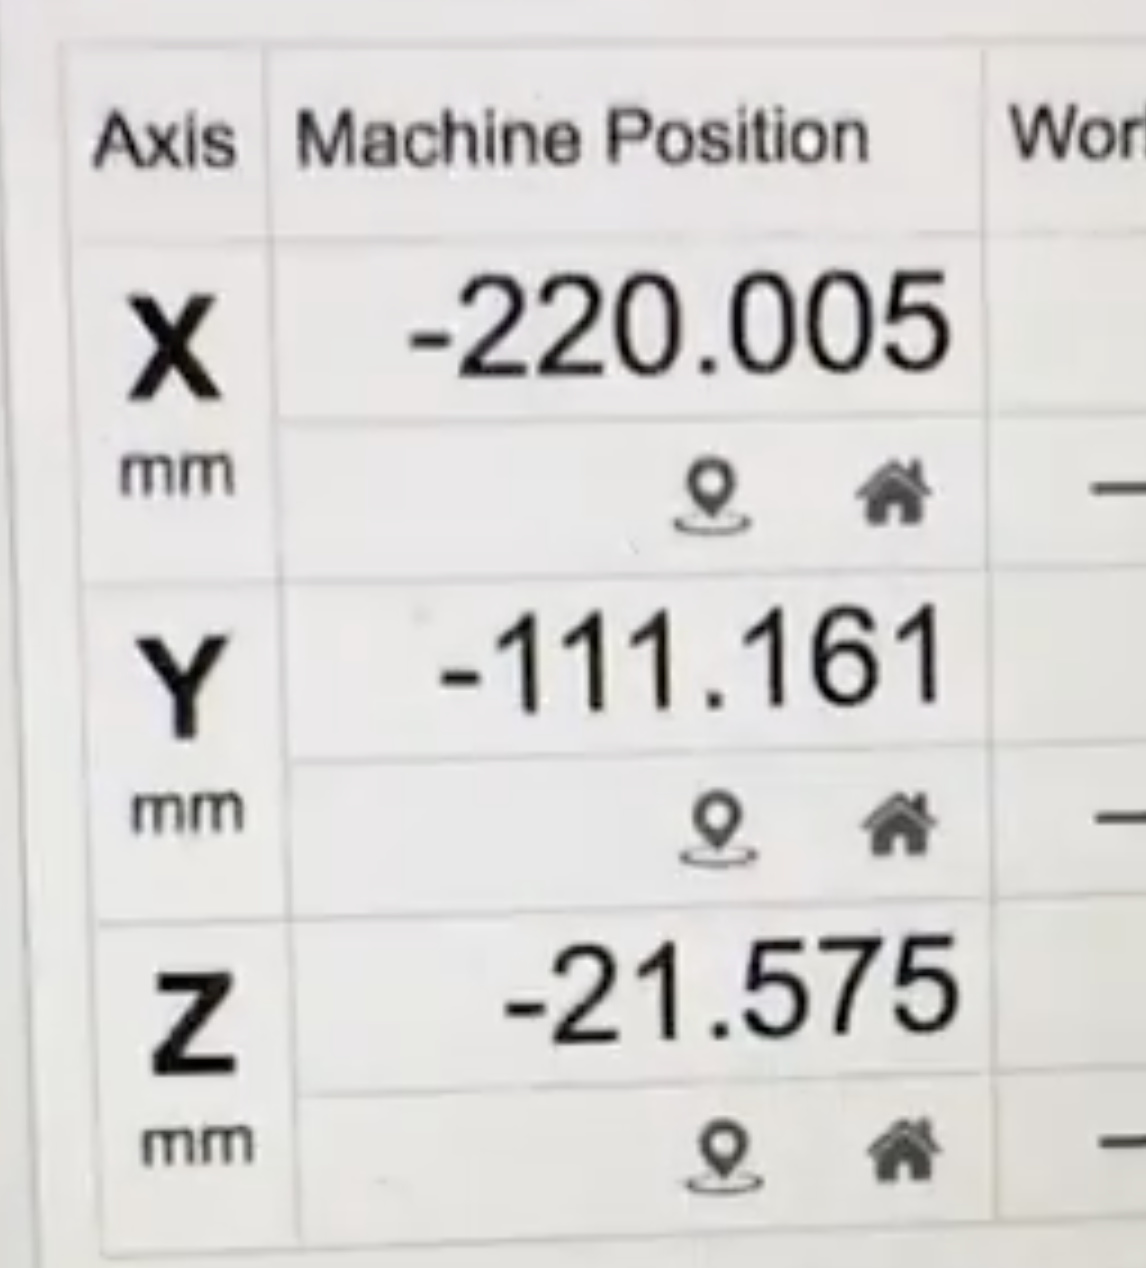
The probe is at X-220 in my Nomad. Is that what you need?. That is the machine coordinate. After I run the macro I get this.
Was looking for a good spot for you to actually change the tool. No worries…you could always modify later.
Anyway, try this if you get a chance…I attached as a txt file.
Probe for XYZ zero, run whatever code, and at a tool change, you’d run the attached macro.
EDIT: File removed because it was no good.
I can’t upload txt files, so it’s a nc.
It will prompt you a couple times. It will go to a tool change location, wait for you to “confirm” you’ve changed tools, go to probe location, wait for you to confirm you’re ready to probe, probe & retract a bit, go back to the tool change location, wait for you to confirm, go to where it was before you ran macro.
I would try changing to a shorter end mill in case something goes wrong
My apologies. You said tool change position and my brain got tool probe position. What you have is fine. It is very close but not working yet. At least I don’t think so. Do I need to run code before running it?. Can I just zero with a bit, change the bit and run the macro and see if it goes to the zero position?. This is what I did and the bit goes under the stock surface.
Notes:
-Can the pop-up windows display instructions in plain layman terms?
-You can rapid move to a height of Z-35 before slowing the feedrate to make the probing a little faster
-Since the tool length probe is a switch that needs to mechanically move to make a contact, how do we calculate how much it moves before contact is made?. Does it matter?.
Here is what I’m doing:
If I look at the machine coordinates for Z at the beggining Z is -19.980. After probing it is -78.030. Does this tell us something?.
To be painfully honest, I don’t know what you mean by offsets  .
.
Is it the physical offset of the pocket in the bottom of the probe? Then the offset is 3 mm on each X,Y,Z. Or?
I have very slight offsets in my machine for belt stretch in x and y, do you need those?
I like your pocket idea for the probe.
As for aluminum advice, I’m not the one to ask as I’ve only just started cutting it. Lots of help elsewhere in the forum though.
If you put the probe on the corner of your stock, how far is it from the actual stock?
How far does it extend to the left on the X-axis?
How far does it extend to the front on the Y-axis?
How far does it extend up on the Z-axis?
I got a macro working with CNCjs, when I clean it up and test a bit more I’ll share here.
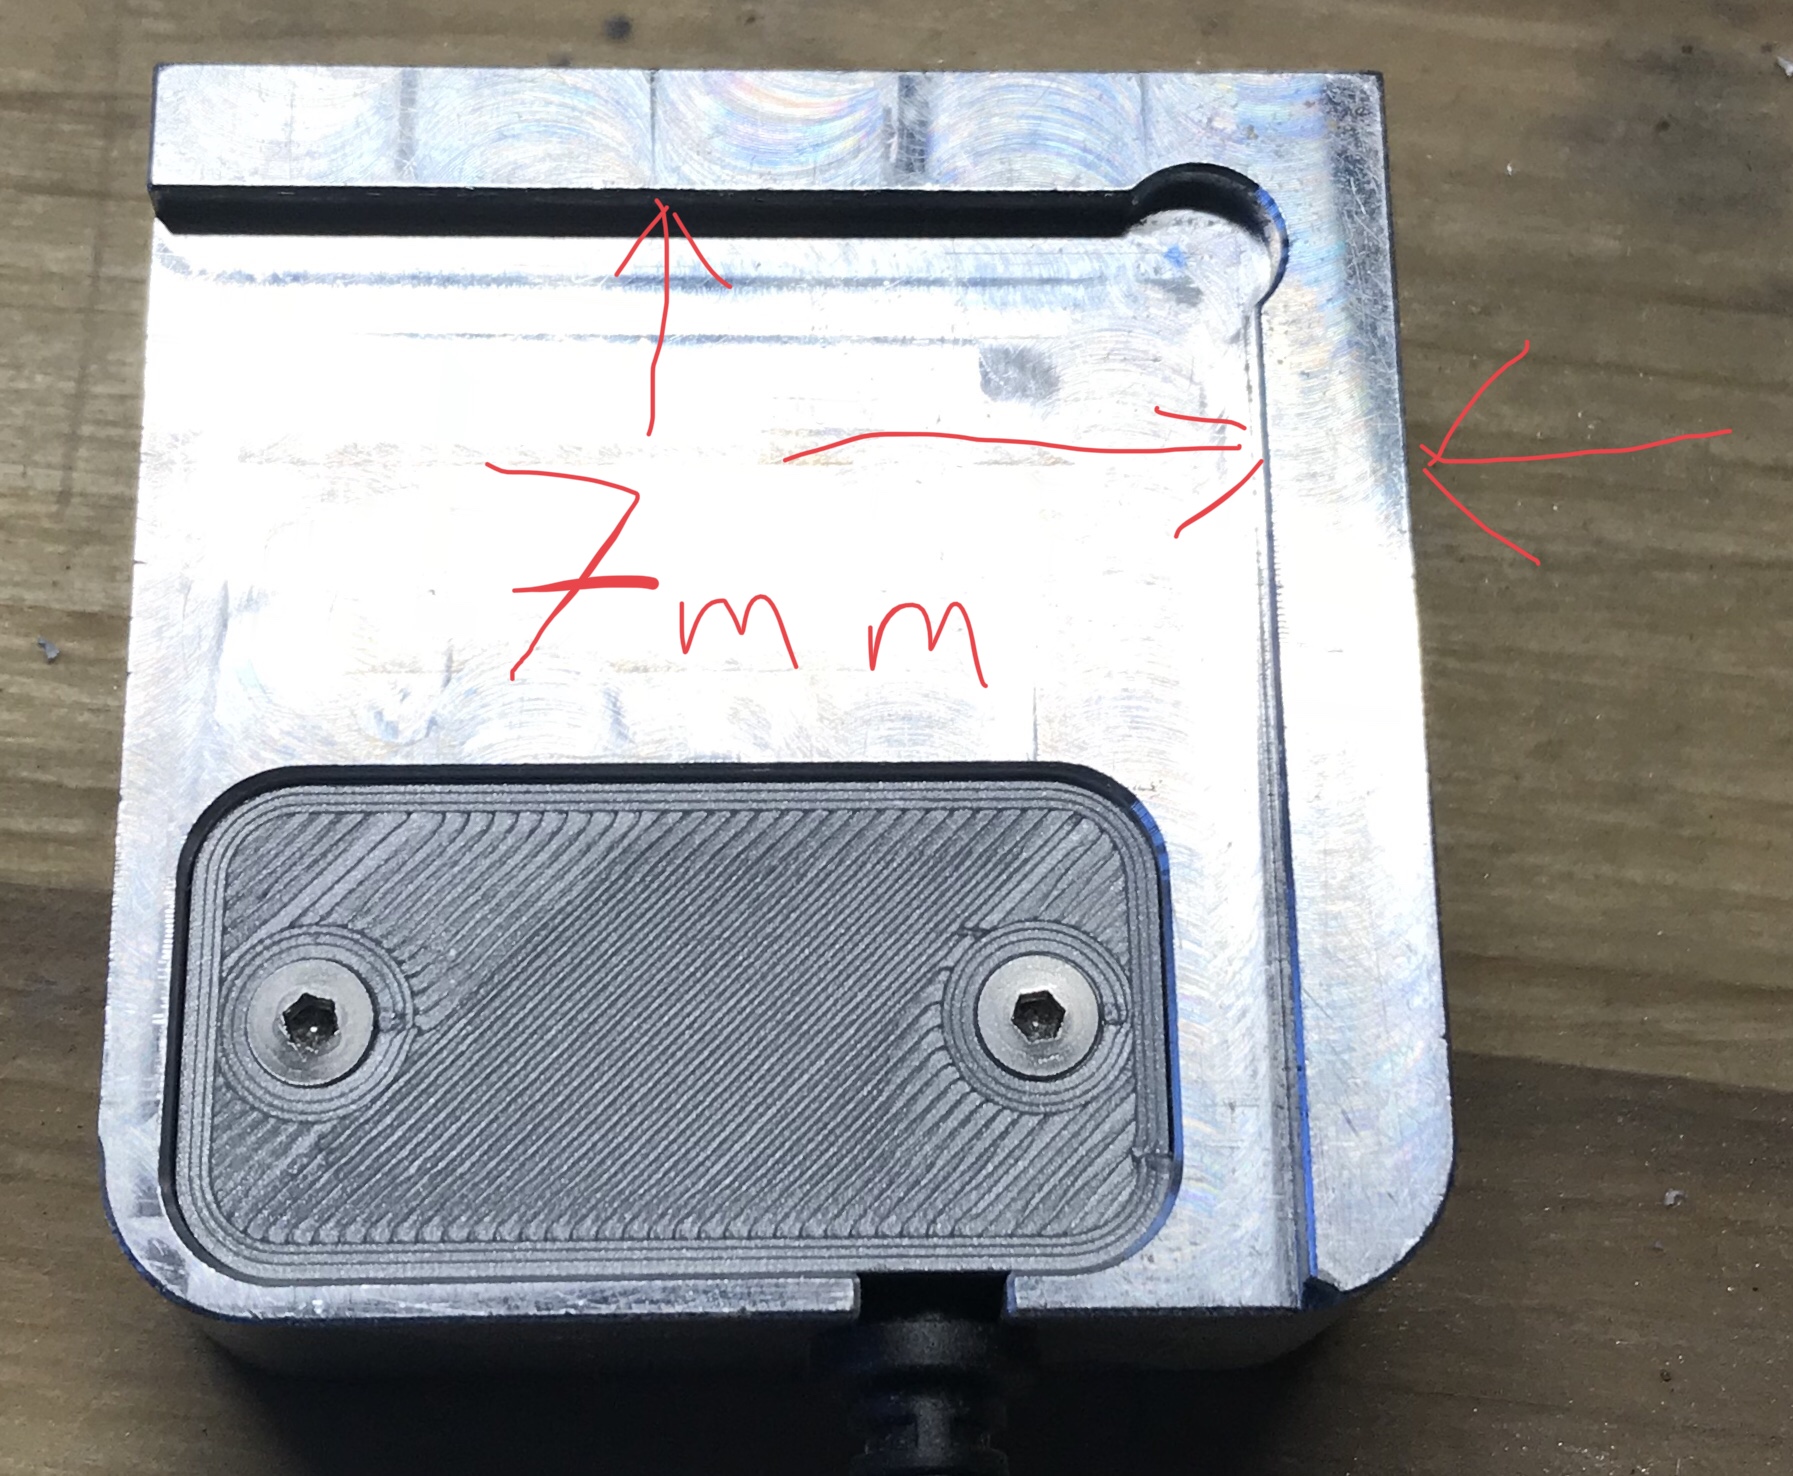
Only 3mm for Z? Looks thicker than that.
Of course you are right. Should be 22 mm.
Got confused, when measuring Z only the probe is placed on top of the stock, 3 mm higher then corner probe.
1 Like
Macro below would work with a 1/4" end mill:
EDIT:Whoops…see below.
Let me know how it goes or if you have questions.
1 Like
This is great, thanks!
It may be a while, still have a lot to learn cncjs before I try anything.
1 Like
OK, I surprised myself. I managed to figure out how to copy/paste the macro into cncjs, don’t laugh, it’s not polite. 
So I screwed around a few minutes without the probe in place, got the expected error. But observed spindle moving in expected direction at expected speed.
When I tried with the probe the mill touched off the X but then it immediately jogged -Y, knocking the probe askew. Aborted at this point. I would expect that the mill would, upon touching X then back off slowly, then move slowly in -Y then slowly in +X then slowly in +Y to touch.
Tried once more, holding the probe in place with finger on E-Stop. Same issue, no back-off just zip-Y after touching X. The Y touch worked as expected but then the spindle jumped upward to the top of Z causing belt slip. Abort.
I’ll be interested to compare the revised g-code when you have time. Thanks again.
2 Likes
Oops! My bad! I forgot to take your offset into account. I took off the 7mm after I wrote the macro, but didn’t account for that. Fixed one below… Using increment instead of absolute.
2 Likes
OK, better but still hits top of Z, loss of steps, mill descends hits block and try’s to keep going.
I’m sorry, @Griff. I should’ve waited until I could do this on a PC (I am now). Phones aren’t the best for editing gcode. This WILL work.
(start with the end mill about 15mm or less from bottom left corner. Z below surface of probe)
G21 ;make sure we’re in mm
G91 ;Incremental mode
G38.2 X20 F75 ;Probe W to the right 20mm
G10 L20 P1 X-10.175 ;Set current X location as negative half the bit diameter - 7mm thickness
G0 X-10 ;Move left 10mm
G0 Y-25 ;Move forward 20mm
G90 G0 X10 ;Move to X10 (absolute) - will put you 10mm to the right of left edge
G91 ;incremental
G38.2 Y25 F75 ;Probe Y
G10 L20 P1 Y-10.175 ;Set current X location as negative half the bit diameter - 7mm thickness
G0 Y-10 ;Move Y-10
G0 Z35 ;Move Z up 35mm
G90 G0 X10Y10 ;Move to X10Y10
G91
G38.2 Z-35 F75 ;Probe Z
G10 L20 P1 Z22 ;Set Current Z as 22mm - thickness of your plate
G0 Z10 ;Raise to 10mm above plate
G90
G0 X0Y0 ;Go to X0Y0
No worries, im just happy to have the help.
So, I set the mill deeper in the collet. No more Z max, cool. BUT, mill descends hits block, bounces, stays down, drags the block sideways. Hmmm
Is that with the most recent one?
stay tuned, just saw it…
Bingo!!
Still rises 20mm or so to high in Z but no hits/slips. I’m going to attempt an edit based on what I’ve learned today
Thanks again!!
1 Like
This one will probe Z first, so you don’t have to mess with changing distances. You can paste the stuff in parentheses with it as a reminder)
(start with the end mill 15mm ABOVE the plate, about 15mm or less from bottom left corner.)
G21 ;make sure we’re in mm
G91 ;Incremental mode
G38.2 Z-25 F75 ;Probe Z
G10 L20 P1 Z22 ;Set Current Z as 22mm - thickness of your plateG
G0 Z3 ;lift Z 3mm
G0 X-25 ;Move left 25mm
G0 Z-10 ;Move down 10mm, should be 7mm below probe surface
G38.2 X25 F75 ;Probe X to the right 25mm
G10 L20 P1 X-10.175 ;Set current X location as negative half the bit diameter - 7mm thickness
G0 X-10 ;Move left 10mm
G0 Y-25 ;Move forward 25mm
G90 G0 X5 ;Move to X5 (absolute) - will put you 5mm to the right of left edge of stock
G91 ;incremental
G38.2 Y25 F75 ;Probe Y
G10 L20 P1 Y-10.175 ;Set current Y location as negative half the bit diameter - 7mm thickness
G0 Y-10 ;Move Y-10
G0 Z10 ;Move Z up 10mm, should be 3mm above probe plate
G90
G0 X0Y0 ;Go to X0Y0
3 Likes
Thanks again Neil. This version works exactly the same as CM.
Would you mind sending me macros for rapid to front, center (for tool change) and rapid to Home? I have an XL btw.
Those two combined with the probe macro you sent should be enough to help me bootstrap my way up the macro learning curve.
1 Like