First Aluminum Attempt

Hi @g2ktcf,

I have never cut 6010, but my (very debatable) rule of thumb for cutting aluminium in general (say 6061) using a 1/8" endmill is to aim for a chipload somewhere in the 0.0005" - 0.001" range.

With your 1/8" single flute at 80ipm and 24800RPM, you are at 80 / (1x24800) = 0.003", not impossible to pull off but that still looks like a hefty chipload (to me…). Now, if you ended up with welded aluminium, chances are this is because of a problem in chip evacuation (which is normally not a problem with single flutes, but…), chips got stuck in the flutes, got recut, heat evacuation decreased, and eventually things melted.

What depth per pass were you using ?
slots can be challenging, they will initially work fine, but as the cut goes deeper at each pass, it becomes more and more likely that chips will get stuck in the trench.
EDIT, sorry, I missed the doc info you provided: a bit high to my liking for conventional toolpaths, but should work

An air jet helps (a lot), as do a little lubrication (WD-40 or otherwise)

Maybe post your design file for additional feedback ?

EDIT: so to answer your question, I would probably have started by using 24.000RPM and 18ipm, to get a 0.0075" chipload, and I would have used about 0.01" for depth per pass, and an air blast. A few months back I would probably have used those settings, i.e. targetting the same chipload but at lower RPM (I know better now, but still it works)

1 Like

What kind of stickout did you have? Deflection is something to consider a little more heavily when using smaller than 1/4 endmills. I would recommend you use a calculator that shows deflection and machine forces if you want things to go smoothly.

For full width contour cutting your doc I’d definitely too high, like Julien suggested, start with a 0.010. That type of cut is hard to push fast if you want process reliability. I suggest using an adaptive strategy if speed is an issue.

You didn’t say what cam program you used but without ramping into the cut, it was definitely too aggressive. The mechanical aspect of your machine needs to be well tuned and tramming makes a huge difference in full width contour cuts. Also I’m gonna say that air and lubrication is not necessarily needed if your cam is on point. Ive been cutting completely dry without chip evacuation and can easily cut 4x+ depth without issue.

Next time take pictures and video, more data more better. Glad you didn’t break anything and it only gets better from here!

1 Like

@Julien and @Vince.Fab have given you the advice you need. All I’ll add is to throw your endmill in some purple degreaser if you can’t knock the aluminum off.

3 Likes

Now that helps too! I was trying to get that little burr off.

Vince,

This was Fusion 360 and I did ramp in and out. The machine is trammed and well tuned at this point. We have been working on that part for the last 4 weeks. The only thing I want to do is upgrade to the HDZ but the machine belongs to a school so I can only “advise” them on what to do. I had the end mill up into the collet up to the cutting surface so it only stood out about 1/2".

When I set the feeds and speeds, I fully did not think “full contoured cut” so that is definitely my mistake as you and @Julien politely pointed out. We have about 8-10 parts to cut ranging from 1/8" to 1/4" and they are all full depth cuts. We can get a compressor in to help and I will try that as well. I have put a sheet of 1/8" aluminum on top of the MDF bed so I can use some lubricant as well.

As far as adaptive strategy, how do you do that on a contour cut? I am not really seeing how to make a 1/4" contour with a 1/8" mill. Any input is fully appreciated by me and First Robotics Team #5923.

Chris

2 Likes

You can add an offset to the geometry, say 3.5mm for your situation.
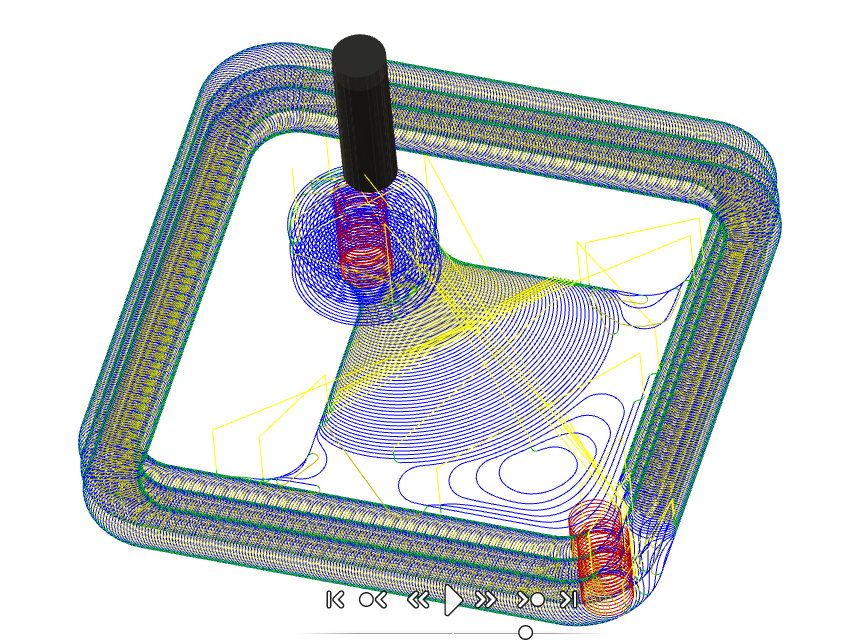
Check out the SO3 toolpaths here.

I may have run conventional, but I’d recommend climb.

If you can share your file, one of us can show you what we’d do. (I won’t be by a PC until tonight)

2 Likes

FWIW, another example of using adaptive on a contour cut with a 1/8" endmill on a thin (and small) piece of stock if you want to look at the toolpath geometry setup

(ignore the feeds and speeds, this is a random example from my Fusion360 directory, I did not double check values)

1 Like

Chris, I have a DIY HDZ built to the original Beaver HDZ spec that I will be retiring soon. The school is welcome to have it.

PM me if interested.

Griff

9 Likes

Griff, PM sent…and omg…THANK YOU!!

1 Like

Griffis Z will definitely make a world of a difference, good score!

Best bet is to just upsize your endmill if your features will allow it imo on those contour cuts. And I guess you can just enable rest machining with a smaller endmill anyway if not. Tons of ways to get around cuts in Fusion360.

Thanks Vince. I have a 1/4" Single flute as well and I plan on using it as much as possible. I do believe the best approach is to use a that with an adaptive tool path for my contours. We have some small details to do as well but that is easy enough to handle.

Each part will have some pockets, a contour and several tiny holes so some planning on my side is needed.

And Griff has just floored me!

1 Like

Retiring soon? Got your sights on something even bigger now? :yum:

1 Like

A quick follow up here guys! This thing is great! I am using an adaptive clearing path with a 1/4" SF bit and chips are flying all over the place. I am only running about 20 ipm max.

I do have a question. The “stock to leave” was set at 0.020 Radial and 0.02" Axial. I am thinking that means I have to do a finishing pass to remove the remainder correct? How do I add that to my current operation? I just realized that I did not already have this pass called out and I need to make a separate file for it. So do I just use rest machining to avoid re cutting all the initial paths?

1 Like

Yes, create a separate finishing toolpath. For complex geometry, you can basically duplicate the toolpath, then check “rest machining” and uncheck “stock to leave” (or set axial and radial stock to leave to 0). For simple geometry, the finishing pass may consist in e.g. a simple 2D contour pass to full depth for example.

2 Likes

I duplicated the toolpath and did just that. Thanks for verifying.

One other question, do you know where in Fusion 360 that I can get the run time for the code? The sideplate we made took about an hour. But we had some numbers that we started about 5:30pm last night. I left at 7:30 and had to pause the program at 45%! lol. Its cutting great (tiny 1/16 2FL endmill) but its taking forever.

There’s a setting in the preferences that will display the execution time of each toolpath on its title line.

Check the “Show operation machining time” box:

4 Likes

Thanks Julien! I am going to have to get some time to read through your book one of these days. FRC Robotics is great but I lose the first three months of every year!

1 Like

We’d like to see some robot parts !
Unless they are secret, as part of the competition :slight_smile:
I guess they must be small and intricate, if you are using a 1/16" endmill to cut them. If you can/want to post a sample toolpath you are using, it may be possible to optimize them a bit to reduce your cutting times.

2 Likes

I tried the lettering with a 1/8" and it would not generate a valid toolpath. That is when I decided to try the 1/16" mill. I could have (and should have) just skipped this part as its not needed. Its just window dressing. But I am cutting from the back side of the part and the only way to make it look right is to let it finish. I will be running the XL hard over the next five days that is for sure. Our first competition is this weekend.

These parts are for a shooter that shoots yellow foam balls up and into a goal. Here is a screenshot of the Inventor Model.

6 Likes

Just wanted to clarify that adaptive toolpaths are not considered finishing strategies. Glad to hear everything is working well!

2 Likes