The HDZ has 150mm of travel — one can pretty much touch the collet nut to the wasteboard.
The additional layers, once secure and trammed should make the machine more stable if anything.
The HDZ has 150mm of travel — one can pretty much touch the collet nut to the wasteboard.
The additional layers, once secure and trammed should make the machine more stable if anything.
I was going to get the bit setter. Am i going to have any issues with the height being up an extra 1/2 in?
No. I have the bit setter and it’s tall enough to clear the spoil board and the sandwiched board.
Even with 1/8” bits ?
Yes. I haven’t had any issues with any bits after I installed the sandwiched board. You would have to pull the spoil board and sandwiched board to install the bit setter, because it’s mounted to the metal frame with set screws. Then replace the boards after bitsetter install.
All this would be good to know before making a purchase. Anyone from Carbide have any impute?
I had intended to purchase a XXL with the Z Plus in a few weeks, but now I’m second guessing if the Z Plus is worth it. We need an official word from Carbide on this.
I would like to make an informed decision and understand if I’m giving up capacity for the Z Plus system before I order.
All - First, sorry for the slow reply here. I wanted to have actual answers for everyone before blindly posting back.
Here are the facts:
The increase in vertical z-axis travel is a bonus for the Z+. We have seen (and heard from) a lot of customers requesting ‘higher’ z-axis travel in order to avoid workholding solutions (like a vise) and to machine thicker projects yet still have clearance to move the spindle around. So, that was the design intent behind the Z+.
If the cutter being used is short, then reaching the stock baseplate on the machine won’t be possible. However, as @Julien (and many others) have mentioned - it really is best practice to add an actual wasteboard to the machine before cutting. The baseplate that comes with the machine shouldn’t be used for a wasteboard. We’ll be sure to add this to the onboarding process so that is more clear for any future buyers.
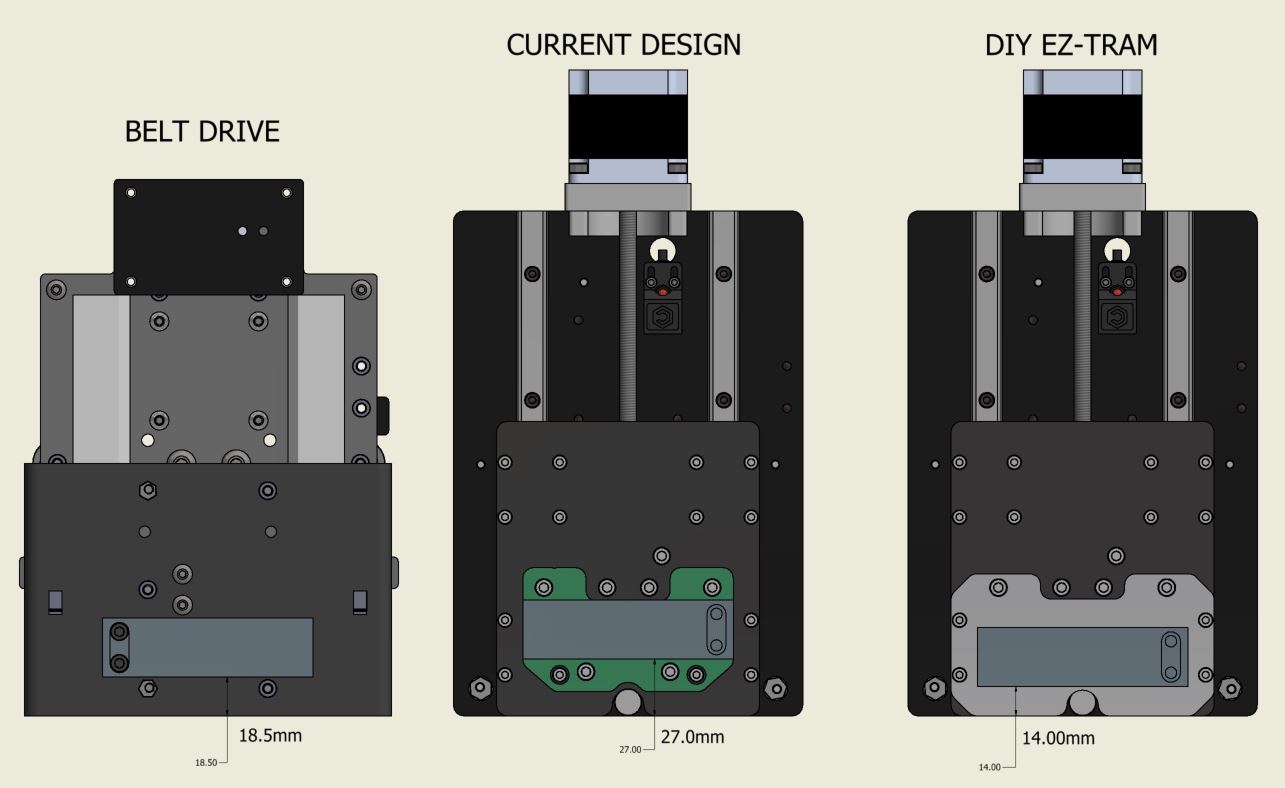
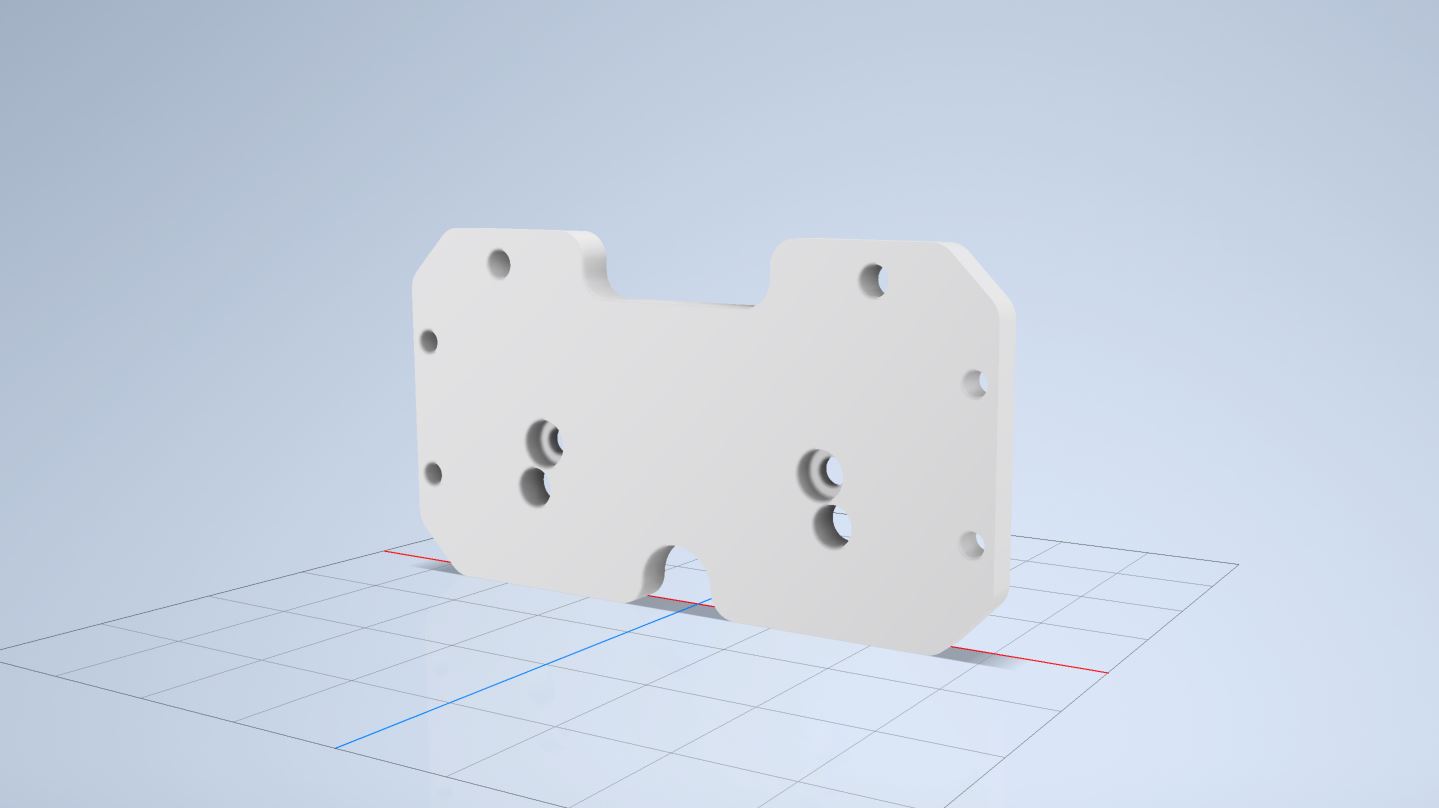
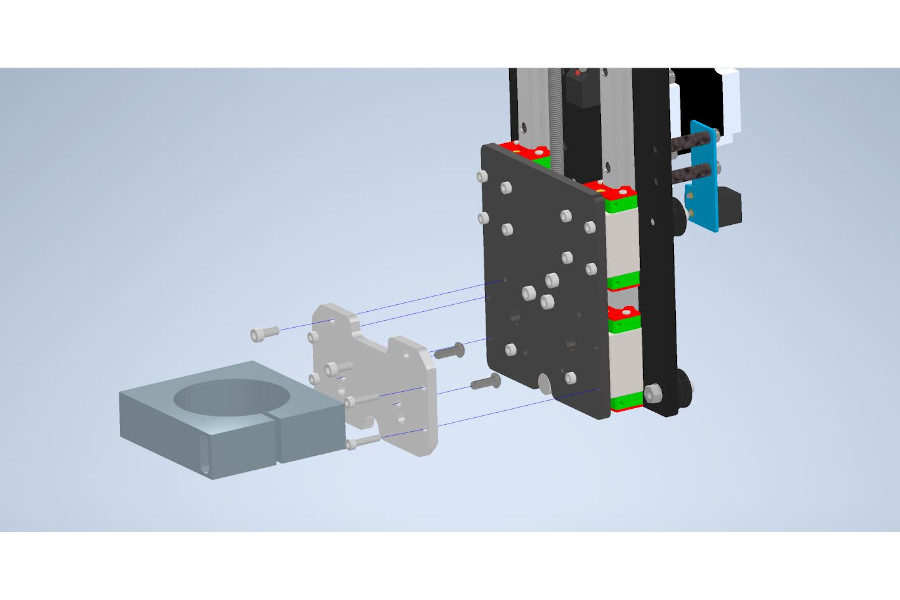
With all of that said, I came up with a DIY design that anyone can use if they really want to reach all the way to the baseplate. You can find the link for it here: https://cutrocket.com/p/5e6a3cae534f3/
Note: I made the toolpaths in the file to be used with an 1/8" cutter - I haven’t vetted these yet, but will try to steal some time and cut one to prove this out - if someone cuts one in the meantime, please feel free to let me know 
-Edward
administrative note: I closed the other (nearly identical) topic as I’d like to keep this conversation in one place.
Thank you for the explanation. I fixed my issue by putting another piece of 3/4 MDF in-between the spoil board and the base board. Which is fine with me. I’m sorry for causing such a turmoil over this. I was just trying to find out if it was a user error or a limitation.
unrelated side note: I think it would help big time if everybody (and the docs) started using that term “baseplate” exclusively, for the MDF part that comes with the machine. It’s confusing for new users that they have to put a “wasteboard” on top of the “wasteboard”.
Kudos on clarifying the mechanical facts & that optional DIY tram EZ-tram idea.
No problem, glad I could clear up the confusion.
Also, no worries about the ‘termoil’ - this is a good example of why the forum is here. It gives us (members of the company) and you (users of our products) a place to have a civilized conversation about the products we both love.
The tricky part about the z-height is that what one user needs/wants over what another user needs/wants is vastly different - so when we’re designing anything it’s really trying to find the balance between what is optimal for some and acceptable for others. In this situation there are several alternative paths that anyone can use to achieve whatever objective they’re after - so this is a win/win!
@Julien 10/10 agreed - I’ll make sure that happens on the revision that is currently in the works!
-Edward
one other useful bit of information would be the vertical size of the 3 common routers, e.g. is the “stick out” below the holder the same for all of them or is there some difference there as well?
An excellent point. All of this may be exacerbated by the original default router being the DWP611 which has a longer body than a Makita or Carbide Compact Router.
Yes, @fenrus question Above is important to have answered to have a complete answer to this issue. I have a dewalt router and I suspect it has a different length barrel and possibly a different length to the bottom of the collet as well.
Not having all three router variations I cannot tell if this is true or not.
Please advise.
I seems that with the mount lower then the longer bodied router would only have to be adjusted up by 13 mm to be in the same place as before the DIY EZ-TRAM.
Maybe I’m totally wrong here, but I would think the machine should easily be able to reach a 3/4" waste/spoil board that is sitting on top of the 3/4" base plate that comes with the machine. Let the users who want it to go HIGHER machine their own new plate.
I had ZERO intentions of ever cutting any type of metal on this machine, and now I have to in order to surface my waste board? I have no idea where to get the aluminum or even what kind of aluminum I need. Do I need special bits for milling aluminum? Looks like I’ll need to at least purchase an 1/8" bit for this design?
Mr. Ford:
I believe what is wanted is the ability for the Carbide 3D router to reach the 3/4" spoilboard - NOT the base plate. You have come up with a solution that meets that criteria.
I hope that Carbide3D will make that part available. As a novice user of a CNC router that is not something I want to tackle as my first project.
Thank you .
Bill
Yeah, i have totally wasted a whole spoil board at this point because nowhere is it said i would need 2 layers of 3/4" mdf just to be able to drill holes. So after shimming up the spoil board after I was unable to drill through a single 3/4" board the actual drilled holes are now off somewhat and it’s trashed. Nowhere on the Z-Plus page or on the XXL page when dropping another $150 does it say you will be unable to use a single spoil board or 1/8" bits with a single spoil board with this “upgrade”. I paid $2000 dollars to not deal with the weirdness of my homemade CNC and I apparently still do.
I believe after last updates and upgrades now its base-board and that’s will keep your Shapeoko more solid , you need to get waste-board on top of the base board
This topic was automatically closed after 30 days. New replies are no longer allowed.