

Not my first CNC project, but my first HDM project as well as my first inlay. Used Maple, Walnut, and Padauk. I’m loving the HDM. It’s a beast!
23 Likes
Very nice. All inlay? Clearly not your first time at this.
Yes, it is all inlay. Pocket has a Start Depth (SD) of 0” and Flat Depth (FD) of 0.25”. Plug has 0.02” SD and 0.23 FD. I used a 0.25 EM to clear and a 0.25” 22* V Bit for V Carve.
This was my first inlay project, but did a lot of research before attempting. Learned a lot throughout the process.
Finished with a 60 minute Mineral Oil Bath and then Mineral Oil / Bees Wax rub.
Really looks nice!!
Can you explain these numbers? Are you using CC?
I recently did a small inlay as a test, and I used this graphic to help me reconcile the numbers.
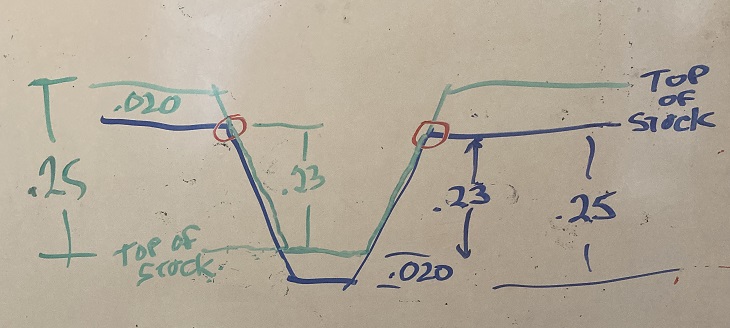
Blue: pocket, Green: Plug. Red: design vector. I changed the numbers to match yours. So I used start of 0 and finish depth of 0.25 for the pocket. But on the plug I used 0.23 start & 0.25 finish. so the carve is following the same vectors. This would leave me a 0.020 glue gap both top & bottom.
2 Likes
Good Morning
First, I use Vectic VCarve Pro. Second, I think the pocket (0.0” SD / 0.25” FD) is pretty self explanatory. The plug, I visualize it upside down when making SD and FD decisions. So, for my project, with the plug upside down, the SD of 0.02” leaves the ‘glue space.’ The FD of 0.23” will make the plug wide enough so that it cannot fully seat in the pocket and therefore wedges itself in the pocket. The gap between the plug and pocket allows one to use a band saw, etc. to cut away the wood standing proud of the project face. I personally use the CNC to surface the entire project as a final step before sanding and finish is applied.
I hope this helps. It took a lot of YouTube videos and practice to get it right. Feel free to reach out if I can help, but I am far from an expert at this technique.
Gordon
I have also done inlays but I still can’t wrap my head around one issue which is the plug cut starting depth. To start the plug depth at .20 to a FD of .23 is taking a lot of material away in one bite. What is the difference if you take multiple cuts to reach the FD? Isn’t the plug going to be the same regardless if its made in 1 pass or 2 passes? Or am I not seeing the whole picture here?
Got it. I was viewing it as the number I would put in CC. The vector / line width is held at the starting depth, so to make it work out right, I need to use 0 for the carve, and 0.23 for the plug.
Being a Marine, I had to get out my high-tech crayons (dry erase) to make sense of it. ![]()
Be Well
To make the math work in CC, start depth of the plug is where the plug meets the surface of the pocket. And you’re right, it can be a big bite. What I do is copy the plug advanced v carve path. Leaving everything else the same, I change the first one to start at 0 and flat depth of the start depth of the “real” plug tool path. The first one, since it starts at the surface of the plug (surface when being cut, not surface ref to pocket), CC uses the tools step down and takes more reasonable plunges into the material.
1 Like
Good Afternoon
Dennyboy - The SD and FD are start and end points only. You can take as many or few passes to accomplish your cut as you are comfortable with. It does not need to be one big cut. I often will use 1/16th per pass depending on material. I’m sure the HDM can handle more stress, but I like to be conservative.
Not sure if this answered your question, but reply if I can explain (or confuse ![]() ) further.
) further.
Gordon
For advanced v carve in CC it assumes no stock above the start depth. If start depth is 0.2” and a flat of .25”, the step down on the bit is .125”, the first pass will be 0.25” since it shrinks it is stepping down from 0.2” to 0.25”, not at 0.125” stepping down from surface on the way to 0.25”. For a 1/8” flat endmill clearing that is a big DOC, doubly so since there is only plunge and no adaptive or ramping paths. For a 1/4” flat endmill, this is not a big bite.
Understanding how CC interprets the depths and makes tool paths is important. while I haven’t used vectric sw, the videos seem to show it with more control over the cam ops. I am a fusion 360 user, and I have precise control over a multitude of cam depths. The free version of CC does not provide this. What it does, however, is provide a math-free complex-cam free to do v carve inlays. It’s definitely worth getting to know as well as recognize it might not do what you think it’s going to do if you’re coming from another cad/cam package.
Thank you for showing your details. I tried my first inlay and had to make the plug 4 times before I got it to fit. I will use your numbers for the next one
Thanks Gordon for the reply.
So why isn’t the SD at 0.00 and the FD at 0.23 and set this up like any other project with the tool (bit) depth of cut set to a conformable cutting range? Reaching the target FD is the goal here.and will be achieved regardless of the number of passes…right?
If so then why is the SD listed as 0.20 if it doesn’t matter?
With the SD at 0.20, the machine will begin cutting at that depth plus the depth of cut set for the bit which ends up cutting a hefty amount of material.at once isn’t it?
Maybe I am being a blockhead about this. You are very helpful, Thanks
For advanced v carves in CC on the male / plug side, start depth (SD) is the point where the male meets the top surface of the female. If SD is zero, the “top” of the male will be exactly same size as the opening in the female / pocket; therefore, none of the inlay will fit into the pocket.
“Top” of the male when carving will be the bottom when inserted into the pocket (middle view below)
Borrowing an image from Avids page,

This hopefully helps make sense of the geometry.
Note the difference between vectric v carve and CC advanced v carve settings is CC’s flat depth (FD) is measured from stock top and vectric is measured from start depth. That is to say vectric’s SD + FD equals CC’s FD.
3 Likes