Help - 1st project was a fail

hello I recently purchased the machine. I decided to make my first project today. I downloaded the simple hex tray from the cut rocket website. I change the thickness of the stock to .83ich as I’m using a maple stock. Exported the file to motion. I initialized the machine. I put on a bowl and tray bit. I then zeroed out XYZ. The machine then went to the BitSetter and did it’s thing. Here is where it went south!

first try- The bit went to the zero point and plunge right into the stock. The router started to smoke, I turned it off immediately. I proceeded to let the machine cool down check the router. Turn the router on without the bit. Router seems to be working just fine.

Second try - initialize the machine, set zero points and BitSetter did it’s thing again. Ran the job and now the the machine proceeded to do the project except it was hovering over the stock about 4ich from it. Mind you no adjustment were done to the file. This happen 3 more times.

What I’m I doing wrong? I’m going nuts trying to figure out why this is happening.

Should I have set zero with a different end mill?

Should I have change the setting for the Bowl bit different then what the downloaded file comes with?

Thank you in advance. I’m feeling a little overwhelmed. lol

My machine is the XXL Pro

How did you work up the feeds and speeds for the bowl and tray bit?

To start, we would recommend folks using tooling which has stock feeds and speeds in Carbide Create.

I just loaded the downloaded file as it was. The only change i did was switching the stock from .75inch to .83inch.

The bit is a Whiteside Router Bits 1372 Bowl and Tray Bit with 1/4-Inch Radius 3/4-Inch Cutting Diameter, 5/8-Inch Cutting Length and 1/4-Inch Shank

Do I need to edit the tool path for the bowl path?

Here is what the downloaded file has

Thanks for the prompt Reply.

1 Like

I got the same machine and love it.! Try loading the file in Carbide Motion first, clear all offsets and set zero again… It sounds like the offsets were not cleared.

1 Like

My Pro XXL is also in the test flight phase. The process is NOT as intuitive as the videos and tutorials profess. Going from Illustrator to Carbide Create to Carbide Motion presents three levels of interface difficulty that seems unnecessary.
I shall assume you are as bright as I and have approached this CNC decision from a reasonable angle.
There is a procedure to every step in this process. We must do ITEM ONE before we do ITEM TWO for some logical, VERY SIMPLE reason. There is NOTHING intuitive about it. The process is VERY literal. As we used to say (but few today grasp) “There are ten kinds of people in the world, those who understand binary and those who don’t.”

I cut my first 4, oh shit, 3(!) coasters today.

One needn’t be religious to have faith.

1 Like

When exactly did you put the bowl bit in?

When the machine is initialised it will prompt for a bit and do a bitsetter probe. Did you put the bowl bit in before or after this first probe.

1 Like

Mangled that so bad its unintelligible. Perhaps if you can straighten it out, and post it on a software programming forum?

1 Like

Getting from Adobe Illustrator to Carbide Create should simply be:

  • create in Adobe Illustrator — view in Outline mode to see what the vectors will actually look like
  • export as an SVG clearing the Responsive checkbox
  • open or import the SVG file

For the actual usage of the machine, there’s a machine operating checklist:

https://docs.carbide3d.com/general-faq/machine-operating-checklist/

and videos:

https://my.carbide3d.com/

and we have specific posts on various accessories such as:

If you get stuck on something, please let us know step-by-step:

  • what you did
  • what you expected
  • what actually happened

and we’ll do our best to work through this w/ you.

I turned the machine on connected to the cutter and initialized the machine. After the router went home I proceeded to bring the router to the front and put in the bit in at this time.

This is still a little unclear.

When you initialize the machine, it comes to the front and asks for a bit. Then, it pops over to the bitsetter to measure it.

If you manually made the router come to the front and change the bit, then this is probably the cause of your issue.

It’s a common mantra, but you can never change the bit unless you are prompted to change the bit. If there’s no prompt, don’t even think about changing the bit.

4 Likes

Open the file in Carbide Create and confirm a couple of settings. From the main window with nothing selected click the gear in the top left corner. Then check the thickness of the material and make sure it is set correctly. Next check that the zero height is measured against where you are expecting. If you are measuring against the top but the file is set to bottom or vise versa you will have issues with the Z depth, like plunging into the stock or carving above the material. Also confirm your toolpath zero is set. My example shows setting against center but you can select something else. Just make sure you set it properly when you set them in Carbide Motion.

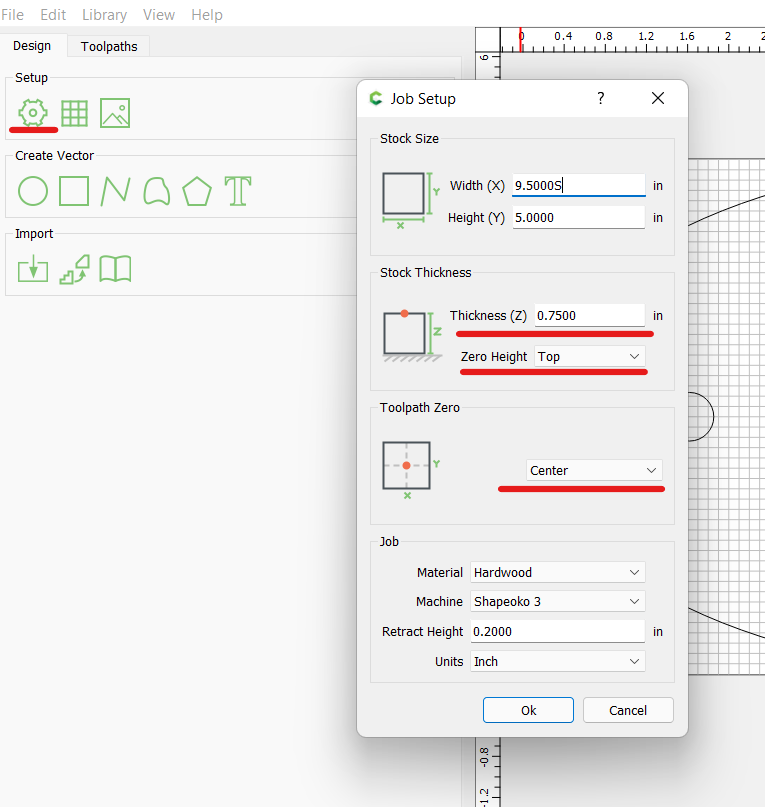
I like to measure off the top but I know that others prefer the bottom. It will really depend on your workflow that you start to develop. Once you have those confirmed go to the toolpaths tab and check the preview. Does it look right? You may want to uncheck the option to show toolpaths so you can see the project instead of a bunch of lines showing where the machine will move.


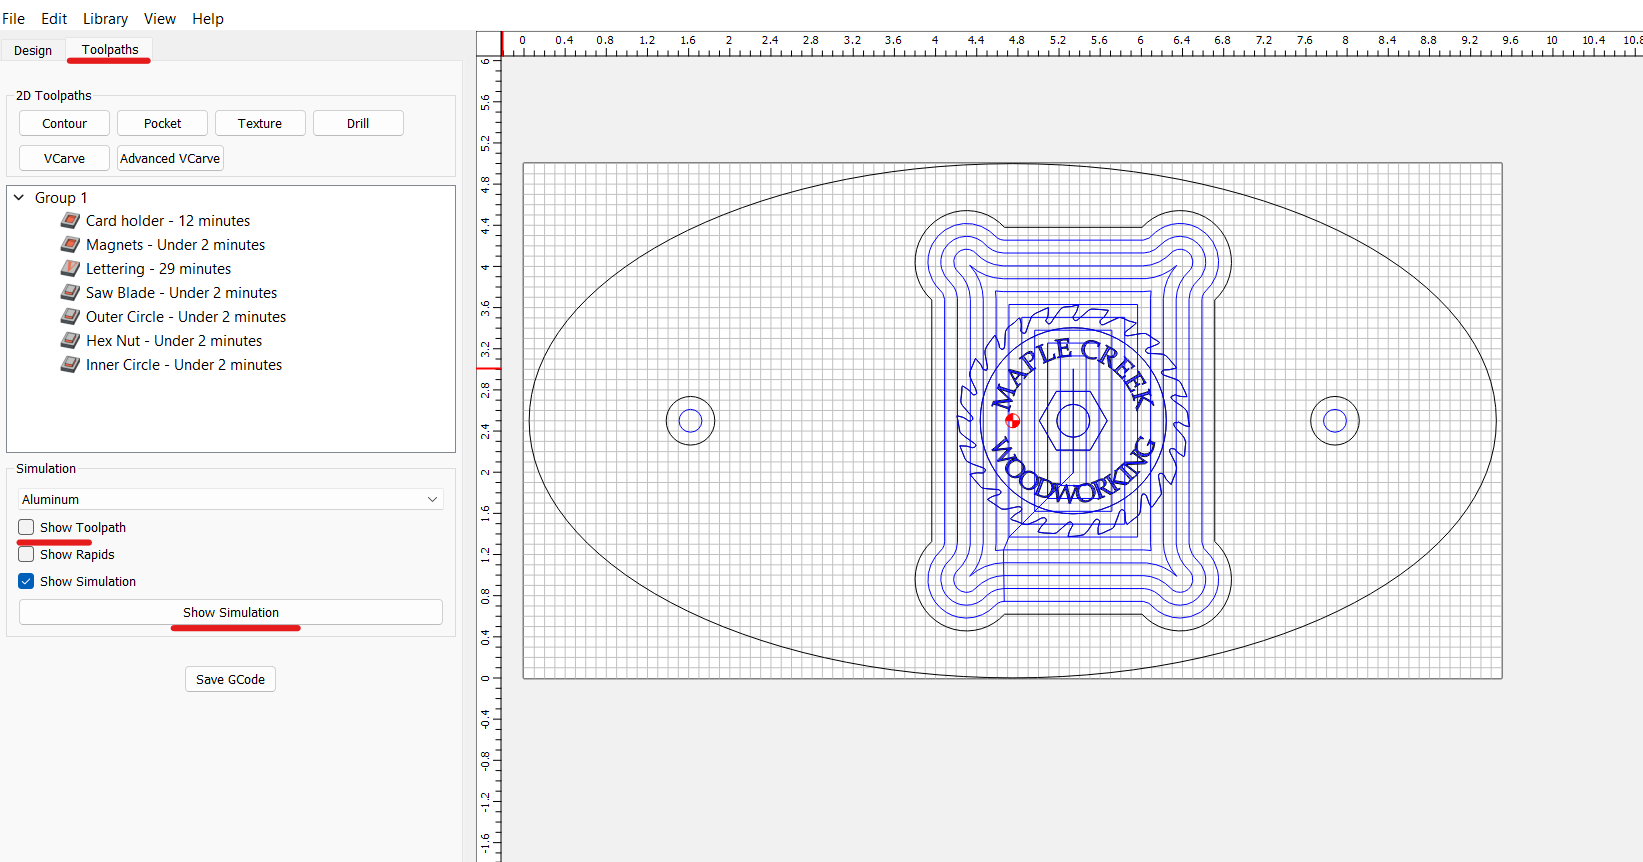
This will show you something like this but obviously for your project.

Once you like the way it looks, click save Gcode and name the file appropriately. You can now go to Carbide Motion and Initialize the machine. As it initializes, it will prompt for a bit. Put in the bit you want at this point and let it check the height. Once that has done move the machine using the rapid positioning and the manual jogging to the zero points you set above. If it is center and top like my example, move the bit to the center of the material and the top of the material. Then you can set the X, Y and Z zeros. I can’t get screenshots right now since I have a job running. This has directions to help you get the zeros set. Just make sure you follow the zeros you set in Carbide Create.

The next thing that you will do is load the new Gcode that you created and start the job. It will prompt to put in the first bit and move to the front center. If needed, change the bit and if not just click continue. It will move to the bitsetter and check z against the new bit. It will then move back to the front center. Here is where I used to do something manually to check the Z height since I had a lot of similar problems when I was starting. I would put a straight edge across the top center of the material and run it out to where the bit was sitting at the front of the machine. I would then run a ruler from the bottom of the bit to the bottom of the straight edged and check the screen in the Carbide Motion software. The left hand side has the Z location of the bit currently. This check would need to match the ruler. Make note this is always in millimeters so you need a ruler with mm or you need to convert. This saved me so much material at first. I would do this check after every bit change.

After a while I was sure I had the process down and no longer run the above checks but it really helped me understand how the machine was working and saved me a lot of false starts with either carving above the material or worse plunging into it. I hope this helps get a better understanding of the process and how the zeros need to be set and at least for a while, double checked.

3 Likes

I want start off by thanking everyone that replied to my post. What a great community, very grateful to be a part of it.

@rnicolson thank you so much for the detailed walkthrough. I was able to get the machine to finally cut out my project! I used your walkthrough and others input.

I found out was doing many things wrong.

  1. I was not saving each tool-paths individually. I found an old post from @gdon_2003 in which he explains this process. The file I downloaded and was trying to use had 3 tool paths, One pocket and 2 contour. I was saving the Gcode as one. I was told this was a No no.

2.The bit that was in the file was different then the actual bowl bit that I purchased. I assumed they were all the same. I had to go into the downloaded file, delete the pocket tool path and enter a new pocket tool path using #201 endmill instead.

  1. I was initializing the machine without loading the Gcode. I would turn on the machine. Connect to the cutter, hit initialize and once it went home. I would then load the Gcode and hit initialize again.

Once again thank you all for helping me out! Here is what I almost lost my sh*t trying to cut, such a simple basic tray, well not so simple for me. :grinning:

5 Likes

Un related, but you used a term which relates to a problem that Im haveing.

Machine initializes then prompts for a bit… it is at this point that the machine goes backwards to the home position for bit setting instead of going to the front where the bitsetter is located.

Now it does this while using the new laptop I baught to run the machine… it does not do this when using my old laptop.

Any thoughts?

Thx😊

1 Like

When you connect a computer to the machine and use Carbide Motion for the first time, you must configure Carbide Motion and the machine as if it was all brand new (like you did when you first connected your old laptop).

This involves turning off the bitsetter, setting the machine type, the axis type, sending the configuration to the machine, then turning on the bitsetter and setting its position.

4 Likes

ok. If I am understanding right. the problem lies in me just plugging up the new laptop and just going through the usual initialization process as if it were the old laptop.

But I forgot how to do the bit setter setup, I think I can find it in the Assembly/Setup manual that came with the SO.

Thank you for the info.
I’ll let you know how it goes.

1 Like

Ok…I’ve just finished doing the “BrandNew Fresh out the Box” set-up as listed in the instructions manual. As an added measure, I even installed Carbide Create on this new laptop, and set the “Post-Processor” as instructed to do so in the manual.

I then went through the initialization process and the machine performed as expected, going directly to the Bit-setter location just after acknowledging the Bit-change prompt.

Thank you so much for the help.

Now about “Why the New Laptop”.
I didn’t like that my nice one was dedicated to the machine and unavailable for use during a project. I wanted the ability to do design-work while working a project at the same time. Additionally, I didn’t like that its fans were taking in shop-dust, also, chips & dust were settling on the screen and keyboard even though I have a Vac connected to the SO.
So, I decided to get a Cheap barebones HP from BestBuy for 250.00. I don’t need it connected to the internet all the time and its is able to take the abuse (although I may find a way to protect it from dust.

Again, thank you so much for the help by pointing me in the right direction to resolve the issue.

2 Likes

This topic was automatically closed after 30 days. New replies are no longer allowed.