Ok, so now its connected, I’ve test continuity through the connector and its good. So for the steps, heres what I tried:
Move the mill into a position
connect the alligator clip to the end mill
send command G38.2 Z-26 F100
This is where it goes wrong, nothing happens, and I get an error message that says “Probing Cycle Failed” and then in the MDI tab it says “Not Homed” even though I homed it previously.
The lead from 360 brass is pretty tightly bound up in the alloy, and isn’t much (2.5–3.7%) — so long as it doesn’t get melted so as to release elemental lead into fumes from being melted or ground up incredibly finely, AIUI, exposure risk should be negligible.
I grew up w/ folks who would melt wheel weights on the kitchen stove for casting bullets, and remember watching in fascination a traveling tradesman melt down and re-cast lead dead-blow mallets in a garage parking lot — an occasional instance of exposure is probably not going to cause health problems — the problem is the bio-accumulation, so we should all exercise every caution reasonable.
Try Universal G-Code Sender, bCNC, or Chilipeppr — those seem to be the top three. I think UGS is the easiest to install if you have a machine which will run Java apps well.
I’ve used that one. It’s nice. Though it doesn’t have some of the g-code interpretation features of CM (so M6 doesn’t work on a Nomad because Grbl doesn’t understand it, CM just simulates it via a combo of other gcode and UI: click here when ready to continue).
I was thinking at some point I’d hack in the M6 stuff. Another idea was to make a plugin for OctoPrint. I did one for Sailfish (and old MakerBot) 3D printers and I think the new plugin architecture is flexible enough to do everything we’d need to do to both the comms and the UX to make it work for CNC.
Most of the 8-bit 3D printer controllers are running firmwares that are based on Grbl. Though one of the main ones “Marlin” broke the call-response assumption of the Grbl protocol which makes the host software way more complicated than it needs to be (deal with out of order responses from the firmware).
So a friend of mine asked me to make him an LED accessory light for his aquarium. I have a stock heat sink here but I’d like to make a custom one, very simple. I made a design in fusion, two 1" x 6" x 1/8" pockets on a piece of 3/16" 6061 aluminum.
The issue I’m running into is it’s trying to cut the entire depth at once and it’s getting hung up. I figure I need to do the pockets in several sweeps versus one.
Fusion 360 puts the stepdown in a few different places to make sure to confuse us. Just kidding. I think they do it because they name it different things when it us finishing vs. roughing etc.
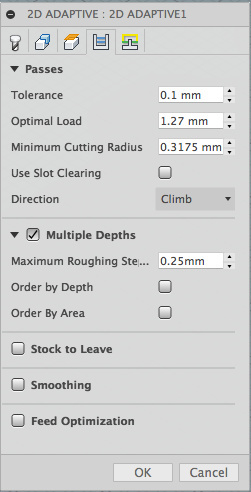
You probably want to look for “Multiple Depths” checkbox.
What operation are you using in CAM? Then I can be more specific.
That fourth tab over is “Passes”, check the “Multiple Depths” box and put in the desired stepdown (here I have 0.25mm which is a little less than 0.01" which is what I use on 6061 aluminum).
Got it! That worked, thank you. Couple more questions.
How do you set the depth for the 2D facing option. I did one pass and it took half the stock off. I just want to remove enough to clean up the aluminum, like .5mm or so.
Any thoughts on how to get a very nice painted finish on aluminum?
I haven’t tried painting, though I’ve been meaning to try just some acrylic to fill engraving. I’ve heard people like to use epoxy for that. I have done some anodizing that turned out fairly well. Though it’s a bit of a messy pain.
For facing you could do a pocket at the depth you need. You don’t want to take more than 0.254mm at a time though and probably less if you aren’t sure you’re zeroed off of the highest spot.
I can only make 2D facing work if I have a 3D model to define the stock off of. It seems like it should work by just defining a fixed size stock box, but I couldn’t make it do anything predictable. But if I have a 3D model, and define the stock to be the same size, the facing will go to the depth of the model top (by default), so if I define the stock top offset as 0.1mm that’s how much it’ll take.
In regards to finishing, I looked at anodizing and powder coating. Powder coating seems easier and safer. The idea of having containers of battery acid laying around doesn’t seem like the best of ideas.
For now I’m going to look into painting using etching epoxy primers and paints.