@Julien
“on small endmills (1/8" and below), runout must be low (sub-0.001") to accomodate this chipload target without risk of breaking the tool. Tapping the endmill works great to reduce runout (@Vince.Fab, @PaulAlfaro)" I really doubt that when cutting forces increase to useful levels for useful usage times. Those sinusoidal forces, which are similar to those delivered by an impact driver, are applied to the cutting surface of the endmill get “amplified” by the length of the sickout. But, you shouldn’t have to bother with that anyway with your HF Spindle and collets - which claim 0.01 mm (0.0004”) runout. Let us know if that’s real and how it works out!
" SFM is probably not a good enough input to determine RPM across a wide range of materials:
see separate thread from @The_real_janderson, and the conclusion that on Shapeoko we should adopt the “Datron-style” milling and focus on chipload rather than SFM
Using the SFM value can still be a reasonable backup plan where no other starting point exists (@PaulAlfaro )"
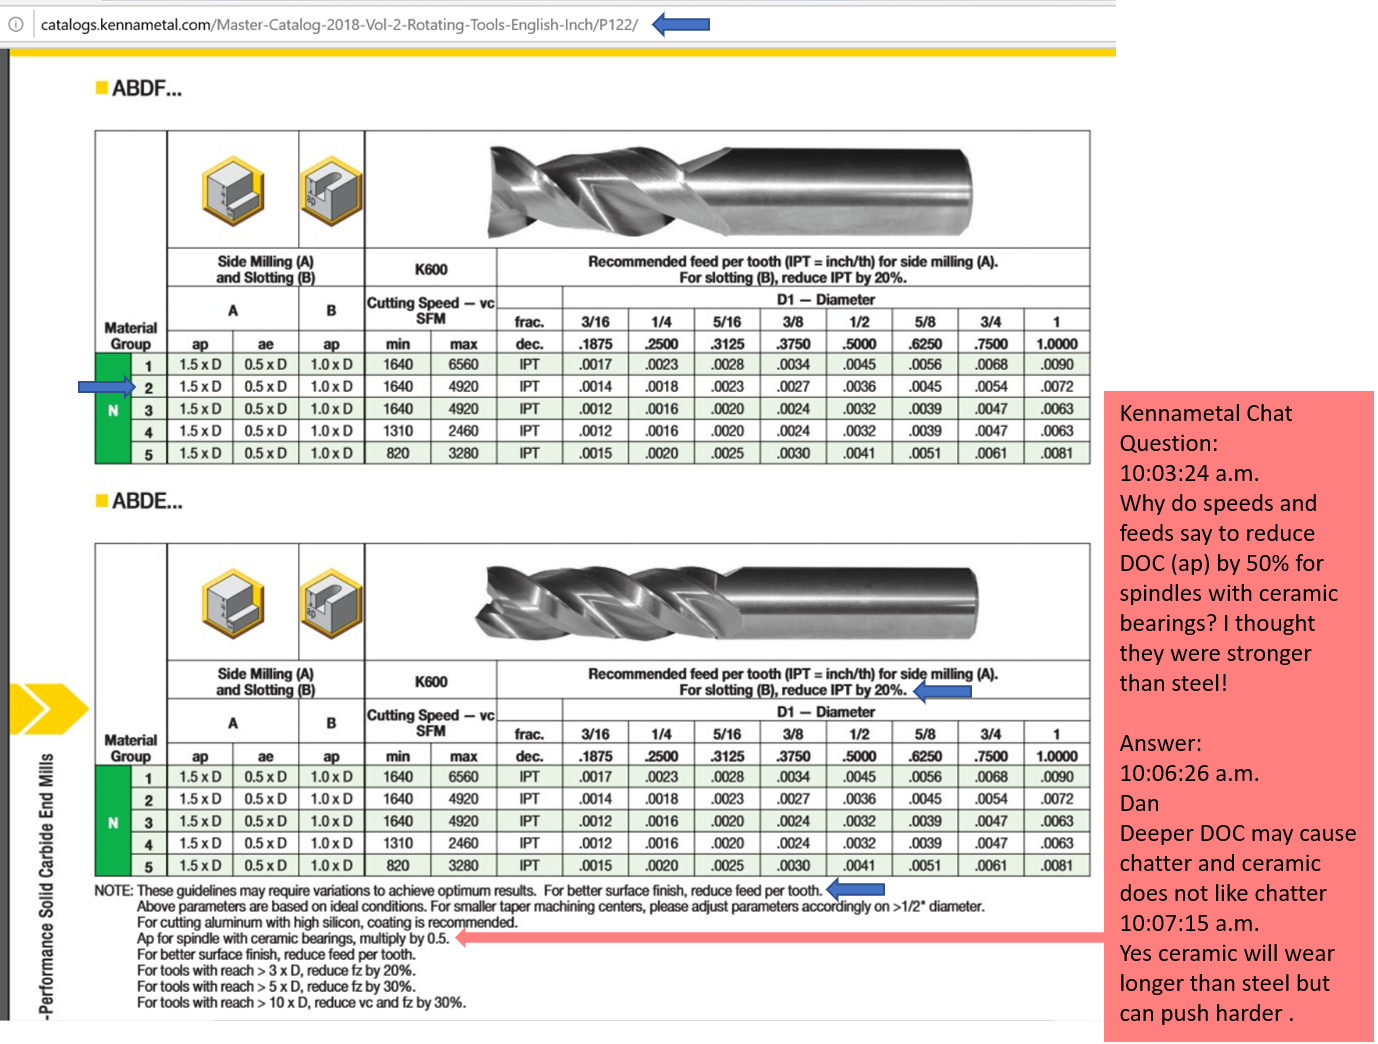
"chipload can be increased up to a max value that depends on the endmill diameter and the material ([see table])," Use manufacturers speeds and feeds recommendations for that!
Some cutter manufacturers, like Kennametal, use SFM for their speeds and feeds recommendations instead of RPM. That’s why we should leave the “SFM Input Option” in the workbook.2019-07-10 Speeds and Feeds Workbook.zip (150.2 KB)
Here’s what one of their endmills should be able to do for you with your HF Spindle if your machine can handle 9.4 lbf (minimize spindle stickout!)
And you even filled the worksheet with my future spindle settings…so cool.
It has arrived by the way, I’m picking it up on Saturday!
Too bad that unlike @Vince.Fab, I need sleep, and it’s 00:22 and I should really turn off my computer now.
@Julien
" chipload => 0.001 + 50% margin (runout, dullness, and other wrong but real reasons…)" shouldn’t compensate for dullness by pushing harder.
" DOC & WOC => shallow and wide strategy (it’s unlikely a newbie will be into adaptive/HSM) "Shoudn’t “newbies” learn to do it the right way (deep and narrow) too?
@Julien
"indeed we were not “arguing”, that’s just my imperfect use of English words, also probably because for a French guy “arguing” is synonymous with “discussing” I’m really impressed with your understanding of English grammar and writing skills (they’re a lot better than that of many engineers that I used to work with). Did you spend time in the US or UK? Do you use software assistance? Do you speak that well too?
"The tricky part is, on a Shapeoko with a “simple” CAM program like CarbideCreate, where you do not have access to e.g. helical ramping, initiating a pocketing cut at 300% DOC will not work well because at the beginning of the toolpath, the tool will effectively be slotting at 300%D." Doesn’t CarbideCreate allow you to define a starting pocket perimeter toolpath using a tool defined as DOC = D followed by another pocket clearing toolpath using a tool defined as DOC = 3X D?
runout adjustment and how long it holds: NYCCNC’s, Paul’s, Vince’s, and my own (very limited) tests seem to indicate that it holds “long enough to be useful”, probably because we are testing at low power/MRR/forces scenarios, but that is a very likely usecase in micro-machining isn’t it ? I will definitely check the runout of the new spindle, from what I heard it is a bit unpredictable so here’s to hoping I do not get a lemon.
max chiploads: yeah manufacturer recommendations are relevant as far as the endmill is concerned, but practical limits once it is installed on a Shapeoko are lower, from my experience. Just now if I google “chipload recommandation” and open a random link (e.g. this one), it tells me to use a 0.004" chipload for a 1/8" endmill in aluminium. Nope, I am probably not going to try that. Funny story: this same PDF has this statement that you wouldn’t like: “Your goal is to select the lowest RPM possible for each application”
worksheet: your version gets better every day, I would really like to include it as is in the e-book as a reference calculator at the end of the feeds & speeds chapter, along with step by step description/instructions on how to use it (because let’s face it, if a total newbie opens it for the first time, or any other similar calculator for that matter, it will look daunting, while in fact you only need to play with ~4 inputs)
deep & narrow cuts: theoretically you could use CarbideCreate to “simulate” e.g. helical ramping, by first cutting the center part of a pocket using conservative DOC (<1D), and then creating a second toolpath that would clear the rest of the pocket at high DOC / small WOC. With no rest machining option in CC that would also mean you would need to create extra geometry to define two pockets. Wait, then the second pocket would look more like a very large slot, and CC would decide to start cutting in the middle of it, not the borders. Sounds like a headache, and IMO it is an unrealistic expectation from a new user to master this kind of subtleties, it would make the learning curve even steeper. I agree with Vince that slotting needs to be mastered anyway, and this is one of the most common cutting scenarios for Shapeokoers. Yes it’s wearing out the tip of the endmill only, yes it means moving away from the optimal feeds & speeds/MRR, but still, there should be a guideline for how to cope with that situation.
English: nope, I never lived in the UK or US but I guess working for GE in France for 10 years, reading all of my books in English, and binge-watching Netflix shows with subtitles turned off helped. What I wish people did is correcting my mistakes, but no one wants to be rude so they don’t. Everybody please don’t hesitate to correct my (recurring) small mistakes, I will be grateful not offended!
Gerald, I suggest you try to use the basic tools available (read free) to most users like Carbide Create and Easel in particular to create a few projects. There are no fancy toolpaths and options are pretty limited. Heck, CC does not even have rough-in and detail passes available. Even the VCarve family products while very powerful do not have many of the features like adaptive clearing.
@luc.onthego@Julien@WillAdams
I’m waiting on my emailed download link for CarbideCreate (I’ve only used VCarve so far.)
But maybe I wasn’t clear in my proposed workaround. Would this work?
Assuming you want a 300% D deep pocket. Define a starting pocket perimeter toolpath using a tool defined with DOC = 100% D (and feed rate 1) which would you would run/execute first (it would take 3 passes). Define a follow-up pocket clearing toolpath using a “different” tool defined with DOC = 300% (and feed rate 1 or 2) which you would run/execute second.
Unfortunately, the software would probably start the pocket from the middle or somewhere else, not from the sides. There is no way of editing the toolpath in CC and it is often a surprise as to where it will decide to start but you can see it on the preview screen.
If I understand what you’re saying you want a roughing/clearing operation and then a full depth finishing pass — if memory serves, I did that in this project:
@gmack: yes, that was clear, and my point (as well as @luc.onthego’s) is that this will require jumping through hoops in CC. If even cutting a simple pocket requires to double the time spent in CC to create additional geometry, create a 2nd toolpath, fight the very simple and non-configurable toolpath generation logic (e.g. where it starts from), then it is unrealistic to expect the majority of beginners to do it
Currently trying to figure out if it’s worth doing an adaptive path down the middle of a rectangle or if a pair of ramping paths connected by arcs would be workable.
@Julien
" max chiploads : yeah manufacturer recommendations are relevant as far as the endmill is concerned, but practical limits once it is installed on a Shapeoko are lower, from my experience." That’s what the worksheet is for!
" Just now if I google “chipload recommandation” and open a random link (e.g. this one), it tells me to use a 0.004" chipload for a 1/8" endmill in aluminium. Nope, I am probably not going to try that. Funny story: this same PDF has this statement that you wouldn’t like: “ Your goal is to select the lowest RPM possible for each application ” Here’s much more reasonable and useful endmill manufacturer’s speeds and feeds guidance (maximum chiploads) for the endmill “used” in the latest workbook that I posted.
" worksheet : your version gets better every day, I would really like to include it as is in the e-book as a reference calculator at the end of the feeds & speeds chapter, along with step by step description/instructions on how to use it (because let’s face it, if a total newbie opens it for the first time, or any other similar calculator for that matter, it will look daunting, while in fact you only need to play with ~4 inputs)" IMO the worksheet would be the best way to teach how to use a CNC Machine - Walk through it step-by-step? I’m not a training guy though!
" English What I wish people did is correcting my mistakes, but no one wants to be rude so they don’t. Everybody please don’t hesitate to correct my (recurring) small mistakes, I will be grateful not offended!" Microsoft Word only indicated that you need a comma after “rude”. I would have just said “English is not my native language, so I’d be grateful if everyone would help me improve my language skills.”
@WillAdams
Yup - Thanks! Defining the center of the workpiece for CC’s two toolpaths looks like it should work just fine if it generates the GCode properly. I.E. A small centered pocket with 3 passes at 100%D DOC followed by the larger concentric pocket at 300%D DOC.
OOPs I didn’t realize that your speeds and feeds were integrated into CC!! Sorry!!
Yes this is a workaround for CC and it requires CAMotics, not something the average Shapeoko user will do for a random project. Very few Shapeoko owner use that software and requires to learn something else. If CC is going to Pro, the toolpaths options will have to be improved within the software. As we have discussed, having access to these toolpath strategies within CC would increase the power of the Shapeoko for the average user.
CAMotics is a GCode visualization tool. In fact I made a mistake because I think that @WillAdams is doing this inside his box generation tool. I’ll let him chime in but it is not in CC.
I just used CarbideCreate to do it as I described. I’d probably do it the same way in VCarve!
Update: VCarve pockets start from the center too. So, the same approach has to be used with it.
Well I suppose it does not hurt to mention this workaround to the lack of helical ramping with CC, then people will have a choice whether they like to invest a bit more time in the design to put themselves in the optimal cutting configuration, or take the shortcut to do regular shallow pocketing, or upgrade to a CAM tool that will make this easier for them.
I think we have reached the closest thing to a consensus we can get from this thread, I will rework my feeds & speeds section accordingly, it will probably not get all the votes but hopefully it will be a good enough baseline to be useful on the path to learning CNC on the Shapeoko. I will definitely write a step-by-step (or in this case cell-by-cell) walkthrough of the worksheet and include that too.