the image in the link @WillAdams attached expresses it well?
if you’re not making a (large enough) chip because the cutter is dull then you want to increase the chipload and get a full scoop of mass that can carry some of that heat away. otherwise your cutter is getting carpet burn on the material - just rubbing and adding heat. it’s still spinning along into the material but heat is no longer being carried away by a chip.
same reason why most people burn out drills prematurely - they want to make a hole through a material fast so they crank up the speed and have it burn up rubbing and not creating a chip. feeds and rigidity play factor in this but it’s the heat that kills the bit
@PaulAlfaro
“if you’re not making a (large enough) chip because the cutter is dull then you want to increase the chipload and get a full scoop of mass that can carry some of that heat away.” So, push harder?
“same reason why most people burn out drills prematurely - they want to make a hole through a material fast so they crank up the speed and have it burn up rubbing and not creating a chip”. Harder materials certainly require lower speeds, feeds, and procedures. I’ve ruined both HSS and Cobalt (M42) drill bits (they turn purple - not black!) by not using cutting oil when drilling stainless and hardened steels. But, I’ve never ruined a drill bit, table saw blade, bandsaw blade, router bit or endmill cutting wood, plastic, or Aluminum. Have you/others?
push harder or faster. whatever allows the flute to take a larger scoop of material. more material grabbed equals more heat pulled up and away. to a point obviously
also, def burned up an endmill in wood. crank rpm all the way up and have the feeds slow. watch the endmill get black with a quickness. cnc routers are known to be fire hazard with wood because bad or slightly off feeds and speeds plus all those flammable chips can allow for a casual fire in no time flat.
@PaulAlfaro “def burned up an endmill in wood. crank rpm all the way up and have the feeds slow. watch the endmill get black with a quickness” You can clean the “black” carbon char off - the bit isn’t ruined (“burned up”).
“cnc routers are known to be fire hazard with wood because bad or slightly off feeds and speeds plus all those flammable chips can allow for a casual fire in no time flat.” Please provide supporting references/documentation.
Chips are not perfect thermal insulators which is why it is so important that they be large enough to actually carry some heat energy away.
The increased cutting power requirements of actually taking a cut allows a more efficient translation into other expressions of that energy.
Somewhere, there really should be a good simulation of the physics of cutting — unfortunately it’s not in Wolfram Alpha (or if it is, I couldn’t find the terms to elicit it).
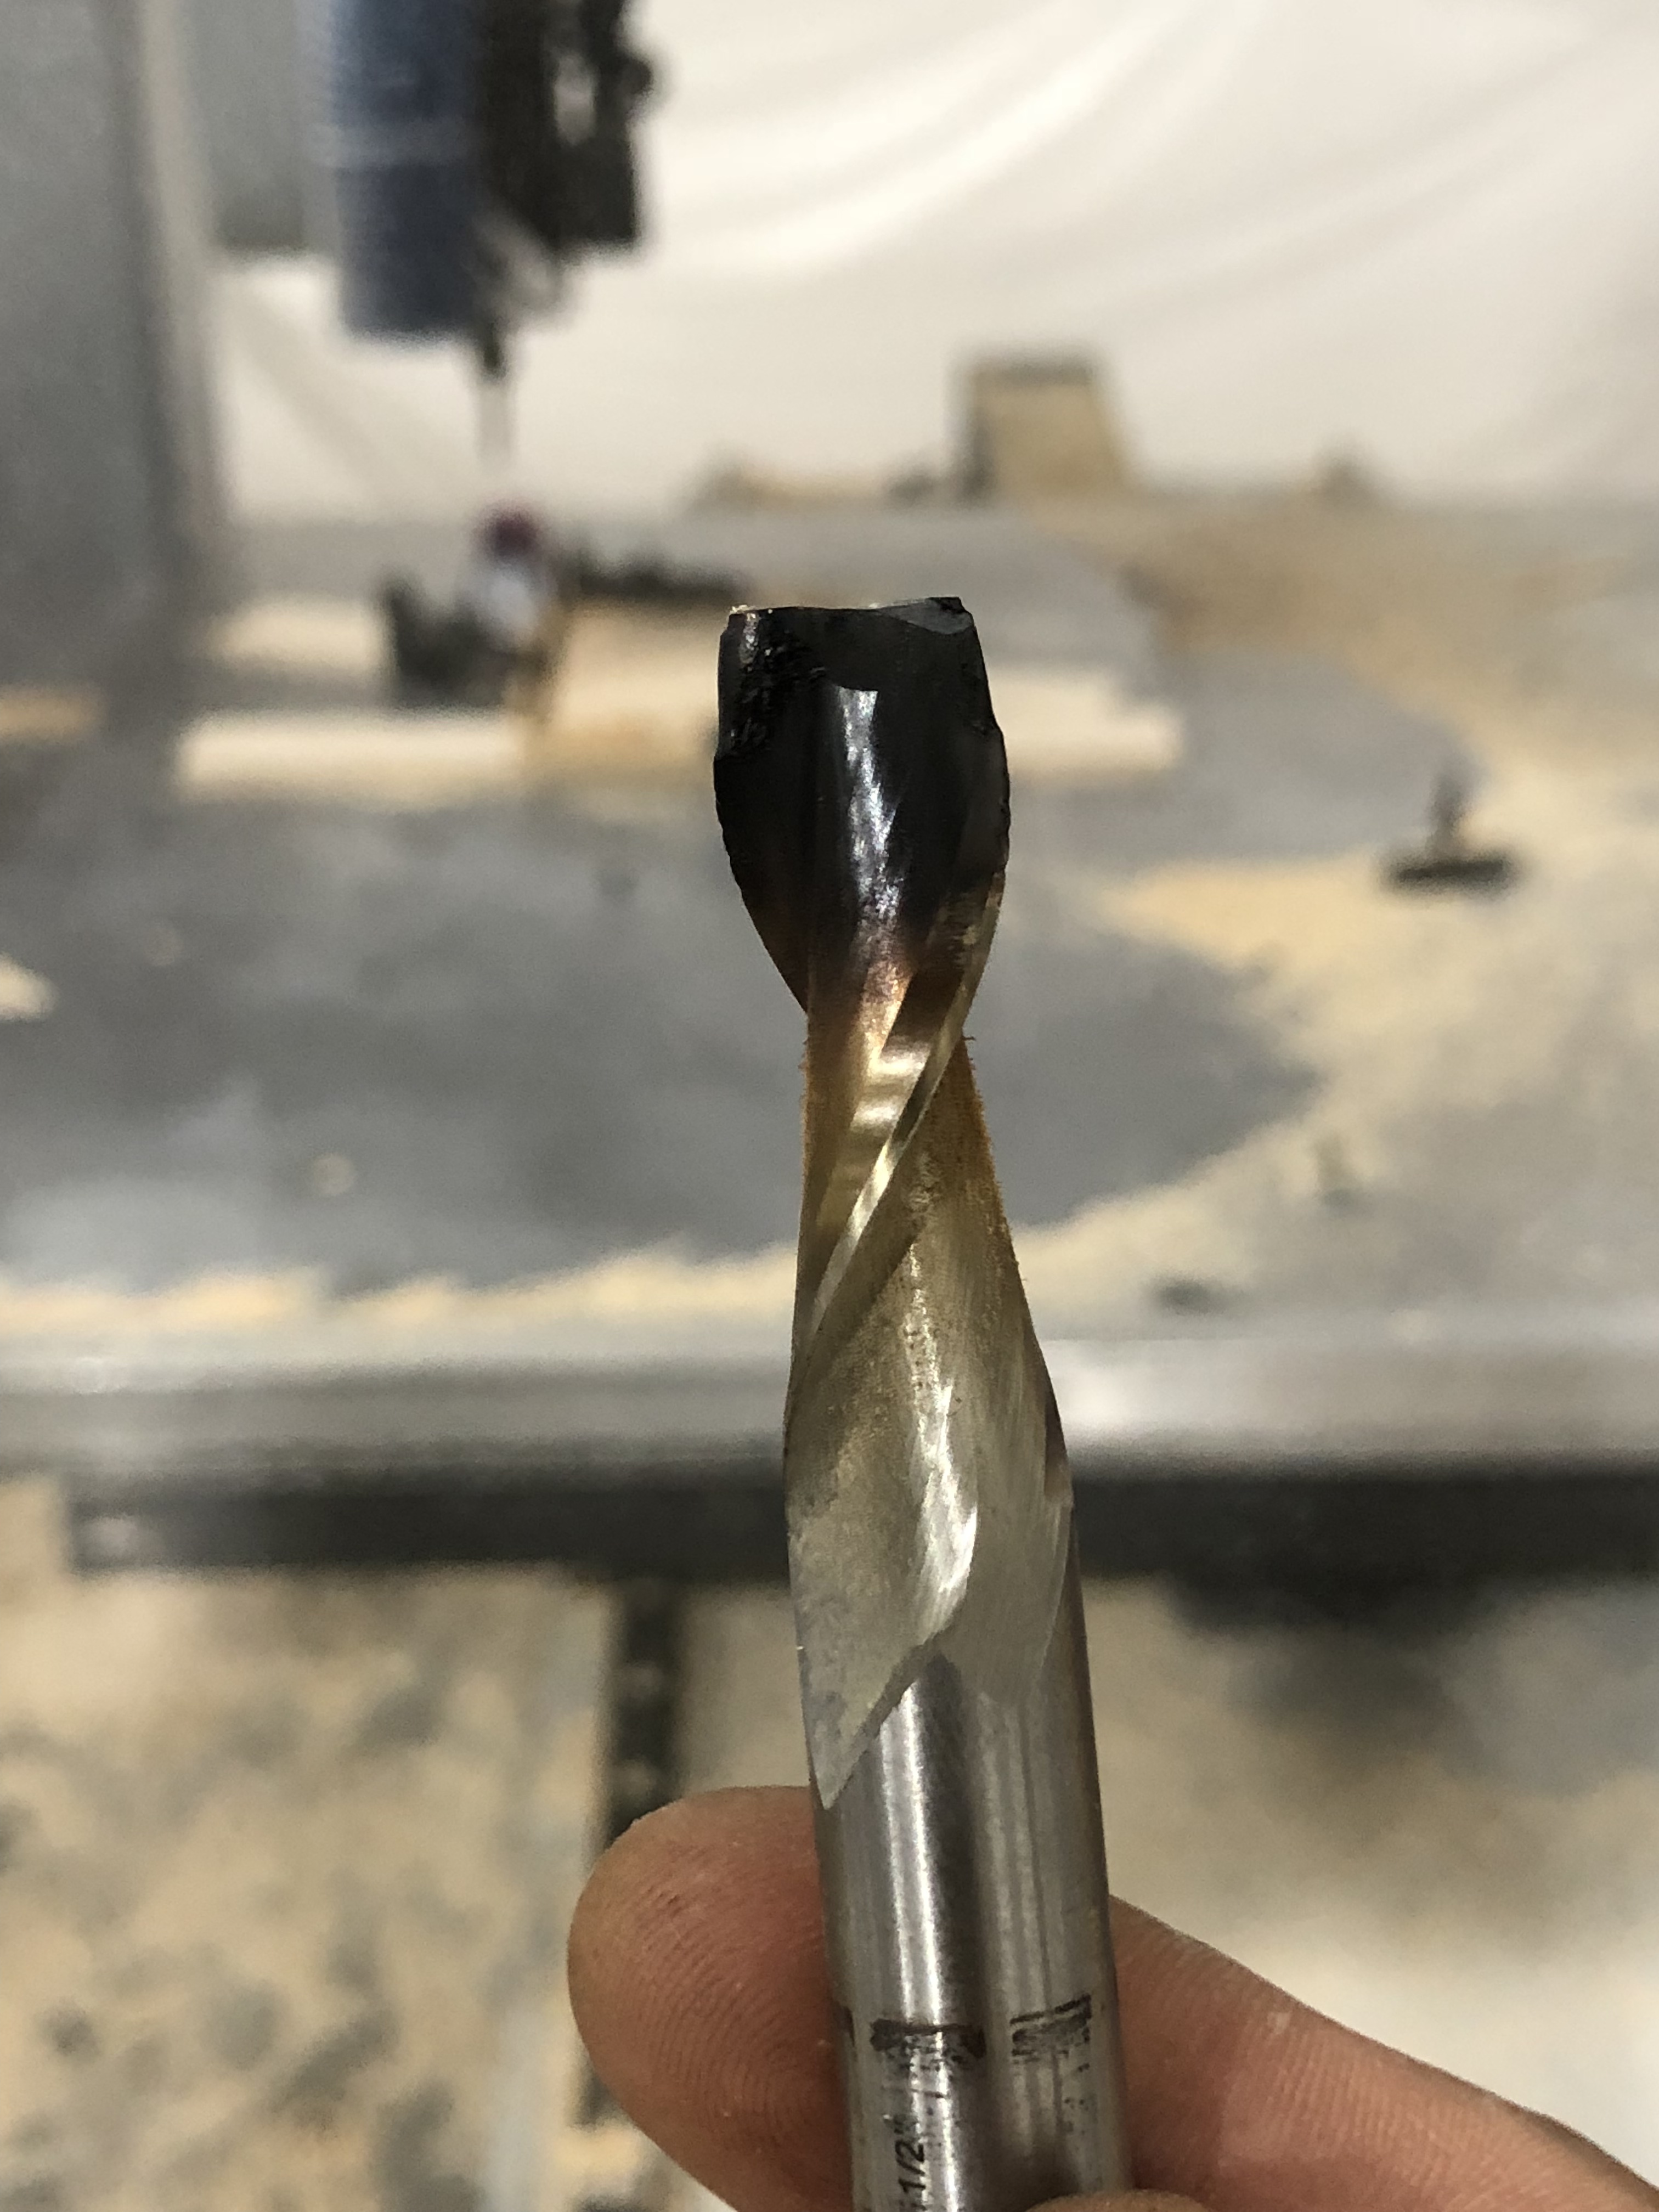
i didn’t mean it literally. you’re correct in wiping it off but it’s a tell tale sign of S&F. the edge is beyond dull from rubbing the abrasive birch ply in this instance. actually looks like the edge developed chip breaking properties ha
you can google instance of cnc routers and fires. i believe it’s an insurance concern to some degree as well.
It can be interesting working with cherry (lumber). Cherry burns pretty quickly when it comes in contact with tooling, and the key is to keep the wood moving as quickly as possible (while remaining safe).
Though, the wood never really seems hot enough to have burned, and when the saw stops the blade doesn’t seem that hot.
What cutting details specifics and spindle were you using with that 1/2 endmill? were you using a Shapeoko? How long did the bit “last” without cleaning?
Baltic Birch is the hardest to cut wood that I’ve experienced so far (harder than Santos Mahogany)! My admittedly limited measurements suggest that its unit power is about 0.1 HP/(cuin/min) (vs 0.22 HP/(cuin/min) which appears to be widely accepted for 6061 T6 Aluminum).
It didn’t go into the sawdust/chips. Most of the heat is likely generated by the friction of the (table/miter?) sawblade’s body rubbing against the workpiece, so you’ll see the most burning on the workpiece surface that experiences the most friction (Likely the cutoff piece when ripping on a table saw if the fence is set “properly”). The sawblade has a lot of thermal conductivity, mass, and dissipation area, so you won’t “see/feel” the heat there.
it was a while ago so i can’t recall the specifics. it’s on a motionmaster at work with a 7hp spindle. typo on the S&F in one of the toolpaths that i didn’t realize while working remotely. it wasn’t until i noticed carbon build up on the walls of the part that i inspected closer and stopped the program. doing pockets and the corners do a number on the tool
You guys are always having the interesting conversations while I’m sleeping, darn time zones
About the “larger chips carry away more heat” thing,
there might be an interesting nugget of information in this other thread by Bob Warfield:
If this is true, then it justifies making thicker chips to carry away heat. This does not say anything about the amount of heat that is produced depending on the cutting force though, indeed.
I had previously thought of it naively as follows: tool friction heats up a superficial layer of material, say of depth of X µm to simplify. If you are using a chipload of Y µm, you will scoop Y µm of hot material. If the chipload is high enough, Y>X, you remove all the hot material layer in one scoop, and the next tooth will bite into fresh, cool material. If your chipload is very low, you will leave some of the hot material on the surface, and the next tooth with come and add more heat, so it tends to accumulate ?
but above all, personnally I was sold on this principle after I actually started to check the temperature of my endmill after each run, and saw that it was not even warm when I used a “large” chipload, while it could definitely get warm or even hot when babying the chipload.
EDIT: I still wonder how one would include the unit power in the process of determining adequate feeds and speeds and DOCs ? I get the part about knowing how far one is from the machine’s limits, but not how that would lead me to specifically adapt my RPM/feedrate/ADOC/RDOC values, since 99% of the time I am probably very far from the machine’s limits anyway?
You guys dont think we’re over complicating it a little?
Stuck to a 0.0007 chipload in ti going full width contour and 0.005 axial on a 1/16 two flute @ 7k. Not enough sfm to make any heat but nice big chips. No tools were harmed and no calculators used lol.
This is what I like most about this forum, you can talk both with people that just make it work, with the right mix of theoretical foundations and a whole lot of experience/experimentation, and with other people that are more inclined to dig deep to understand the underlying principles (and possibly debunk a few myths in the process)
I guess it comes from the diverse backgrounds we all have, and wildly different expectations about what we do with the Shapeoko (for example, I could not care less about productivity since this is purely a hobby for me, while for others it is the difference between making money and loosing money)
The intent of the book if I remember correctly was to simplify things so people don’t need an engineering degree to produce good results on the Shapeoko. I think this needs simplification not increasing complexity with calculations required using 4 or 5 F&S calculators that may or may not have been created with a prosumer CNC router like the Shapeoko or the Nomad in mind. While it may be interesting to check the validity of the values to ascertain that the recommendations are valid for our equipment with some variations for out of the box to fully modified machines, I think that there is a need to rely on rules of thumb once we agree on what they are. It may not be the optimal F&S for particular cases but in general will lead to very good results.
agreed 100%, and that is exactly what I went for in the book so far (guidelines for starting points, rules of thumbs, experimental approach). This thread evolved to a somewhat geeky discussion, I am trying to figure out if there is a useful rule of thumb that could/should be added regarding checking power values, maybe so maybe not, we’ll see !
I really like all this discussion of the calculations of the chipload and power requirements.
Even just to put it in perspective or debunk alternative settings/suggestions.
This type of thinking and pre calculations is not my strong suit. I still work off trial and error with some known data on the setup, material, etc, and any more knowledge on this is always helpful. Usually a quick check with a F&S calculator to confirm and let the endmill eat.
My admittedly limited experience using power tools with wood, plastic, and aluminum tells me:
With routers:
Use the highest router speed possible (because it minimizes force requirements). Router bits typically have 2 flutes (teeth) and can be safely operated at 24,000 RPM if under 1 inch diameter.
Start with a reasonable depth of cut (DOC) and width of cut (WOC) for the router, workpiece, and cutter.
Start with a comfortable and controllable feed rate of about 1 inch per second (60 inches per minute -IPM). (That provides a chip-load of 60/24,000/2 = 0.0013 inches per tooth - IPT.)
Reduce feed rate (hence chip-load) if necessary to keep feed forces acceptable.
Replace router bit, reduce DOC, reduce WOC, and/or use a more powerful router if feed rate reductions don’t enable sufficient feed force reductions. Don’t push harder!
With table and miter saws:
Table and mite saws typically spin 40 - 120 tooth blades at ~ 3,600 RPM.
Start with a comfortable and controllable feed rate of about 1 inch per second (60 inches per minute -IPM). That provides a chip-load of 0.0004 - 0.0001 IPT.
Reduce feed rate (hence chip-load) if necessary to keep feed forces acceptable.
If feed rate reductions don’t enable sufficient feed force reductions, replace saw blade, reduce DOC, reduce WOC (via thinner blade), and/or use a more powerful saw. Don’t push harder!
Aren’t the cutting physics basically the same for CNC machines - which basically replace the human in these processes? Why is the guidance provided in the “[cnccook]book” so different?
I prefer to reduce DOC where machine rigidity is a concern. Reducing feed rates without a corresponding reduction in RPMs can get you into quick trouble with melting plastic or aluminum.
I start with the highest RPM I can tolerate (noise-wise). I then calculate the feed rate based on recommendations I find for the materials I’m cutting and the tooling I’m using.
I start with half the DOC that is typical (of a more rigid machine).
I cut my piece and study the results. If I need more pieces, I might adjust my DOC based on my observations.