SO3 XXL homing error "GRBL Error: Setting Disabled"

I just setup my SO3 XXL yesterday, installing all three homing switched, and noticed when I run the “Click To Begin Homing” command I get a “GRBL Error: Setting Disabled”, and the machine moves the X axis to the left a few inches and then stops.

I set the “Shapeoko has Homing” option to “True” under settings before I ran it. Is that the correct way or am I missing something? Do I need to set this up a different way.


Thank you,

James

James, Did you configure GRBL to activate homing yet?
Heres the link:

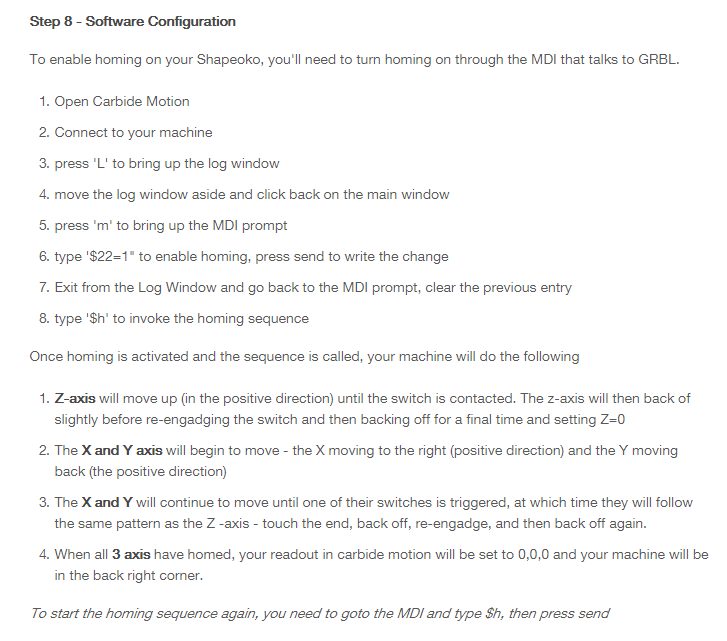
Heres the part you need specifically:

1 Like

No, was not too sure on how to do that. I will follow those instructions and see what happens.

Thanks,

Thanks ApolloCrowe, I was not too sure about trying that code before I posted this, did not want to mess anything up. Thanks for the help!

James,
One more detail, for the XXL - in order for your Rapid positioning options to work properly for your machine you will want to change the Table dimensions to 850 X and 850 Y

Thank you again, I was just trying to figure out where to find that information, you read my mind! LOL

Thanks

Hi there, was just having this same homing issue on my newly built XXL and this was a great help. One thing I noticed though if I put 850x850 my machine would hit forward left pretty hard. I dropped that value to 840x840 and the issue went away. Is this an issue with my machine, should it go to 850x850mm without hitting the ends? I know 33" is closer to 838mm. I’m good with how it’s working now, just want to make sure I didn’t miss something. Thanks!

Dan

Set your GRBL X/Y extents to limits that avoid crashing against your extrusions and/or machine frames.

Jog your machine after homing to a position where it’s just about to mechanically stop and note these maximum X/y positions. Enter these max offset positions into your controller and CM settings and you’ll stop whacking edges.

So is it just slightly different variations from machine to machine or is my machine built wrong? I’m a mechanical engineer in a busy production environment for my day job, I totally understand tolerances/variation, just want to make sure I didn’t miss something during my build. The machine is working great otherwise as far as I can tell, and I’m not concerned with losing 12mm extra I didn’t even know I had past 33"x33" (838mmx838mm) compared to 850x850mm. Thank you for the help!!!

Dan

The extents are what you’re comfortable with when it comes to the clearance of your carraige and gantry against the extrusions and framing in max travel positions. I characterized my X/Y with about .5mm clearance in each worst case position.

The machines are manufactured to some pretty tight tolerances, so unless there’s something really inconsistent in your assembly your extents are where you want them. 850mm x 850mm is the generic recommendation “out of the box”, and one can fine tune as needed.

Makes sense. Thank you for your reply.

Dan

I’m having the same issue then OP, tried your approach and it works to the point where Carbide Motion say “Limit Switch Hit”, I hit that button and it return back to the Info section. Would it be that I broke the micro switch when I first start playing with Jog?

Anyways now I’m clueless what I should try next.

If your switches are plugged in correctly, and you get a “limit switch hit” error - then yes its probably a broken switch.

Email support with your details.

Thank you for the quick reply, I removed the switch and the protective rubber part seems broke.

2 Likes

Just an update on my issue. I contact Carbide 3D support and they promptly sent me a replacement. I now have my CNC working :slight_smile:

2 Likes