Tool Change M06 not recognized with TC Post Processor

Hey Neil,

I found what you were referencing. Wish I had known that earlier. The reason I selected the M01 in the first place was that when I was trying to get a grip on how GCode worked and was looking for a way to pause the machine, a search in the Wiki for available GCodes showed me there was no M00. :slight_smile:

Here’s a snippet from the Wiki…

G94 ( G94:Inch per minute )
G95 ( G95:Per revolution feed )
G98 ( G98:Set Initial Plane default )

M01 ( M01:Optional Stop )
M02 ( M02:End of program…no rewind )
M03 ( M03:Spindle On )
M04 ( M04:Spindle CCW )
M05 ( M05:Spindle Stop )
M06 ( M06:Tool change )

I’m heading out to the shop this afternoon. I’ll look in later this evening.

Thanks again.
Bill

Hey guys,
@Signdude
I just tried replacing an M6 on a simple tool change test file with the following and it worked perfectly.
M0 ;pause to start process
G53 G0 Z-20
G53 G0 X-768 Y-340 ;probe location off workpiece
M0 ;pause to allow tool change and add probing wires
G0 Z30
G91
G38.2 Z-100 F100
G0Z2
G38.2 Z-5 F35
G10L20Z5.2 ;5.2mm was the predetermined difference between my probe height and my stock zero
G4P0.25
G90
G0 Z35
M0 ;pause to remove probe wires, re-install dust boot, start spindle and vac

1 Like

Hi Phil,

I’m attempting to modify the Shapeoko_inch_TC.pp to automatically insert the code for actually performing a tool change.

I’m using the Universal GCode Sender Platform Version available at https://github.com/winder/Universal-G-Code-Sender.

Tool Change Post Processors will allow you to create a GCode file with multiple tools, but will only insert the M06 Gcode in your program at the correct location. However, it does not insert the coding to actually carry out the tool change.

@neilferreri Neil is the one who explained that it was actually UGS that didn’t recognize the M06.

Hope this helps.

Bill

Unfortunately, jogging is disabled during a pause. That’s why it’s typically up to the sender to handle the M6.

1 Like

Darn, I was hoping there would be essentially a pause option that UGCS would grab and then suspend execution while I made adjustments.

But at least I have some of the instructions and can google them with “UGCS” and see what others have done.

Very much appreciate the info guys!

I finally managed to get some time in the shop this afternoon to finish up the Post Processor modification.

The GCode program output by the Post works fine on my machine. The X,Y & Z locations are based on my XXL table and the height of my probe. I tried this out as a standalone gcode file run using UGS Platform before moving it inside the Post and it worked fine. By making it a part of the post, each program written will automatically have all the coding it needs built-in rather than pausing and running macros.

I use Vectric’s VCarve Destop software. Vectric lists 242 different Posts to choose from. If you use other software you may have to use one similar.

This is not a macro. I couldn’t find a way to get a macro of this length into UGS, ergo the Post route. The code is inserted into the Shapeoko_inch_TC.pp Post Processor found in the MyPost folder. If you use VCarve and don’t have that one listed when you go to save the GCode program, you need to copy if from the PostP folder into the MyPost folder.

I opened the Post using Notepad and scrolled down to the section shown below.

	+---------------------------------------------------
	+  Commands output for tool change
	+---------------------------------------------------

	begin TOOLCHANGE

	"M6 T[T]"

Removed the “M6 T[T]”

Then inserted my lines of coding in it’s place.

*** CAUTION ***: All instructions to be placed within the Post must be enclosed “within” quotation marks!

Then I saved the Post back to the MyPost folder. I went back into VCarve Desktop. Loaded the small two-tool test program that cuts a 1/4" x 2" and a 1/8" x 2" profile, one under the other. I then saved the GCode file using the modified Post.

After manually zeroing the workpiece XYZ to begin, the program cuts the first profile with the 1/4" tool then it runs into my code… Posting doesn’t seem to allow tabs, so reading this might be a little rough. :frowning:

“G21” ; I work in inches, so Switch to Millimeters
“G0Z25”; Raise the bit and move to my
“G0G53X-700Y-830”; Tool Change Location hanging over the front rail
“M00”; and Pause. Change the tool and click continue.

'G0G53X-739Y-676"; The bit is moved to my probe location and pauses
'M00"; I place and connect the probe and click continue.

“G91G38.2Z-12.7F25.4”; The probe operation executes. My probe height
“G10L20Z19.30”; of 19.30 mm is made the Z height.
“G0Z5”; The bit is raised from the probe 5mm.
“M00”; Then a pause to remove the probe. Click continue.

“G90G0X0Y0Z0”; The bit is sent back to XYZ Zero.
“G20”; Switch back to “Inches” and the code for the second
profile line continues to the end.

This is my first shot at GCoding, so if you decide to give this idea a shot, please be careful. During testing, I manually inserted M00 commands like a Salt & Pepper shaker. Proceed a few lines, pause, proceed one line, pause… checking the GCode against what the machine was doing.

Anyway… over the next couple days, I’m going to sit down at the machine again and begin looking to see if I’ve made sure I’ve lifted the bit high enough for the various rapid moves in future programs etc.

Hope this helps. Please feel free to let me know if you see ways that it can be improved.

Bill

EDIT: Adding full GCode output file. Caution-- Do not run as-is on your machine.

T1
G17
G20
G0Z0.8000
G0X0.0000Y0.0000S12000M3
G0X9.0000Y7.0000Z0.2000
G1Z-0.1000F30.0
G1X7F60.0
G0Z0.2000

G21
G0Z25
G0G53X-700Y-830
M00
G0G53X-739Y-676
M00
G91G38.2Z-12.7F25.4
G10L20Z19.30
G0Z5
M00
G90G0X0Y0Z0
G20

G0X9.0000Y3.0000Z0.2000
G1Z-0.1000F30.0
G1X7F60.0
G0Z0.2000
G0Z0.8000
G0X0.0000Y0.0000
M02

2 Likes

Thanks for sharing the progress!

Is your probe on top of your workpiece?

I’d recommend a short dwell after the G10L20. That command writes to the EEPROM which takes time (insignificant amount of time for us, but might matter to the microcontroller). I’ve never had an issue with 1/4 second, but I’ve seen a half recommended.

No reason to send it back to zero unless you like the visual. Be cautious with the Z0, though. From there, your endmill might drag through something on its way back to where it needs to be. Especially if the router/spindle isn’t on yet.

For those just joining in…what Bill is doing here is creating and inserting a pure gcode snippet that can replace toolchange commands regardless of the CAD/CAM package or the machine control program. This would (should) work with any sender (there are some that do unexpected things with our machines, though).
Limitations would be that your probe location would need to be on your workpiece (if setting zero at the top of your workpiece), on your wasteboard (if using that as a reference) or at a known offset from one of those. I think that would cover most use cases. Problems might come when you carve your material surface away. There’d also be no adjustments once the job started as it’s part of the gcode file.

Just to understand how you envisage to use this in your work process.

You would use VCarve to produce your GCode then
open the text file in an editor
search for occurrence of M6
Replace the M6 with your standard GCode commands using a copy and paste
Save the updated file
Run the GCode using your GCode sender.

I guess that your Probe location would have to remain constant for each project or you would have to determine you probe location then modify your code to reflect this before inserting into the file.

Am I correct?

@luc.onthego

Hey Luc,

First, let me say that I do have a fixed location on my table that I use for most of my jobs. So, this procedure will only work for jobs that are placed in my fixed location bracket.

I created the bracket based on the video provided by Ben Myers at Myers Workshop. https://www.youtube.com/watch?v=RTthw9BU88I

Excellent video. Thanks Ben.

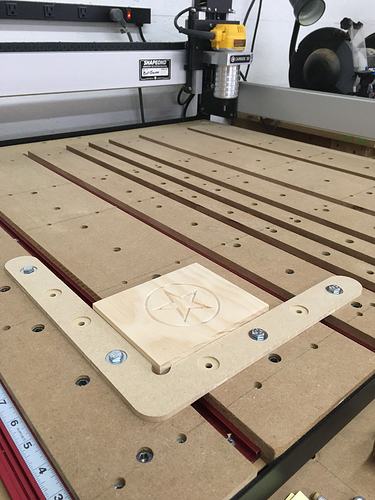
Here’s a pic of the bracket I use for positioning a workpiece so that each job will begin
at machine position X-755 Y-693.

With that said…

I’m not editing the GCode file produced by VCarve. I’ve edited the Post Processor that VCarve uses to produce your GCode file. That way each file you create with multiple tools will have the necessary tool change codes automatically inserted into them. You simply run your program and it will pause at the proper points to change your tool, connect your probe, probe the workpiece and allow you to remove your probe before continuing with the new tool.

You only need once insert the coding into your Post Processor. From then on, it will insert that coding into each program you create with VCarve.

Just a note…All XY positions used in the coding are Machine Coordinates accessed by using the G53 command. You would need to determine those locations you wish to use on your machine.

X-755 Y-693 is my bracket XY location.
X-700 Y-830 is my tool change location.
X-739 Y-676 is my probe location. Which is currently located on the workpiece’s lower left corner.

Hope this helps.

Bill

ps…Thanks to @neilferreri for his help and comments.

EDIT: Added my machine coordinates for reference to the code.

4 Likes

Hey Neil,

Yes, currently.

Thanks… I forgot that I saw several Dwell commands used in one of your other posts. I’ll insert that next time out in the shop and update my post.

Correct. That was a remnant from testing another pause that I removed before publishing. :slightly_smiling_face:

The first instruction in the second tool cut raises the bit .2 inches before moving to the XY cut position.

Thanks for all your help.

Bill

1 Like

Thank you for the clarification. Using the default position is great, I have something similar but I also use a center of the bed position for some projects. I guess that means making a copy of the Post Processor file for each instance.

That being said, while UGCS is unable to perform this, I wonder if CNCjs would be capable of doing this intercept. Neil @neilferreri already has several macros to perform tool changes, check tool length and reset Z0, in fact maybe it does already. I am still using CC and waiting on the availability of the CC probe but I see some of the limitations and advantages of changing to another code sender. CNCjs certainly appears to provide great features and abilities.

Hey Luc,
There are some great advantages for this stuff with CNCjs, but by using pure gcode, as Bill is doing, allows you to use any sender. UGS doesn’t handle the M6, but @Signdude’s mission here is to replace that M6 with everything else needed. In theory, even Carbide Motion should be able to run a tool change like this.
The real advantages to using CNCjs or bCNC for this is that they allow you to calculate the difference between tool lengths. The probe, in that case, can be at any arbitrary height compared to the stock.
Regardless, any of these solutions take some comfort with the machine and gcode as we’d all have slightly different parameters.
It’s pretty cool, though, to see seamless carves using multiple tools all in one job.

1 Like

Hey Luc,

I’m using UGS. It works just fine. @neilferreri uses CNCjs. I’ve tried CNCjs and it looks like a good sender. If he uses it it must be. I was considering switching unless I got my coding to work with UGS. It works, so I guess I’ll be staying for a while longer.

Thanks for the note.
Bill

@chamnit Any word on when “next gen GRBL” might start to show up online?

1 Like

Hey Phil,

I just did a side-by-side comparison of the Shapeoko mm TC.pp and the G-Code Arc mm.pp Post Processors. With the exception of the “History” section, they are almost identical. The Shapeoko PP has the ARC segments already in it and looks like it should be named Shapeoko mm ACR TC.pp.

Please check carefully… I may have missed something. :thinking:

I’m thinking if you match the two by simply inserting the

+---------------------------------------------------
+  Commands output for tool change
+---------------------------------------------------

begin TOOLCHANGE

“M6 T[T]”

beneath the Commands output at the start of the file segment you should be able to insert the tool change coding according to my recent post.

Please test carefully. Just my two cents worth. :slight_smile:

ps.

I’m 76 trying to get to 77. :slight_smile:

1 Like

Oops…

should have been:
looks like it should be named Shapeoko mm ARC TC.pp.

Thanks Bill but I’ve been giving this some more thought and I’m not sure I can implement this on my machine as I’ve modified the unit so the spindle cannot extend beyond the front of the unit.

So my only other alternative would be raise the Z and change the bit wherever the carriage happens to be, but the problem with THAT is I might have to lift Z in order to do it, and I won’t be able to generate any universal code which could do this w/o the risk of lifting the Z too high (I don’t have any home/limit switches installed so that could be an additional problem).

I think the only solution that would work for me would be one similar to Mach3 where I can jog during the tool change. That way I’d be able to move the spindle to a location where I can change the tooling.

So I think for now I’ll have to continue just creating multiple files.

Hey Phil,

I understand your concerns and certainly wouldn’t suggest risking damage to your machine.

My Tool Change location is X-700 Y-830 on my XXL. This position leaves my bit sitting about 1" to 1-1/2" in front of the front frame. When you have time, you might jog your gantry forward and make a note of the Y coordinate you would be comfortable with and change the code to match that. The program would then go to that Y position of your machine for the tool change.

As to raising the Z position of your bit… The highest point the bit is raised in the coding is 1" above the workpiece. The instruction G0Z25 raises the bit to a height of 25 millimeters so that my 19.3 millimeter probe will fit between the workpiece and the bit leaving approximately 6 millimeters for the probe operation. If you were to make any changes here, you would change that instruction to a height of 5 or 6 millimeters higher than the height of your probe. Lastly, a change to the G10L20Z19.30 line would be necessary to change the Z19.3, the thickness of my probe to the thickness of your probe.

I hope you understand that I’m not suggesting that you should make any changes. I’m just offering food for thought. :slight_smile:

I’m presenting my method of executing a tool change procedure to any and all who might be interested in modifying the code so that it will work properly on their machine.

Thanks for your interest and comments.
Bill

1 Like

No Bill I don’t think you’re suggesting anything you’d think will harm my machine, don’t be silly I appreciate all the help.

I’m going to take another look at this, I appreciate all the help!

This topic was automatically closed 30 days after the last reply. New replies are no longer allowed.