Hi I am setting up cncjs on my fusion5 tablet to use on my shapeoko pro xxl. I tried using the bitzero like normal as per instructions in this tutorial I’m following CNCJS - For beginners with Shapeoko 3 - YouTube but the endmill just kept pushing down into the bitzero and wouldn’t stop. I used bitsetter first to determine length of endmill, what am I doing wrong? Thanks in advance!
1 Like
What does this mean? So you were just probing for zero?
Can you provide more detail?
You need to set your Z-zero before running the bitsetter macros.
The procedure should start with:
- Homing
- Set Z-zero (BitZero or manual)
- Initial tool macro
I was using Bitzero to find the zero for X, Y, and Z.
So I should just turn on my machine, connect cncjs, home machine, use bitzero to find X+Y+Z, and then use bitsetter to find Z of my initial tool?
But in order for bitzero to work properly, don’t I need to use bitsetter first to identify length of the tool (1/4" probe) I am using for the bitzero sequence?
No. The tool length doesn’t really matter in this use case. All that that matters is where the bottom of the tool is. The bitsetter just establishes an absolute reference for that tool’s bottom.
While you’re trying something new, check out gSender. Has more momentum behind it.
@neilferreri I’ll throw this out here again for you to consider… If you make this change to your macros then you can change the z height without having to remember to run “initial” tool after doing so. That change is to record the distance that the probe has to travel to the bitsetter instead of the Z offset of the bitsetter. The initial/new tool macros then become independent of the Z zero position which I find to work much better for how I tend to work:
1 Like
Thanks @crpalmer. I saw this earlier, and it looks pretty good! Personally I don’t think I’ve come across a job where I needed to do this, but I can see where this would make things less prone to human error.
In the @gabrielcampbell’s case, I’m not sure where things went wrong…we’ll need more detail. That video by @ogbulldog looks like it covers it pretty well.
1 Like
Hi @neilferreri I’ve attached a youtube video to specify the issue I’m having.

Noob question here but what are all the pro’s of using cncjs instead of carbide motion? And are you saying I would be better off just using gSender instead?
Thanks
Can you also post the contents of the macro?
That’s just the start of the macro. Can you edit the macro and then from the edit screen copy and paste all the text of the macro?
That’s a macro for the old BitZero.
It probes Z first and didn’t have the little corner hole.
I don’t think I ever did a macro for the v2, but a bunch of us made holey probes back then. I know there’s a macro for that.
I can look later.
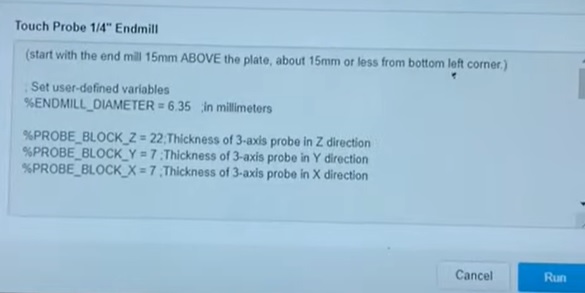
(start with the end mill 15mm ABOVE the plate, about 15mm or less from bottom left corner.)
; Set user-defined variables
%ENDMILL_DIAMETER = 6.35 ;in millimeters
%PROBE_BLOCK_Z = 22;Thickness of 3-axis probe in Z direction
%PROBE_BLOCK_Y = 7 ;Thickness of 3-axis probe in Y direction
%PROBE_BLOCK_X = 7 ;Thickness of 3-axis probe in X direction
G21 ;make sure we’re in mm
G91 ;Incremental mode
G38.2 Z-25 F75 ;Probe Z
G0 Z2 ;lift 2mm
G38.2 Z-25 F45 ;Probe Z
G4 P0.1
G10 L20 P1 Z[PROBE_BLOCK_Z] ;Set Current Z as plate thickness
G4 P0.1
G0 Z3 ;lift Z 3mm
G0 X-25 ;Move left 25mm
G0 Z-10 ;Move down 10mm, should be 7mm below probe surface
G38.2 X25 F75 ;Probe X to the right 25mm
G0 X-2
G38.2 X25 F45 ;Probe X to the right 25mm
G4 P0.1
G10 L20 P1 X[-ENDMILL_DIAMETER/2 -PROBE_BLOCK_X] ;Set current X location as negative half the bit diameter
G4 P0.1
G0 X-10 ;Move left 10mm
G0 Y-25 ;Move forward 25mm
G90 G0 X5 ;Move to X5 (absolute) - will put you 5mm to the right of left edge of stock
G91 ;incremental
G38.2 Y25 F75 ;Probe Y
G0 Y-2
G38.2 Y25 F45 ;Probe Y
G4 P0.1
G10 L20 P1 Y[-ENDMILL_DIAMETER/2 -PROBE_BLOCK_Y] ;Set current Y location as negative half the bit diameter - 7mm thickness
G4 P0.1
G0 Y-10 ;Move Y-10
G0 Z10 ;Move Z up 10mm, should be 3mm above probe plate
G90
G0 X0Y0 ;Go to X0Y0
Hi @gabrielcampbell.
I’m not sure if you saw my reply above. That’s a macro for an earlier version of the BitZero.
It will not work with the hole on the V2.
Where can I find the macro for the Bitzero V2?
I don’t have a BitZero to create one from.
You could modify this one:
Or, just set zero by eye.
What are the pro’s of using cncjs over carbide motion?
Generally speaking this is a matter of “you will know it when you need it”
Meaning, if you can’t think of a reason to use a third party gcode sender, you probably don’t need a third party gcode sender ![]()
That said, here are some concrete examples of what I want to do in gSender that I cannot do in carbide motion:
- Custom gcode on tool changes.
- Custom macros on job start and job end (For example, an inspection probing routine)
- Maintaining custom offsets and routines for repeat jobs.
- in process probing (Though I’m not sure how to do this myself…)
- software automations. (Meaning automation of the gcode sender software, not the gcode itself)
Some other quality of life items would be the widget interface and native webcam support.
Carbide motion has been great and i still use it daily. They are also adding more functionality all the time and I expect much of the custom functionality will be possible someday.
Until then, I’ll be running both motion and a third party sender.
1 Like
Thank you for the thorough response Tyler! Well said that “you will know when you need it”. I’m gonna stick to carbide motion for now but will keep cncjs in mind for when I might need it.
This topic was automatically closed after 30 days. New replies are no longer allowed.