The snowflakes i am looking to do are in the screenshot. I hope you can see them
Thanks all. This really has grown to be a big discussion 
The snowflakes i am looking to do are in the screenshot. I hope you can see them
Thanks all. This really has grown to be a big discussion
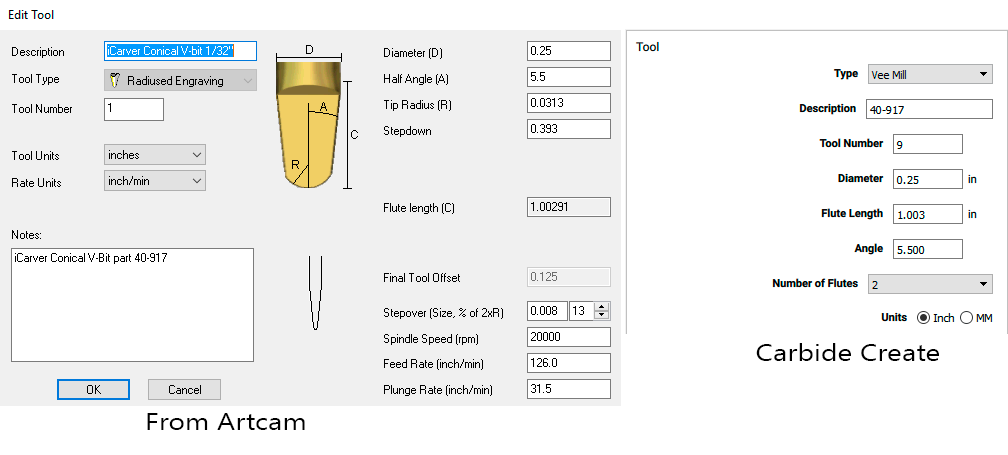
Referring to my question on the bit sizes of the iCarver 40-928 its not anywhere on the web… BUT… I thought out of the box and did the following.
The product is mde by General Canada for the iCarver CNC
They use ArtCAM and I thought if those bits were preset in the software. And guess what they are. As this screen shot shows.
Now all i have to do is add them and i am set for making my first carving tomorrow.
Cool looking snowflakes! One of your big considerations is going to be dealing with interior corners/radii. You will never be able to get any sharper than the diameter of your cutting tool, so the smaller the diameter of the cutter, the finer the achieved detail. This will also, of course, be contingent on the final size of the snowflake because larger snowflakes will be less effected by rounded interior corners, such as the sharp corners in the triangle circled here:
So, you’re probably going to have the best luck with your .125" two flute up cut bit. Depending on the thickness of the material you’re cutting, you might even be able to get away with using your 1/32" bit, but I recommend you start with the .125" bit for practice first.
Also, just a tip for your order of operations (the order that you cut things), cut out all of the interior patterns, then end with a contour toolpath around the outside to actually cut the snowflakes out.
You can get a bit more detail on things such as this by running a V-carve engraving pass first — if you use a painted or coloured surface (suggestion: seal w/ lacquer or other clear finish first, then cover w/ a compatible paint) it will almost be as detailed as using a laser cutter.
I am new to the Shapeoko and what I have done is to use my ruler as spacer and I then used it to mark a line from the centre, then from the front of the board to the back. Then at every cross I drilled for a M6 insert then hey presto all I have got to is to make the hold down clamps.
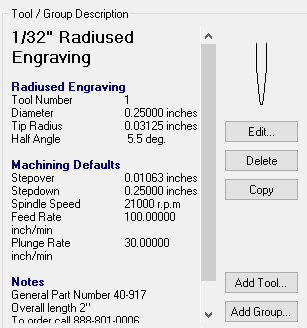
So i want to enter a new End Mill to the toolset and found these details on the endmills.
I want to make sure i go this right so could use some checking by those that have added tools to weigh in… Are these the right settings?
Thank you
Would really appreciate and feedback on how to input the new End Mills into Carbide Create. Specifically with the end mill data i have included in this post
I’ve added tools and that looks like what I’d put, but haven’t ever used a tapered ball end, so I’d be doing some test cutting/engraving with it to determine how best to utilize it in my design. (The feeds and speeds from artcam look very aggressive and like a broken bit to me, but you were asking about CC right?)
You are correct i want to use CC.
Question: how do you determine what the feeds and speeds are ? What is correct ? As a new owner i have no idea what is aggressive and or not.
Can’t help you with tool creation in CC, unfortunately. Creating new tools in CC was always a struggle for me, and now I’ve switched over to Fusion 360.
As far as speeds and feeds, here is a free calculator mentioned in another thread:
http://www.zero-divide.net/index.php?page=fswizard
I’ve heard only good things about GWizard (not free):
http://www.cnccookbook.com/FeedSpeedsCalculator/CCGWizard.html
You can also refer to the Materials section of the Shapeoko Wiki for a log of what has worked for people:
http://www.shapeoko.com/wiki/index.php/Materials
The thing to keep in mind about speed and feed calculators is that they’re typically assuming you’re using a very rigid, commercial mill, and a mill with a spindle with RPM’s well below what either Makita or DeWalt routers can do. I’m not a subscriber, so someone else can verify, but I think GWizard actually includes a profile for the S3 that takes rigidity and capable RPM’s into account.
So far, I’ve been using the material chart that Carbide3D did for a couple of their tools and then tweaking from there. I’ve got a Nomad, so I use the other chart, but the ShapeOko chart for the 0.25" tools is here: http://carbide3d.com/shapeoko/feedandspeed/
YES, YES, YES!
As a brand new user, I experienced many of the frustrations expressed earlier in this thread.
I think it would be great to include a step-by-step projects/guides to do after the Hello World project. They should cover creating simple versions of everything you need to get started using your CNC.
A parts list, step-by-step instructions, and the digital files (already tested/optimized for Carbide Motion) needed to do the above projects would have been a huge help. I also think it would be best to have the above projects specific to each model.
@WillAdams to answer your question about the XXL board being doubled up, that is not the case. There are two screws holding down the support beams, on the other side towards the middle of the frame support there is one hole located 18inchs from the two holes on the other side.
hello what “doc” means? in the speed and feed chart.
and all the settings are of speed and plunge are in inch?
thanks
DOC = depth of cut
In the official chart everything is in inches. Feed and plunge are inches per minute.
It would be very helpful to have these files in the Carbide Create Library.
Actually, having links to documentation through Carbide Create would be convenient too.
Lastly, if all of these files were updated every so often (automatically) to reflect the latest files through some cloud magic, that would be very helpful too instead of tracking down information in the forum. Thanks!
In that same spirit, I would also like to see the units clearly labeled on the speeds and feeds chart.
It’s a recurring question of new users, myself included. The fact that it’s not labled always reminds me of https://www.xkcd.com/833/
Ok noob here and this might be a stupid question for all the pros out there but here it goes. When making the holes is that going into the original 2 pieces of mdf that came with the machine or do I buy another and put on top of those and drill and use that as wasteboard? Just wasn’t so sure if the 2 boards were for drilling or more for holding machine in place…thanks! @WillAdams
@tchad — yeah, agree, there are some typos and outright errors which really ought to be fixed as well.
@GaylonR — no, not stupid (the only stupid question is the one which goes unasked). Either way is valid — for an XL or XXL, it’s probably better to add a layer as I did here: http://www.shapeoko.com/forum/viewtopic.php?f=37&t=8332&p=65068#p65068 (because they have taller endplates, and the new Z-axis plate has less reach)
Lots of other options here, and most of them ought to be collected at: https://www.shapeoko.com/wiki/index.php/Workholding
My “Perfect World” forum/Wiki: Fixed headers with fixed subheaders. Only moderators could post updates and topics A “fixed” forum posting for “New to CNC?” A One-Stop-Shop for all “Noob” queries.