If anyone is wondering how to get those lines as clean as possible without a jointer, all I did was use my miter saw to cut the pieces down to size, leaving them ~1/8" larger than I need them. Then I secure each piece to the table, and use a profile tool path with a downcut end mill to finish those edges. Leaving 1/8" extra gives you enough wiggle room to make sure you are actually cutting all edges, while also keeping the forces to a minimum so you don’t get any nasty tool deflection when doing the final cutout. Otherwise that deflection will totally be visible when doing the final glueup.
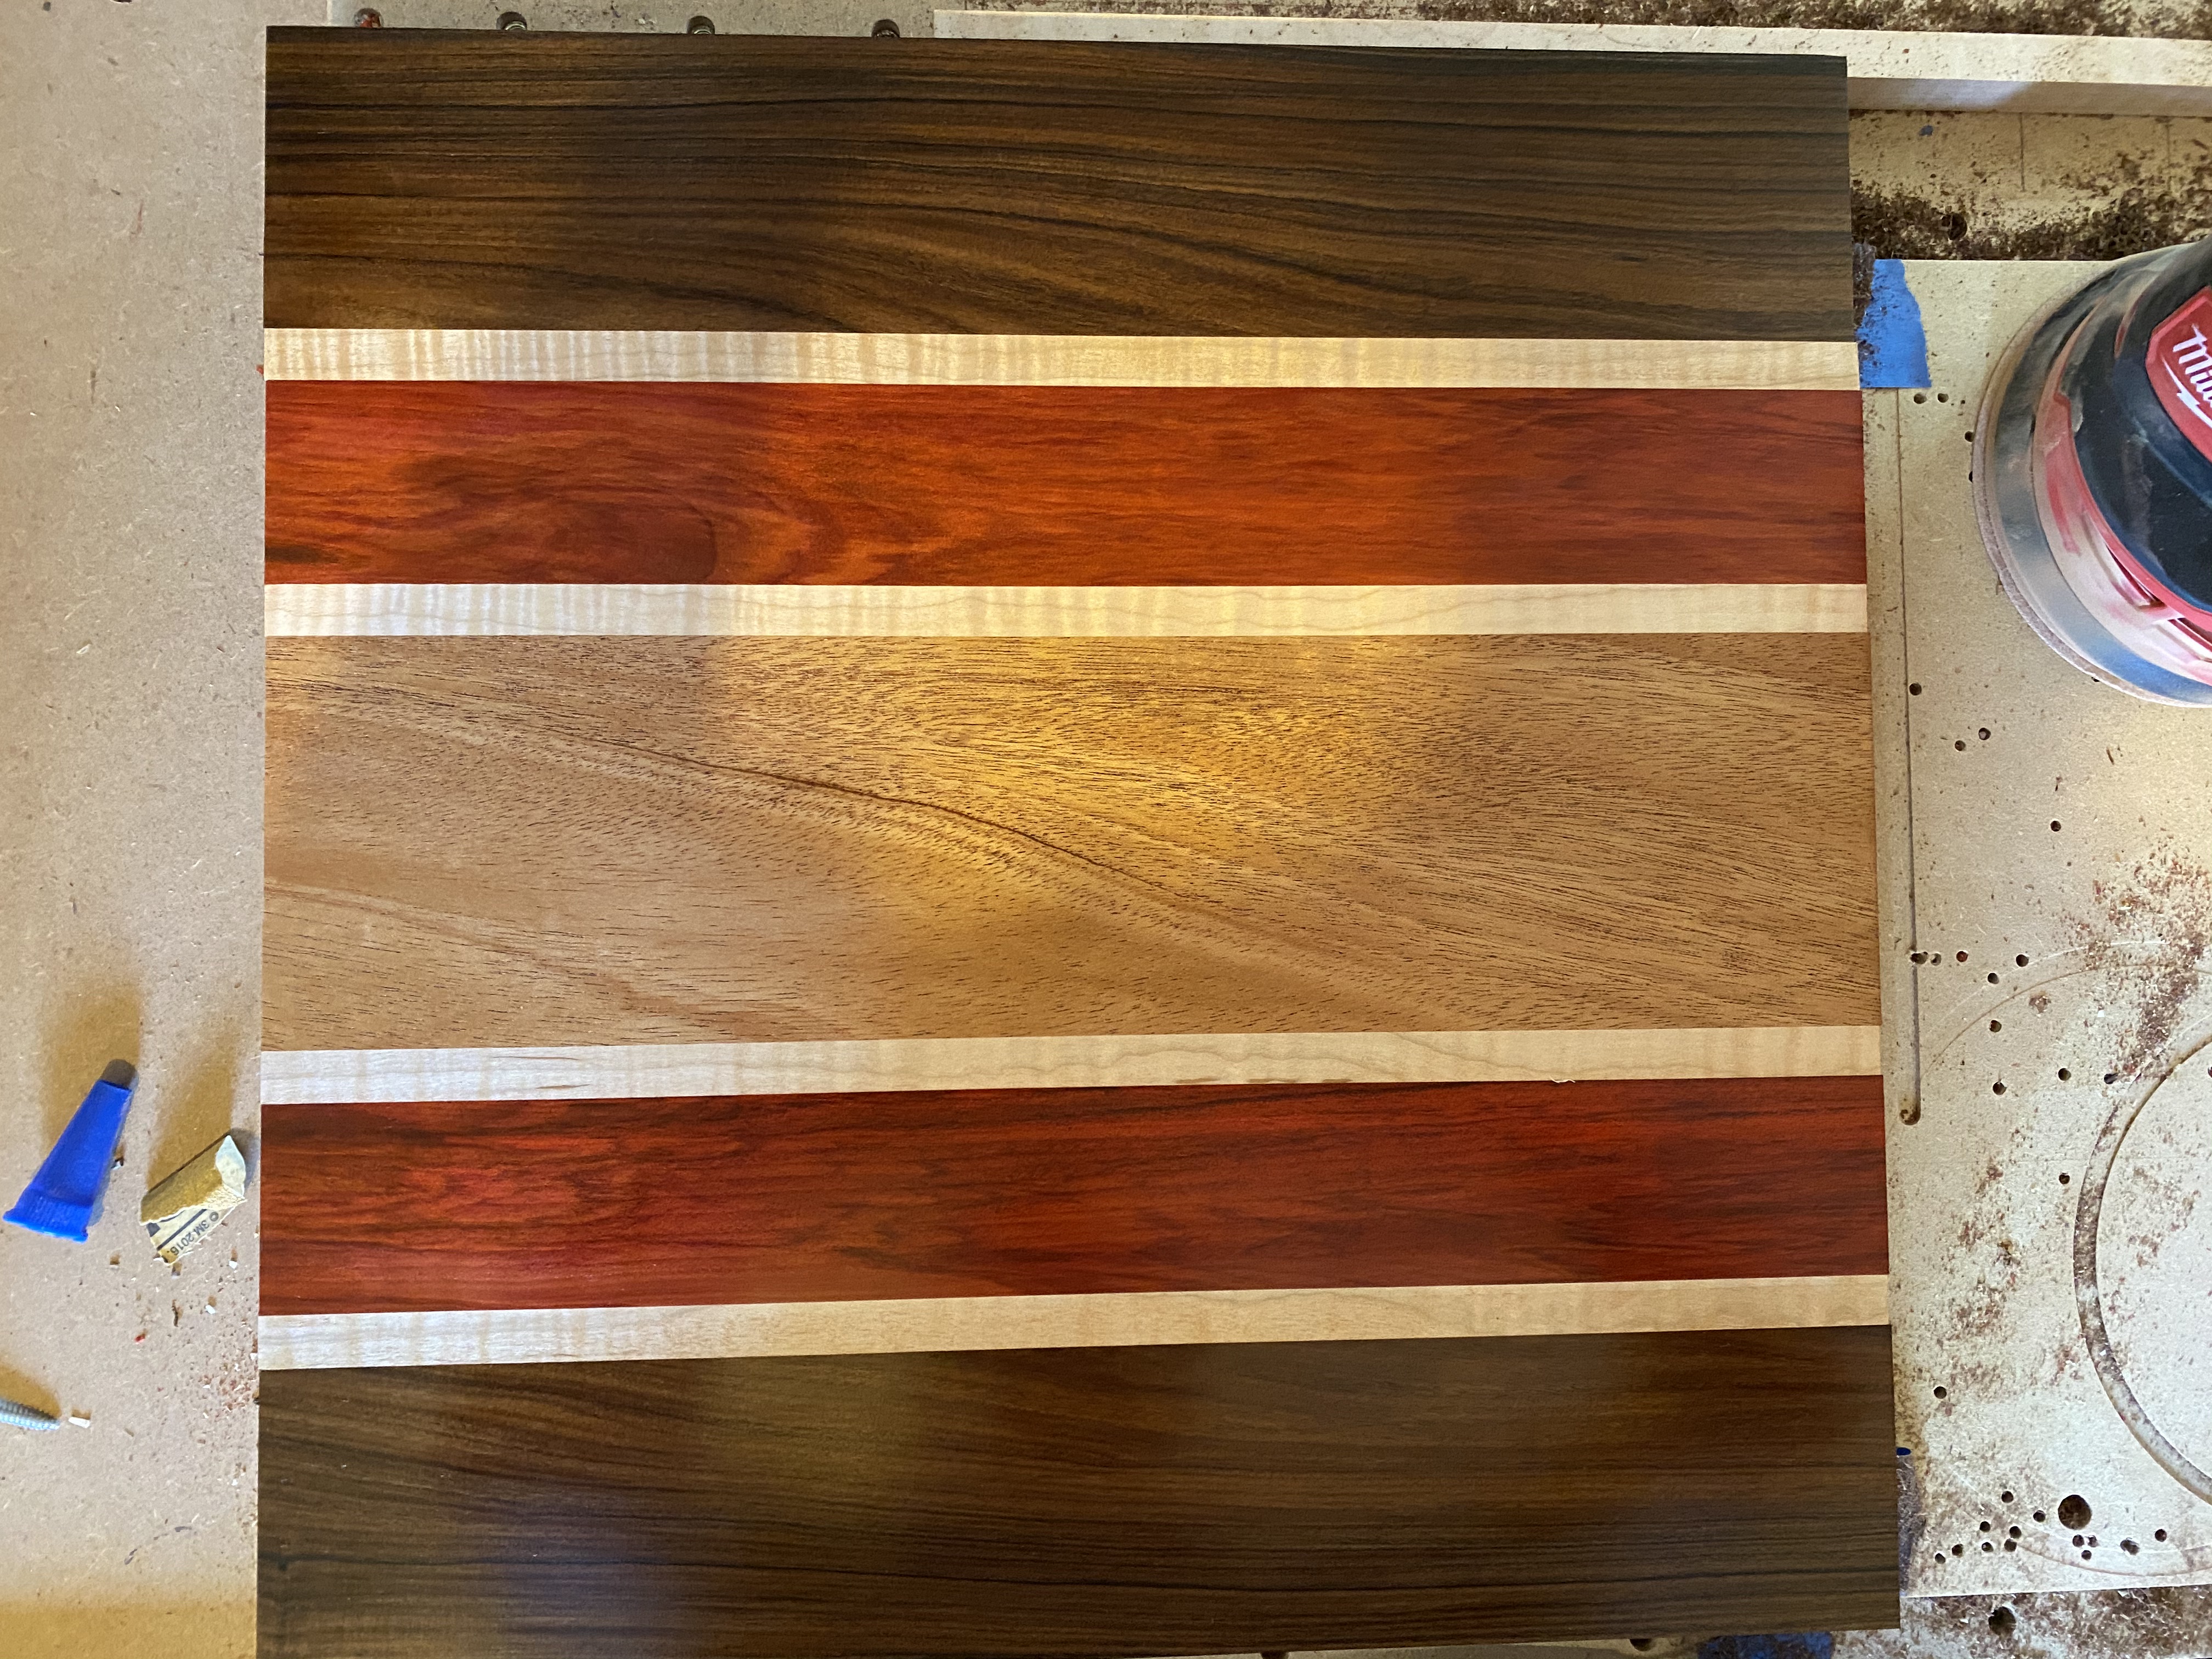
The maple pieces were so thin, however, that I couldn’t properly secure them to the wasteboard, so I needed to do some old fashioned profile cuts for those with a .007" finishing pass. Those took the longest to cut, but they turned out nice and clean.
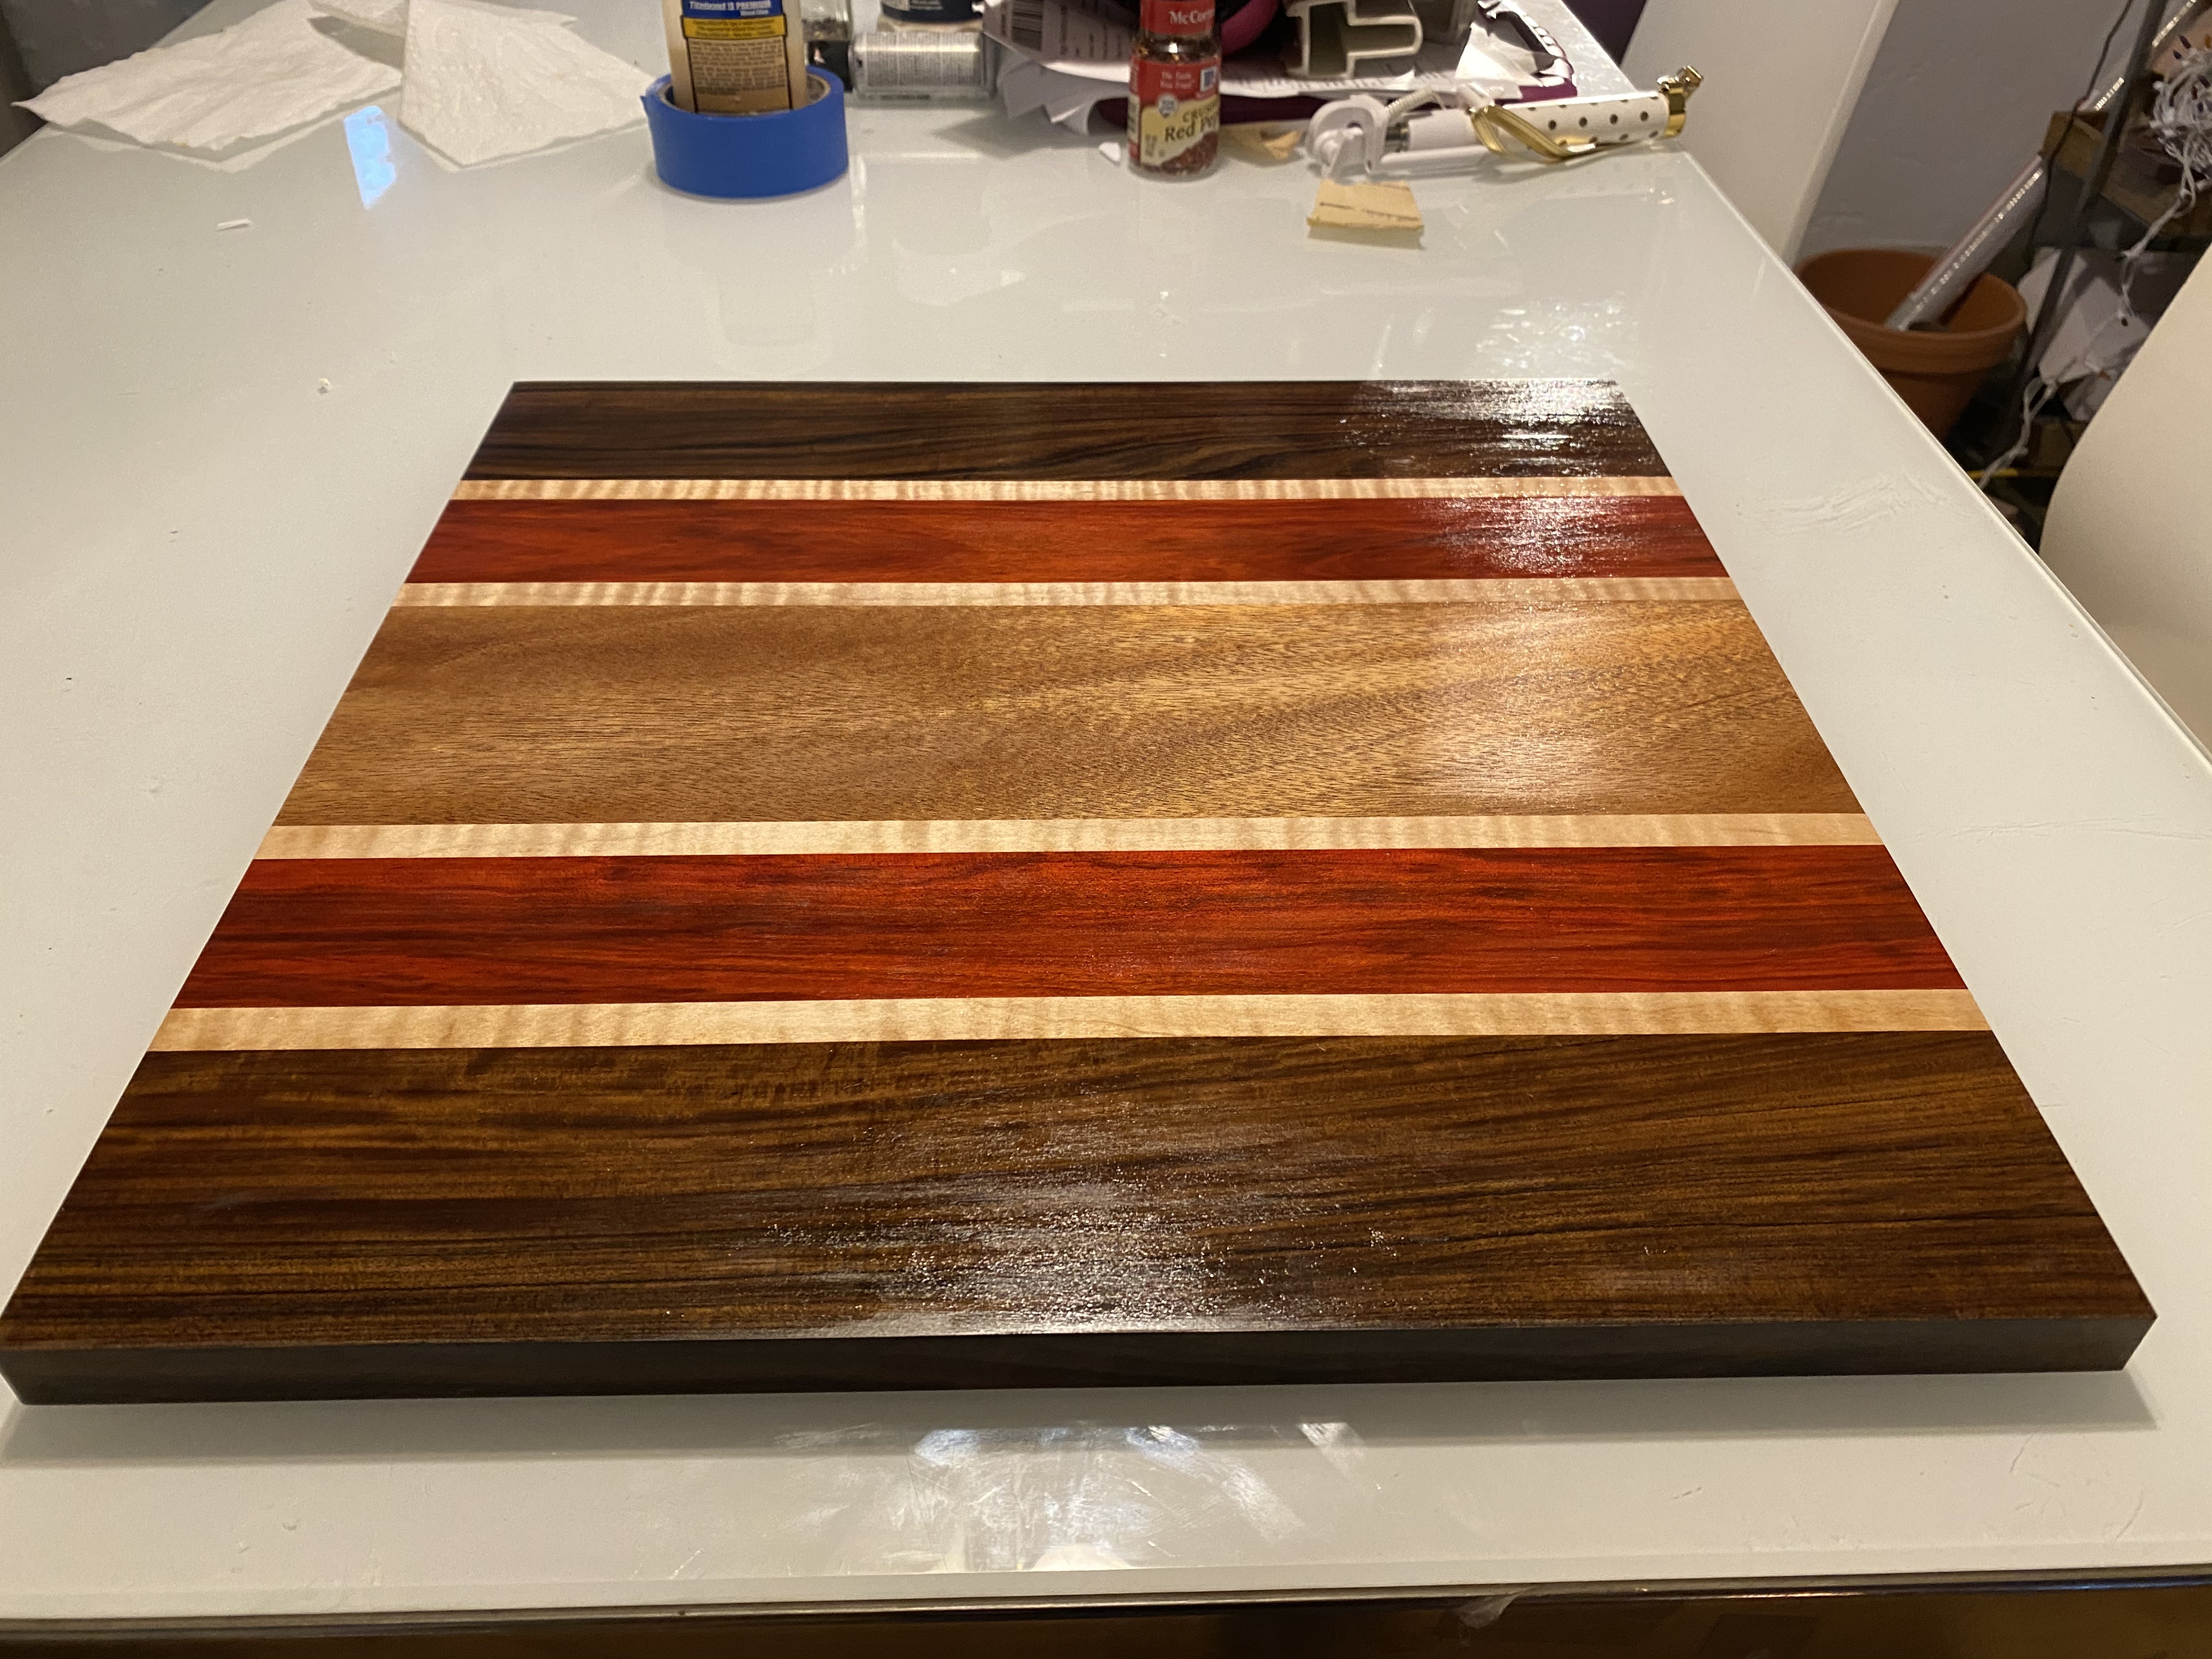
The other problem I had? Sanding the Red Heart. The red dust really wants to dye the maple. Not nearly as bad as something like Padauk, but it made getting everything sanded and shellacked a bit of a challenge!
I don’t make any that move – right now these are all pocketed into each other for stability. But that is a really cool idea! It would be fun to make the piece that much more dynamic. I’m going to give that some thought
This is something I have been doing for a while, it’s just slow… I’ve had this crazy idea in my head that there must be an even better way to make a jointer. You kind of have all the basic bits there - being a spindle and flat surface. Seems like a box you pass wood through with the spindle lowered in could work. It’s just not safe…
@rekluse Hey Corey! Really like the board. The choice of woods and proportions is really well done. The piece could stand alone (and sell well) as a serving board. I’ve made a lot of boards and find that the Jointer works just fine I usually cut everything long and the square it up after glue up. But I understand why you want to CNC it. I even find myself cutting mortises with the CNC rather than just cutting them with a router and jig…mostly for the fun of designing it…but yes, it’s takes many times longer!
You might want to put a coat of finish onto your curly maple (TOPS) before you sand. That will keep the bleed down.
I noticed you said “Poly” - not sure if you really meant that…but if you haven’t heard of it before, look into “Waterlox” as a finish. It’s a Tung Oil base, so it’s REALLY easy to apply (particularly in nooks and crannies) and puts an exquisite finish that’s has a warm and rich casting to the woods. With their mixture, it’s both water and alcohol resistant, so it makes a great finish for tables and such. I don’t use Waterlox (or Poly) for serving boards, because - although they say Tung Oil is food safe when fully cured, I choose to err on the side of caution. I stick with Walnut Oil, or one of the Howard’s Oils for butcher blocks when I’m finishing anything that will hold food regularly. But your piece is a background to a cool clock-ish thingy (technical term), so Waterlox might be a great way for you to go!
Really nice work on the Inca dial. Where are you getting the designs for those layers?
Yeah, when I work with rough cut wood I just face off one side, then when I do the flip I add a spoilboard which has a uniform thickness to function as a registration surface, then I can take the full-length pass off the edges so that they’ll be square (as part of finishing up the part).
As noted, a router table would be the correct work-around here:
Thanks Gary, for the feedback and the suggestions! And yeah, I think I will try to add a bit of finish before the sanding next time and see how that works out. I’ve tried that strategy before with a piece that had lots of padauk, using shellac to seal the wood before sanding – well, it turns out that padauk dust is alcohol soluble, which means it immediately absorbed into the shellac and stained the surrounding wood. So that particular piece has a nice pink hunk of maple in the middle of it But the red heart shouldn’t be nearly as challenging.
And I will check into Polylox! For my art pieces I generally use a combination of shellac and semi-gloss spray finish. I don’t know why I love shellac so much, but I really do and I use it for just about everything I make. Maybe someone can school me a bit and make me more aware of better options!
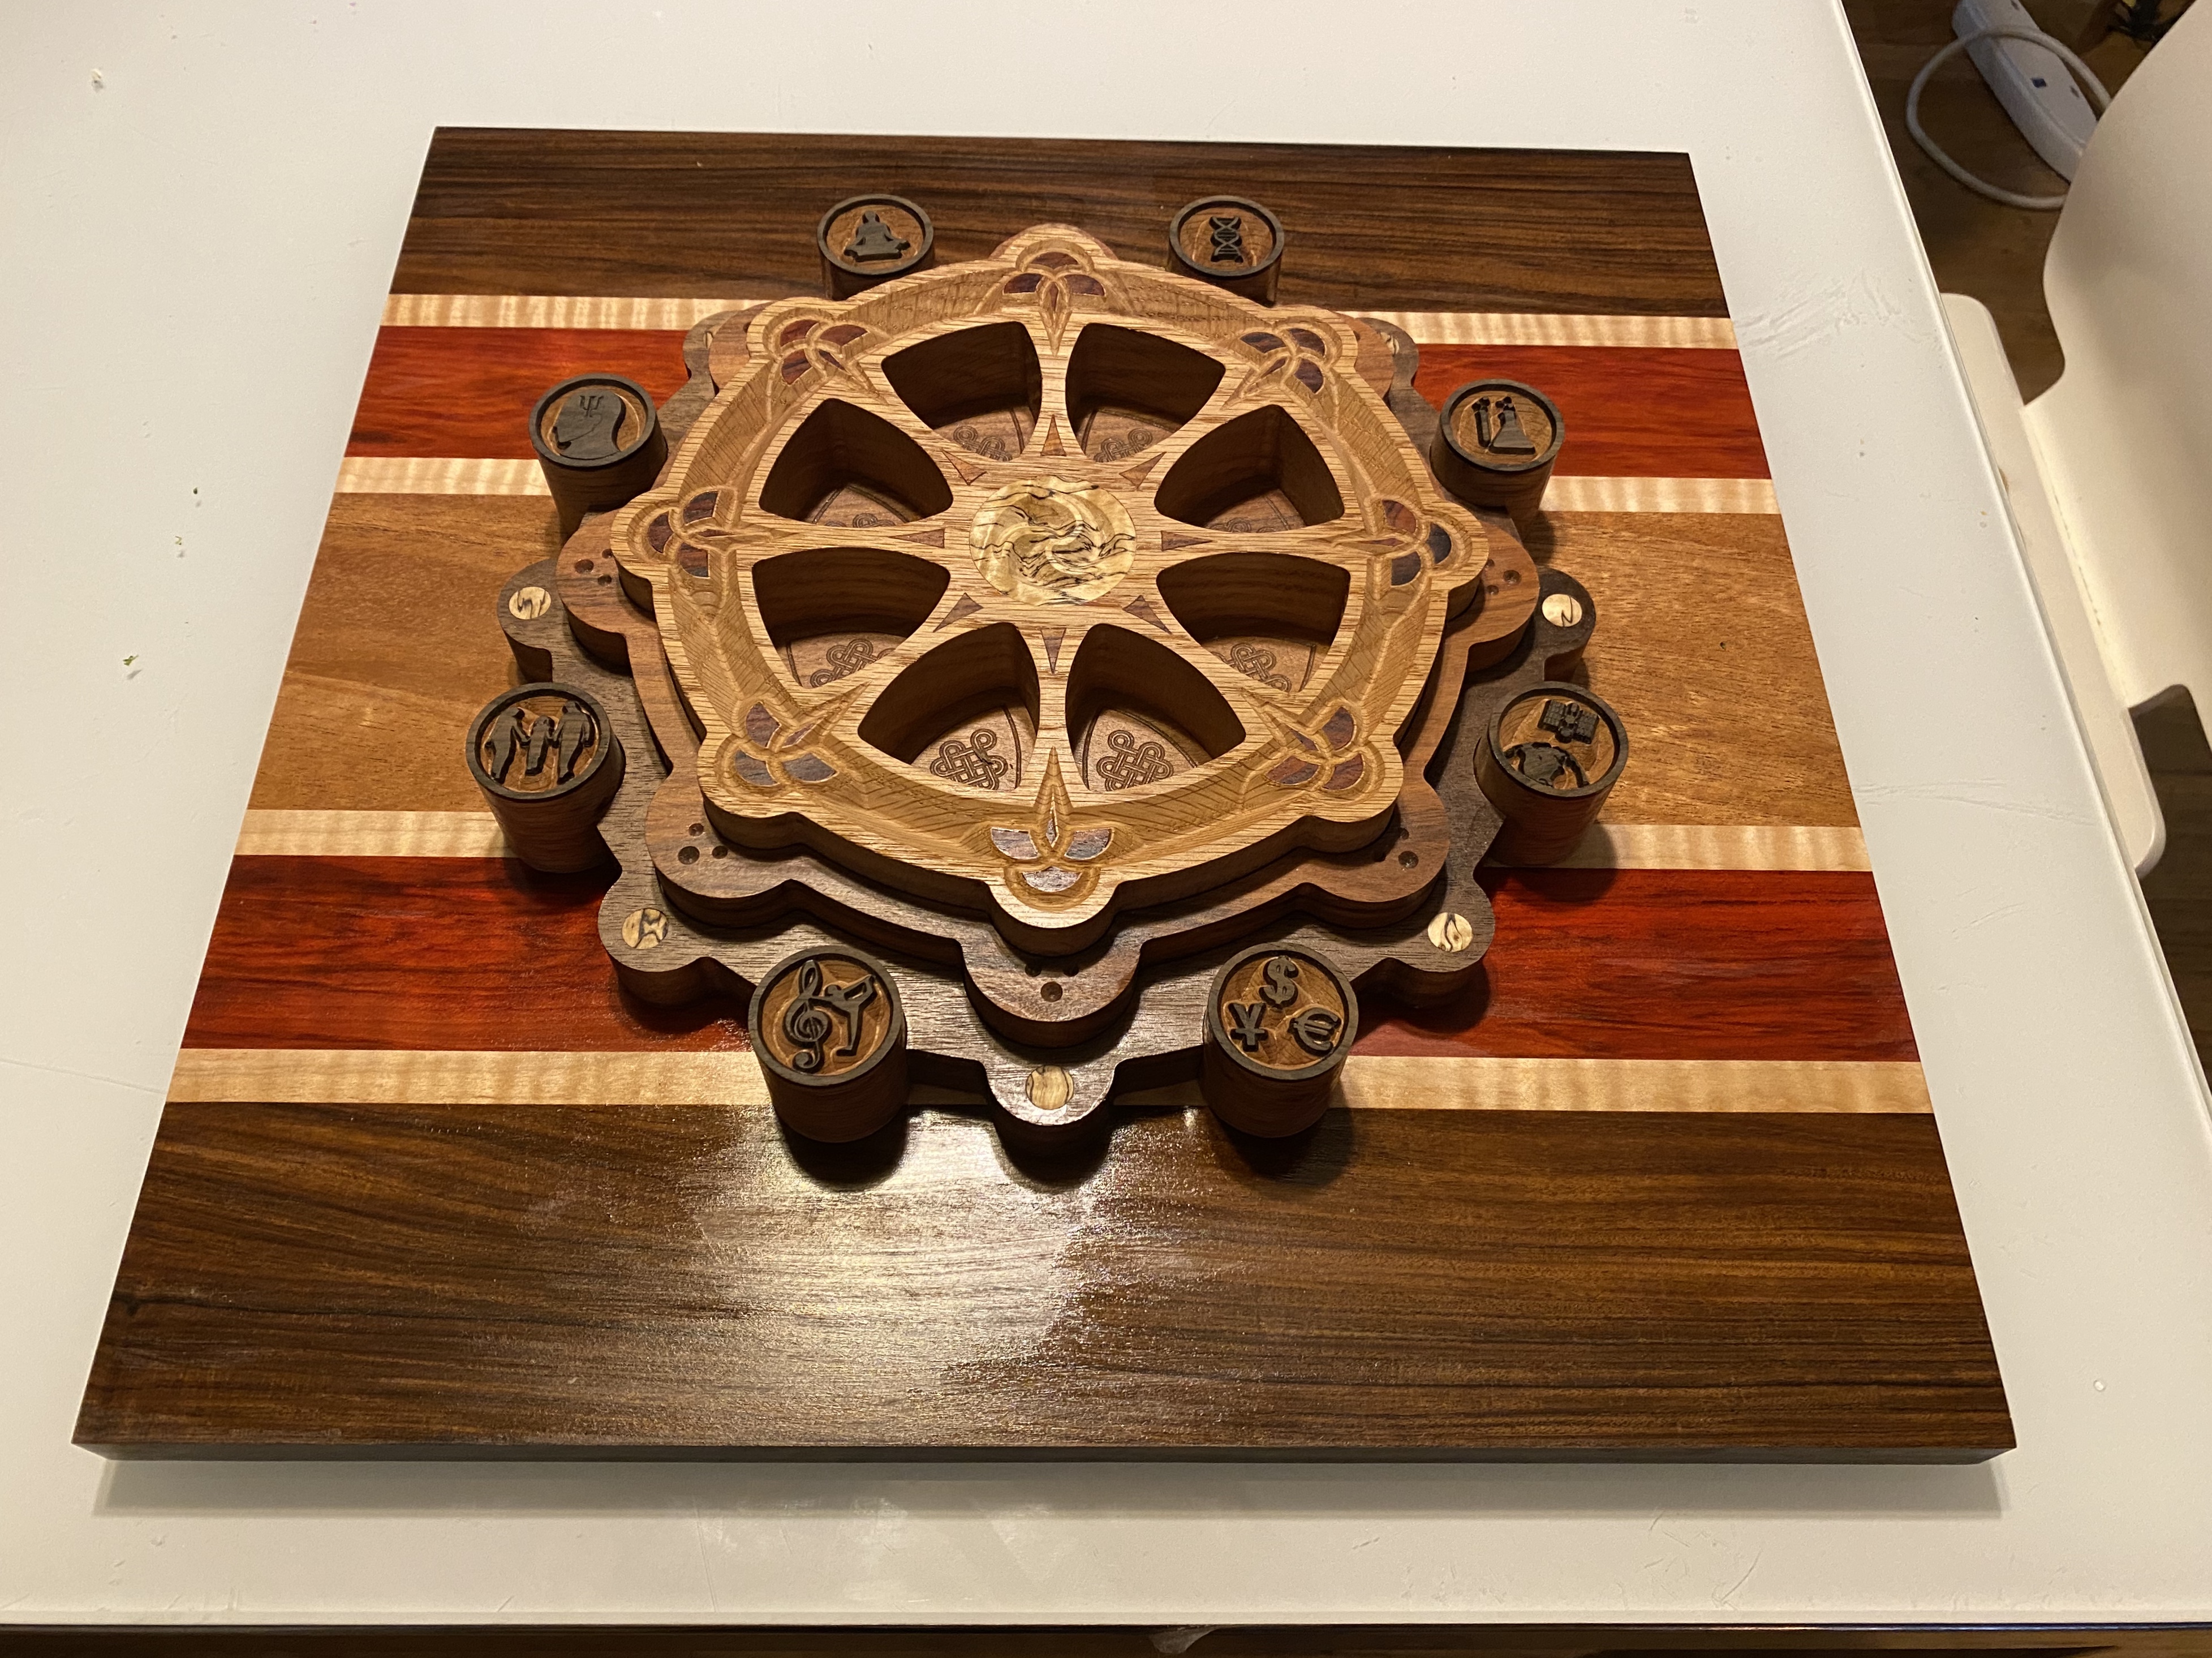
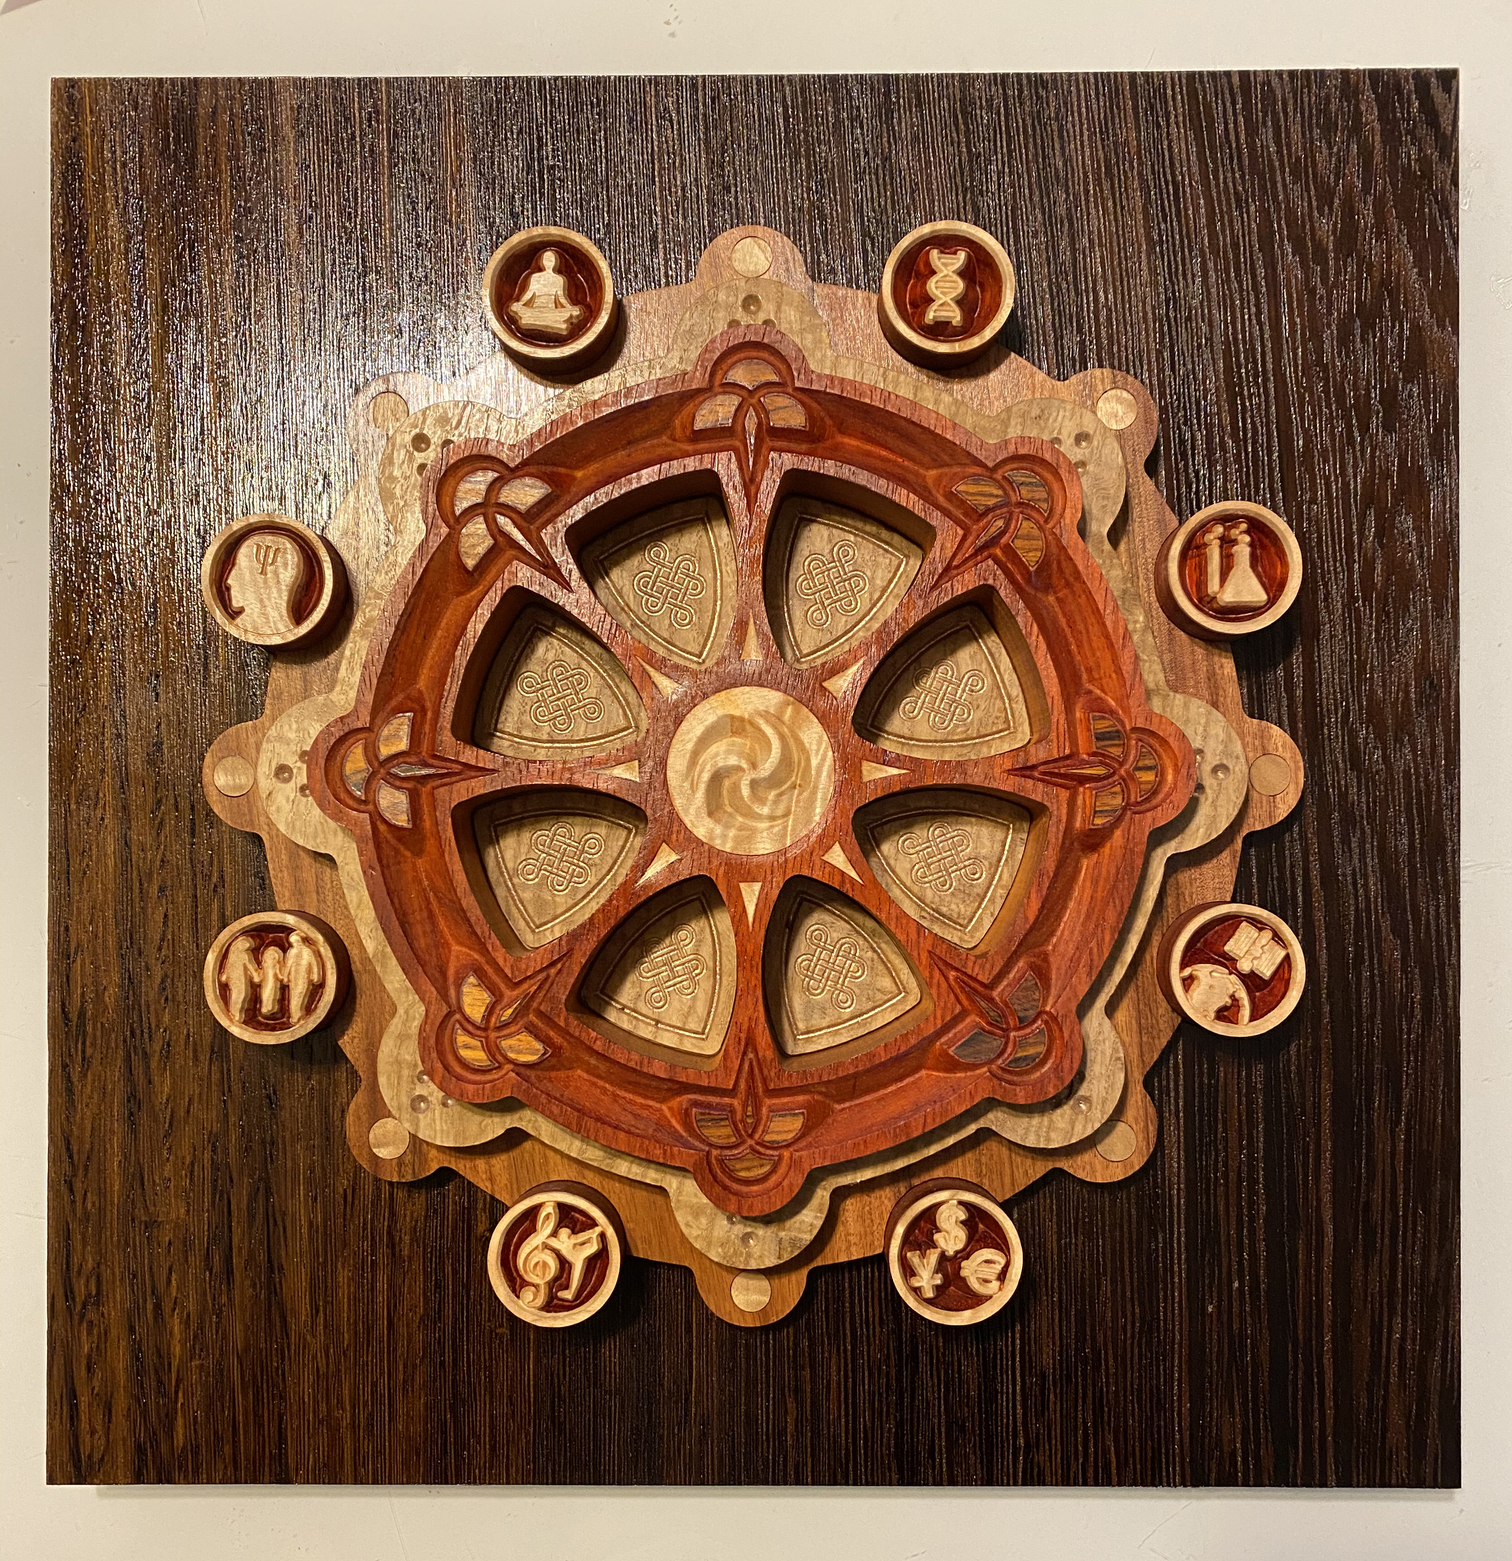
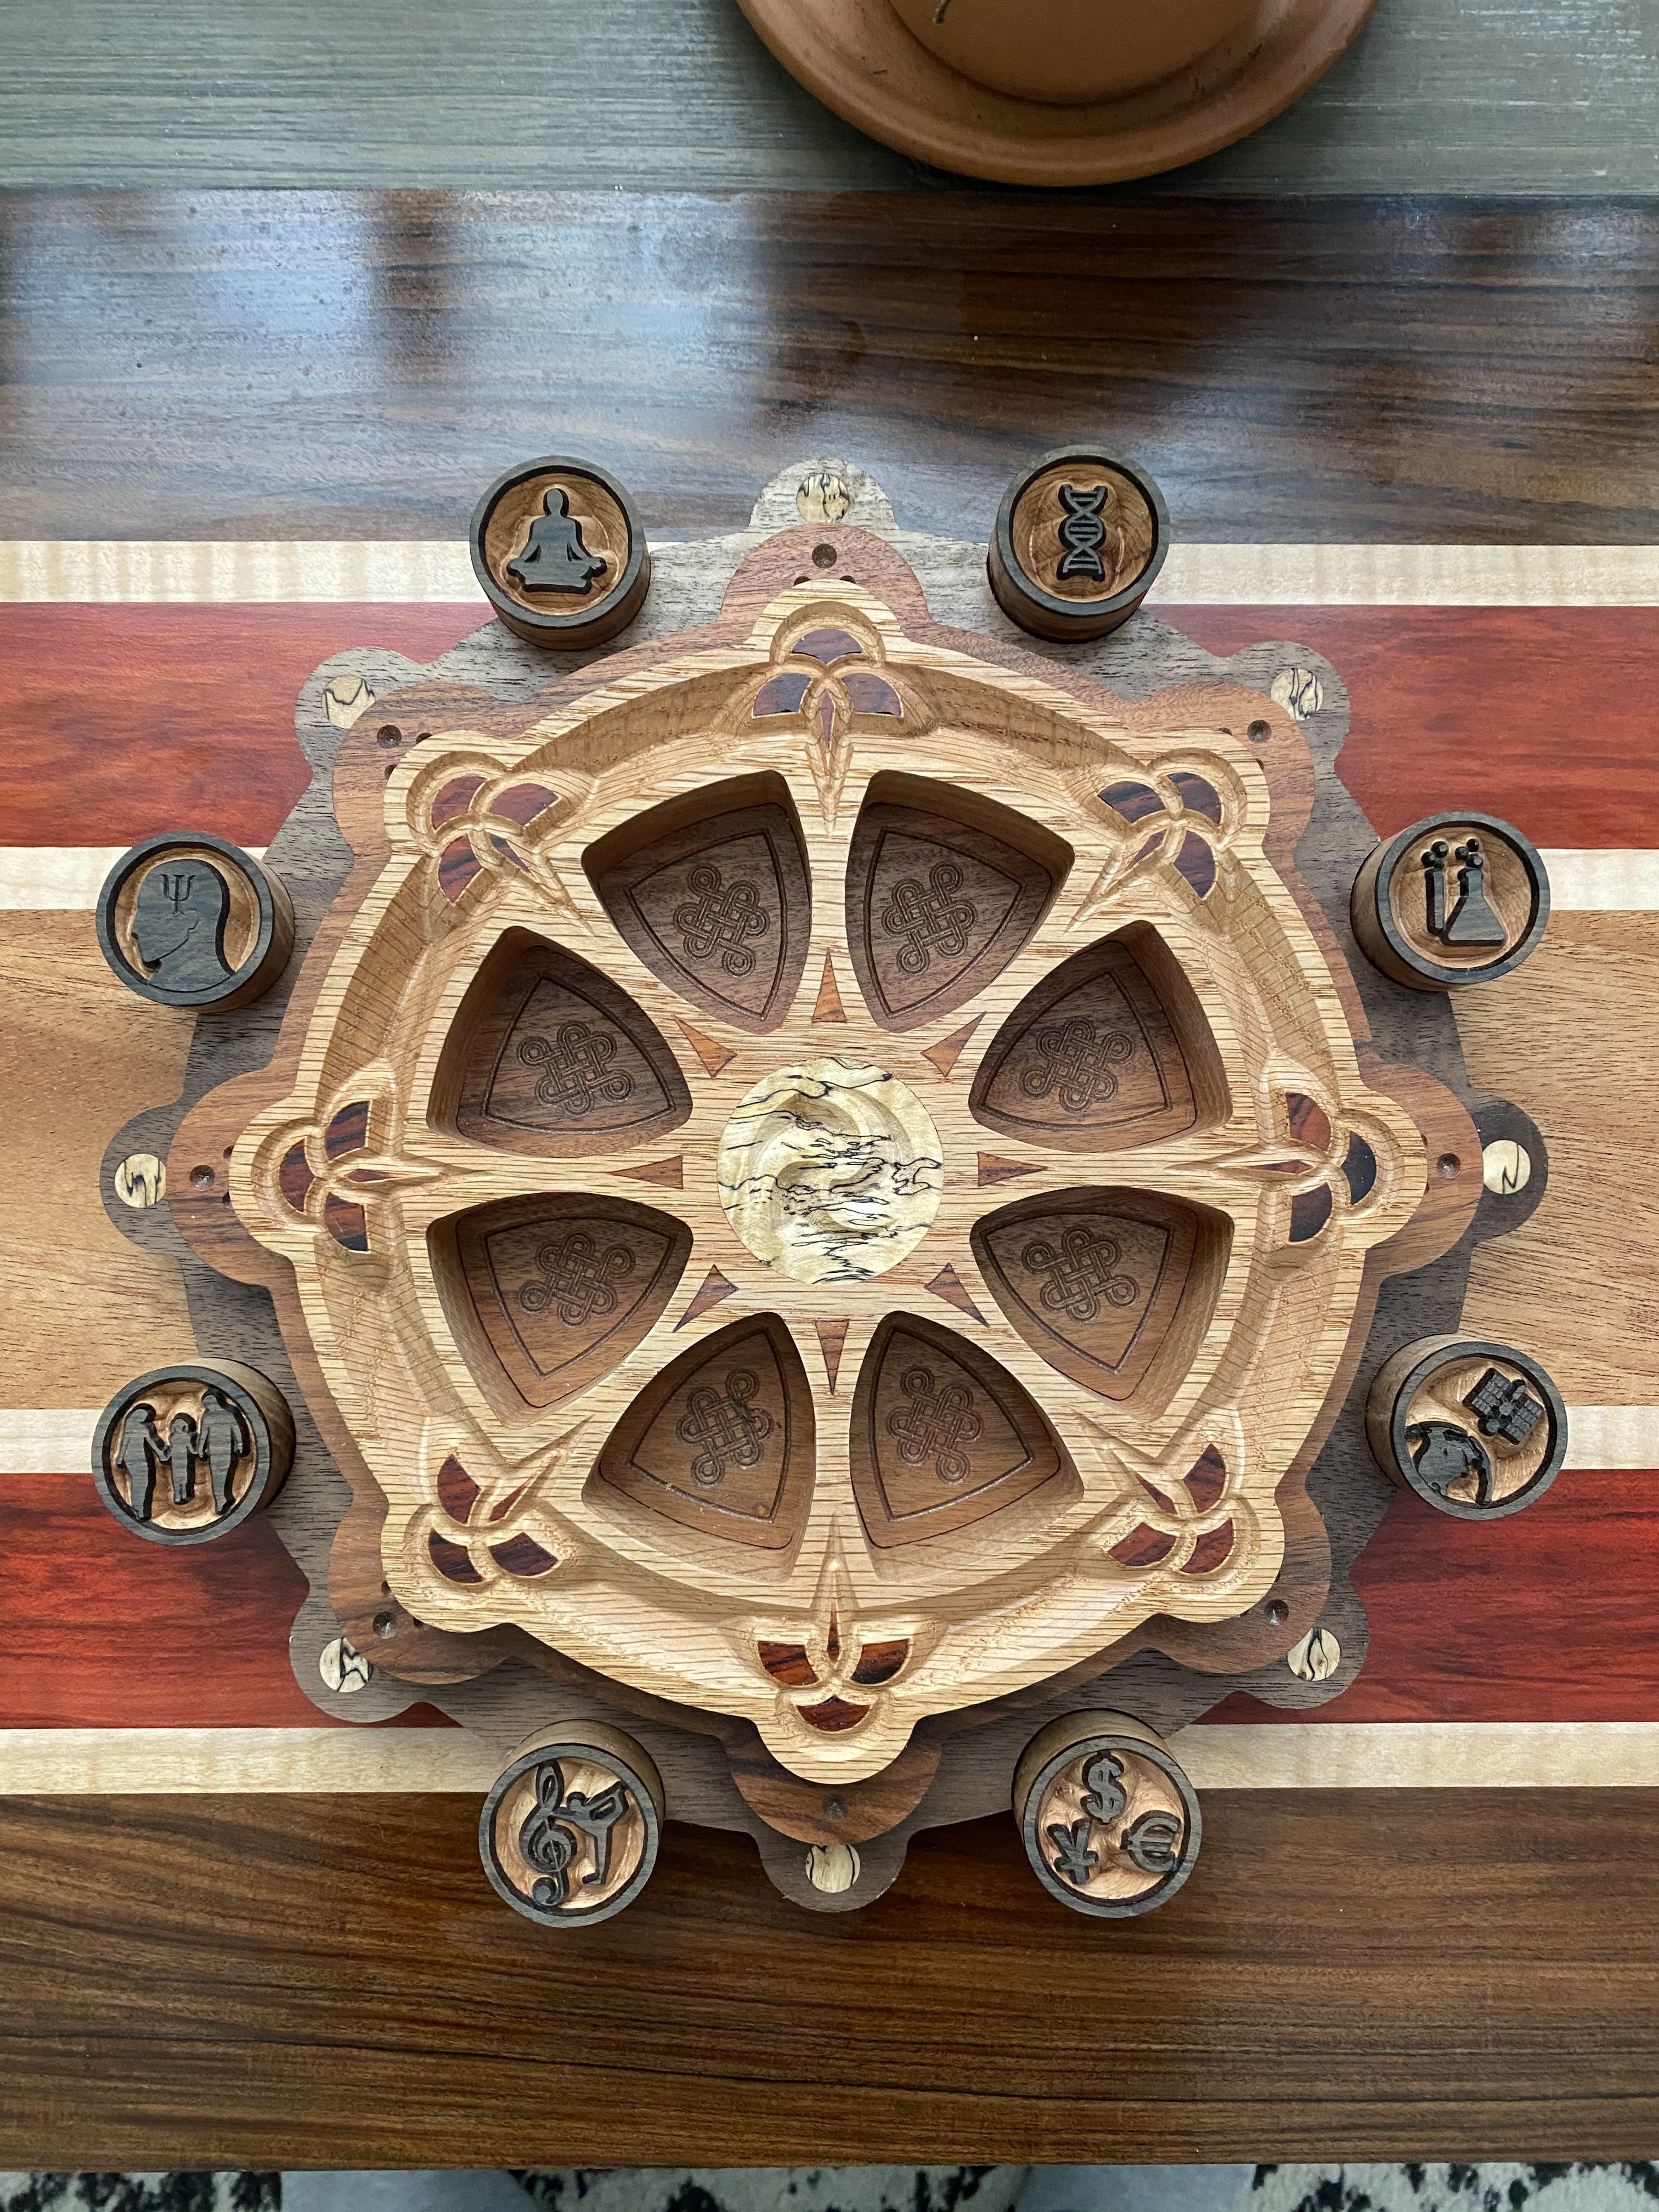
As for the main piece, it’s actually a Buddhist dharma wheel, representing the “fourth turning” of Buddhist thought and practice that would integrate the fruits of modernity and postmodernity. So the icons represent (clockwise from top) genetics/evolution, science, technology, economics/governance, art & culture, family & community, psychology, and spirituality. I helped design the 2D graphic several years ago for a project, and then I took the original design, broke it up into multiple parts, and used my machine to create a 3D version. I’ll post the original image, and a couple different versions I’ve made below so you can check it out!
Woot! Those are absolutely beautiful! Love 'em. WILL steal them.
Two things:
The product is Waterlox, not Polylox (not even sure if there is such a product).
I used to be a Shellac guy too…but you really have to be careful with dust and sags, particularly on edges of boards like those. You also have the hassle of brushes (cleaning, soaking in alcohol between coats, etc.). With a Tung-Oil base, you get a really nice deep finish, no possibility of sags, no worry about dust ruining the finish, no orange peel if the temp isn’t perfect, etc. Plus, you can apply it with a rag, or a stain pad - and throw it away when you’re done. I put finish into crevices with a Q-Tip…without worry about the cotton or anything else (when the finish dries, anything that ended up on your finish just wipes off). I got sold on it after doing a dining room table with curved chairs that would have been a PITA in shellac (Dining Room Table and Chairs)
The glossy finish Waterlox is slightly more finicky due to the quality of the finish (the gloss layering), but your pieces look like a semi gloss, so you will have zero issues.
After everything cures, I use 0000 Steel wool as an applicator for paste wax - and buff it off with a cotton towel…and it gives a great tactile semi-gloss finish.
How about using it as the top for a case that holds your Buddhist dharma wheel. You might have just enough material to continue the stripe down the front of the case.
I honestly have no idea why I wrote “polylox” – I must have been looking at two different words while typing
And yeah, when I do shellac I dilute it with denatured alcohol and then wipe on, often four or five coats (which is easy because it dries so quickly). I find this is particularly important if I am going to be doing any painting, since I can get the acrylic paint into the grooves (I like working with metallic paints) and then wipe away with a wet rag (though it’s a real PIA when the paint gets into the actual grain and I need to scrape it out with a razor blade). I wonder if Tung would allow me to do something similar?
I love these kinds of conversations, because there are so many different and wonderful approaches to finishing wood, and each seems to have its own plusses and negatives. So it’s always awesome to learn about how other people are doing it.
Tung does NOT dry quickly First coat is usually an 8 hour wait…sometimes more. Subsequent coats, I usually wait 3-5 hours. I’ll do 4-5 coats with a light sanding in between and then do that steel-wool applied paste wax as the final hurrah. The table above took 5 days to finish. That might be more than some folks want - but - it feels awesome and you can put a wine glass down on it and not be concerned about water or alcohol. All the benefits of poly, without the poly look and feel.


 But the red heart shouldn’t be nearly as challenging.

 First coat is usually an 8 hour wait…sometimes more. Subsequent coats, I usually wait 3-5 hours. I’ll do 4-5 coats with a light sanding in between and then do that steel-wool applied paste wax as the final hurrah. The table above took 5 days to finish. That might be more than some folks want - but - it feels awesome and you can put a wine glass down on it and not be concerned about water or alcohol. All the benefits of poly, without the poly look and feel.