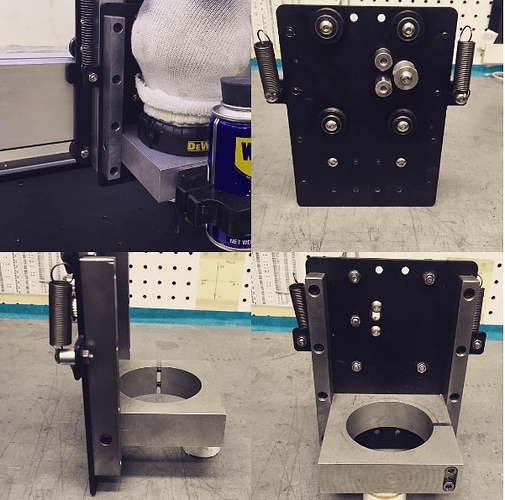
As you may know, I am a BIG fan of cutting metal on my Shapeoko 3, but almost immediately after receiving my S3 (October 2015), I realized that the Z Axis plate was not going to be able to take the stress of cutting metal greater then about 0.010" deep. In fact, traveling along the Y Axis, my machine develop a harmonic pogo effect causing the spindle to jump nearly a 16th of an inch, and then destroy the end mill.
Unfortunately there didn’t appear to be any off-the-shelf option to fix this problem, and since I spent most of my life as a mechanical engineer, I felt comfortable in tackling a fix. Here is what I came up with.
(About) $10 for material and $8 for fasteners, and it was made using only hand tools
This fix made the machine a lot stronger and stopped the pogoing effect completely. There remained one problem. Since the spindle was mounted about 3 inches below the bottom V-Wheel, this created a moment arm (a lever) that placed added forces to the X-Axis/Motor plate allowing it to bend, which contributed to some poor harmonics and made it vibrate. There was no fix for this except a thicker X-Axis plate, so I thought…
When Carbide3D released some early CAD picture of the new XL/XXL and I noticed that the spindle was mounted higher, and the Z Plate was shorter, I HAD to get my hands on this new plate. I begged and pleaded for and finally received the new plate for testing, and testing I did.
The fact that the spindle is now mounted BETWEEN the V-Wheels, made all the difference. It removed the lever that would bend the X plate and with it, removed the harmonics that allowed the X plate to vibrate. Now please understand, if you place your end mill out too far, you will still develop a vibration, FROM the END MILL, but not from the machine.
Overall I am very pleased with the results and have been able to take depth of cut (DOC) far greater that I have ever been able to with my personal upgrade (Today I took 0.100" DOC at 25 inches a minute. Check out my Instagram for a short video, with sound (IG: JPL_Richard), Now since the Z is belt driven with a narrow belt it is now possible to stretch the belt and as a result, I was seeing some slight variation in my Z depth (up to 0.003"). The fix, is to take a light finish cut (which is good practice, and a Fusion 360 default).
What you may or may not know, is that since the Y-Axis has 2 motors (17kg of motor force) it is the stronger axis for cutting, but without an upgrade, it was the weaker axis. For me (with the upgrade) I can double the depth of cut from the X-Axis (8kg of motor force). I also understand that not all parts allow you to do most of your machining in the Y direction, but this is something to keep in the back of your mind when designing and doing you CAM setup
So in closing, I HIGHLY recommend this very affordable and easy upgrade ($20!!!)
Store Link:
https://shop.carbide3d.com/products/shapeoko-upgrade-z-axis-plate?variant=24357348678
The following are some photos of this upgrade.
New (Motor Plate) on the Left, Old on the Right. What needs to be moved: 4 V-Wheels, 2 Springs, and the stationary Belt Pulley and the 2 Guides.
Change over complete (Total Time, 25 min)
This is also a GREAT time to make sure the guides are square to the table (Only the side with the non-moveable V-Wheels really need to be square)
I also made the spacing between the 2 rails a little smaller so the the eccentric nuts would not bottom out. I then checked the spacing at the bottom and top as well (not really necessary, but it’s what retired engineers do)
I also made sure that the spindle mount was square (Just checking the machining in the new Z Plate, and it was perfect)
Now if you recall, I posted something about cutting steel a few days ago, and that this 4" tall tube would NOT fit under the Spindle. Well LOOK!!! I not have an extra 1 5/8" of room under the spindle (and there is another set of spindle holes on the top of the plate that would give me almost another 2.0" inches. This is a a WONDERFUL BONUS for guys like me who like to indicate the part for second side machining:
Indicating the critical surface to determining the X and Y Origin (For 2nd side machining)
Another happy machine FULL of chips (Note: There are NO clamps holding my work, just a few drops of HOT GLUE)
Connecting Rod (with 0.001 Press Fit Bearing Bores) and 1/2 of the Connecting Rod with adjustable stroke slot.
Yup, that’s nearly 15 pounds of Aluminum chips, ready for recycling.

