Replacing the Nomad bed

@Darren I came across this ā€œMill Tooling Plateā€ from Sherline which looks like an interesting idea that could be scaled to fit the Nomad. Didnā€™t look to see if they sell those really small t-slot nuts separately so something like that would need to be sourced.

So, I removed the 6 screws from the table and it still didnā€™t want to come off. Did I miss something else? Do I need to turn the machine upside down and get to something on the underside?

I didnā€™t want to force it.

Anyway, so can anybody verify that these screws are M5x12 low profile socket head cap screws ? Iā€™m super new to all of this, so when I measured it, the fact that everything is a little ā€œoffā€ makes me second guess myself. The head of a low profile M5 screw is supposed to be 8.5mm diameter and 3.5mm thick but the one I measured actually had a slight taper (~8.35mm at the top and ~8.22mm at the bottom) and only 3.44mm thick. Or is this all within normal tolerances for such a piece? If so, I assume that the holes for the socket head screws are not what holds the table perfectly in place but rather the registration pins that are doing all the work?

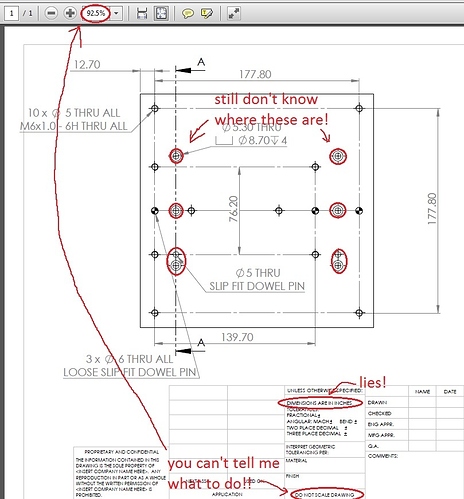
Regardless, @patofoto, were you able to get precise measurement for the 6 holes that hold the table to whateverā€™s underneath and the 2 reference pin holes? Everything else seemed to line up very nicely on 1, 1/2, 1,4" steps but the 6 holes and ref pin holes didnā€™t seem to line up with any nice round number in inches or mm. i.e., where are the holes I marked in cyan?:

We agree on dimensions. Here is what I got when measuring. Havenā€™t verified them yet. I want to make one out of wood just to check.

If anyone can confirm or rectify, please, do so. I also got M5 but didnā€™t get too specific. It will take a little bit of gentle tapping to get it off. The registration pins are snug. I think they are 2mm holes.

1 Like

I agree with most of your measurements (by 1.88 in I assume 1 7/8", or 1.875"?), except for where I marked here, which is why I wasnā€™t sure about the placement of those 6 holes and pin holesā€¦

Iā€™ll probably play it safe and make a plate that sits on top of the existing table rather than replace the table until we get an official measurement list or you or somebody else successfully makes one to really verify the measurements :slight_smile:

table.PDF (33.0 KB)

Hereā€™s our original drawing.

Note that the internal dimensions are what count, not the position relative to the edge. The position of the holes relative to the edge of the table can vary by up to 1.5mm since we donā€™t profile the perimeter of the table. The drawing does not reflect this since we machine right from the solid model, not the PDF.

For what itā€™s worth, MIC-6 is not specified to be incredibly flat but weā€™ve never had to reject any yet. They all show up very flat and ā€œstickā€ to a granite surface plate when we lay them on one.

The same goes for most of our standard 6061 up to about 4" wide. Itā€™s generally very flat even though itā€™s not specified to be.

-Rob

2 Likes

My notes :smiley:

Yeah, my 3 pieces of 6061 came shipped in a stack and were ā€œstuckā€ together. I have no way of measuring ā€œflatā€ but Iā€™m just going to pretend that if I take any two sides of any of the 3 pieces and place them together and they stick, that counts as ā€œflat enoughā€ for me!

1 Like

table.PDF (33.7 KB)

Updated version

Lies, incomplete data, and unenforcable demands have been fixed.

-Rob

6 Likes

A ha ha thanks - perfect :slight_smile:

Well that settles it. Hahahaha. Thanks Rob. All mysteries solved. Now to find out if the Nomad is up to the job. Been studying another mod for my Nomad too. Will post a proof of concept and will share as soon as I get it working. Itā€™s a way to zero X & Y with a USB microscope. Saw it on the Web and working on adapting it to our units. Love all this tinkering!!!

Except for the title block box not being nealy large enough, I think the true dimension callout is ā€œDIMENSIONS IN INCHES, BUT EXPRESSED IN SOFT METRICā€ :stuck_out_tongue:

Randy

@robgrz, thank you so much for the pdf with dimensions. Mine was close but not accurate. This paves the way for anyone to customize their bed any way they want or add custom attachments. I, for one, are having a blast thinking of ways to make mine my own. Again, Iā€™m sure I speak for manyā€¦thank you.

I donā€™t get why people want to change the bed, unless itā€™s to get some t-slots and that seems like youā€™d lose a lot of of Z height. And I would think the original picture in the thread would not only be flexible in using but flex under much pressure. But what do I know knowā€¦

@Randy - The correct callout is ā€œDRAWN BY AN EE, USE AT OWN RISKā€

@patofoto - Glad it helps. This was always something we wanted people to do. If we have time, weā€™ll probably make a batch of something different too.

@garyinco - We find that most people use very little Z depth in practice. Many of those that need more than an inch or so tend to be using it for fixturing of some type so I can see a threaded table being popular ( but obviously itā€™s not everyone)

-Rob

1 Like

@patofoto: heh, I still canā€™t get the table off. I mean, I wasnā€™t using all my strength - I didnā€™t want to break anything - but it did seem pretty much locked on thereā€¦ Did you turn it upside down to be able to tap up through the slots in the machine floor? You really just removed the 6 bolts and were able to get the table off? I even tried taking the M6 screws and putting them in and pulling on those, as well as getting a stiff spatula (the one Iā€™ve been using the pull up sticky-taped pieces) under the table, but neither seemed to do anythingā€¦

Hmm. Mine didnā€™t take much to pull off. I didnā€™t turn anything upside down.

Depending on the day and serial number, there are a number of pin types and Loctite combinations that have been used on the table. (And this is one of the biggest points of contention between different people in the shop) Later machines should be using undersized pins and less Loctite to make table removal easier.

You may have to turn the machine on itā€™s side and use a small punch to tap the dowel pins out from the bottom.

-Rob

1 Like

This is table Iā€™ve built to clamp things down.Iā€™ve used Delrin but I didnā€™t like how it turned out .Its self-lubricated characteristic is perhaps what I should avoid the most. Maybe I should try Aluminum. :smile:

The hardest part was to tap all the holes manually (actually, used a drill). Thread mills are very expensive ($80~$150) but I may eventually try them out.

PS.: this is a borrowed design from a comercial product that fits Normad bed fixtures. http://www.hightechsystemsllc.com/pt_work_holding_system.html

2 Likes

interesting system ā€¦ though unless iā€™m missing something, at 14" wide it wonā€™t fit in the nomad.

I eMailed Derek Berger at High Tech Systems about making an adaptation of his HTS Modular Work Holding System. He had this to say:

I already make smaller versions for other companies. I would be happy to make these for Nomad in any size. Let me know exactly what sizes you would like. Thanks, Derek Barger www.hightechsystemsllc.com

A modular system like this for about $100 seems worth every penny.

Thoughts?

absolutely! shoot him the pdf and see what he says ā€¦