I’m pretty sure Carbide 3D won’t disable the probing commands (which as I understand it we helped develop / fund?) — the problem is working out the macros so that they won’t break / damage endmills or mar stock or third-party touchplates
You are exactly right Mike, that’s why they have my support and encouragement and why I am planning on adding more systems. I was trying (maybe like a bull fighter) to make a point. This has been a very long topic and a lot of people seem discouraged with their own impressions. People are obviously concerned about Carbide3D leaving them behind with comments that other probes won’t work. Proprietary usually ends up expensive, complicated and mandatory. That is my very small worry. The simplicity, accuracy and unlimited potential is what I bought into and still believe they offer. I do warn about over growing. Edward Ford answered my support email in 10 minutes the other day. He solved my problem, saved having to replace a board and I added another new feature ( of my design and requirement) to my Shapeoko 3. Carbide3D has overwhelmed me with the best support I have ever experienced. I successfully use alternate programs and alternate accessories and Carbide3D has supported me in all my efforts. Edward Ford has my respect and support. To date, the only thing actually proprietary to Carbide3D is their initiative to make a simplified, accurate, basic CNC experience affordable for entry level cnc’ers while providing a system of unending potential for those experienced in cnc, while maintaining the highest customer support in any industry. NOBODY else does that. Maybe I can clarify my thoughts, because I have seen limited progress with CC and CM and the long delay of the probe, the worries of “proprietarizationalism” have grown like a conspiracy within this topic. Let us not have any conspiracies beyond Bigfoot and may Carbide3D grow and prosper.
3 Likes
Well said. I too have gotten nothing but support from Carbide. I do have faith that outstanding solutions will be produced by Carbide. I just want them to keep in mind that they can and should support multiple options.
1 Like
I read upstream here there’s a “strain gauge / load cell” that’s integral to the C3D probe? That’s an interesting twist. I had been wondering about the integral “puck” and what needed to be “amplified”. Now I know.
Touching off can be accomplished without the end-mill/collet/chuck being part of the probe input circuit which is a nice feature. I concur with the opinions above, we all hope that Rob/C3D incorporates probe dimension in an upcoming release.
If you’re reading C3D, please add the numerical keypad v3 jogging keystrokes in v4… pretty please?
This would include jogging speed and Z movements.
1 Like
Hi Jim
I’m really intrigued by you mentioning that you are using the Estlcam exclusively as I think its the perfect tool for me too but I’m unsure how to go about setting my machine up to use it. I think it would be useful to be able to switch between the software too but not essential if its easier. I’m especially interested in the probing 3d parts that Estlcam provides as I mostly engrave aluminium parts of all shapes and currently have to draw measure and draw each one!!!
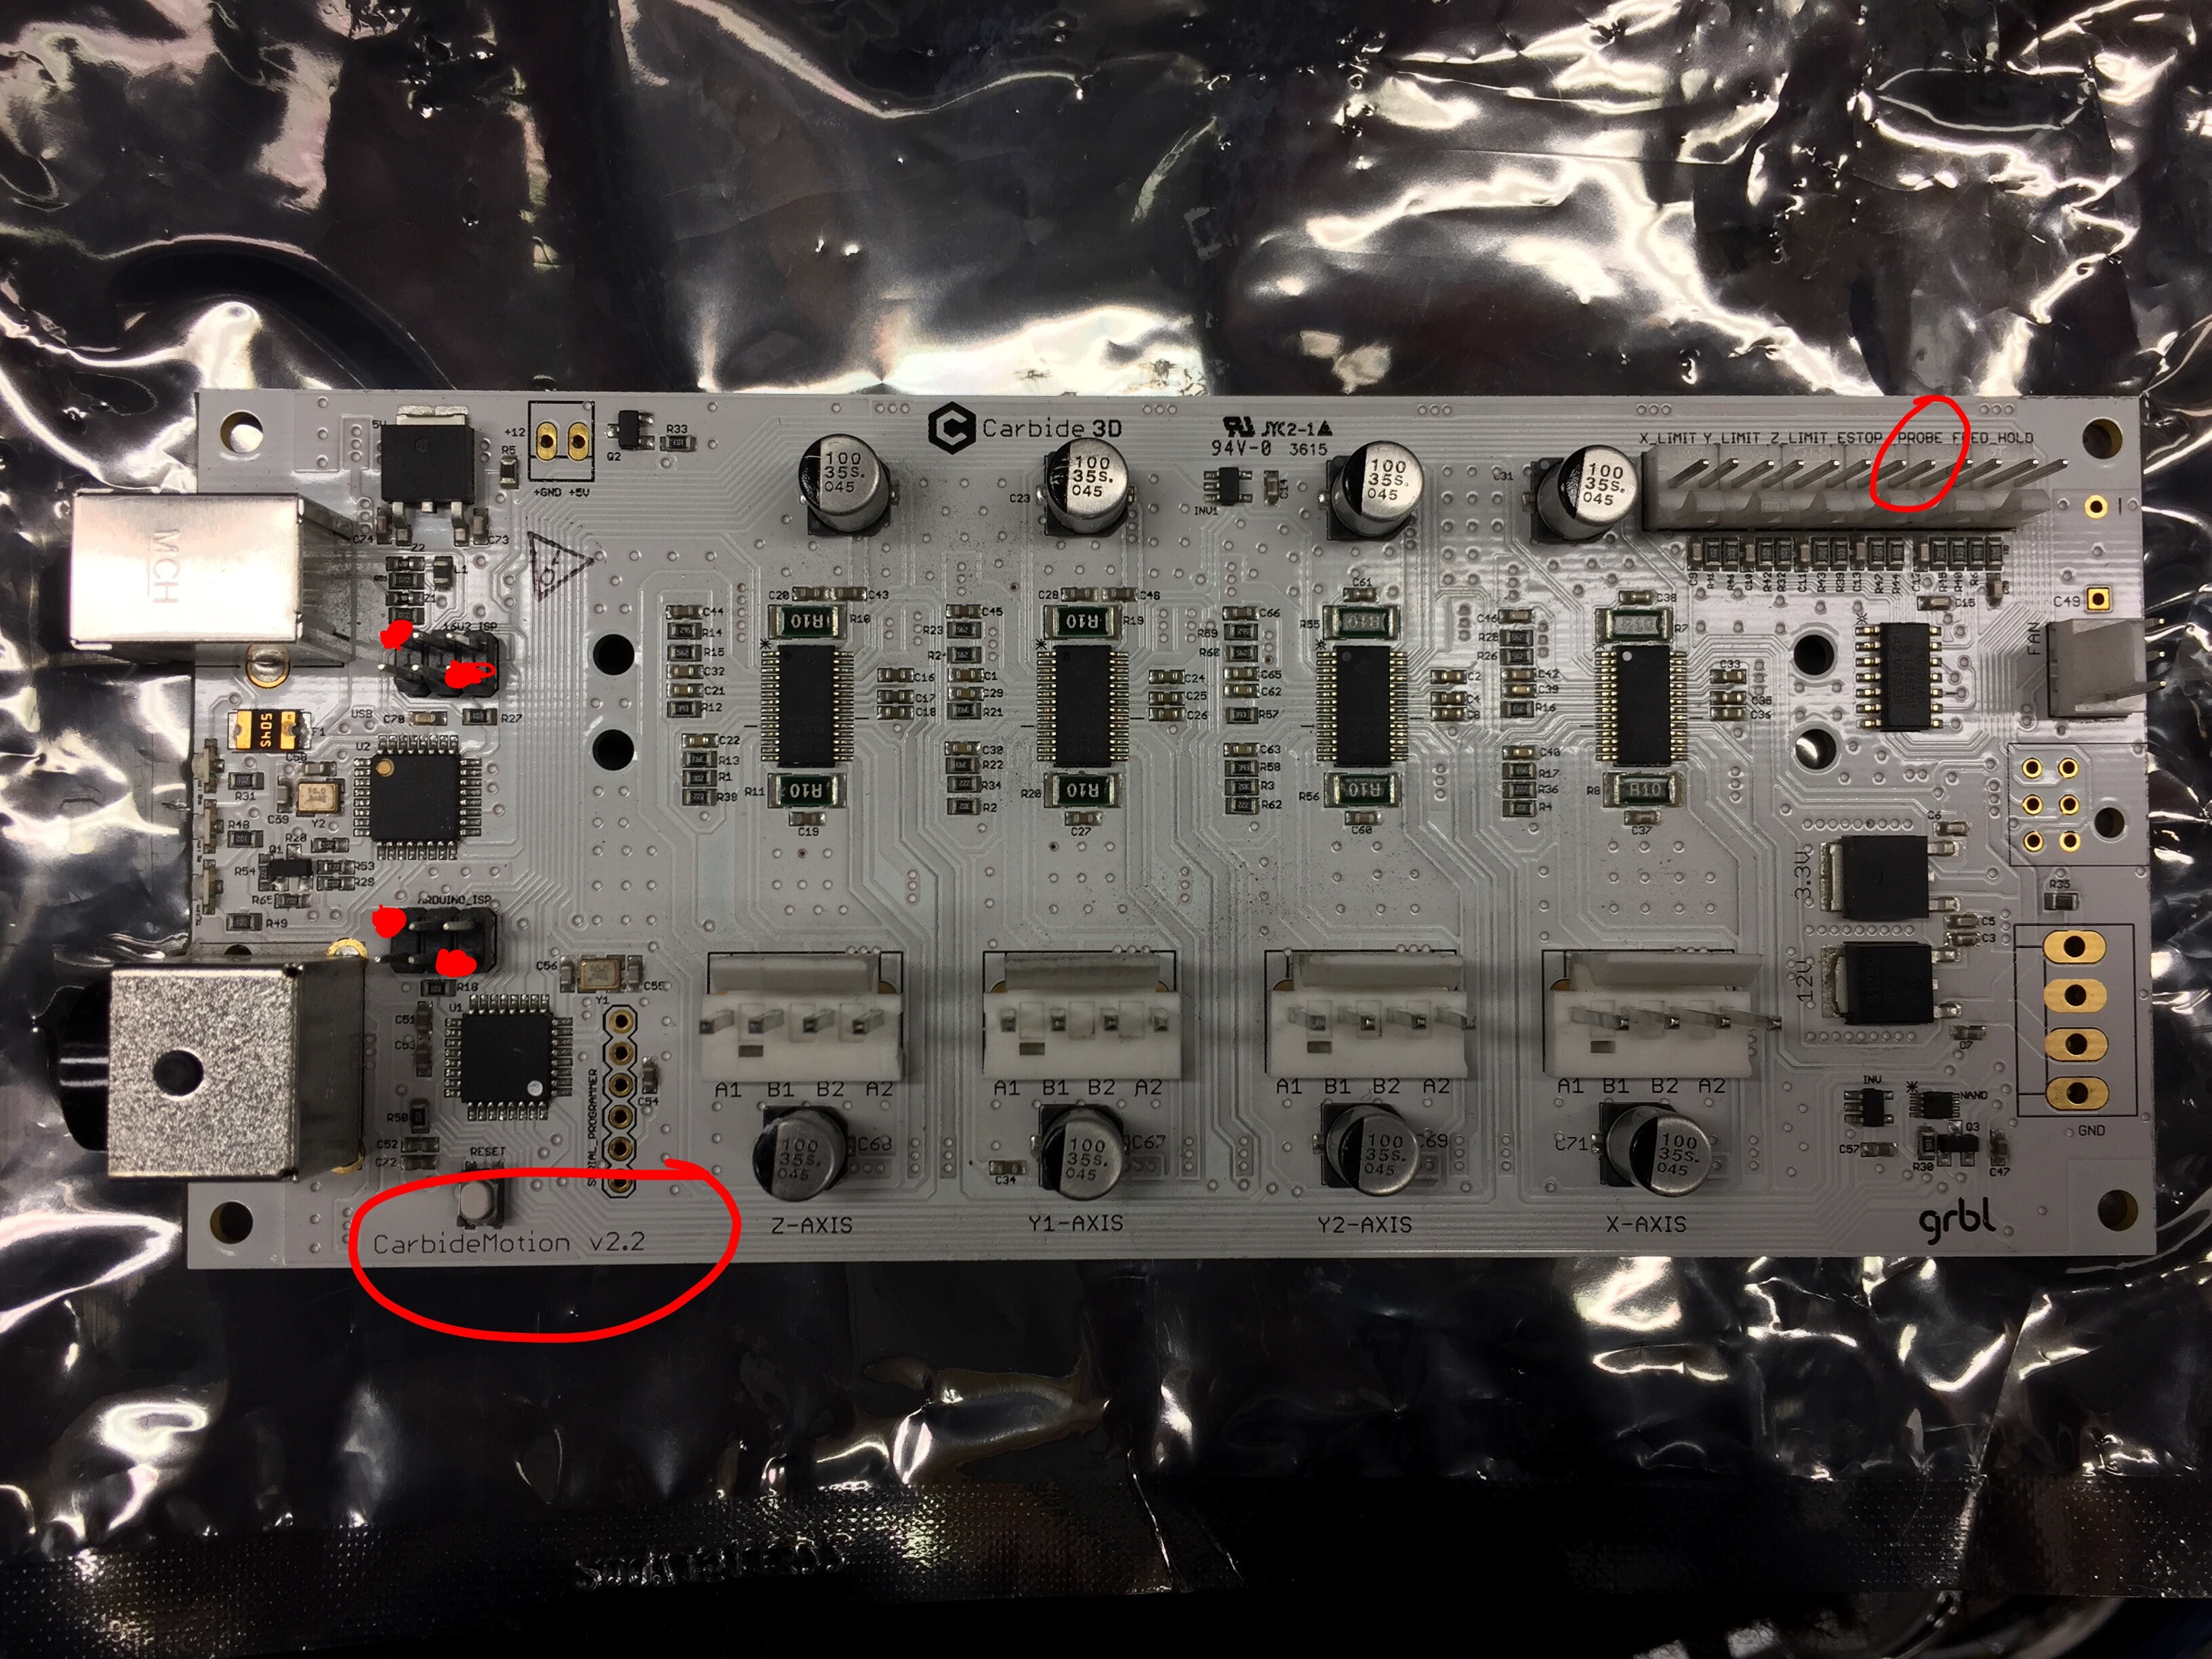
I believe my board is Carbide Motion v2.2.
Would you be willing to tell me exactly how to go about it and how I can then connect a probe? Plus are there any downsides? Like does the measuring probe become redundant etc.
Any help you can offer will be much appreciated.
v2.2 CM should work right out of the box with Estlcam (no PROG pushbutton). I had some issues with the bootloader of my v2.2 board and I ended up reflashing the bootloader. I documented the reflash here:
I also used the standard Shapeoko configuration right out of the Estlcam box, and I don’t employ the Shapeoko homing switches (those I use with my GRBL controller).
Sounds like Estlcam contour mapping will get you where you want to be.
3 Likes
I’m not Jim, but can assist: First the new Touch Probe will come with the necessary documataion to tell you how to connect the probe to all versions of the GRBL board. But as the owner of a Ver2.2 board AND a Touch Probe, here is how (I believe) you will connect it.
See photo.
You will connect to the two (2) pin connector marked PROBE (part of the long white connector) and circled in red. Nixt, you will also connect the provided pigtail to a 5V source. I have identified four 5 Volt pins on the 2.2 board (Red Dots).
I ALSO have a probe that is part of the Additive Aerospace kit, and I use it to locate the center of holes (when I want the center of a hole to be my X0Y0, so NO it does not become redundant, it just becomes another tool in out toolbox.
I hope I have answered all your questions.
3 Likes
What software is that?
I got bored with looking at alternatives… I tried the new version of CM without a official touch probe…
6 Likes
I use sketchup 2017 make exclusively to draw and Estlcam exclusively to cam and control my Shapeoko 3. They are my tools and the Shapeoko 3 is my machine which I have enjoyed learning this new adventure with. Search Estlcam in the forum, it;s a popular topic although not a C3D product. It has proven itself to be very easy for me to learn and use productively but I am not a programmer or a machinist so the high end programs are not within my learning curve.or ability. As with anything relating to my use of the Shapeoko, I have and do suggest that using any non-C3D product with your Shapeoko or C3D machine that one communicates and qualifies that product with the C3D support team. They supply the best support I have ever experienced in any product ever. They have legitimate concerns with warranty issues but they have proven that their customers’ productive use of their machines is prominent , thanks to Edward Ford and his team.
3 Likes
@Luke It appears you will just need a probe of the correct size. It resets the zero to the top corner, then when the mill is up it is at the correct height.
Thanks for your vid… it’s been confirmed that v4.08 probing works. It should be all well and good when using the C3D probe of expected dimension, so when custom/non-C3D probes are used, it’s unclear any custom offsets can be used… AFAIK, there’s no support currently for this (I’ve emailed beta@carbide3d.com to request this feature).
Your machine thinks X/Y are zero, but are they in respect to the work piece? And for your Z, is 28mm your retract height? If you removed the probe and positioned to 0,0,0 you’d likely see the dimensional offset differences between your probe and the C3D probe.
1 Like
Hi Jim
You may or may not be able to help as I’m running in circles trying to find out if I can use Estlcam with my Nomad Pro machine, and in particular the 3d probe facility within Estlcam.
If I briefly explain what I’m trying to achieve it may help you understand as I’m not electronically minded so I’m not familiar with the Carbide Motion V2.2. circuit board.
I basically engrave aluminium parts of different shapes so it would save me hours of trying to ‘reverse engineer’ these aluminium parts if I could probe each piece so that the Nomad sees the engraving as ‘flat’ which is clearly demonstrated in one of Estlcam’s videos. That’s it really…but the downside is I haven’t got a clue how to go about it although I’m not completely stupid I do have a theory on how I think it might work.
My probe pins are currently occupied by 2 cables that I assume connect to the homing/tool depth switch within the machine which I believe isn’t necessary when using Estlcam so I’m happy to disable this if necessary.
So if I convert to Estlcam, do I simply disconnect these 2 cables and use them for the 3d probing? Or is it not a simple as this?
If you have assist that would be great but if not don’t worry I’ll carry on searching.
Best regards
Stephen
1 Like
I don’t see why it wouldn’t work… there’s likely some customizing of the stepperrs and workspace you’ll need to consider for the CAM controller setup, and if you remove the probe connector wires you could replace them with some wiring to support your surface contouring operations.
I’d ping @Estlcam and see if he’d have some pointers on your CAM and stepper setup. I can’t say I’ve read about anyone in the community forums running this CAM controller, but it should work effectively out of the box and you can try it for free.
Since you’re running a v2.2 controller there’s no PROG pushbutton, so provided your bootloader is operational you should be able to reflash with the CAM utility and restore the original GRBL using the built in flash utilities.
I’ve not used the contouring features, but it looks very handy for the type of engraving you want to do.
1 Like
Thanks Jim Very much appreciate you taking the time to respond.
I did email Christian back in February of this year and he kindly responded as follows
"Hi,
** If you’re willing to take a little risk try the following:**
- Select the “Shapeoko 3” preset.
- There should be a very little, white “PROG” button at the left side of the carbide motion controller board just above the limit switch headers.
- Keep it pressed and then click “Program Arduino” – Estlcam should now be able to program the board and control the machine.
Risk: it may be difficult to get it back to factory settings if it does not work as intended - Estlcam has a backup and restore function but it is untested with the new board version."
As you’ve mentioned I don’t have the PROG button so how do I know if my Bootloader is operational? Sorry I don’t fully understand the machine workings etc. most of these terms are a steep learning curve at the moment!!
I will try Christian again to ask him about the CAM and stepper setup too.
2 Likes
It’s my understanding that if one has a newer board, then rather than the “PROG” button, one holds down the Z-axis limit switch — check in w/ your board revision at support@carbide3d.com for a definitive statement.
2 Likes
You will know when you attempt to flash the controller firmware… it works, or it fails. As @WillAdams suggests, if it fails try it again with the Z-axis homing/limit input activated.
Start as Chris has suggested using the default Shapeoko3 setup, and if you’ve reflashed perform some basic jogging operations and verify movement vs. command (super easy direct commands).
2 Likes
Any updates on the probe?
2 Likes
yes a touch probe would be very useful…
Of course not! There haven’t been official updates for months! 