Acrylic adjustments based on results

First time cutting acrylic. I have read lots of recommendations on experimenting with acrylic settings to tune them, but I had not seen much for visual examples of what some of these conditions look like. I had some pictures of what was happening on some of my cuts and am curious on any feedback.

First the setup :
Carbide Create build 652
Carbide Motion 563
Shapeoko 4 with sweepy and vacuum hose, carbide compact router
cutter Amana 51411-K (new)
settings from Carbide 3D library hard plastic
1/16" Red on White Acrylic Sheet (25267-03), top layer 0.005" from Inventables

Settings (inches)
Stepover 0.03
Depth per pass 0.025
Plunge Rate 12.0
Feed Rate 45.0
RPM 18000
start depth 0.0
max depth 0.02

Q1 - Contour op - moving right to left, this is a complete cut in 3 passes for the 1/16" material
Is this just the tool heating up and then starting to have the material stick together ? Is this just a matter of increasing the feed rate ? I went up 10% and it didn’t seem to make much difference. What are indicators that you have gone too far if you just keep increasing 10% at a time ? Should increasing feed rate eventually remove this sticking material ? or is this expected to some degree? it is not sticking to the tool.

Q2 - Pocket op
Referencing A, its leaving these islands of material, I tried reducing the stepover, didn’t make any difference. Just wanting to check if this is something someone recognizes and the solution. My other theory is that this a Carbide Create issue with the current version. I think I had gotten something like this pocketing MDF and went back to an older version of Carbide Create and then the pocketing op was not leaving material in areas like this, did not try using an older version of carbide create on the acrylic this time. Just wanted to check if someone knows what would cause this.

Referencing B - first 2 letters cut didn’t leave much material then on the B there is a lot more clusters of material, is this that the tool is heating up and material sticking together ? Seems like a heating up issue similar to the contour op above that started collecting material in the cut that could be addressed with increasing feed rate ?

Referencing C - These ridges are lower in the material that was pocketed, so they were cut down some, but it still left these lower ridge lines as opposed to A where none of the material was cut.


Q3 - Do you typically leave the plastic coating on the acrylic when cutting or peel it off first ?

Hi @tsetsefly,

Q3: I tend to remove the plastic coasting before coating when possible, it’s super soft and tends to shear/melt rather be cut by the tool, and gets in the way of good chip evac.

I did remove it for that recent project where I cut tons of shiny black acrylic, and found out that after the cut if you use a soft brush to remove the dust/chips, and then a microfiber cloth, then you can clean-up the acrylic without leaving ANY scratches.

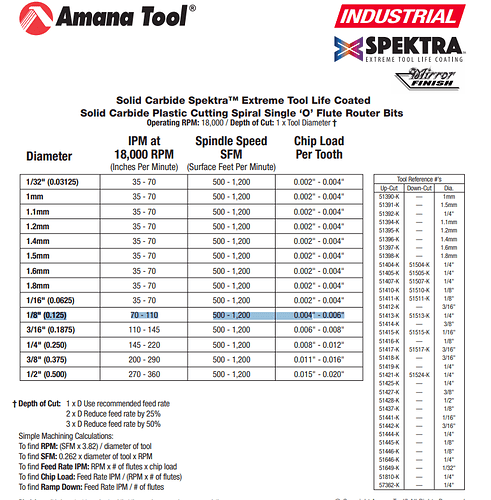
General/Q1: you are feeding 45ipm @18k on that single flute, which is ok but you could feed faster (and plastics tend to crave high feed rates). The Amana recommended values for that endmill are 70 to 110ipm at 18000RPM,

They tend to be a little aggressive, but there is probably a lot of margin for your to explore between 45 and 70ipm.

Also, in plastics I usually use a plunge rate that is at least half of the feedrate. If you plunge too slow, you may end up with melting just during the plunge, and sometimes that’s enough to compromise the rest of the cut. You should be able to plunge at 30-40ipm without any issue

Regarding A: it may be one of the corner cases where rounding errors and/or the cutter not being exactly the specified diameter, leave a small ridge like that. I’m surprised that changing the stepover did not help at all though. Usually just adjusting the stepover ever so slightly, makes the math behave.

Regarding B: yeah, probably the joint effect of a not-quite-fast-enough feedrate and the presence of the plastic coating preventing chips to get away from the cut

Regarding C: weird, but it may just be the same as A but with a thin enough ridge that it broke and flew away, leaving you with that ? (you can see how in some places of the O and the R, that extra line is not there, it’s discontinuous)
1 Like

This topic was automatically closed 30 days after the last reply. New replies are no longer allowed.