Anyone built Fisher's Flip Table for the Pro XXL?

I have a new Pro XXL that is still in the box. Due to limited space in my garage I need to build a flip top table for my machine. I really like the one Fisher built at the link below, so I was wondering if any of you have built one for your XXL? If so, what size did you make your tabletop?

https://www.youtube.com/watch?v=6A4iHVVnDHo

1 Like

I have 2 flip-top carts for 4 of my tools but to create one for the SPXXL would be complicated. I’d worry too much about stuff moving around as well as running wiring?

He pretty much solved the wiring problem, check out the video in the link.

So what size table top do you have for your SPXXL?

That is one interesting looking SPXXL?
My table is big enough for the CNC with 5 inches or so on one side to lay tools and stuff to work with. (No wheels (to be added later)) It is stationary in the corner of my small work area.

According to the Shapeoko website the footprint of the SPXXL is 50" x 42". Does that include the Y-axis stepper motors sticking out from the frame?

My table is 48 1/2 X 56.


Link to this project is… Senet Project
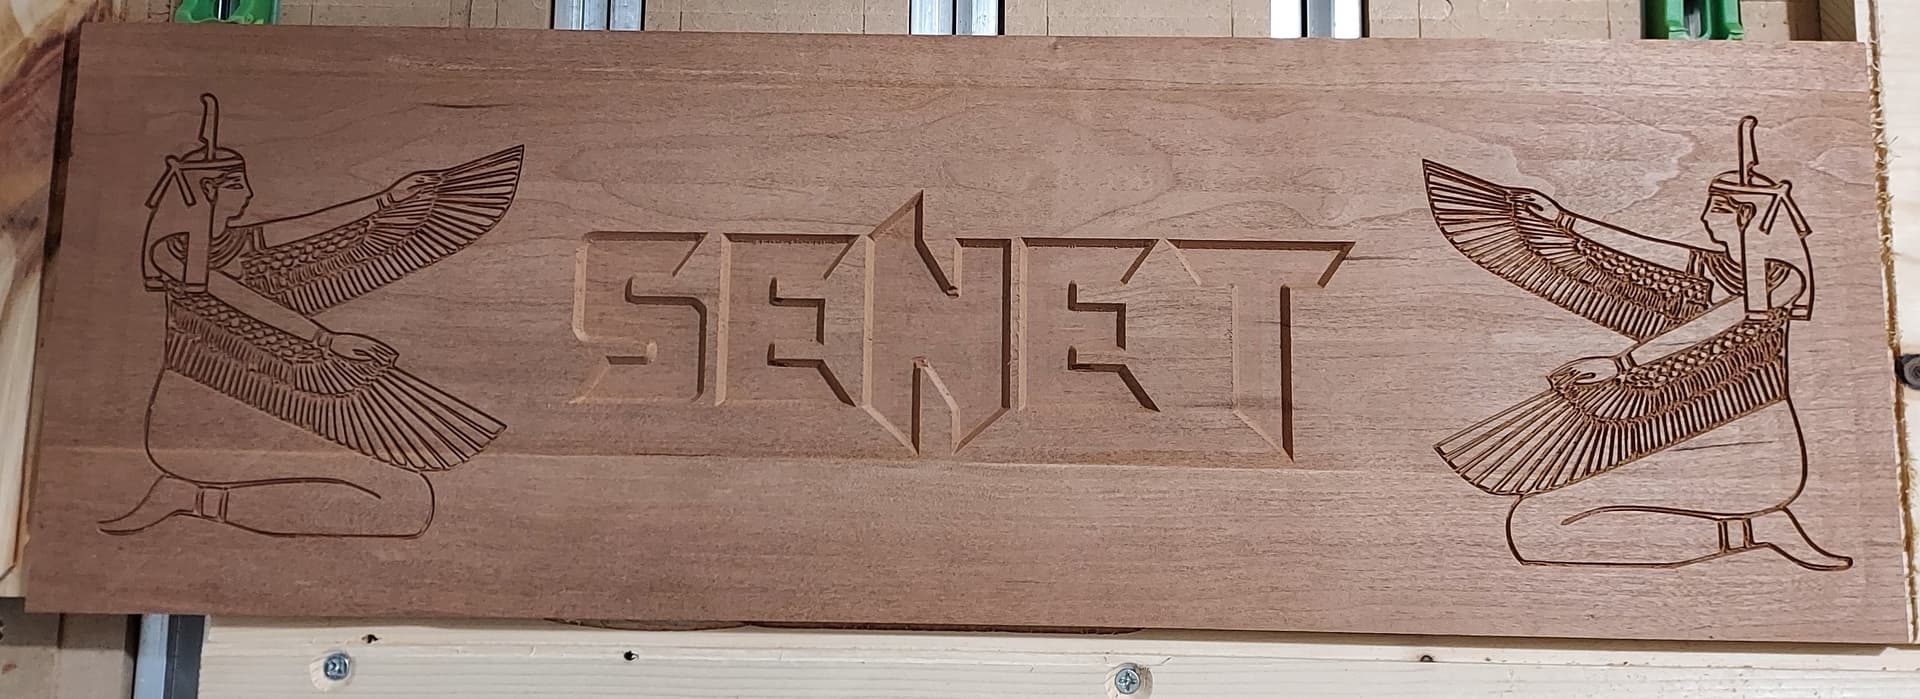
The top cut is as follows but still needs finish.

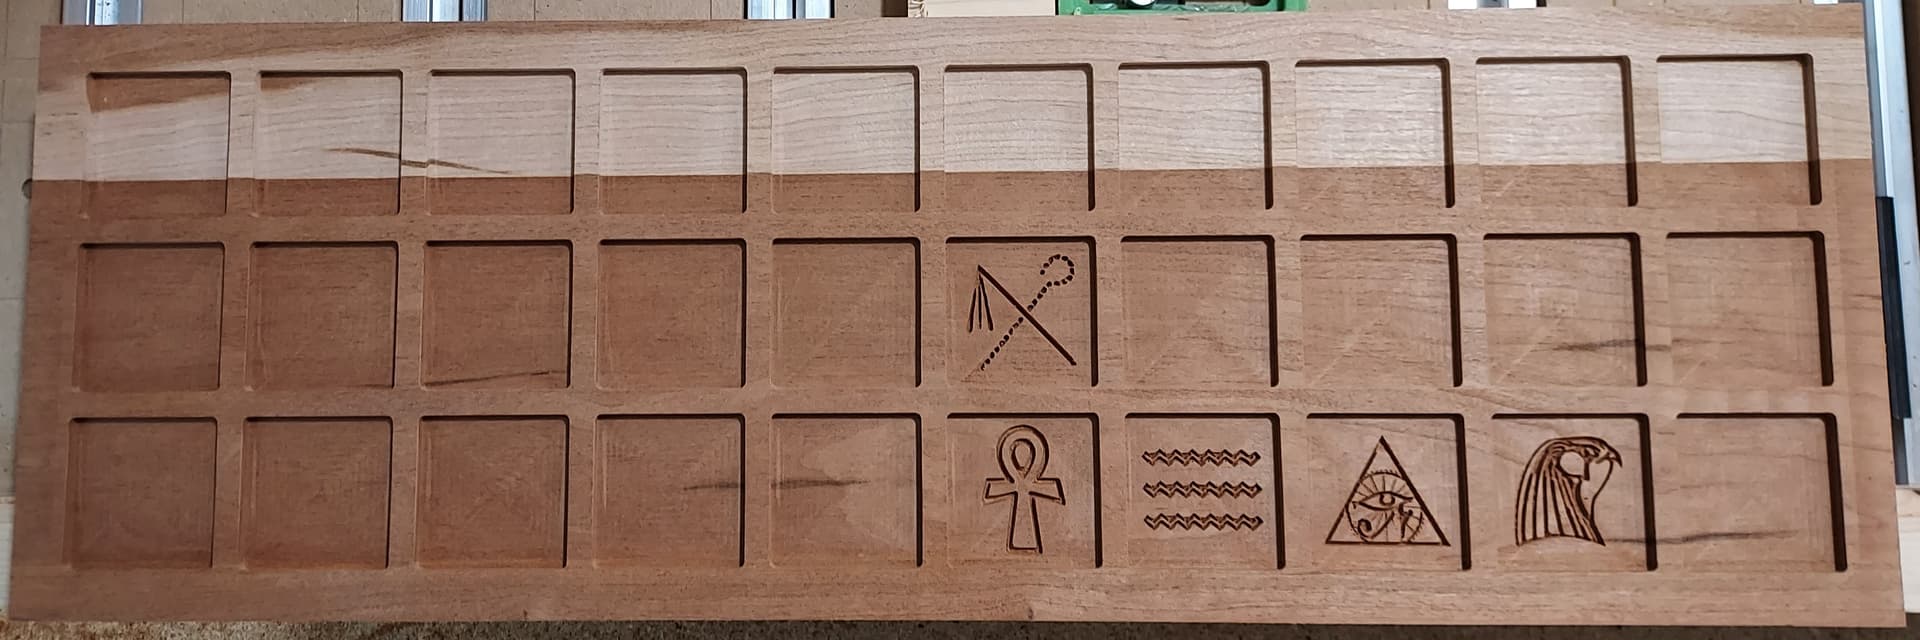
The actual Game Board is as follows…

I did change the last image due to my feeling the lines in the first were too thin in comparison to the other images.

5 Likes

I actually built a flip top table, but have never flipped it.

Im away this week, but when I get back im happy to post pictures and i think I can still access my F360 file with dimensions.

1 Like

Sweet! Thank you Brandon!

So, @wmoy has a YouTube video out there called How (Not) To Build a Shapeoko Enclosure. I never understood the video title until after having my enclosure and system for a full year.

I actually thought I would have done this writeup 9 months ago, but I never finished my enclosure, which you will see from the terrible photo’s that I tried to post.

That being said, it actually is pretty good and functional, but if I did it all over again, there are some parts to the approach I would have adjusted.

The best youtube video I found describing what I would need to do was this one

One other thing, I believe these are the holes you would use to mount the Shapeoko

Last Disclaimer: The CNC desk and enclosure design and build is based on it being a hobby. I do not sell stuff on etsy nor do I make professional furniture. This is important as you will notice that most of the pictures are semi-complete, because as a hobby, I only have time to play with the machine at nights/weekends when the family lets me, or when my conference calls are so boring :sleeping: I attempt to multi-task

The concept

So the concept was to build a flip top table. The reason for this was that I wanted the ability to flip it down and bring it inside the house when I wanted to use my garage for another purpose (ie. Birthday Party, etc). So the table had to

  • Flip down
  • The enclosure could only be so wide because I had to be able to get it through a door

I am not an engineer, nor a CAD person, yet I needed to use Fusion to figure out “Where do you put the bolt to enable it to flip, and then when it is flipped how much wider will the CNC machine stick out due to the enclosure?”

So the Fusion File, which I hope I exported correctly, did that perfectly, and I had the CNC machine cut out all the parts of the desk for me - Mostly using vCarve, but there was a little CarbideCreate

WhatsApp_Video_2022-02-01_at_5_45_01_PM_AdobeCreativeCloudExpress

The Fusion File
Desk That I created.zip (2.0 MB)

KEY DIFFERENCES OF CAD FILE:

  • The enclosure design is a little different from what is shown in the CAD file, but the rest (what I call the desk) is correct
  • Vacuum placed on other side
  • I ended up putting draws on the other side of the unit as I wanted the extra support on the other side.

I built the desk, per the rough design and it flipped perfectly, however I never attached the machine to the table and flipped it. After buying the CNC I have acquired a significant set of additional tools and the garage will never be used for cars/birthday parties again :slight_smile:

Here is a photo of the Vcarve diagram that has a circle for the bolt on which the table pivots + a 'banana-shaped cutout’. This was so I could put wires in the torsion box table and when the unit would flip, the wires would go from the top of the banana to the bottom of the banana.

The challenge is

  • I never finished the torsion box with a bottom.
  • I never ran all the electrical wiring with stops and stuff that I intend to through the table (hence you don’t see a 1.5 inch whole cut in the side of the table to match the cut out banana

Note: I did not make the @DiscoJon mistake and call them semi-torsion boxes for fear that I would face @CrookedWoodTex wrath :rofl:

The other important image is how you secure the table. I went with bolt’s and wingnuts as I planned to very rarely flip the table

The actual build

The actual build (DESK – Not Enclosure)

So the desk (minus the enclosure) was pretty much to the design of the CAD file. The difference being

  • The extra set of draws on the left hand side (for stability purposes)
  • Vacuum on the right hand side

I enclosed the Vacuum in the cupboard and lined the cupboard with Rockwool foam. I also put a baffle on the back wall, which I don’t know whether was really worth the effort. New Shapeoko Pro Enclosure - #30 by Intohouse

I have the vacuum ported to a Duststopper vs Dust Deputy. The reason for this is really simple. The dust deputy requires an additional foot of headspace and on a flip top table, this will not work. (FYI – I have an Onedia dust deputy brand new sitting on a shelf collecting dust, which is quite ironic).

What is really cool though, is that it is attached to a semi clear bucket 5 gallon semi-clear bucket for dust - #6 by Intohouse which helps me know when I need to empty my dust bin vs the Orange Home Depot Bucket.

In terms of dimensions

Table is 49” deep and 52” long.

FYI – I used 4 casters originally but had to add some additional casters to take the load, as the bottom piece of wood was bowing with all the weight.

The actual build (Enclosure)

So I created this beautiful flip top lid, but after building it, realized that I didn’t have the headroom in my garage to use it. I also used ½ inch think Polycarbonate. If you thought MDF was heavy, this is brutal. I definitely would use thinner polycarbonate sheets in the future.

I definitely like my front window and my side window, but the top window was pointless unless you are a giant and are looking through.

I like the side doors and back doors I created to access the machine. Note the side doors must be completely recessed so that when you flip, it doesn’t get caught on the side of the table

On a positive: I did make the height of the enclosure correct from a flipping point of view, as if I actually flipped it, it would fit through the door. That being said, I wish I had more height, especially when you are trying to fix your workpieces using the blue tape method. Just trying to get to the back of the unit with low height is awful.

Insiders tip: Make sure on your design, you have the ability to make the enclosure open up so you can secure stock to the back corner of the unit.

MDF is great for sound proofing, but it is just too heavy for the enclosure. Even if I’d make the desk out of MDF again, I would definitely make the enclosure out of plywood.

Where too from now

  1. Well, my dust collection works, but it’s a pile of hoses that are frustrating me. Since I am not flipping it, I’m going to start to mount rigid PVC piping (vs the hoses that are bending and swaying) as I think this will give me better CFM throughput
  2. My Plastic blast gates are not securely shutting. I have spent a ton of time looking at other youtuber’s solutions. My answer is this 3D printed design Ball Valve design highlighted in LRN2DIY video. FYI - My 3D printing strategy for big jobs like this is to have my library do it. There is no charge and my 3d printer is always being used by my kids printing the next generation TicTac Guns

Just look at the result…

  1. I do need to paint the cupboard and make draw faces for the draws
  2. Organize the mess underneath the CNC machine
  3. Replace my CNC machine and Enclosure when @robgrz informs me that he has a 4ft wide CNC cutting bed coming out - The honest truth is, I wouldn’t have the time to deal with a new machine right now, as work is all consuming PLUS my next big purchase is a sawstop and I think my wife would kill me if I bought both so close together
  4. I really want to tram the machine and do all the maintenance tasks that you are meant to do. However I’m a little bit worried that if I touch the machine, it will make it worst not better, wished there was Carbide3d had a service where they would come and tram and do the routine maintenance.
5 Likes

Thou shalt not wrath folks that have such a clear path to victory! :smiley: +1

3 Likes

Exceptionally well written post with great info. Thank you!

1 Like

@Intohouse how did you bolt your machine to the tabletop?? I’ve just about finished my flip table and I’m ready to bolt on my machine, but the mounting holes are too small to use a socket big enough to use any appropriate sized lag bolt or regular bolt and nut. Ideas???

Because I realised that I won’t flip it, I never ended up bolting it down to the table.

1 Like

This topic was automatically closed 30 days after the last reply. New replies are no longer allowed.