BitSetter doesn't like long bits

My BitSetter works well most of the time. It works when I have less than 1" of bit below the collet.

When there is more than 1" of bit below the collet, it takes its first quick plunge towards the BitSetter, never recovers for the second plunge, and I get an error (“Probing cycle fail” or something of that nature). It’s almost as if the initial plunge is too fast for the BitSetter. If there’s enough time between start-of-plunge to button-press, all goes well. If the time is too short (i.e. longer bit, thus shorter distance and shorter time to button-push), the process fails.

This normally wouldn’t be a problem because 1" of bit is fine for most operations. But if I’m cutting deep, I’m prevented from using the dust shoe because I can’t extend the bit further from the collet because the BitSetter throws a fit. I have a BitZero and I’ve ensured it’s not making contact. Through trial and error, I’ve narrowed it down to the fact that my BitSetter just like short bits (I believe, at least).

Another thread mentioned there’s no way to slow down that initial plunge. Can this be a feature request? Or is there another issue possibly at play?

Hi @PJambo,

Interesting, I can’t remember any similar report here on the forum. There is no (good) reason why the BitSetter behavior would change based on how fast or quickly the first probing move happens, it may be coincidental that longer stickouts produce this problem, with something else is going on.

What exactly happens during a failed probing ? When you say “never recovers for the second plunge”, do you mean it plunges once, triggers the BitSetter (does the LED light up then ?), and then does not retract for the second plunge as it would normally do ? Do you have a way to capture a video and upload a link to it here ?

You could contact support@carbide3d.com too, they may have heard of similar situations or have specific tips for figuring out what happens.

3 Likes

I have two bits that I use every day that have at least 2" sticking out of the collet.

1 Like

@Julien, I can grab a video later this evening. The bit plunges once (quickly), depresses the button, the LED lights up, and it stops right there. In this stalled state, it remains pressing the button with the LED lit. An error message appears in CM stating “Probing cycle failed”. I can’t jog the machine.

The only thing the machine will then respond to is a re-initialization, which then it retracts, homes itself, moves to the front of the machine, and requests a tool be inserted. I will then loosen the bit, raise it a touch into the collet, tighten everything down, and then it moves to the BitSetter and interacts with the BitSetter just fine and as expected. This “fix” has fixed it the several times the cycle has failed.

I’ll play with it some more and send support a note if I’m still stuck.

1 Like

I’m intrigued…

If you can reproduce this, could you grab the GRBL logs ? (Go to Settings in CM, click “Open Log”, reproduce the problem, and copy/paste the content of the log window and post it here). It may provide clues as to why the probing sequence fails.

1 Like

(little thread detour for G-code nerds, sorry)

Out of curiosity I checked on my machine what commands CM uses when probing the BitSetter, and it does this when I click “Change Tool” for example:

G0Z-5.0000 => retracts to top of the Z axis minus 5mm

G0X-210.0000Y-400.0000 => move to bit change location (front middle of my SO3)

G0X-3.9950Y-369.5250Z-5.0000 => move to BitSetter location, with Z axis still at top - 5mm

G0Z-15.0000 => move down 10mm, at the default feed rate

G38.2Z-155.0000F800.0 => initiate probing sequence: this triggers a movement of the Z axis
downwards at 800mm/min (the initial “quick plunge”), until it detects contact (BitSetter LED on) or reaches the absolute value of Z=-155mm (in which case probing fails and returns an error)

[PRB:-3.995,-369.525,-98.875:1] => probe results, in my case the endmill triggered the pushbutton at Z=-98.875mm

G0Z-95.3310 => retract by 3.5mm, before second plunge

G38.2Z-250.3310F50.0 => initiate second, slower probing sequence at 50mm/min. Interesting how the max Z target for that proving is -250mm, when by definition it can’t be more than -155mm anyway…Not sure why this value was chosen, but it is irrelevant since the probe will stop movement as soon as it contacts anyway.

[PRB:-3.995,-369.525,-98.844:1] => results of the second, slower probing, granting a slightly more precise value for Z zero (-98.844mm in my case)

G0Z-5.0000 => all done, retract to top of the Z minus 5mm

G0X-210.0000 => and finally return to front center / tool change position.

@PJambo :

  • can you confirm your machine does retract to top of the Z minus 5mm before moving over the BitSetter ? What distance is left between the end of the tool and the bitsetter button then ?
  • it will be interesting to see what the absolute machine coordinate Z value is on your machine when you have that 1" stickout and the endmill is about to touch the bitsetter button.
1 Like

@Julien

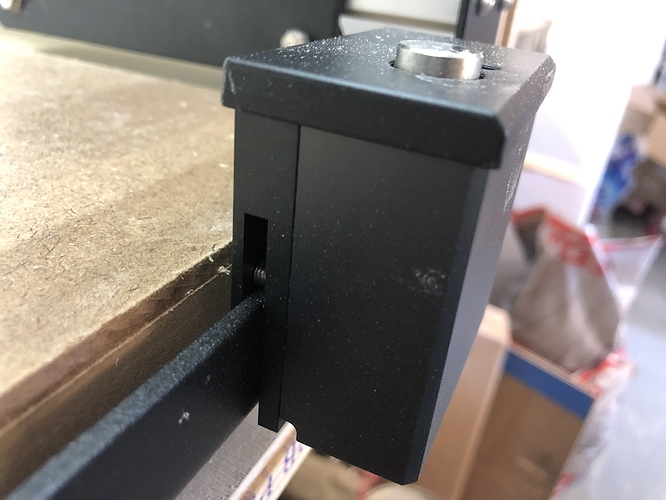
  • Confirmed, the machine retracts to top of Z minus 5mm. I estimate about 10mm remaining between bit and button when I have about 1.25" of bit extended. This means the max I could achieve is less than 1.5" with the BitSetter. Could it be installed wrong? Pic below.

I recreated the problem. Here’s a link to the video: https://streamable.com/3uxide

Log results below. The order of operations here was initialize, probe fail, reinitialize, another probe fail.

N0 M5
ok
N0 G4P0.005
ok
N0 G4P0.005
ok
$h
ok
N0 G4P0.005
ok
N0 M5
ok
N0 G4P0.005
ok
N0 M5
ok
N0 G4P0.25
ok
N0G0Z-5.0000
ok
N0G0X-210.0000Y-400.0000
ok
N0 G4P0.005
ok
N0 G4P0.005
ok
N0 M5
ok
N0G0Z-5.0000
ok
N0G0X-3.0000Y-402.7750Z-5.0000
ok
N0G0Z-15.0000
ok
N0G38.2Z-155.0000F800.0
ALARM:4
GRBL_RESET
ok
Grbl 1.1f [’$’ for help]
[MSG:’$H’|’$X’ to unlock]
$X
[MSG:Caution: Unlocked]
ok
N0 G4P0.005
ok
G92.1
ok
G54
ok
G10L2P1X0Y0Z0
ok
G21
ok
G49
ok
G90
ok
$G
[GC:G0 G54 G17 G21 G90 G94 M5 M9 M56 T0 F0 S0]
ok
$#
[G54:0.000,0.000,0.000]
[G55:0.000,0.000,0.000]
[G56:0.000,0.000,0.000]
[G57:0.000,0.000,0.000]
[G58:0.000,0.000,0.000]
[G59:0.000,0.000,0.000]
[G28:0.000,0.000,0.000]
[G30:0.000,0.000,0.000]
[G92:0.000,0.000,0.000]
[TLO:0.000]
[PRB:0.000,0.000,0.000:0]
ok
N0 G4P0.005
ok
N0 M5
ok
G92.1
ok
G54
ok
G10L2P1X0Y0Z0
ok
G21
ok
G49
ok
G90
ok
$G
[GC:G0 G54 G17 G21 G90 G94 M5 M9 M56 T0 F0 S0]
ok
$#
[G54:0.000,0.000,0.000]
[G55:0.000,0.000,0.000]
[G56:0.000,0.000,0.000]
[G57:0.000,0.000,0.000]
[G58:0.000,0.000,0.000]
[G59:0.000,0.000,0.000]
[G28:0.000,0.000,0.000]
[G30:0.000,0.000,0.000]
[G92:0.000,0.000,0.000]
[TLO:0.000]
[PRB:0.000,0.000,0.000:0]
ok
N0 G4P0.005
ok
M56P1
ok
$$
$0=10
$1=255
$2=0
$3=6
$4=0
$5=0
$6=0
$10=255
$11=0.020
$12=0.010
$13=0
$20=0
$21=0
$22=1
$23=0
$24=100.000
$25=2000.000
$26=25
$27=3.000
$30=1000
$31=0
$32=0
$100=40.000
$101=40.000
$102=40.000
$110=10000.000
$111=10000.000
$112=5000.000
$120=500.000
$121=500.000
$122=400.000
$130=845.000
$131=850.000
$132=100.000
ok
N0 M5
ok
N0 G4P0.005
ok
N0 G4P0.005
ok
$h
ok
N0 G4P0.005
ok
N0 M5
ok
N0 G4P0.005
ok
N0 M5
ok
N0 G4P0.25
ok
N0G0Z-5.0000
ok
N0G0X-210.0000Y-400.0000
ok
N0 G4P0.005
ok
N0 G4P0.005
ok
N0 M5
ok
N0G0Z-5.0000
ok
N0G0X-3.0000Y-402.7750Z-5.0000
ok
N0G0Z-15.0000
ok
N0G38.2Z-155.0000F800.0
ALARM:4
GRBL_RESET
ok
Grbl 1.1f [’$’ for help]
[MSG:’$H’|’$X’ to unlock]
$X
[MSG:Caution: Unlocked]
ok
N0 G4P0.005
ok
G92.1
ok
G54
ok
G10L2P1X0Y0Z0
ok
G21
ok
G49
ok
G90
ok
$G
[GC:G0 G54 G17 G21 G90 G94 M5 M9 M56 T0 F0 S0]
ok
$#
[G54:0.000,0.000,0.000]
[G55:0.000,0.000,0.000]
[G56:0.000,0.000,0.000]
[G57:0.000,0.000,0.000]
[G58:0.000,0.000,0.000]
[G59:0.000,0.000,0.000]
[G28:0.000,0.000,0.000]
[G30:0.000,0.000,0.000]
[G92:0.000,0.000,0.000]
[TLO:0.000]
[PRB:0.000,0.000,0.000:0]
ok
N0 G4P0.005
ok
N0 M5
ok
G92.1
ok
G54
ok
G10L2P1X0Y0Z0
ok
G21
ok
G49
ok
G90
ok
$G
[GC:G0 G54 G17 G21 G90 G94 M5 M9 M56 T0 F0 S0]
ok
$#
[G54:0.000,0.000,0.000]
[G55:0.000,0.000,0.000]
[G56:0.000,0.000,0.000]
[G57:0.000,0.000,0.000]
[G58:0.000,0.000,0.000]
[G59:0.000,0.000,0.000]
[G28:0.000,0.000,0.000]
[G30:0.000,0.000,0.000]
[G92:0.000,0.000,0.000]
[TLO:0.000]
[PRB:0.000,0.000,0.000:0]
ok
N0 G4P0.005
ok
M56P1
ok
$$
$0=10
$1=255
$2=0
$3=6
$4=0
$5=0
$6=0
$10=255
$11=0.020
$12=0.010
$13=0
$20=0
$21=0
$22=1
$23=0
$24=100.000
$25=2000.000
$26=25
$27=3.000
$30=1000
$31=0
$32=0
$100=40.000
$101=40.000
$102=40.000
$110=10000.000
$111=10000.000
$112=5000.000
$120=500.000
$121=500.000
$122=400.000
$130=845.000
$131=850.000
$132=100.000
ok

Even though I might be completely wrong after double checking a picture online, i’ll leave the response below. I’ll update once I get home and can look at mine in person.

“It looks like yours is resting on the set screws. If you back them out and push the bitsetter further down you should get a lot more usable length. It does make it tough to get to the screws, but you can make it work.”

1 Like

Thanks @CatalystGilles I also checked online since it didn’t look right, but I saw in the product page that that’s how Carbide3D has it installed. I’m curious how yours (and anyone else’s) is installed on the frame.

I think the set screws are there, as the regular SO3 has shorter(height) frame rails than the XL/XXL frame rails.

On XL/XXL you land it all the way down, on regular size you put set screws in. Without them, it would bottom out and not rest on frame edge.

Clear as mud?

1 Like

I have the SO3 (not with the stock Z axis though) and I definitely have it all the way down.
I’m very curious to see that C3D pic where you saw it installed like this?
Maybe to accomodate cases where people have clearance issues depending on their wasteboard size.
Anyway, pretty sure this is what is causing the issue for you, lower it and it should be fine

In the pictures on the store here,

It is shown “raised up”.

Looks like I’m not up to date on the docs!
The hardcoded 10mm Z move downwards just before starting the actual probing is causing the issue (since the probe is already triggered when the probe command is executed, and GRBL does not like that…you were right @neilferreri)
I am not sure why others would have a larger clearance, but unless that causes a problem I would still lower the Bitsetter and call it fixed. Or contact support to get a better official answer?

1 Like

Both the store photos @CatalystGilles mentions and the pdf @David.Curtis linked reference the BitSetter raised on the grub screws as I have it. However, I’m going to do as you mention and lower it all the way in the spirit of Occam’s razor. That will buy me over 1/2" additional bit capacity. Thanks @Julien for your guidance! For my benefit, could you explain what you mean by the probe already being triggered? As in the BitSetter isn’t looking for a signal until 10mm of travel (hence my <10mm of clearance causing issues?)

Exactly. I had to look up what GRBL Alarm 4 is, and it’s:
ALARM:4” : “Probe fail. The probe is not in the expected initial state before starting probe cycle
And this is most likely what is happening (probe triggered early due to that 10mm move)

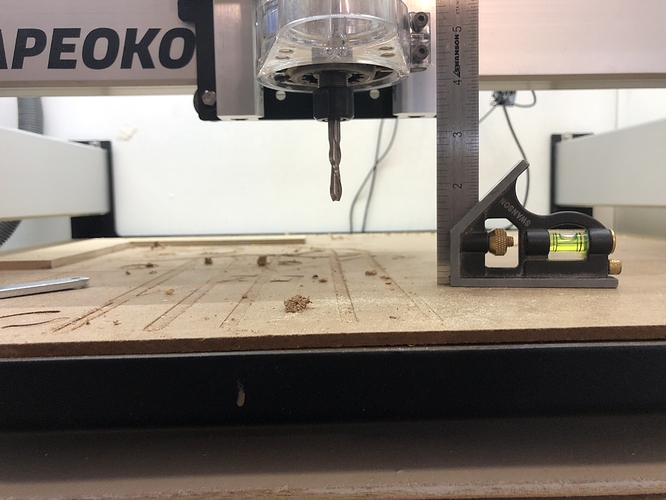
By that video, looks like your Dewalt router is landed all the way down, and at max Z height the collet is still well below the Z carriage. Add on your 1.5” of bit length, and you probably don’t use much Z travel before hitting your wasteboard?

If you take a picture of machine front-on I think it will offer an answer as to why you’re having issues.

1 Like

@Julien I’m sure there is an intelligent reason behind the 10mm delay. But it’d be nice if that were adjustable.

@David.Curtis It is indeed landed all the way down, per assembly pics I referenced. With the factory wasteboard and my additional 1/8" wastesheet, I have 3.325" of space beneath the collet. I could raise it a little. Is there any issue doing this, structurally or otherwise?

Structurally, I don’t see any reason not to raise it up.

Moving It really shouldn’t affect tram or anything, while the clamping bolts are threaded into aluminum and I wouldn’t make a habit of changing it daily, I feel pretty comfortable moving mine occasionally as needed.

If I were in your shoes…I would do this.

Loosen router clamp, Load up the shortest bit you use, and with Z all the way down, make sure that bit can reach like 1/8” past your wasteboard. Clamp router there. That should give you some extra clearance above workpiece and bitsetter when at max Z-height.

1 Like

Thanks all, I’ve implemented the suggestions here and the issues have resolved. In summary, my BitSetter was set as high as it could be and my router was set as low as it could be, resulting in suboptimal clearances for the BitSetter cycle to perform as designed. Adjustments to both BitSetter height and router seated depth have alleviated these constraints.

5 Likes