I have a new XL and bought a BitZero V2 to go with it. It zeros the X and Y just fine but always sets the Z axis at 5 mm at the top of the work piece. As a result the machine always thinks it is 5 mm lower than it is. Digs into the top surface on the first pass and wants to go below the bottom surface. What am I missing?
Please post a .c2d file, generated G-Code, step-by-step notes on how you are securing your stock and setting zero relative to it (including a photo of how your BitZero is positioned and screen grabs indicating which interface options you are choosing) and how you are managing tool changes, and a photo showing where the machine is at Z+6mm above the surface where you have set zero.
The stock is held down with double sided tape and is secure. I have to use a pry bar to remove it. The process is as follows:
turn on the CNC and it homes, asks for bit change (I insert probe) then it bitsetter’s.
Load the .nc file.
Put the bit zero on to the stock to be cut, plastic over the edge as noted for zeroing edges and Z axis.
Jog and lower probe to the “hole” on the bit zero and lower the probe below the surface. Attach magnetic ground.
Initiate bitzero probe. It goes thru the cycle without issue.
When it is complete the probe reading is at x=10, y=10, z=19.
If I jog down to the surface at the corner the probe reads x=0, y=0, z=5
If I try to try to carve the machine asks for a bit change then goes to bitsetter and does the zero. If I let it go the bit takes a big first pass that is a little over 5 mm deep.
That is about it. Let me know if you need any other pictures.
Hi @Stardaddyed
Just checking, excuse the silly question: do you have the correct BitZero model selected in the probing menu? It would seem so or the probing routine would probably not proceed correctly, but I never tried. And the only reason I can think of that would introduce a Z offset as checked right after a probing operation, is if CM somehow thinks the probe height (thickness) is larger than it actually is. I wonder if the difference in thickness between the BitZero v1 and v2 is 5mm ?
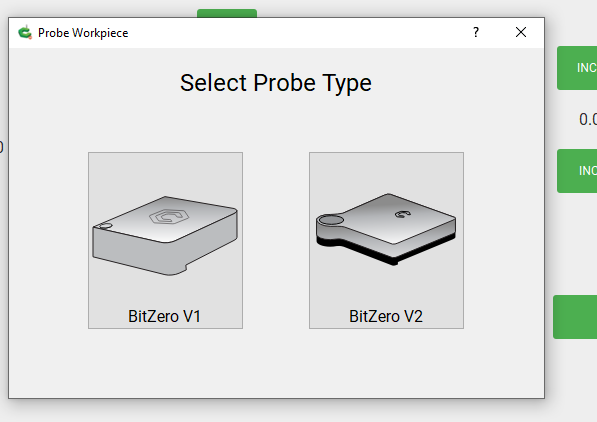
The current probing mechanism in Carbide Motion (you pesky cncJS users ) prompts you for the BitZero model at the start of the process each and every time.
When you initial a probe, it goes through a set of big buttons - first, which BitZero do you have, and then what sort of probe do you want to do (the corner probe image here is misleading btw).
(edit: there is no menu anymore is what I was trying to say)
I meant, what happens if you mistakenly click the wrong thing and tell CM you will be probing using a BitZero V1, when in fact you have a V2 ? (I would test it myself, but I can’t right now)
It might be possible, but I think the probe routine would fail.
If he’s put the probe above the hole, then the BitZero v1 sequence would fail as it could not hit the Z spot, and the machine would disconnect. It would also be running a probe routing that used the outside of the BitZero and not the inside of the hole.
FYI: This is what the user is presented with at the start of the probe:
I am selecting the BitZero V2 and that is the one I have. I actually wish there was a way to pre-select once and for all. I went through last night and manually zero’ed the z axis with the paper method and it work perfectly. I was thinking that there is a setting somewhere that lets you specify the offset exactly. This is common in 3D printing for accuracy down to >.01 mm. I though I was missing something. I can zero manually but then what is the point of the BitZero.
I don’t have the resources to determine if this is so, but to me it looks like this is where the problem starts. Z should not be = to “5” here right after a BitZero operation.
Not having set the Z-Axis has caught at least three people out recently, so you certainly aren’t alone in having this sort of issue.
Perhaps @robgrz can get someone make some changes to Carbide Motion to do something like one or both of the following:
Upon connection, check to see if this CM installation has ever sent its configuration. If not, show the settings window.
If not settings have been sent, make sure there is no default for machine or Z-Axis in the settings and the user is forced to select one prior to sending configuration.
It might be helpful if the Z-Axis names are re-described in new versions of CM. Z-Plus is now standard (only really mentioned on the shop page on one line), but it’s likely people might not think something with the word “Plus” in it is in fact standard. So perhaps some extra words like:

 ) prompts you for the BitZero model at the start of the process each and every time.