I recently setup up the shapeoko and I’ve been having odd results - circles looked oblong - odd steps that wouldn’t follow paths, a lot of chatter, etc – so I’ve been tensioning the belts according to carbide wiki (via various carbide vlogs), ensuring things are square w/in a 1/32 of an inch and so on, tighting the set-screws on the motor. I think I’ve fixed most of the issues (thanks to community support) – except for one; My Z-Axis.
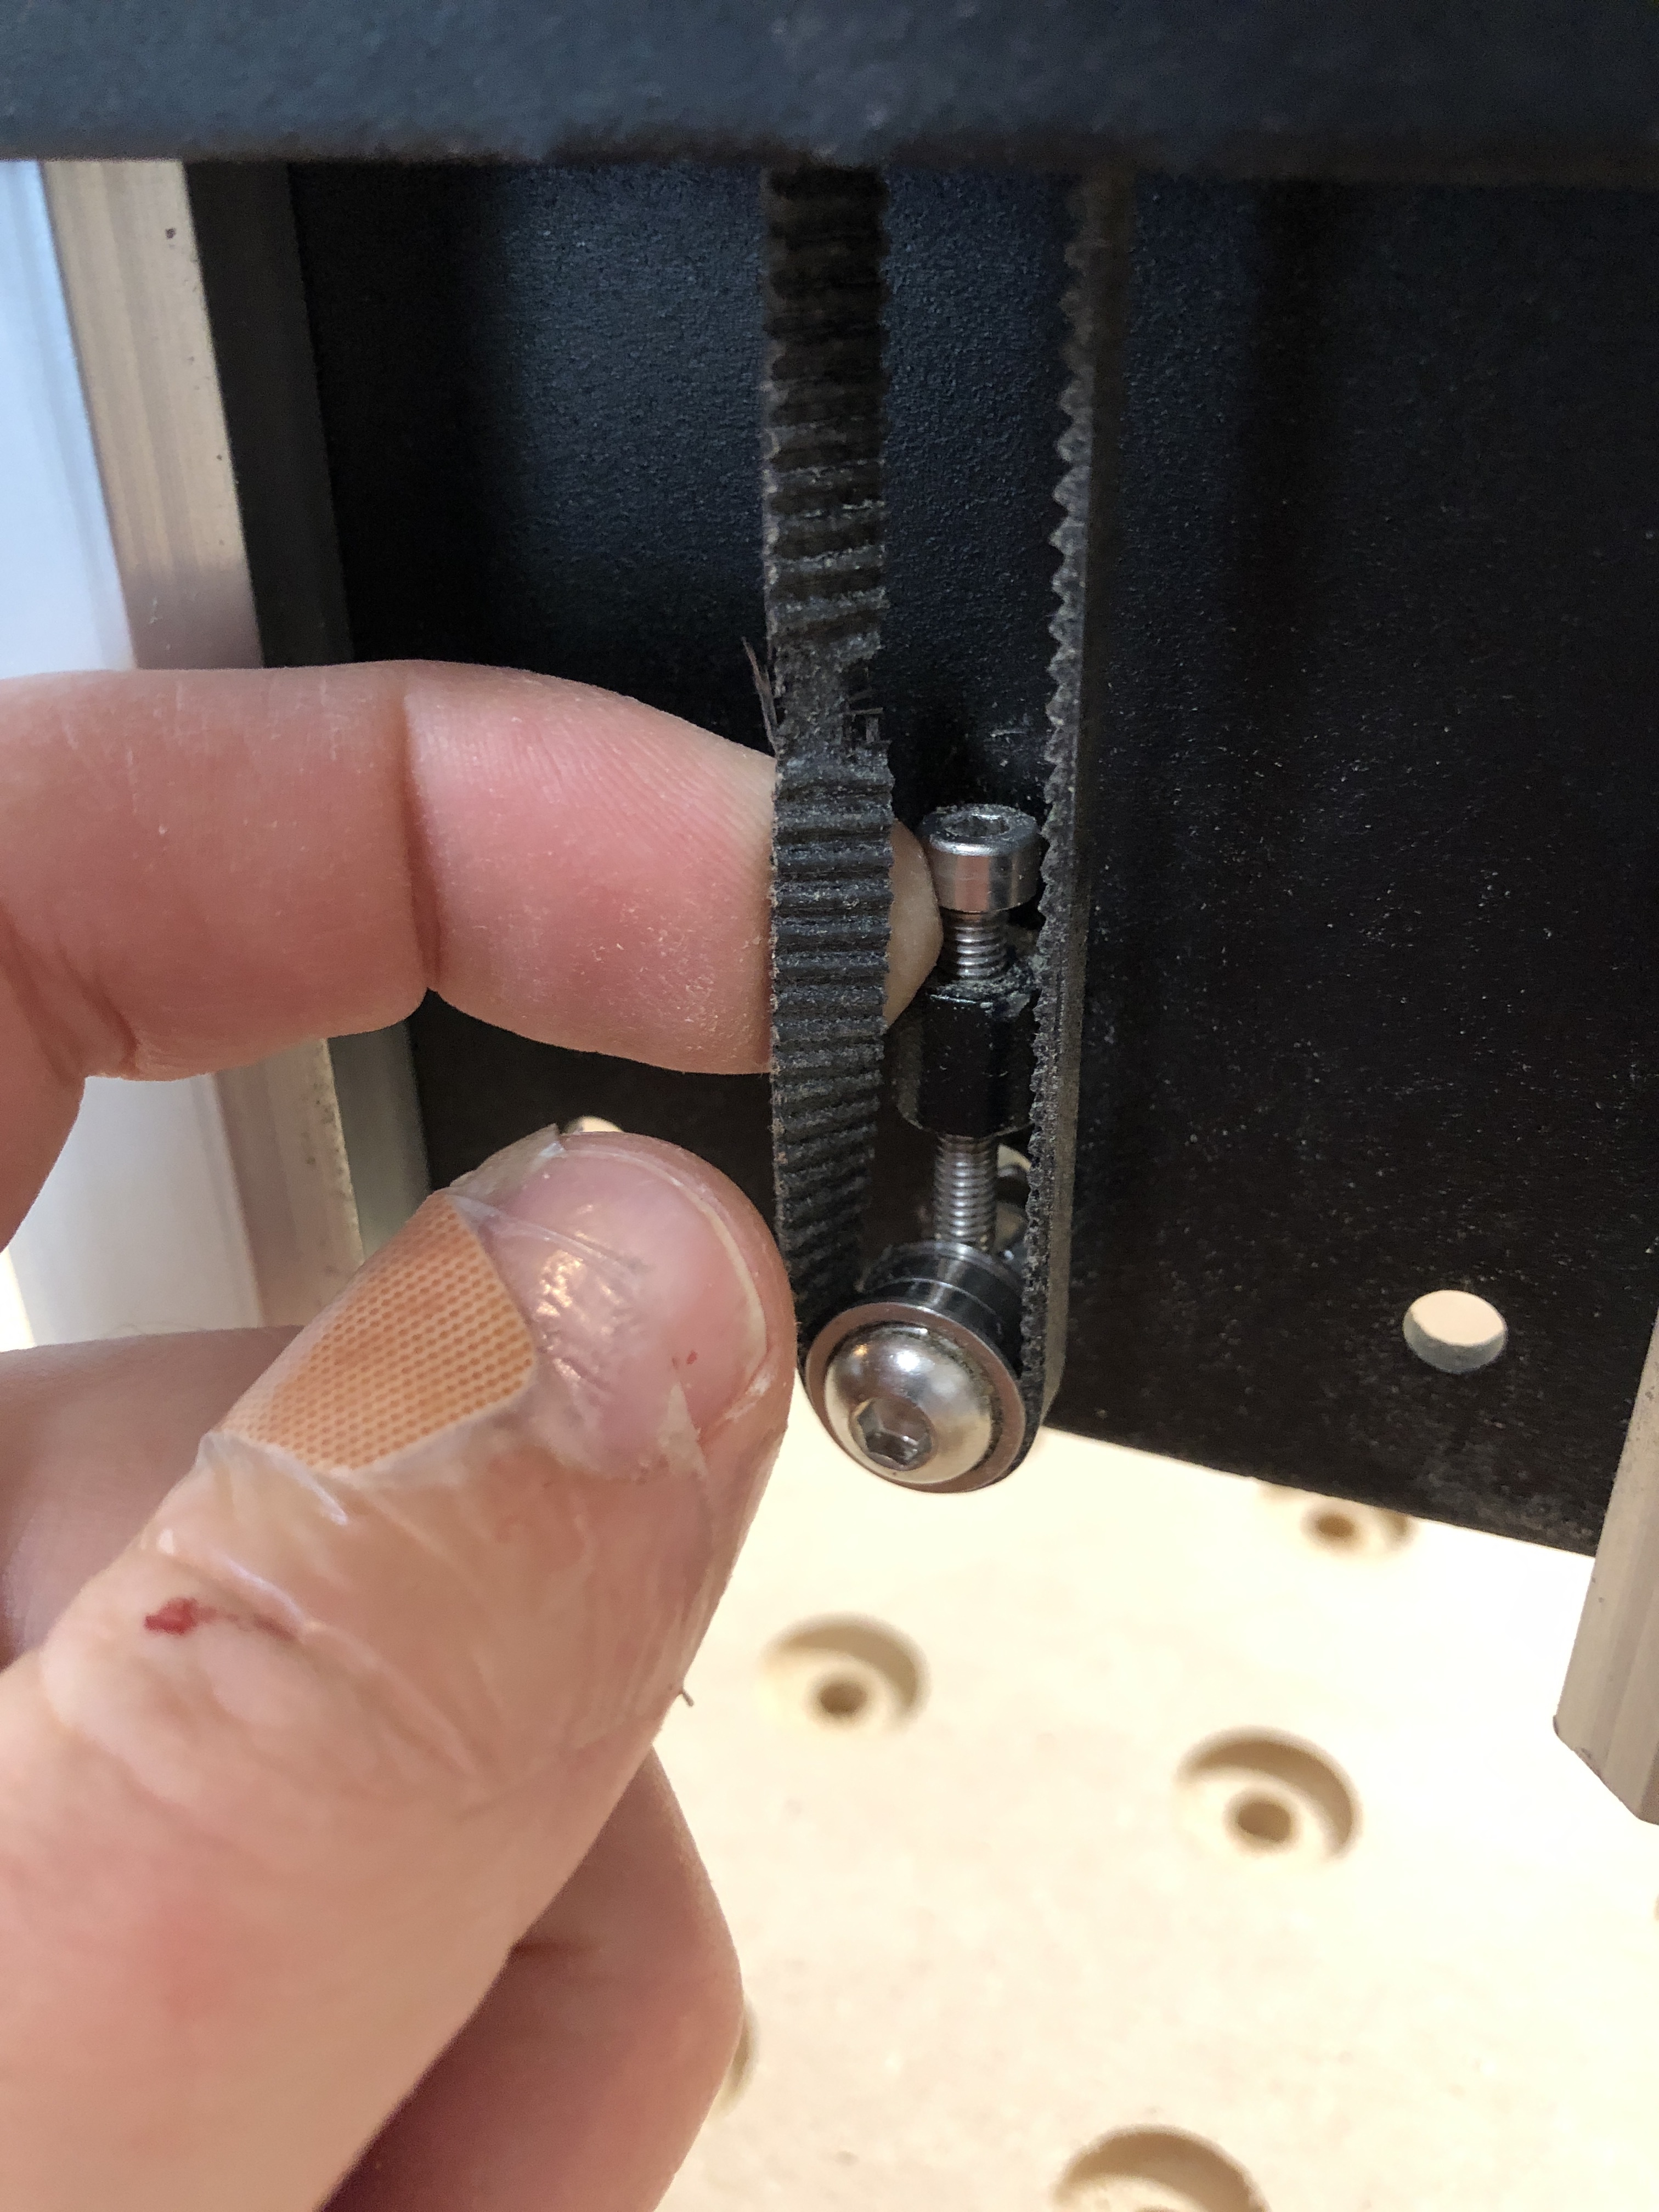
The Z-Axis was always skipping steps every few passes on the way down – each step would be more shallow than the last. It seemed really odd, I thought maybe the wood (mdf!??) was too hard causing some push back/etc – maybe I needed another surface of the spoilboard – I slowed down, sped up my feed rates etc – mabye my router wasn’t square … I then double checked the tension on the z-axis belt and noticed when gantry was down, the belt in the lower part was looser than it was on the top - so I tightened it to ensure consistent tension on the top/bottom. Things seemed to work better - but would still have skips – just not as frequeuent. Eventually the belt started making a quick knocking noise and it wasn’t moving correctly – stopped the job and noticed the belt (see attached) was horked.
I’m guessing (?) it’s something I did – however I’m trying to understand what would cause the belt to snap like this? Too much tension? I ordered the following belts from Amazon
>> BEMONOC Pack of 10pcs 2GT-520-6 GT2 Timing Belt Round Rubber Closed Loop L=520 Width 6mm Belt Pitch 2mm Teeth 260 for Motor Belt
The TLDR: My questions really boil down to two things (pardon the longish post)
What could have caused this tear on the belt; what can I do to avoid this
I think I saw another post on here that said these belts are the proper ones, can someone confirm the belts ordered are correct?
I have to wait for amazon to ship this belt; what type of stores might have this belt in stock?
Can you keep us updated with your fix? Would like to know if it fixes it. I am currently having the same trouble with the depth of cuts getting progressively shallower as the cut continues…
I tried reducing speed as well, but every once and awhile I’d hear a knocking sound and it get more shallow after that. I’d stop the job, reset my z zero, and it was usually off by the depth of the pass …
I live way out in the country and all options are internet ordering. I ordered a XXL repair kit from Carbide3d ($99.00) that has spare belts, stepper motor pulleys and V-Wheels. When something goes wrong I want to fix it right now. So I keep the spare parts kit with the Shapeoko.
Just to double check, if your collet is not tight the mill bit will be pushed up in to the collet further and further is not tight on each pass. You can check that by marking the bit with a marker after installing and tightening. The other thing you might want to check is the retract height. If you have additional spoil boards above the factory one you are shortening the Z axis height. If you are using 10MM or 12MM that is probably not the problem. If you are using a considerably larger retract height the Z axis may be retracting to the limit and slipping. These are stepper motors and not servo motors. The homing and setting zero put the relative depth in GBRL and if you retract too much it may be causing slipping. So if you have the original spoil board then a 3/4" spoil board the maximum Z axis height is reduced to 2.25 Inches.
3" (Max Z )-.75"(Supplemental Spoil Board)-.472" (12MM Retract)=1.78" Maximum Project Height To be save you may want to limit to 1.75" maximum project height.
3" (Max Z) - .472" (12MM Retract Height)= 2.58" Maximum Project Height (No Supplemental Spoil Board)
3" (Max Z) -.393" (10MM Retract Height)=2.61" Maximum Project Height (No Supplemental Spoil Board)
Plus you could be losing some Z axis height depending on your router depth in router bracket with bit protruding decreasing the 3" Max Z axis height slightly. Check if your router can cut through the project to the factory spoil board and/or supplemental spoil board with the longest protruding bit you have and adjust the router in the mount to get maximum Z axis height. Most pictures I have seen have the router all the way down in the mount. The gantry is 5.5" ± above the factory spoil board, and the Z axis mounting plate is 4.5" ± above factory spoil board.
Check your router position, then retract height and do the math for maximum project height based on your situation.
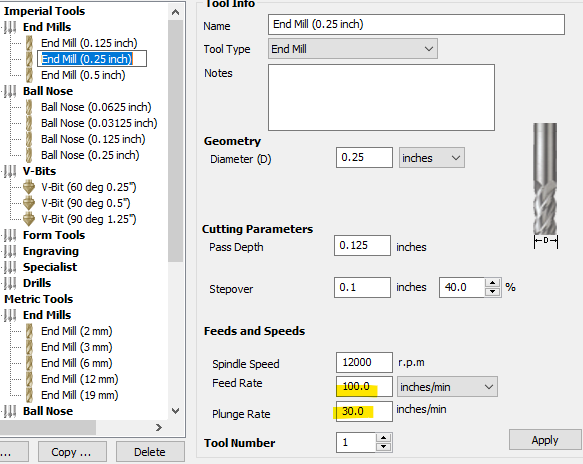
Thanks @mikep for the response. I don’t doubt it could be the plunge rate - however I’ve never raised it from the default of 30"min – I’ve dropped it down to 20"/min (with a 80" to 100" feed rate) – and the knocking noise still happens. I’d like to think that the shapeoko can handle this speed – maybe I’m missing something
Thanks @gdon_2003 for the respone as well. I also thought about the bit getting pushed up; but I generally always sink my bits in until they hit the end – so I’m not thinking it’s that. I know I loose a little depth, but I think that’s ok :-).
I wasn’t as detailed when checking the measurements when checking to see if the bit could make it through the piece I was working on – I added an extra ~1/4" board under it since it was a spoil board I was making when my belt broke / knocking nose happened and I would slowly loose depth.
You’ve got two things going on here - the belt is stretching as is fails from your picture. That will have a lot of impact on the depth.
The second one though, the knocking, is steps being skipped. End mills are awful drills. Drills are awful endmills. Feeds and speeds depend on material as well as the tool (2 flute? 3 flute? High helix?) and the toolpath (plunge, slotting, adaptive, etc). Cutting that deep hole though the material is a tough thing for an endmill, they’re awful at chip clearing in that direction. A peck cycle helps a lot if your software supports it.
@mikep Ah thanks for the details – and that actually makes a lot of sense! I’ll review the speeds and feeds calcs. I’m using a program that has peck drilling – I’ll give that a whir
Also, I’ve been using my 3 flute endmills –
@gmack Thanks – what you’re saying seems to be a consistent message across the board