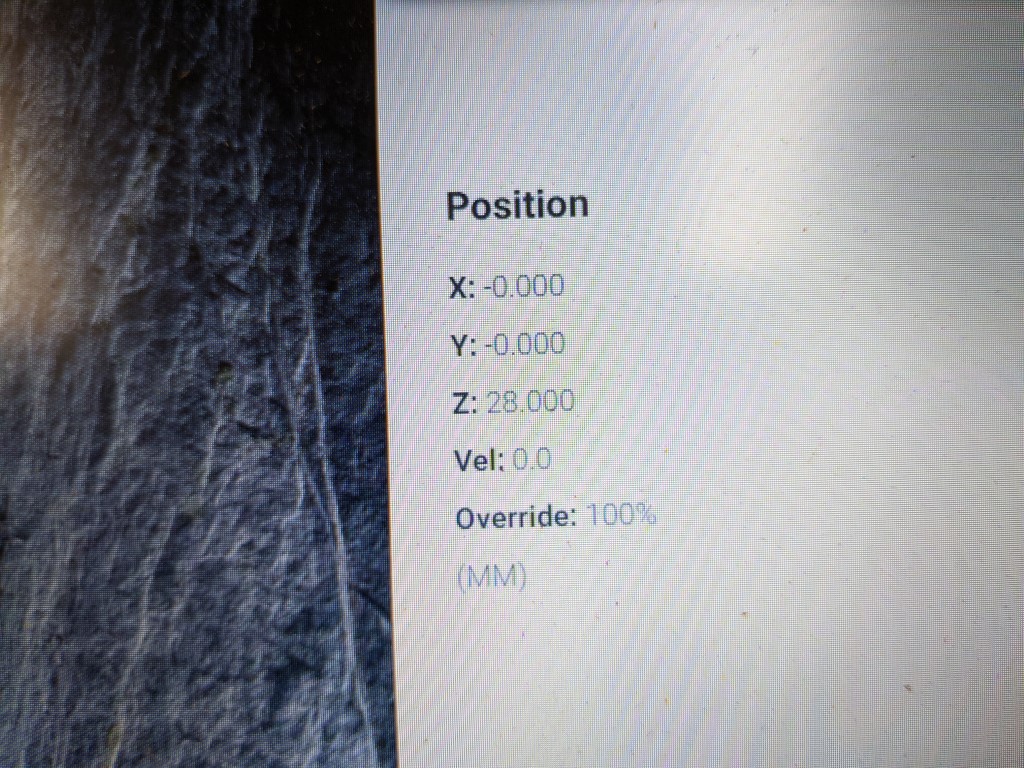
Just installed the probe and I’m getting a weird repeatable error. Place the probe as directed (with lip overhanging the stock), probe X/Y/Z, Z retracts to 28mm (confirmed with 25+2+1mm gage blocks) and CM shows X0 Y0 Z28. All good.
First experienced this in CM 417 (I have an HDZ to install) so I thought it might be an error in the 417 beta so I installed 416 and got the same error. Checked stock clamping and mechanical stuff and I cannot find anything that’s loose or would seem to create the repeated error. Also the exact 2mm difference has me thinking it’s a setting.
I originally noticed when my first test job didn’t cut through the stock, checked the cut depth and it was exactly 2mm shallow. After finding the discrepancy described above I probed, dropped the Z 2mm and reset Z0 then ran another test job and it worked perfectly.
Doubtless it’s operator error but it’s got me stumped. Any input is welcomed.
I’ll have to check that. I did manually go to Z28 but I think it was after I dropped the 2mm.
I did upgrade to grbl 1.1 today before installing the probe. Everything seemed to install correctly, but I don’t see where I can get access to the settings to check/edit anything in CM anymore. I seem to recall
back in the CM 3.X days that you could access settings to change things like the max X/Y travel.
I’m getting something similar. First noticed it when I ran a pocketing operation to level the top of a work piece. I used the probe, zeroed Z, and then ran the very simple program to take off 0.05" from the board. I watched in horror as my 1" surfacing bit plunged ~1/4" into the material. I’m also not convinced that it is doing it every time as some operations, even when zeroed with the probe cut the correct depth and then subsequent operations (which require rezeroing) do not. Pretty frustrated with the probe currently as it’s doing exactly the opposite of what I want and making Z in particular less accurate. Any advice would be appreciated.
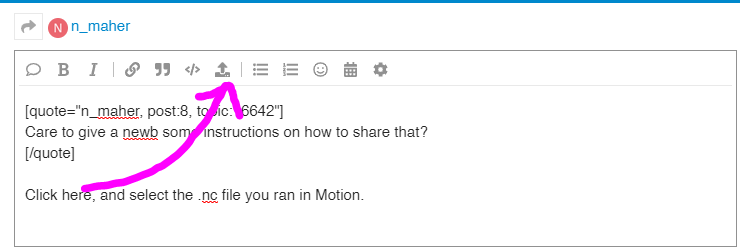
Can you share the surfacing gcode?
My first guesses are that your Z axis pulley is loose or you retracted beyond machine limits which caused the extra depth in the plunge.
Care to give a newb some instructions on how to share that? Do you just want a cut/paste of a text file or is there a way to upload straight from Carbide Create that I’m not thinking of?
I don’t think over-retraction is the issue since a) I have the stock limit switches on my XXL and b) once zeroed the machine was immediately put to work (no jogging around or anything like that). It has also now happened with multiple bits so it’s not just something related to the 1" surfacing bit. I was running a two part operation tonight where the first two passes where cut with a 1/4" bit for roughing out and then op2 was loaded to use a 1/8" bit. I used separate files per the instructions to allow for the machine to be re-zeroed during the tool change (it’d be nice to not have to do that…) and the 1/8" finishing pass went significantly deeper than the roughing passes (again, watching in horror). I went back and checked the tool paths in Carbide Create and both operations were set to the same max depth. I also checked the depth of the pockets cut during the first operation and they are not correct either. Thankfully for this particular project the failure can still be made to work but there are certainly things I want to do with the machine that require repeated (reasonable) z-axis depth accuracy and I’m not there yet.
The limit switches aren’t, by default, used as switches to prevent motion past the limits. Your Z axis retract setting might be too high in some files. That may cause the Z to crash at the top. The machine now “thinks” it is higher than it is, so it plunges deeper than you want.
It’s not uncommon to miss that.
Ok, thanks for the clarification. I can confirm visually that the machine is not retracting too high and crashing, but for science I’ve uploaded the flatten file (*.nc) for folks to look at. When I review this tool path in CC it all looks correct to me but it removed a ton of material instead of just being a very light pass. Ignore the fact that it was programmed using a 3/4" diameter bit, I hadn’t yet figured out how to add a custom tool when I first ran this. I solve that the next time I ran a similar operation (didn’t bother saving the file) and it too plunged way too deep.
At this point I somewhat suspect belt tension but I checked that tonight and it’s not super loose but not ‘guitar string tight’ either. I’m going to tighten it a bit as soon as time permits and then I’ll try zeroing some stock again. For what it’s worth when I did the last V carve operation on a piece tonight it incorrectly zeroed the bit. I checked and near enough as I can tell it was off by 2mm just like the original poster reported. I then zero’d the bit manually and throughout several operations with the V bit, including rezeroing it 3 times in total, it was never off again. I’d welcome any suggestions for settings to check or if someone can think of a better experiment to run to test/prove the issue. For now the Z zero probe function is not something I’m going to use moving forward. X and Y seem fine.
I want to clarify one more thing since I went back and read the original post again - my offset is 2mm to the negative. As in, when I send the tool to the 0 Z it ends up 2mm below the surface of the workpiece, not above. Sorry for mixing those two up and hopefully I haven’t hijacked this thread.
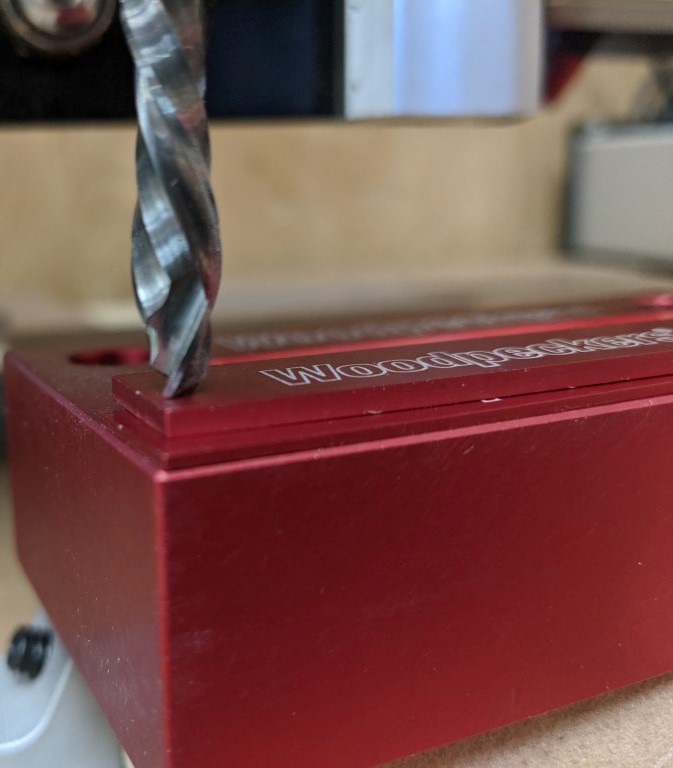
Is the 2mm exact? Are you probing Z only with the entire probe on top of your workpiece?
After you probe Z, it retracts. How does the reported position (28mm) compare to the measured?
I’ll have to check both of those and report back. I was trying to finish a project tonight so the focus was on getting things done “well enough” so I took rough, but not very precise measurements when I tried to zero the v bit with the probing function.
And yes, I’m probing Z only (sometimes anyway). But I am correctly positioning the probe on the corner of the work piece which I believe is correct. If I’m supposed to have the probe entirely on top then this is user error on my part and I’ll feel a bit of a doofus.
Uh, yeah, remember that I time I complained about something not working right when I wasn’t using it right…
Oh well, speed bump on the learning curve, there’s bound to be more. Thanks for being willing to help me figure it out, even if I should have been able to figure it out myself. I’ll try to do better next time.
Ok, so I’m still having an issue with my z-axis and figured I might as well pile on this thread instead of starting another one.
Symptom - z axis is not cutting to the correct depth.
Example - see attached code. I was cutting a pocket/raised text and while the X and Y scales are exactly as they should be (1" letters measure almost exactly 1.000") the depth of the pocket, which was created at .200" is cut only 0.16" deep.
I’ve searched around and didn’t find anything good to explain how I could be having a scale issue like this. My Z is holding position just fine so I don’t think I have a belt tension issue. The pocket cut cleanly and to a consistent depth. I even looked at the old wiki to see what I might be able to find and all the links to more information appear to be dead (not surprising). I’ll keep looking but any suggestions on what to tweak in settings or other things to check would be greatly appreciated.trash_op1.nc (572.1 KB)
Sometimes, the edge is a little bit thinner than the center. Another thing I found is that the probe can be sitting uneven on the work piece just a bit.