Finally got around to trying this out. 0.089" (2.25 mm) is the tap drill size for a 4-40 thread. Carbide circuit board drills are typically 1/8" shank and come in a range of sizes, including sizes larger than 1/8":
150-400 SFM is the recommended surface speed for drilling aluminum with carbide and this calculator recommended 0.0008 to 0.0018" per rev for the feed.
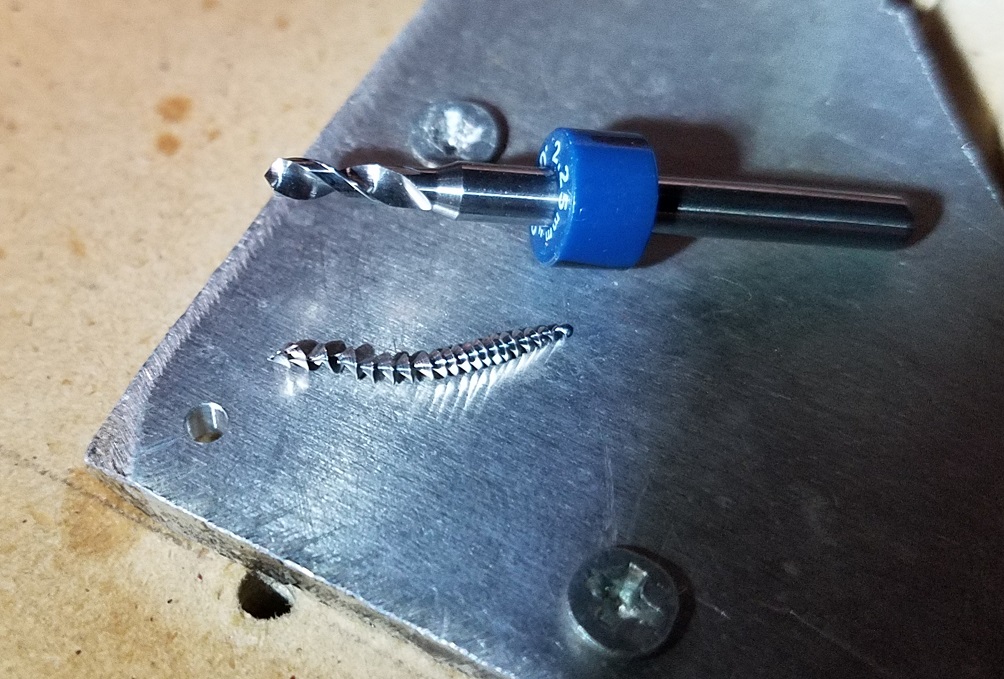
I went with 10,000 rpm for a surface speed of 233 SFM and feed rate of 10 IPM for 0.001" per rev. Put a little drop of 3-in-1 oil on the plate and a little on the bit and voila!
Tested on scrap 1/8" plate, drilled all in one go. I read up on peck drilling and that wasn’t recommended unless you’re going deeper than 3x the diameter of the bit. This page seemed to have some good recommendations on peck depths:
Can you let us know what machine you’re using and what grade of metal it is?
The hole looks clean but I can’t help feeling that the spiral chip would get really tangled up if drilling a lot of holes.
IMO 0.001 feed per rev is pushing the minimum I would go, that’s 0.0005" chipload and starts to get iffy on the chips ability to carry the cut’s heat with it. A thicker chip will be better for heat management and should help break them which can be easier on the tool. Ive found that 0.002-0.004" FPR is the magical sweet spot for carbide drills (depending on helix). Might require an HDZ or other ballscrew Z axis to push them with enough force though.
Shapeoko 3 with HDZ 4.0 and a Makita. Material is 6061 (probably T6 or T651 temper).
The hole is beautiful and it sounded fine.
With this thickess of material, the chip being as tightly spiraled as it is, and it being aluminum, I’m not too worried about chip wrapping. Also, it’s on a pretty clear expanse of flat plate. If you’re drilling down inside a pocket or close to a step or a clamp, you can get the “weed-whacker” effect where the chip hits something and bounces back toward the tool. If it doesn’t break, it could potentially wrap.
True - this is definitely a thin chip at 0.0005". I’m fairly confident that I could double the feedrate without issue. I will have to try that next time I fire up the machine.
Thanks for posting this I am looking into drilling on a cnc router for a friend that needs to drill hundreds of holes in 3/16 aluminum bar stock.
How long did the drilling take? When I entered it in a drilling calculator it comes out to under a second.
I’m hoping he can reliably run an 1/8" stub drill with air blast and light lubricant mist. He needs 1/8" and 3/8" holes. My thinking is drill everything with the 1/8" drill then use a 3mm Datron single flute stub mill to go from 1/8’ to 3/8" where needed.
I was using a clearance plane of Z 0.125" and went down to Z -0.166" (0.125 material + 0.021" drill point + another 0.020" to make sure it went all the way through). 0.291" total travel at 10 IPM is about 1.75 seconds. Rapiding back up out the same distance at 100 IPM would be about 0.175 seconds. Total cycle time of about 1.93 seconds.
Changing the feedrate to 20 IPM would cut that total down to about 1.05 seconds.
time (in seconds) = distance (in inches) x 60 / feedrate (in IPM)
I like the idea of drilling out the center of the 3/8" holes with the 1/8" bit and then milling out to full size. I’m assuming the latter would be done at full depth to spread wear along the length of the cutter.
Yes it will ramp down to full depth then open it up. I figured pre drilling will help take the plunging load off the endmills work and speed up the cycle time. The work will be done on a Tormach 24r which is a linear rail ball screw machine that should be fairly rigid. Had the HDM foot print been large enough I would of had him go that route but he needs 40" of travel for his parts.
He has been hand machining and drilling 1000’s of holes to make adaptive reachers for quadriplegics every year for the past 20 years on an old bridgeport knee mill so I’m excited to help my friend to get into doing Cnc work for the first time. His tools changed my life and I couldn’t live independently without them so to help him help others is a pleasure and the least I can do.
Here is a video of how each reacher is made 1 at a time solo in a little garage shop.
To avoid tool changes and having to revisit the same holes, the 3/8" holes could be done with a combo drill / end mill. I would think the style with the twist-drill type point would be best (what they call “Drill Style - 2 Flute” here):
Instead of retracting a drill, you could go right into milling with the same tool in the same hole with it already at full depth.
I like the video. I wonder if some of the setups where the mill head is angled over could be avoided with fixturing that holds the workpiece at an angle (or one of those tilt-type tooling vises).
Also, this video spurred me to learn something new - that the term quadriplegic includes people affected with partial paralysis of the limbs. I had always associated the term with complete paralysis previously.
I looked into them as the first option but I don’t know long the sharp point will last with non stop drilling. From my understanding they are for light drilling not for constant drilling as the point quickly wears out. I couldn’t find any drill mills with 118 degree tips.
The holes will be drilled prior to bending with only 2 holes being drilled in a angle jig. I had him try it flat but those hinge holes deformed when bent so they have to be done after the bend.
these are the drills I have in mind they have a high SFM rating so I think they will work well but time will tell
Yes, the mill/drills could be one of those situations where you compromise some of the attributes of each of the two tools by combining them into one. This page recommends 130 to 140 degree angles for aluminum:
Those Kyocera PCBs I have are 130 degree. I think the angle is slightly different when they get over a certain size ( I think I saw that in the ebay listing description for them).
Those ones you show look like they have a decently high helix angle, which was also recommended in the above link. I’d say give 'em a try if the price is reasonable. I don’t think the tip angle is going to be super-critical. 118 is the common angle for jobber drills that have been used for years and years.
“The threshold for aluminum is something like 60,000 sfm, which is enormously fast,” he said. “I’ve seen aluminum run at 24,000 sfm with an uncoated carbide insert, and it didn’t harm the aluminum or the insert. I tell our customers that, within a safe working environment, don’t be afraid to crank it up because I’ve seen that higher speeds in aluminum gets you both better tool life and a better surface finish.”
I pretty regularly use a carbide spot drill to pre-drill holes to then open out with an end mill running a bore or adaptive toolpath in Aluminium, I started doing that after killing a couple of endmills in the initial helical ramping.
I use this spot drill type quite a lot, these are < $5 each
There is also a properly fluted version for deeper holes, similar pricing
I’ve also used regular ‘jobber’ drills in the spindle for repetitive drilling ops where I didn’t want to wear out nice carbide tooling and that works well too, at well under $1 per drill bit you just replace them as they blunt.
In the Shapeoko, with a spindle capable of running well at low RPM the limit seems to be how hard the Z axis can push down to meet the feed per revolution required to be cutting instead of rubbing. I’m up to about 4,000RPM on the 4mm bits now. At a certain point increasing the RPM and Z feed rate the whole X gantry starts to vibrate and I chicken out and back off. In Aluminium I add small amounts of Isopropanol as lubricant as that’s largely ‘self cleaning’ as it evaporates away.
I’ve found that both chip extraction and some small amount of lubricant / coolant are key to using the carbide drills and not getting a hot workpiece, I’m not up to the SFM where the temperatures start to drop back down and I’m not sure this machine can get there.