CNC Enclosures Designs

For all of you that have a CNC and have an enclosure for it…

1)what does it look like…picture if possible
2) if you were to build or buy an enclosure again what would you do differently?
3)what would you consider the most important features from a functional perspective

I’m now retired and this is one of my to do/wish to get done projects that there never was previously time to do… so…no more excuses I guess. I’m a wood guy so perhaps wood structure ideas would be more desirable/beneficial to my journey.

Looking forward to your comments.

Cheers

1 Like

There is a giant thread here for inspiration :

My latest iteration is that big box:

image

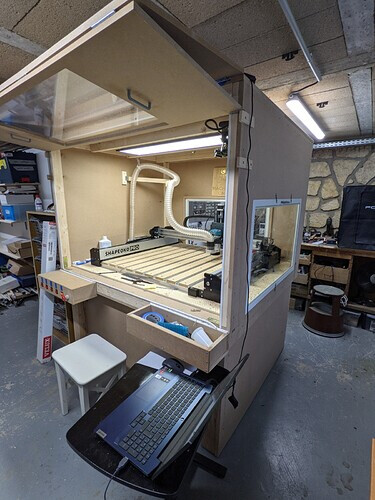
Some folks go to extreme lengths to build fancy enclosures (I don’t).

Enclosures are a rabbit hole of their own, there is no definitive answer/design, it all depends on your needs and budget. Noise reduction is a priority for some, not for others. Dust containment, ditto.

You can find literally tens of threads about building enclosures on the forum, some with plans.

You’ll want to make one that is tall (like, really, taller than you would think you need), has windows, and possibly has a hatch at the back of the machine to allow tiling jobs that require to slide the stock along Y beyond the wasteboard limits.

You will want enough clearance on each side of the machine for maintenance, and some space in front of the machine (endmills falling on the floor while you swap them in the router is not a great feeling)

The space underneath the machine should not be wasted, and that’s a great place to store a shop vac and dust separator (cyclone).

Also, you want a readily accessible “OH sh**” button that removes all power when you smash it.

Plus another ten things I forgot to mention, but really building a first enclosure and using it is the best way to know what you want/need. You will likely build several ones anyway.

4 Likes

I personally do not have an enclosure.
Ideally, If I could have the enclosure of my dreams and if money were no object, it would most likely be one made of 80/20 material. Most likely black 10 series frame with scratch resistant Polycarbonate plexi.

1 Like

I made a table with casters and built-in vacuum setup. Works great. Still no actual enclosure, but I did add some foam panels on four sides to keep the wood shop dust from building up.

1 Like

I went the ultra-cheap route. Can’t seem to find a real picture right now. This is the design

Sides are 1/2" solid core PVC (white). Front, Top & Back are 3/16" Acrylic for lots of light.
Bracing & trim are scrap lumber I had laying around (2x2 & 1x2)
Doors are bifolding & fold up & lay on top when open. And both front & back open in case I ever need to do a tiled cut.
I didn’t consider sound-proofing at all when I built it. The machine is relatively quiet to begin with. But to my delight, the enclosure does block a lot of sound.
Overall size (For my HDM) is 36" x 48" x 30" tall. That allowed me to use a full sheet of acrylic.
A couple holes in the right side for the wire & coolant harness, and a smaller one for the bitsetter cable.
The whole thing sits on a 40" x 74" x 2.5" chunk of bowling alley maple, which leaves room for my laptop, and a granite sink cutout for a surface plate.
I used some of the remaining PVC to build the shelf & drawers in the table.

Things I would do different: A little taller to avoid bumping my head. I’m used to it now, but a little more room would be nice. A good 1/8" gap for the plexiglass. It’s not perfectly square, so it occasionally binds. Perhaps I’ll modify it a little bit & add some gussets to stiffen it up. Other than that, it does it’s job & keeps the mess contained.

Found a better picture

3 Likes


5 Likes

Take a look at Max Bergs , best I’ve seen.

3 Likes

Here is mine.

7 Likes

Here’s a wooden framed one.


Inevitably, you’ll need to get to the most difficult to access area of your enclosure…I considered framing out actual 8ft walls so I could just walk into the enclosure, but space and resources are pretty limited.

9 Likes

Shapeoko 3XXL Enclosure. A link to mine that lpl have given list and input into. Made primarily out of melamine, 360 access is a must in my opinion and i am 6’3" and can crawl in and sit. Biggest and most important part is how and what type of dust extraction you have. I have a rigid shopvac with a dust stopper so wanted to quiet that doen as well.

2 Likes


I have hinged the front of this with gas shocks. Made from welded square tube steel and a big plexi window in front. I like that when open, it allows easy access to all areas. There’s a little dock on the side for the computer, and (not easy to see) on top sits a large monitor. From a functional perspective, make it bigger than needed. The last thing you want is to be cramped when you’re moving parts or working on the machine itself.

4 Likes

Here’s the one I built:

I spent entirely way too much time on it, but it is awesome from a noise and dust containment standpoint. If you go the plexiglass route for windows, I recommend Tap Plastics. Decent prices and will cut the sheets to the exact size you want.

I’ll strongly second the above recommendations for leaving ample space inside. Also, getting the height right for ergonomics is worth the effort, especially if you prefer sitting at a stool while operating (like me).

2 Likes

Hello DustyWoodChips,

  1. I also have more pictures of the enclosure/base during construction.

  2. To be honest I cannot think of anything I would do differently if I had to build the enclosure again.

  3. Definitely, having caster wheels on the base, plus having a drop-down door in the back for longer items came in handy a few times.

I wanted to be able to use it at any time, so noise was a factor I wanted to address. I wanted drawers for all my cnc-related stuff, and I wanted an area for my vacuum and dust deputy to reside. I also wanted the enclosure to look “sexy” with angled corners and rounded windows, lol

Let me know if you have any questions, I will be happy to answer them!


8 Likes

Currently building my enclosure. I have a 3 car garage and 1 bay is dedicated to work space. I have not even cut anything yet with my Pro! The cabinet is built to return some storage space I had with 2 previous shelves in the same location.
I still need to mount the doors for the lower and upper shelves and make the acrylic doors for the enclosure area. I have drawers on 3 sides, where the front side is larger and will store the tablet that connects to the Pro.

The only concerns I have right now is 1. Will my dust collection hose catch the top of the router and tear off?


& 2. Will I ever get this thing done!?

4 Likes


I have a Shapeoko 4
One piece cabinet with drawers for tools or accessories and dust collection below and swing away laptop.
It’s 4X4X8 shapeoko 4 is smaller but it does what I want so far. Really happy with the machine and this setup.
Noise reduction is between 20 and 22db without sound deadening foam.
Dust is handled very well by a shop vac and dust deputy.

5 Likes

Importance: Noise reduction and dust containment.

Yes make it a little bigger than you think you need it lol

Mine is just 3/4 plywood and pine ( what I had available as scrap. I had some old 6-panel pine doors I had scrapped and used the 1-3/8 pine for the door frames.

I read all the specs and bought acoustic ceiling tile - mistake - it transmitted the sound. Wound up buying Styrofoam sound deadening from Lowes. Just place the machine on top of it - worked wonders.

SInce I used 1-3/8 material for the doors, I put two layers of plexi for door windows. I don’t think I got much sound deadening from the second layer. Weather striped the doors.

Put a 4" muffin fan in the top and a box with baffles to let ait in and out and to reduce noise.

Lighting: put in LED strip lights on box top.

This topic was automatically closed 30 days after the last reply. New replies are no longer allowed.