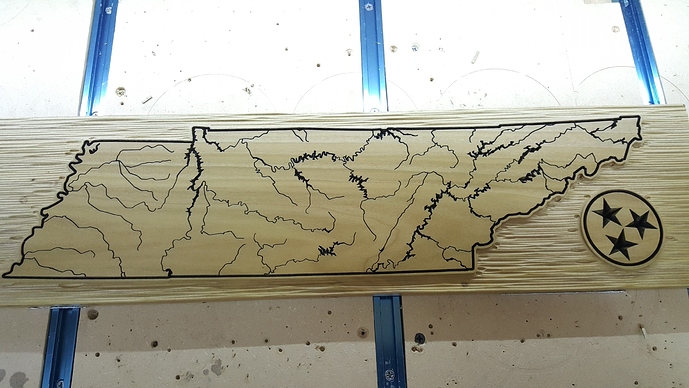
Hi is there a way to create a burnt look to carvings without a laser?
Several, the easiest is with a torch. A plumbers propane torch is fine.
If you are looking to burn patterns via CNC, you can CNC cut a mask and do the burn with a torch. I don’t know what would be best for a masking material, but for a one shot, it needs to block the flame, not survive unscathed, so I would guess that even wood is fine. I would avoid materials that offgas when heated, like plastics, or burn easily, like cardboard. They may protect the work from the flame, but acutely toxic fumes, or a my shop going up in flames, is a definite negative in my eyes.
I am sure there are other options.
milling with lots of rubbing.
most people experience it when they’re starting out 
I explicitly avoided mentioning this. Don’t want to encourage bad habits…
i don’t see why it couldn’t be done intentionally with decent results. would be watching it closely just in case ya know 
Maybe could be done but IMO it shouldn’t, it would also damage the endmill.
doesn’t need to be an endmill tho
cheap old drill bit would work. scrap alloy quick crappy grind and a single flute-esque notch and presto chang-o. depends on what look he’s after but for some engraving may pan out. thinking outside of the box for someone not interested in getting the right tool for the job
Paint with ammonium chloride solution and hit it with a heat gun. It’ll chemically burn the wood.
Oh man! You beat me by 1 minute. 
Yup, there are many videos, but I learned it from this one.
Brilliant idea this is very clever, I’m still scratching my head thinking should I just get a laser head for my Nomad though to have that precise control.
Is this the primary type of projects you plan on making? Maybe it would be better to get comfortable with the Nomad then figure out the laser. You may even decide to get a dedicated laser table with a more powerful laser.
Hi, no not really just something I would like to do having seen different ideas on Etsy.
The thing I like is this kind of thing https://www.etsy.com/uk/listing/731085681/cthulhu-ouija-wooden-board-spirit-board?gpla=1&gao=1&&utm_source=google&utm_medium=cpc&utm_campaign=shopping_uk_en_gb_anniversary_All+Products&utm_custom1=kenshoo_clickid&utm_content=go_1713594941_66749248763_333502272900_pla-293946777986_t__731085681engb
You can just carve that with the machine as is. Seal, paint then sand or, seal and epoxy fill *black then sand.
I get a similar look by using a pre-conditioner(which in my experience helps cut down on stain “bleeding”) and clear coating the wood before putting it on the bed of my machine. After cutting, I use an ebony stain to darken the cut, making sure to wipe it back quickly and often. followed by a light sanding and top coat. This may not work for objects that need a completely smooth surface without doing an epoxy fill like @mjmike6988 mentioned. I imagine cutting through wood with a top coat isnt doing my endmills any favors, but they dont seem to wear too quickly compared to the ones I use solely on wood.
Example of the final product using this method:
That looks really good.
How do you apply the stain do you wipe it on or brush it?
Thanks.
Thank you for the kind words! I apply it with a cheap foam brush. Just dab along the cuts and wipe back. For wiping it off I use good paper towels as opposed to cotton rags as the few “fuzzies” left behind are much easier to deal with.
This topic was automatically closed 30 days after the last reply. New replies are no longer allowed.
