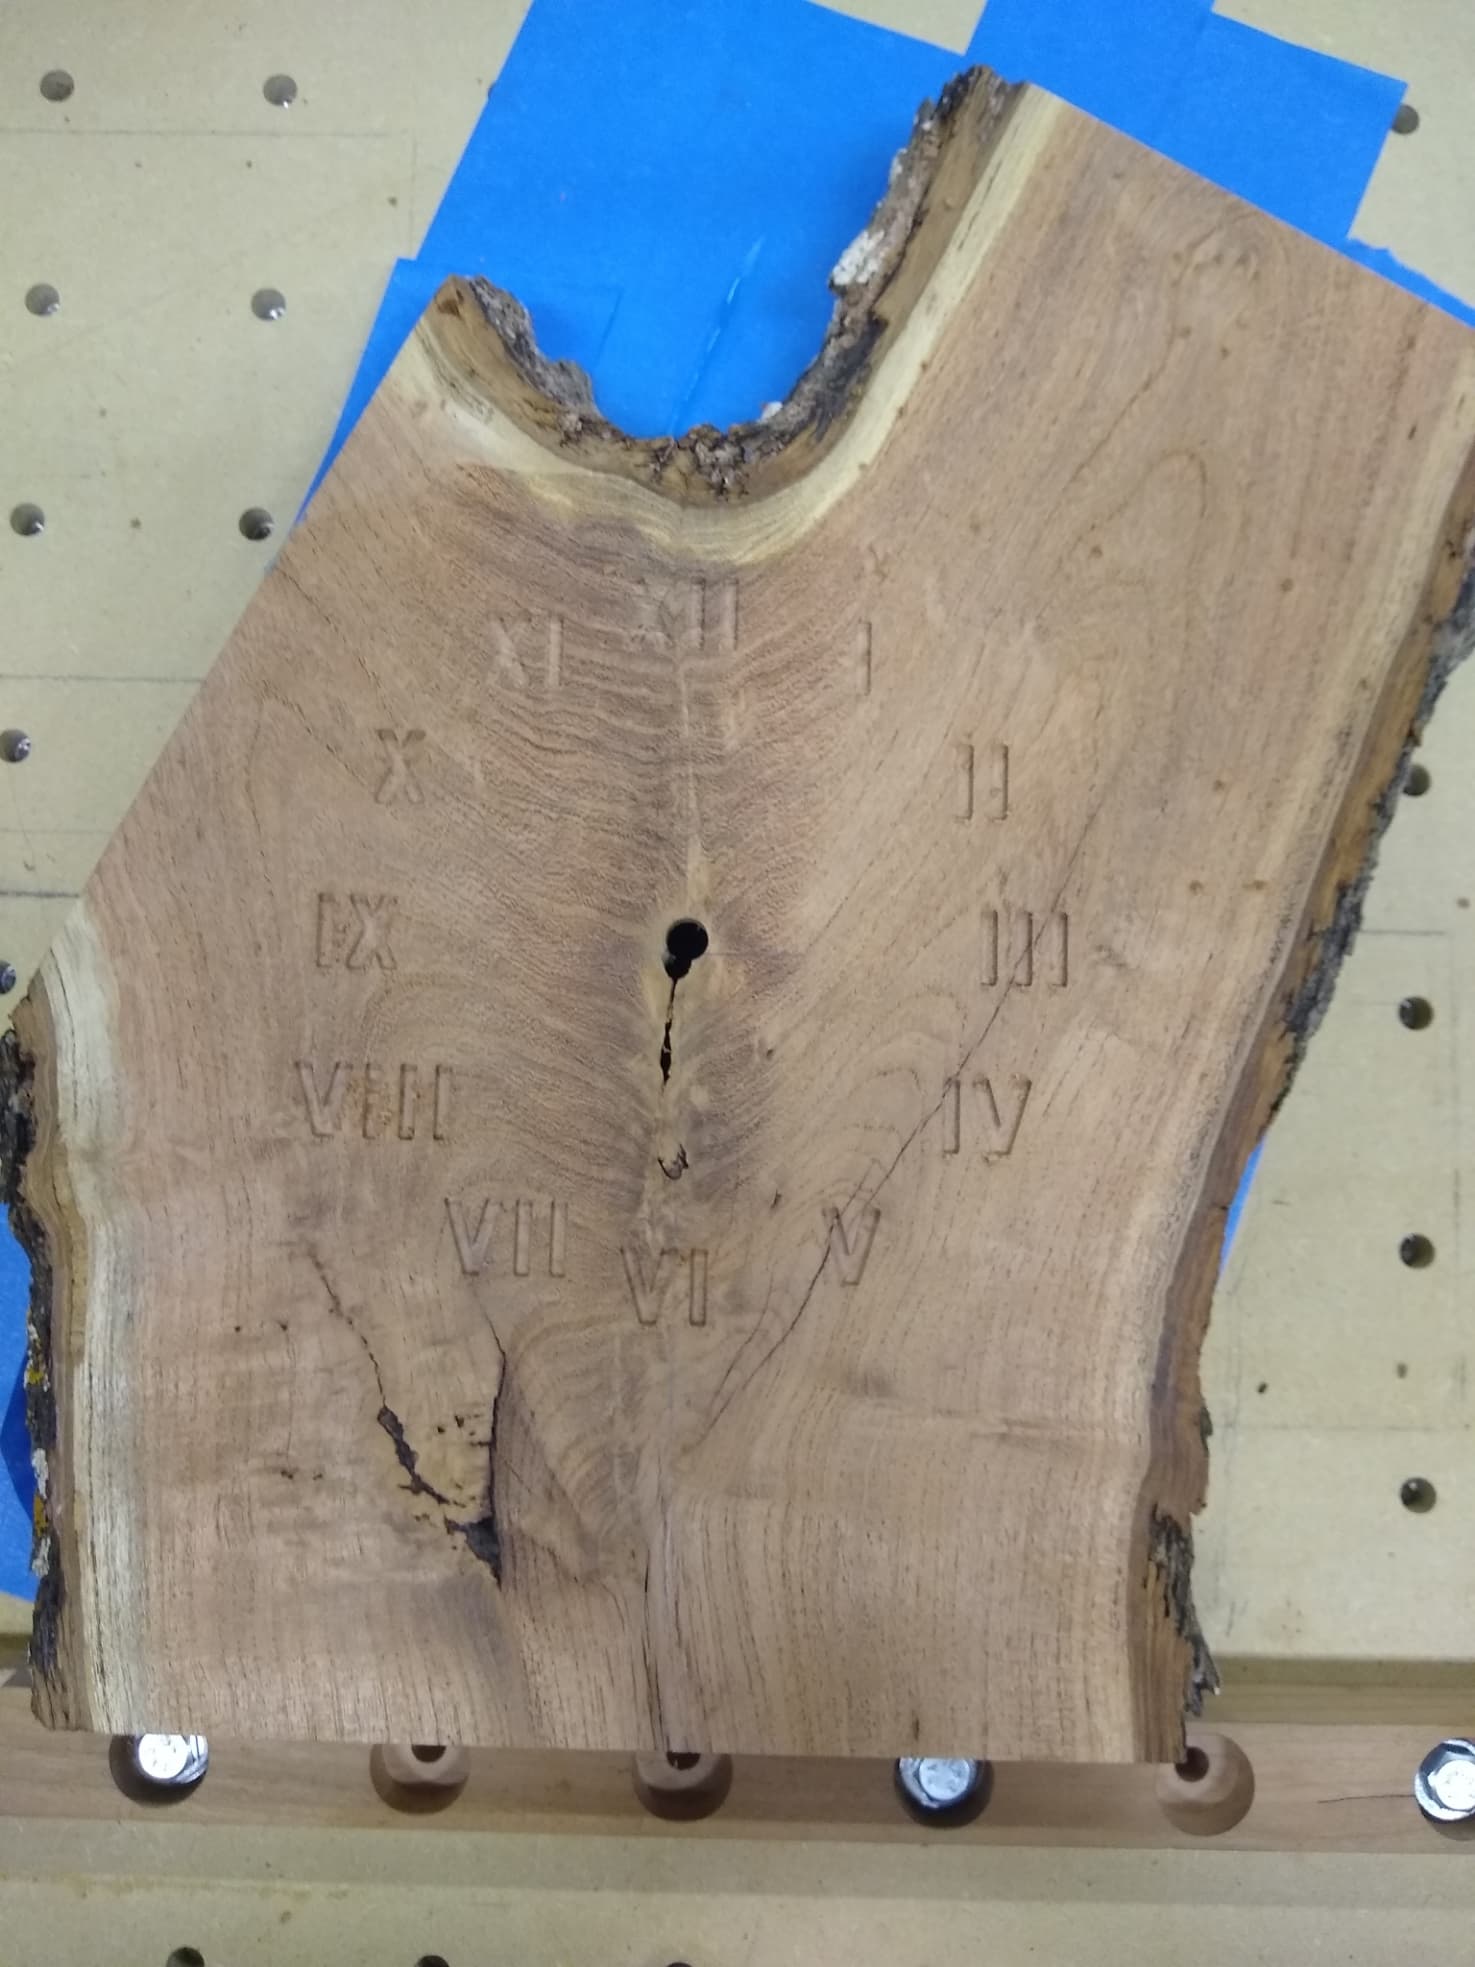
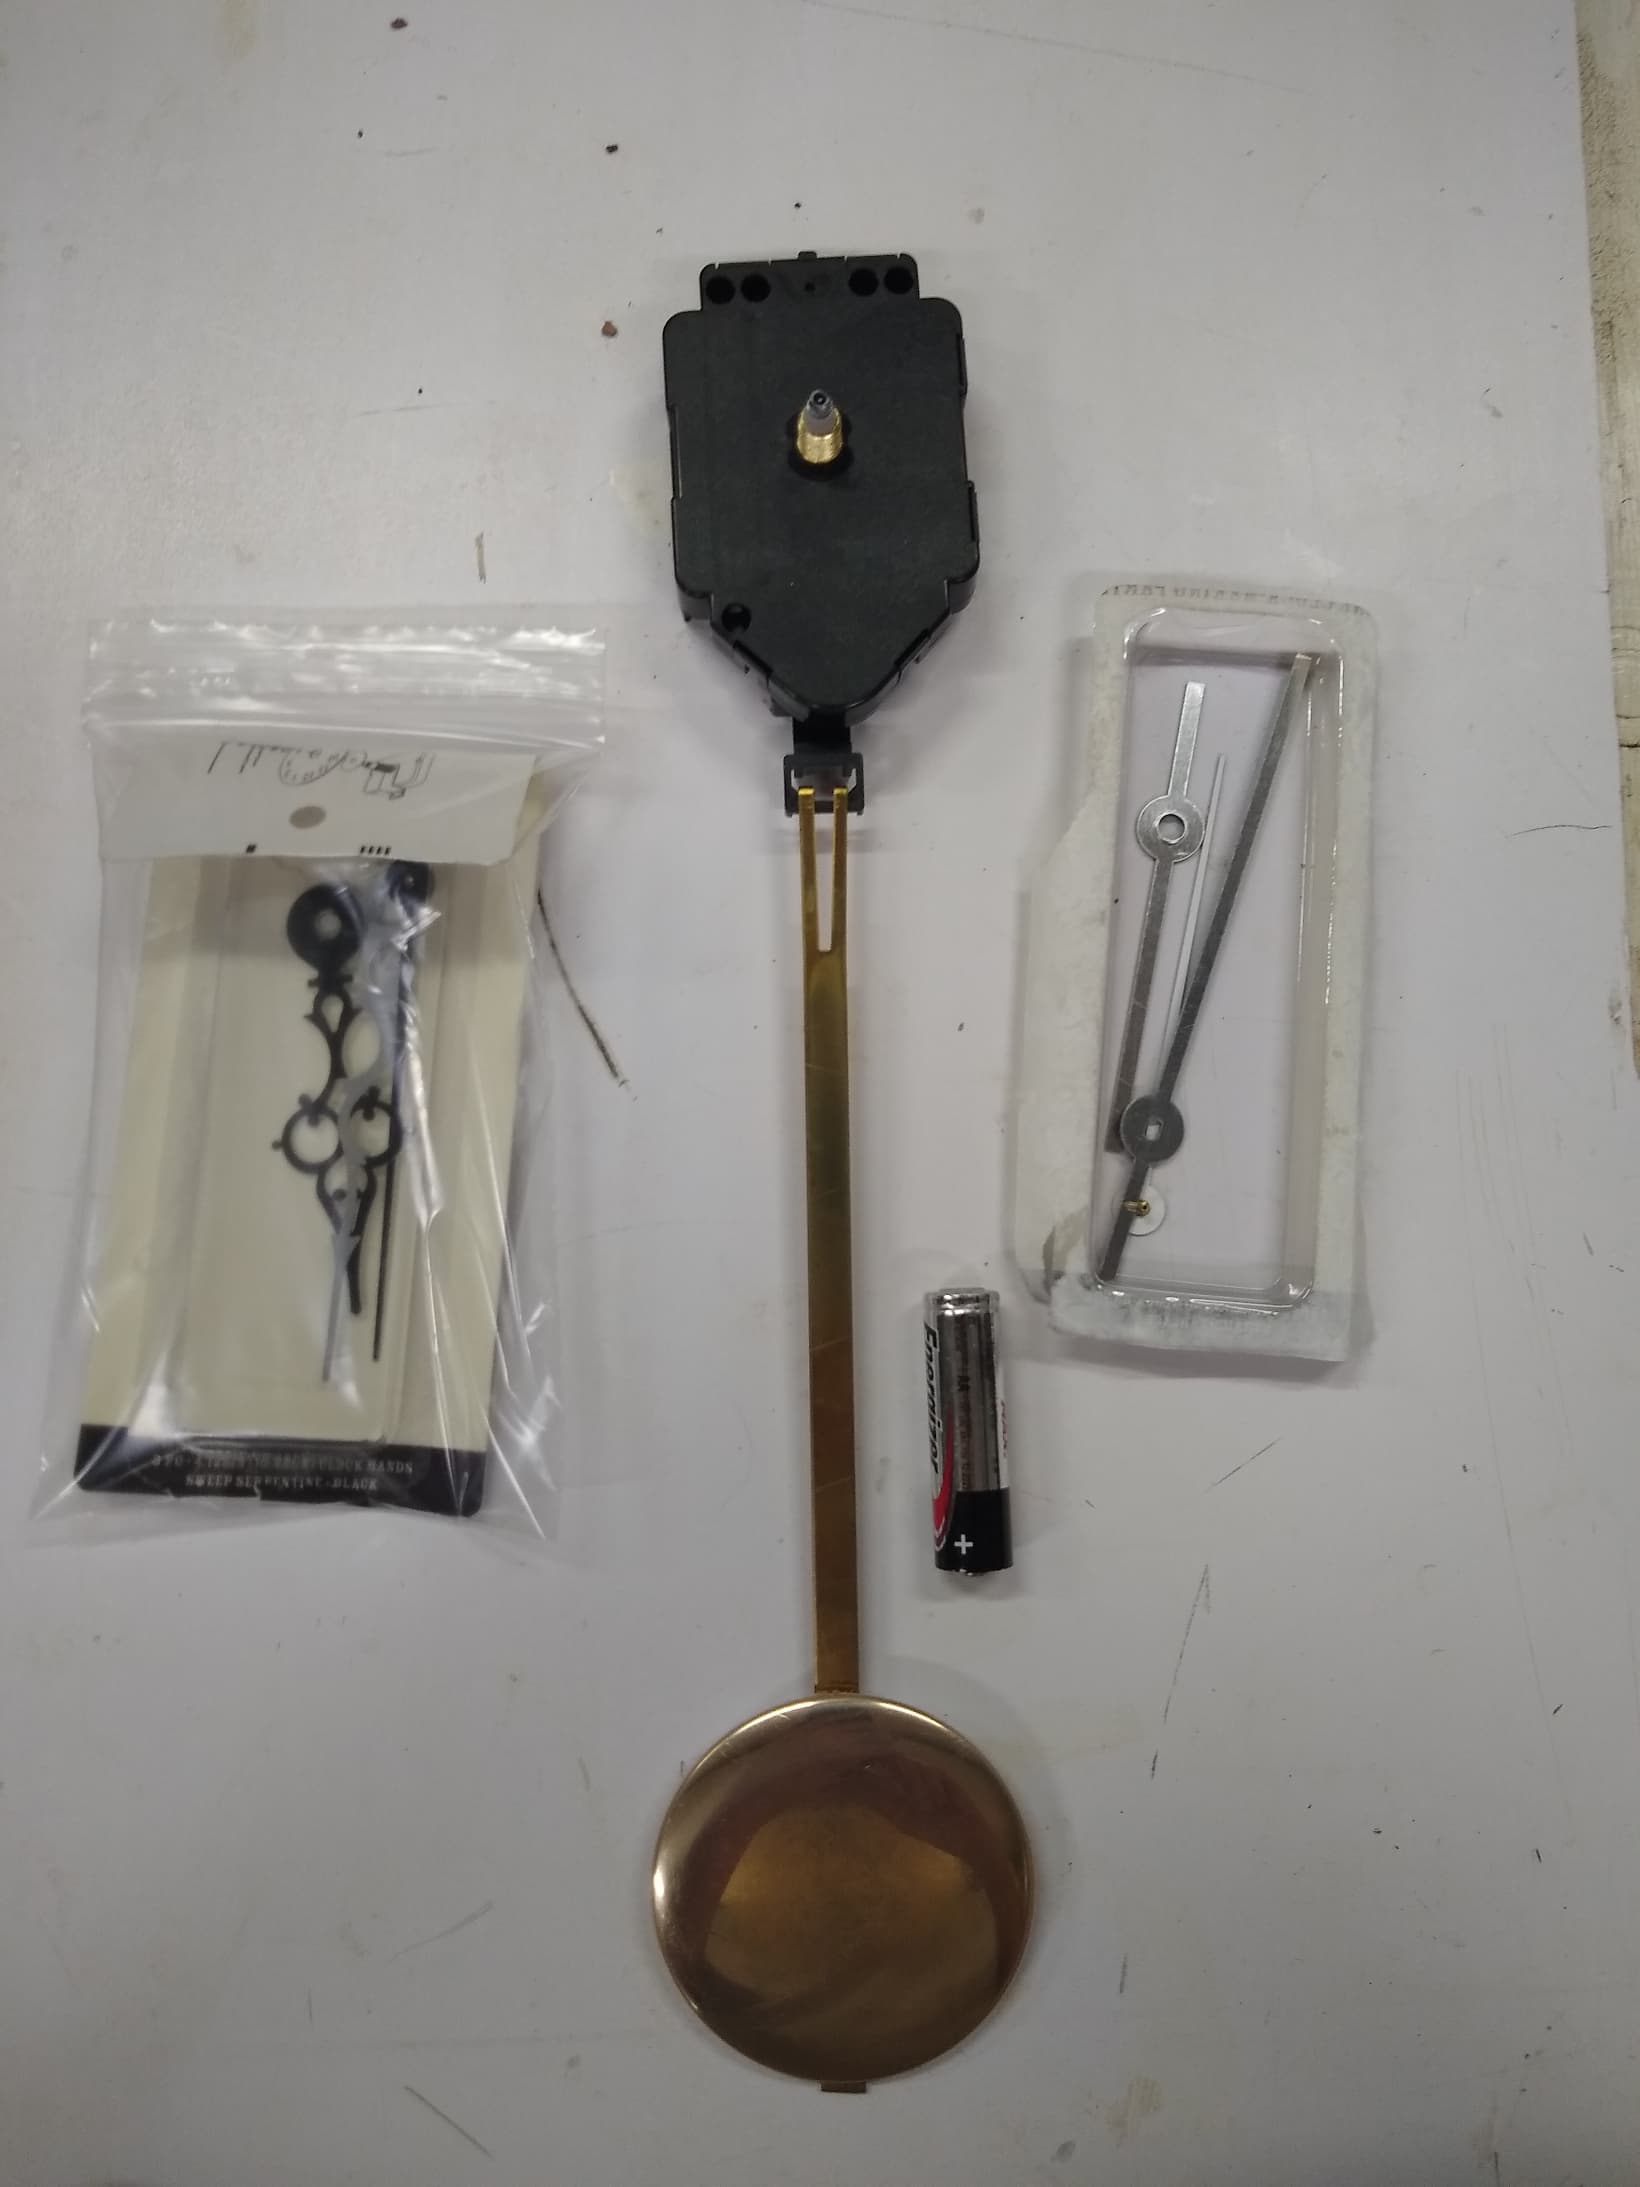
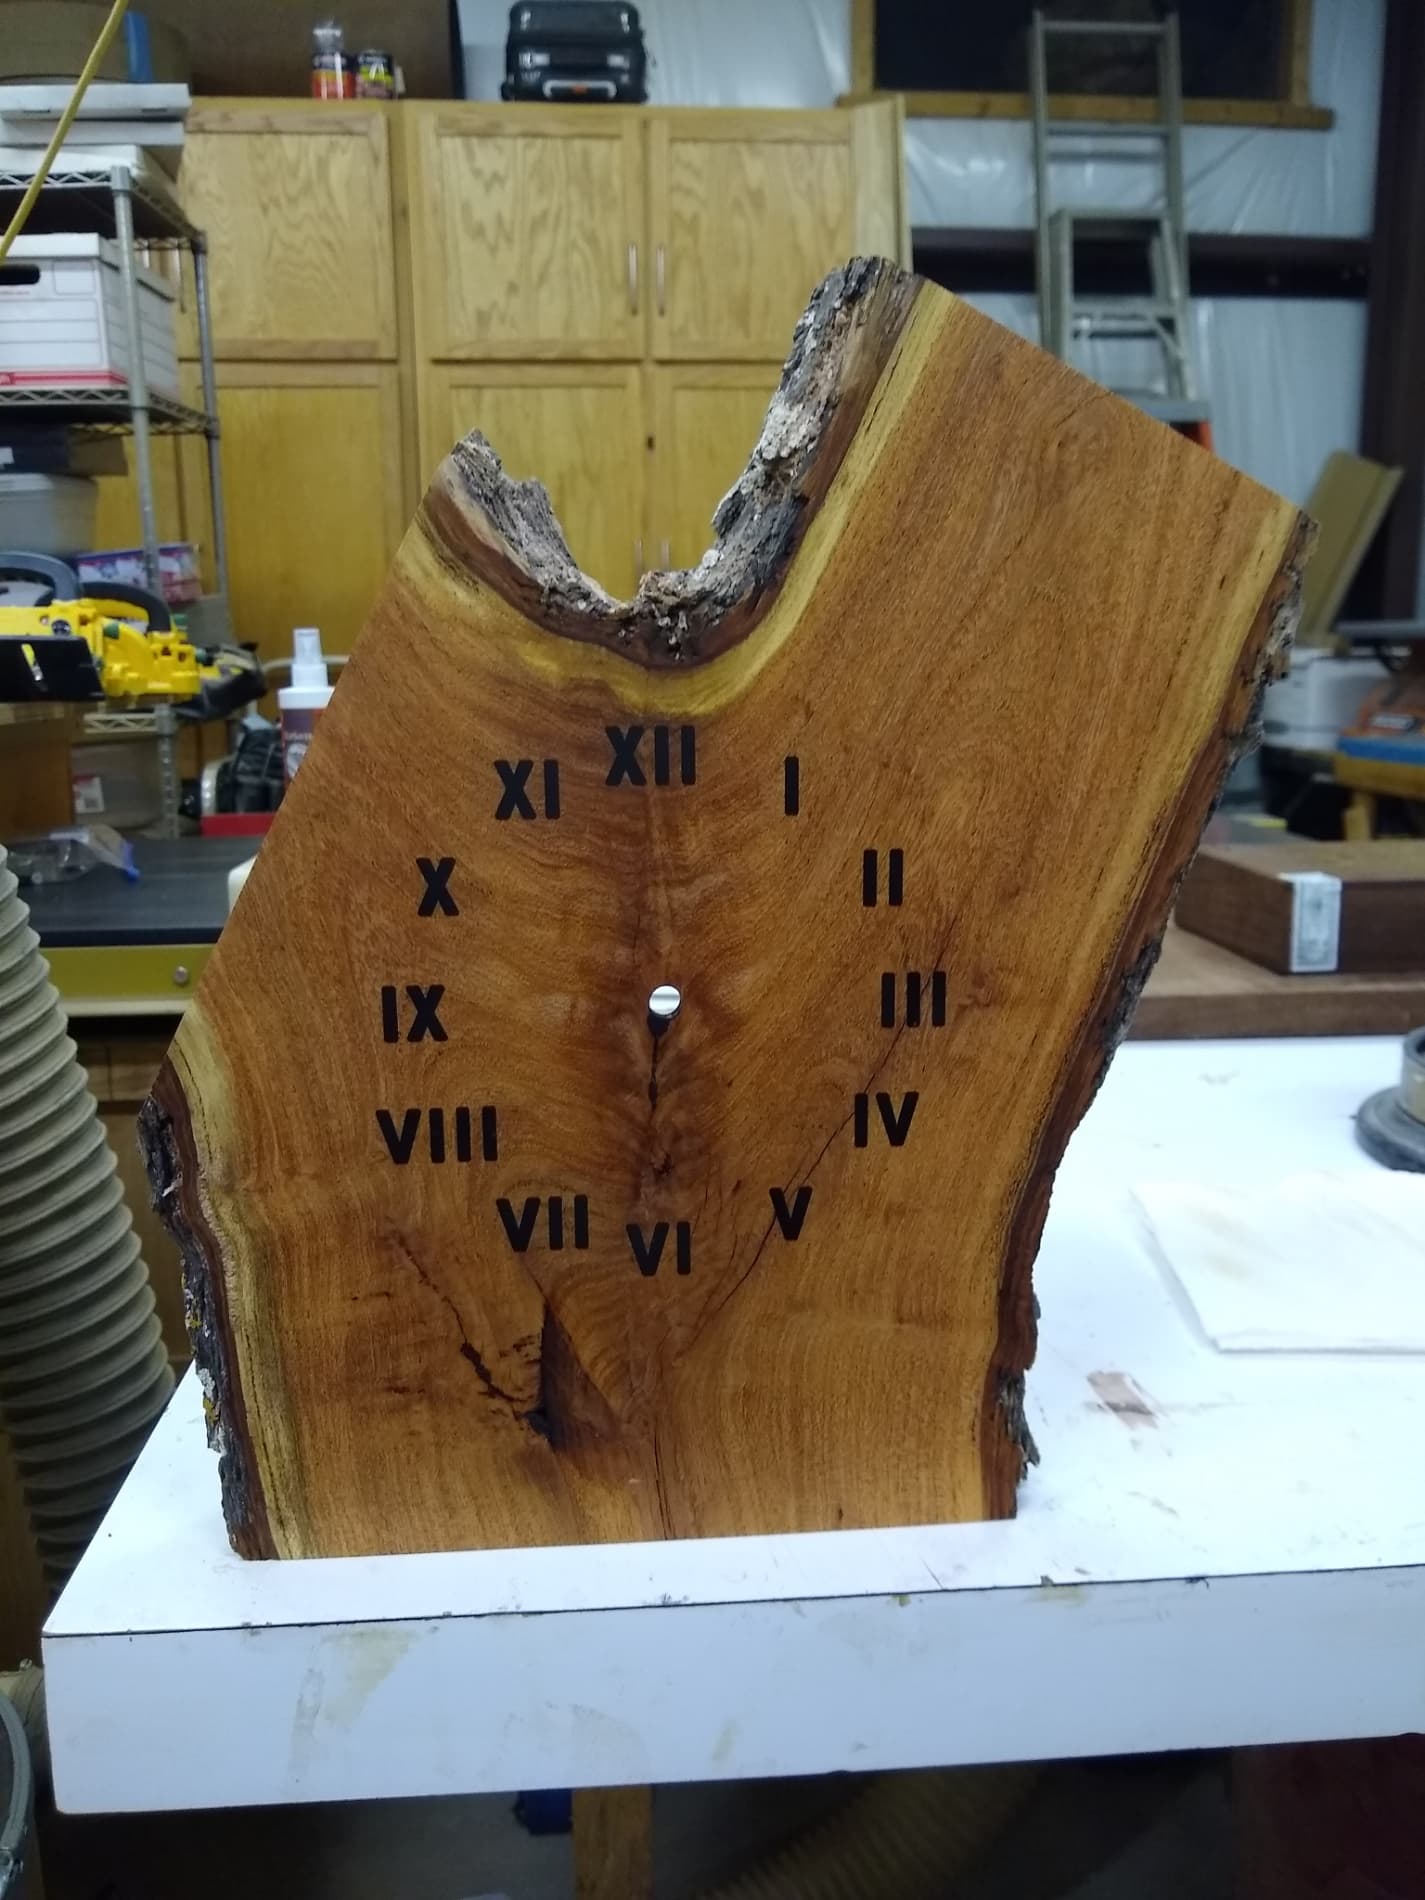
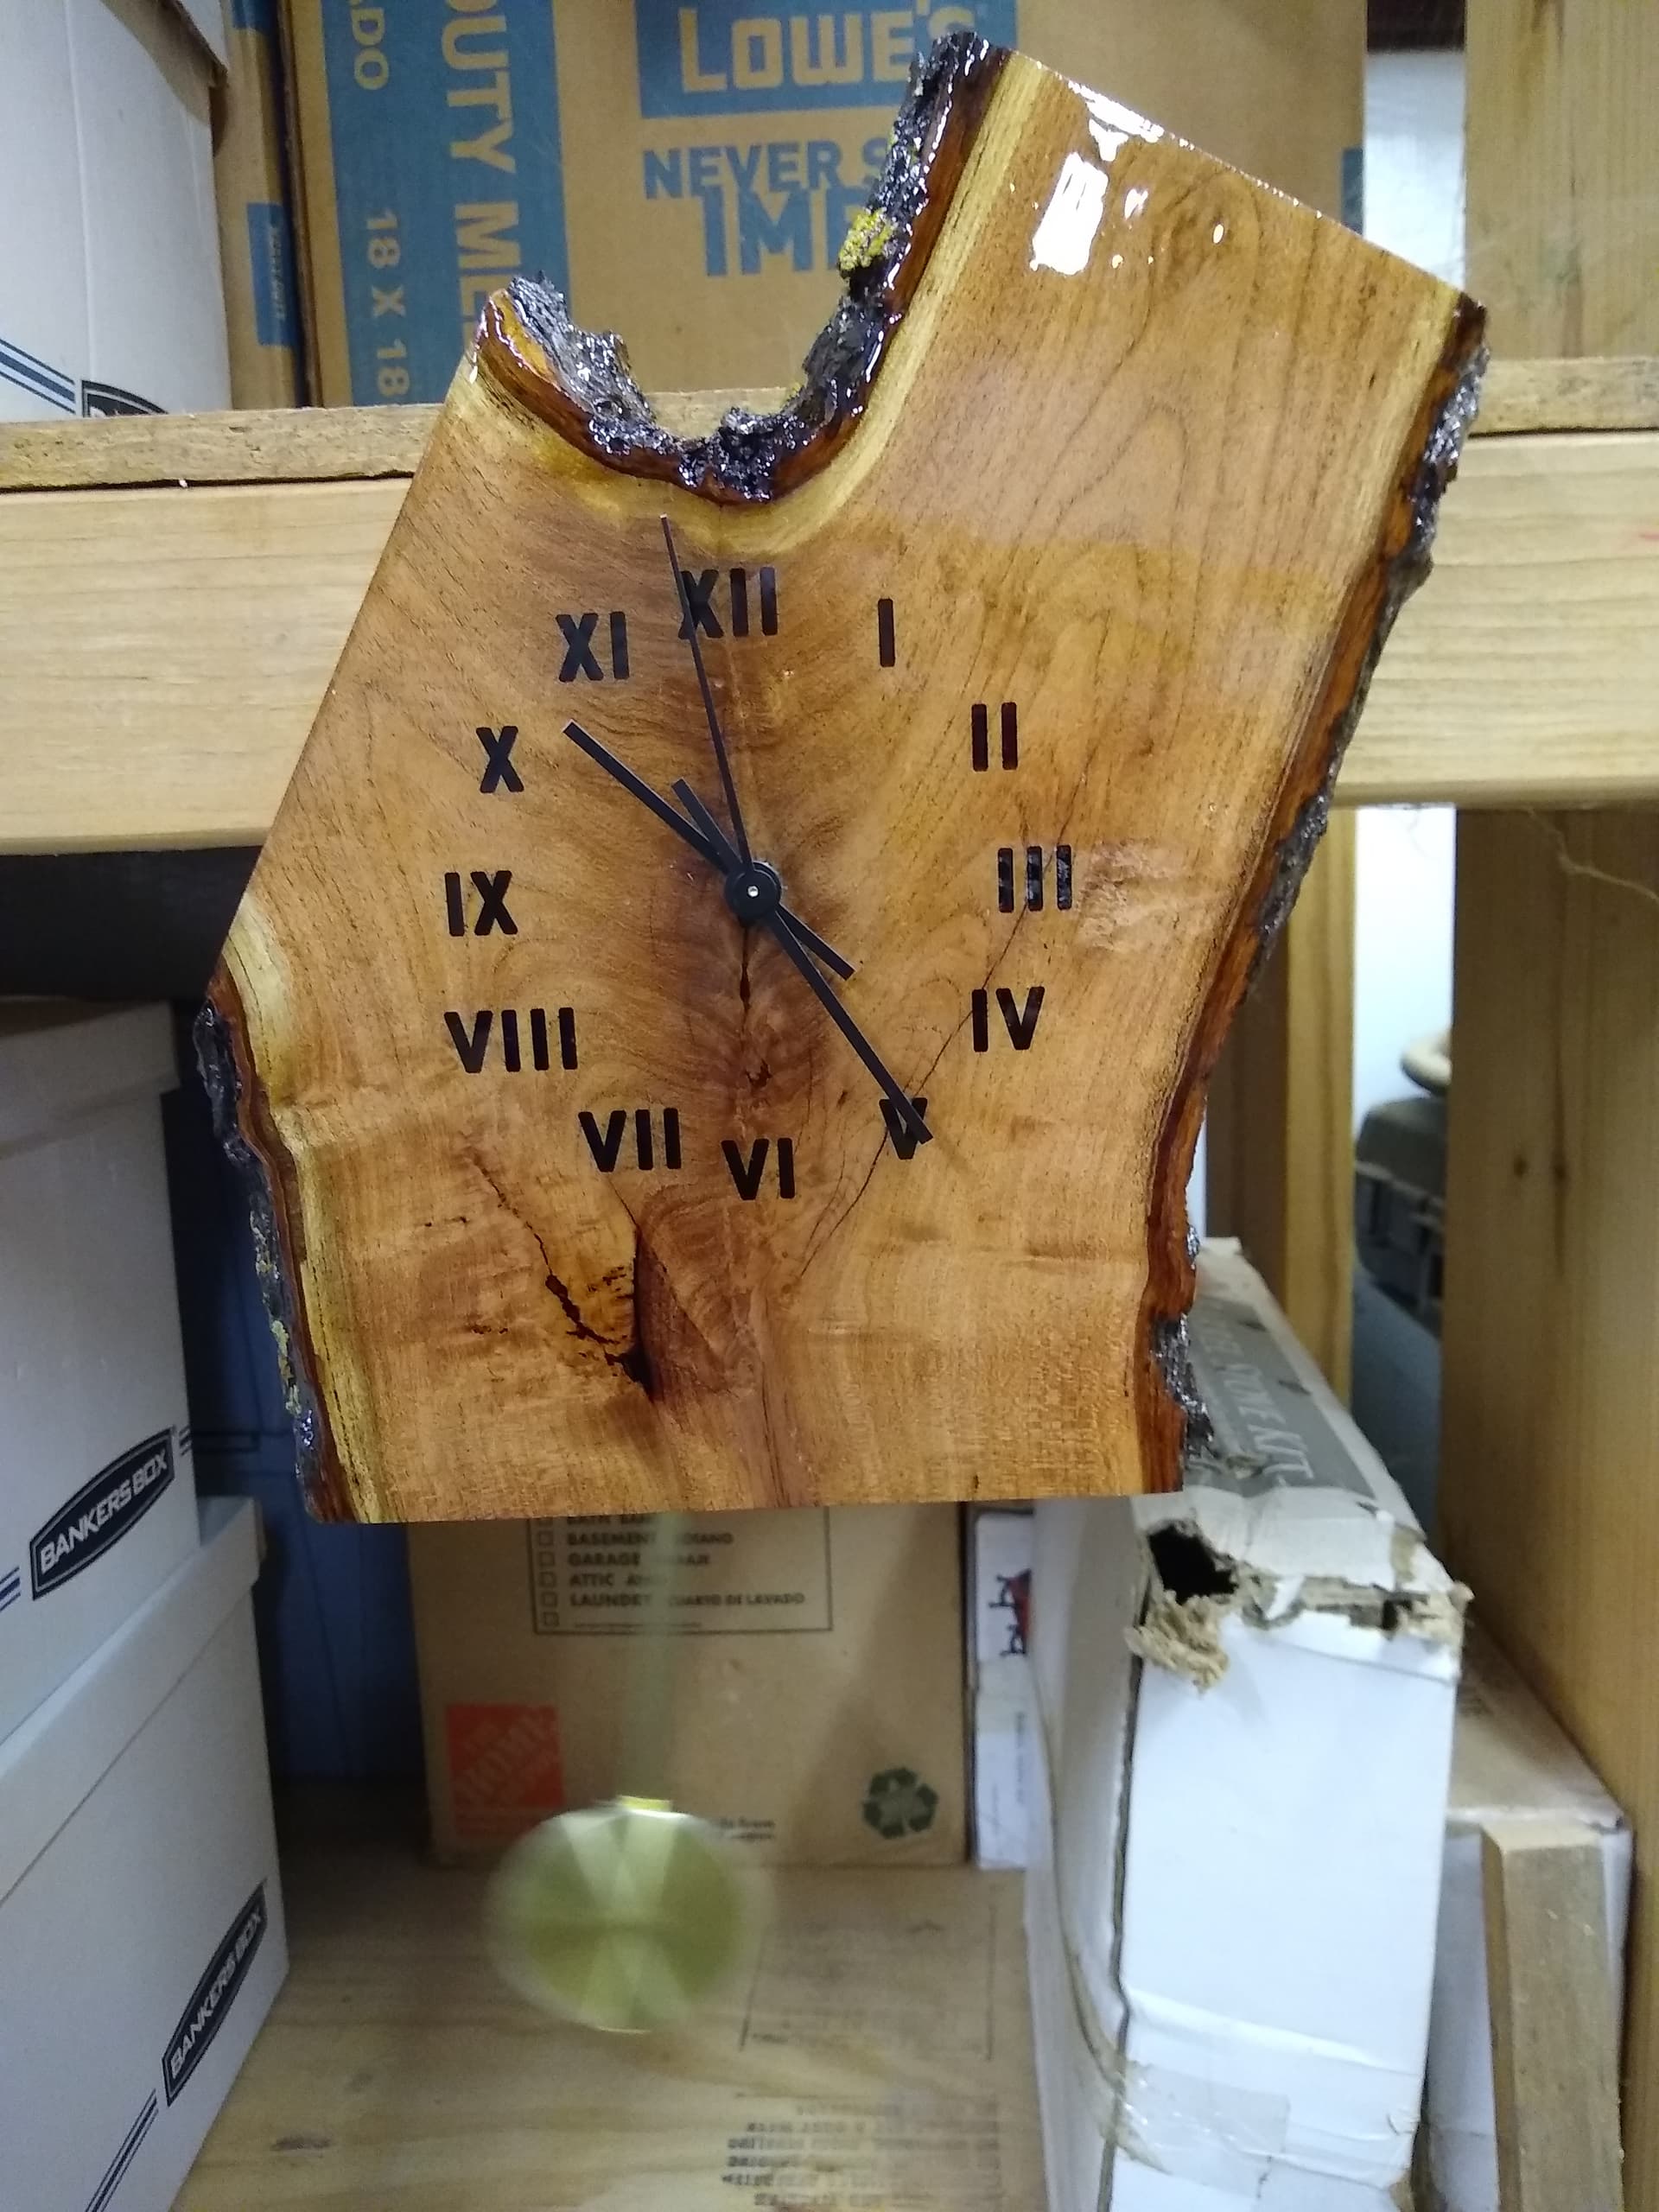
I am making a pendulum clock for a friend that gave me a giant mesquite tree a couple of years ago. Another friend cut it on his sawmill and it has been air drying for 3 years. So I have started making some projects. I had a branch crotch piece laying around and I decided to make a clock. I had a bunch of the little square ones but I had a pendulum one in my clock parts box. The face is 5" round and I got the hands that match that.
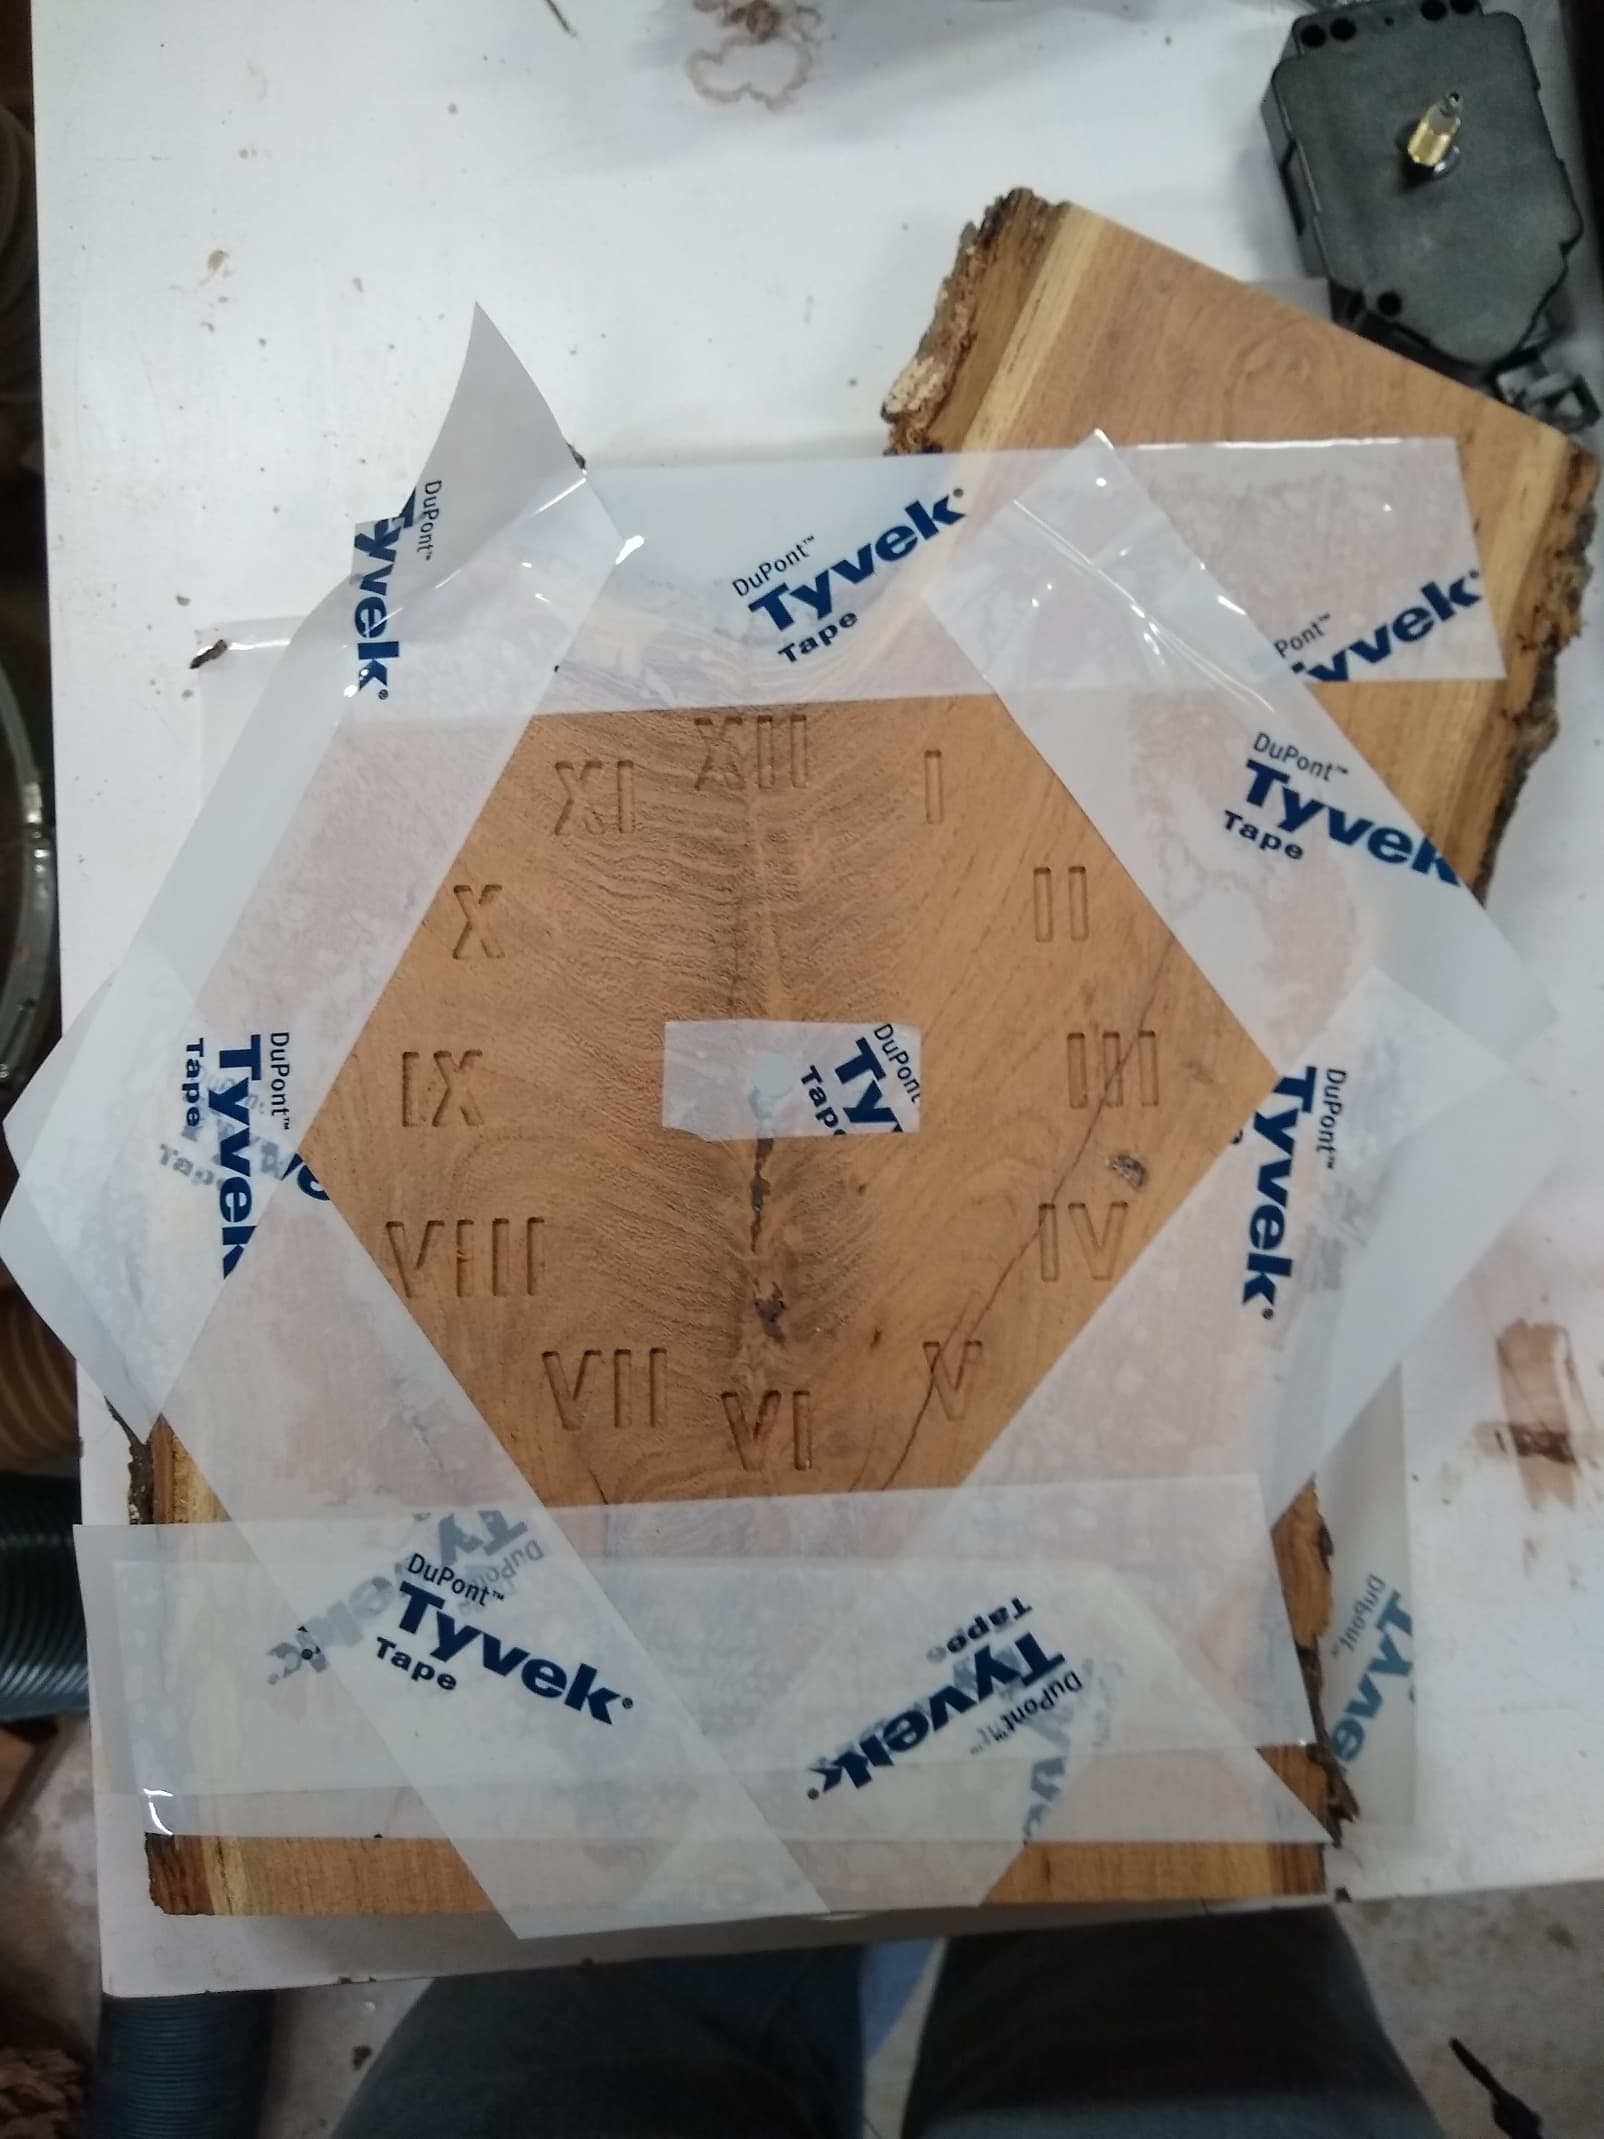
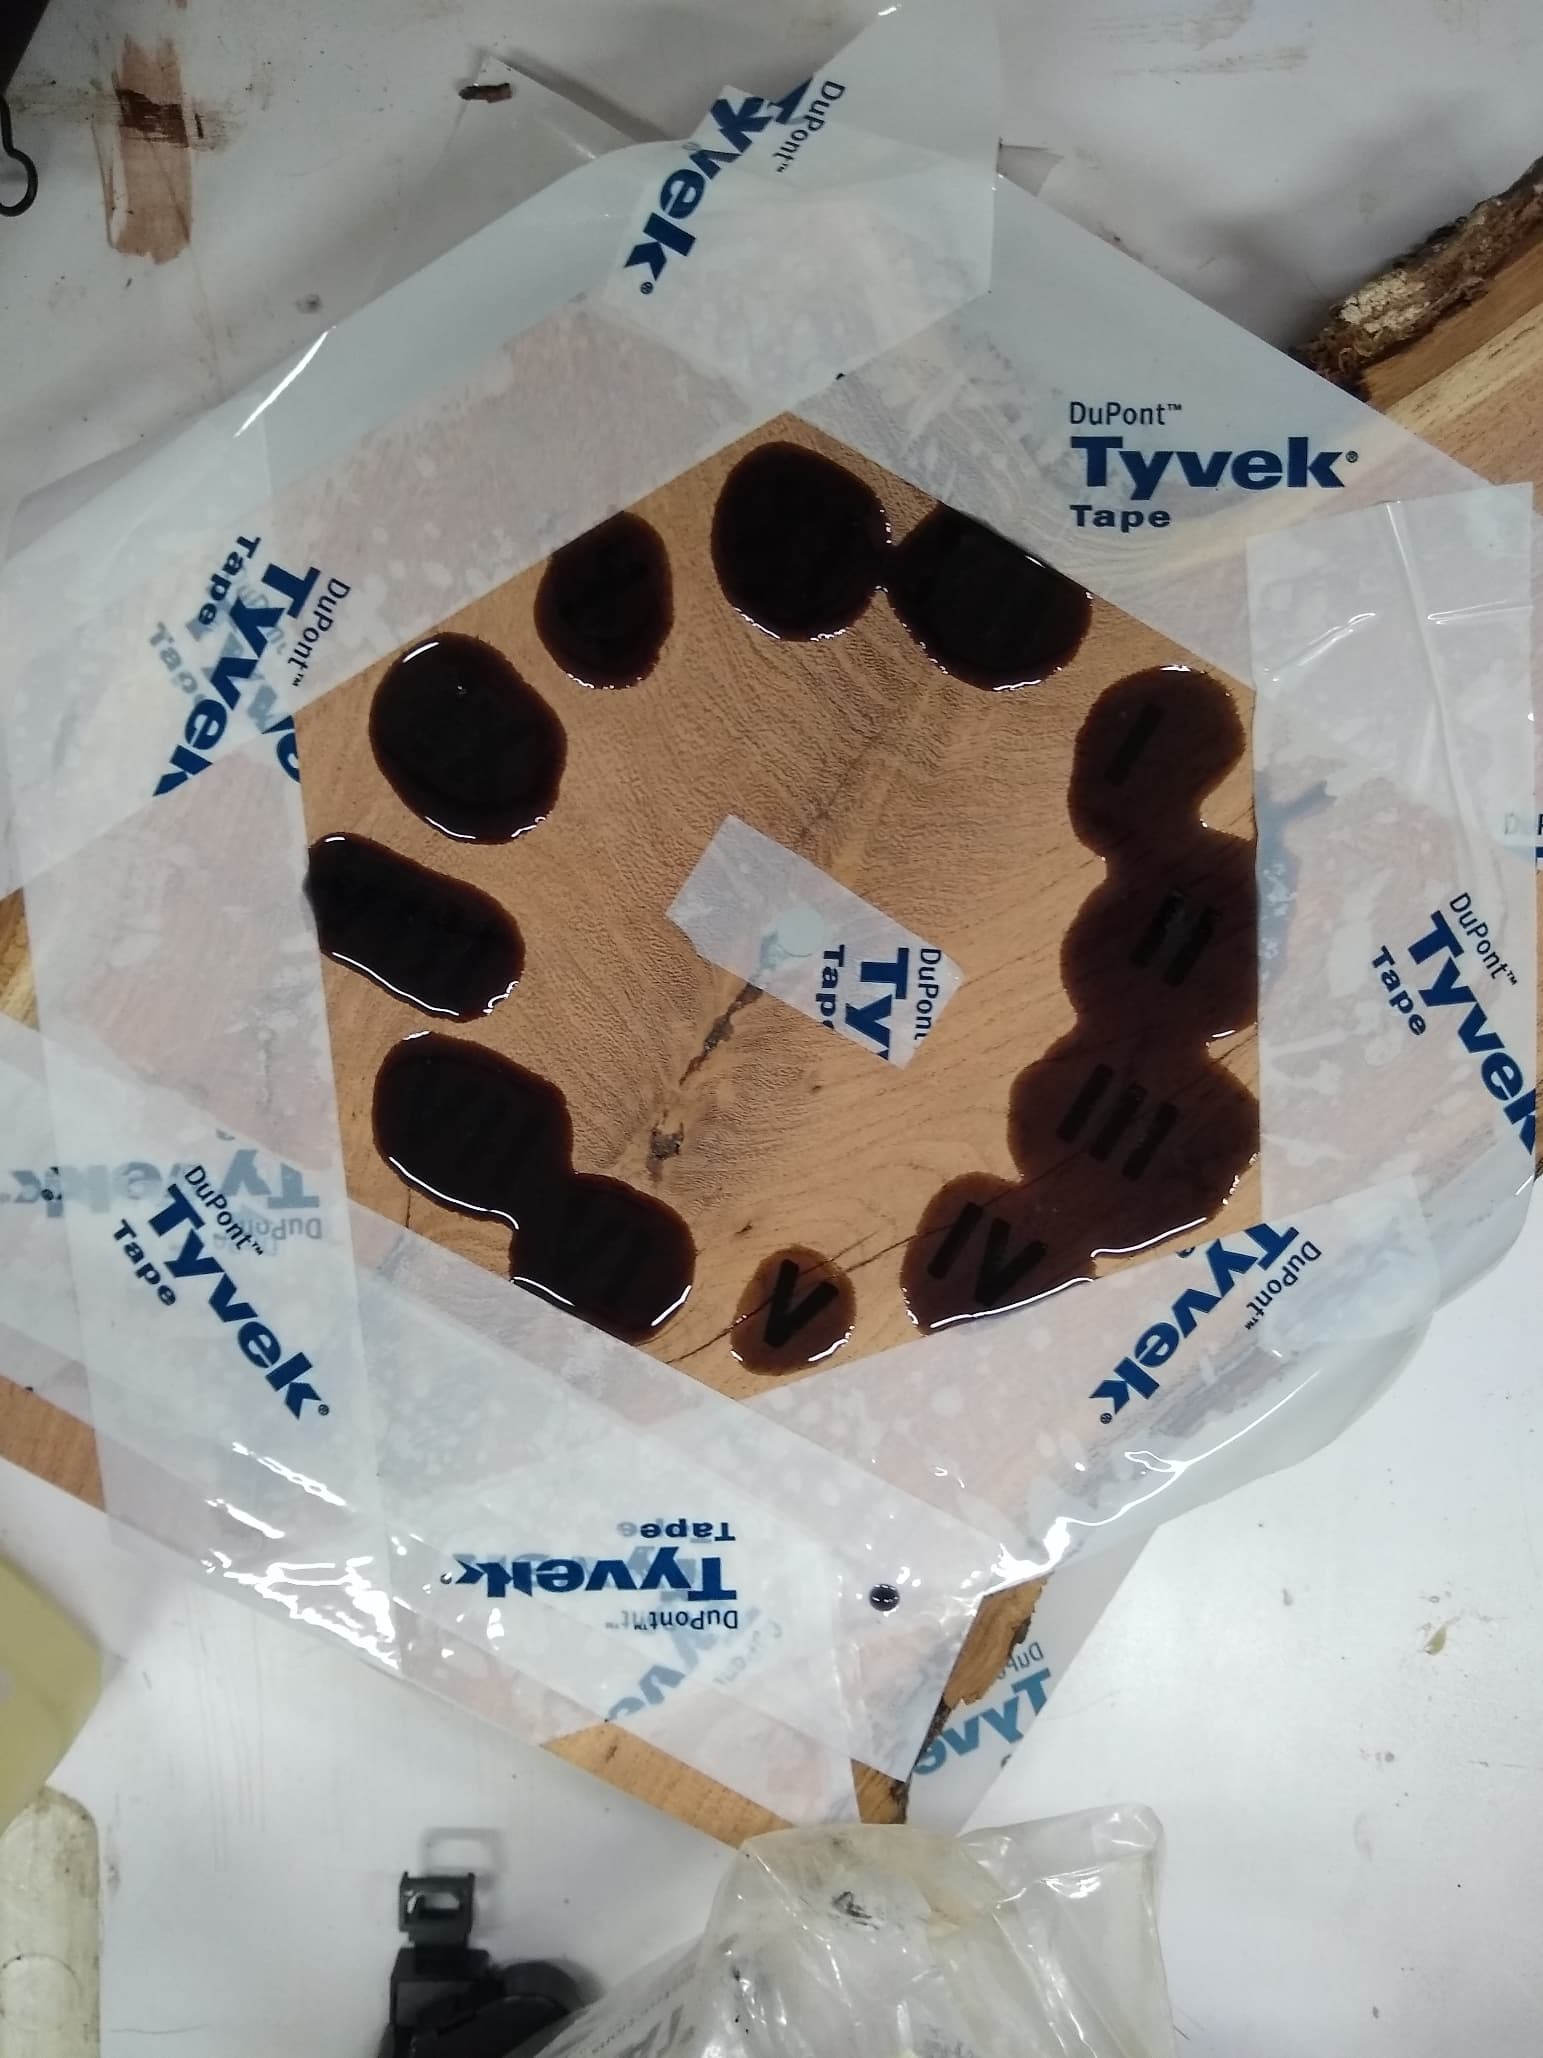
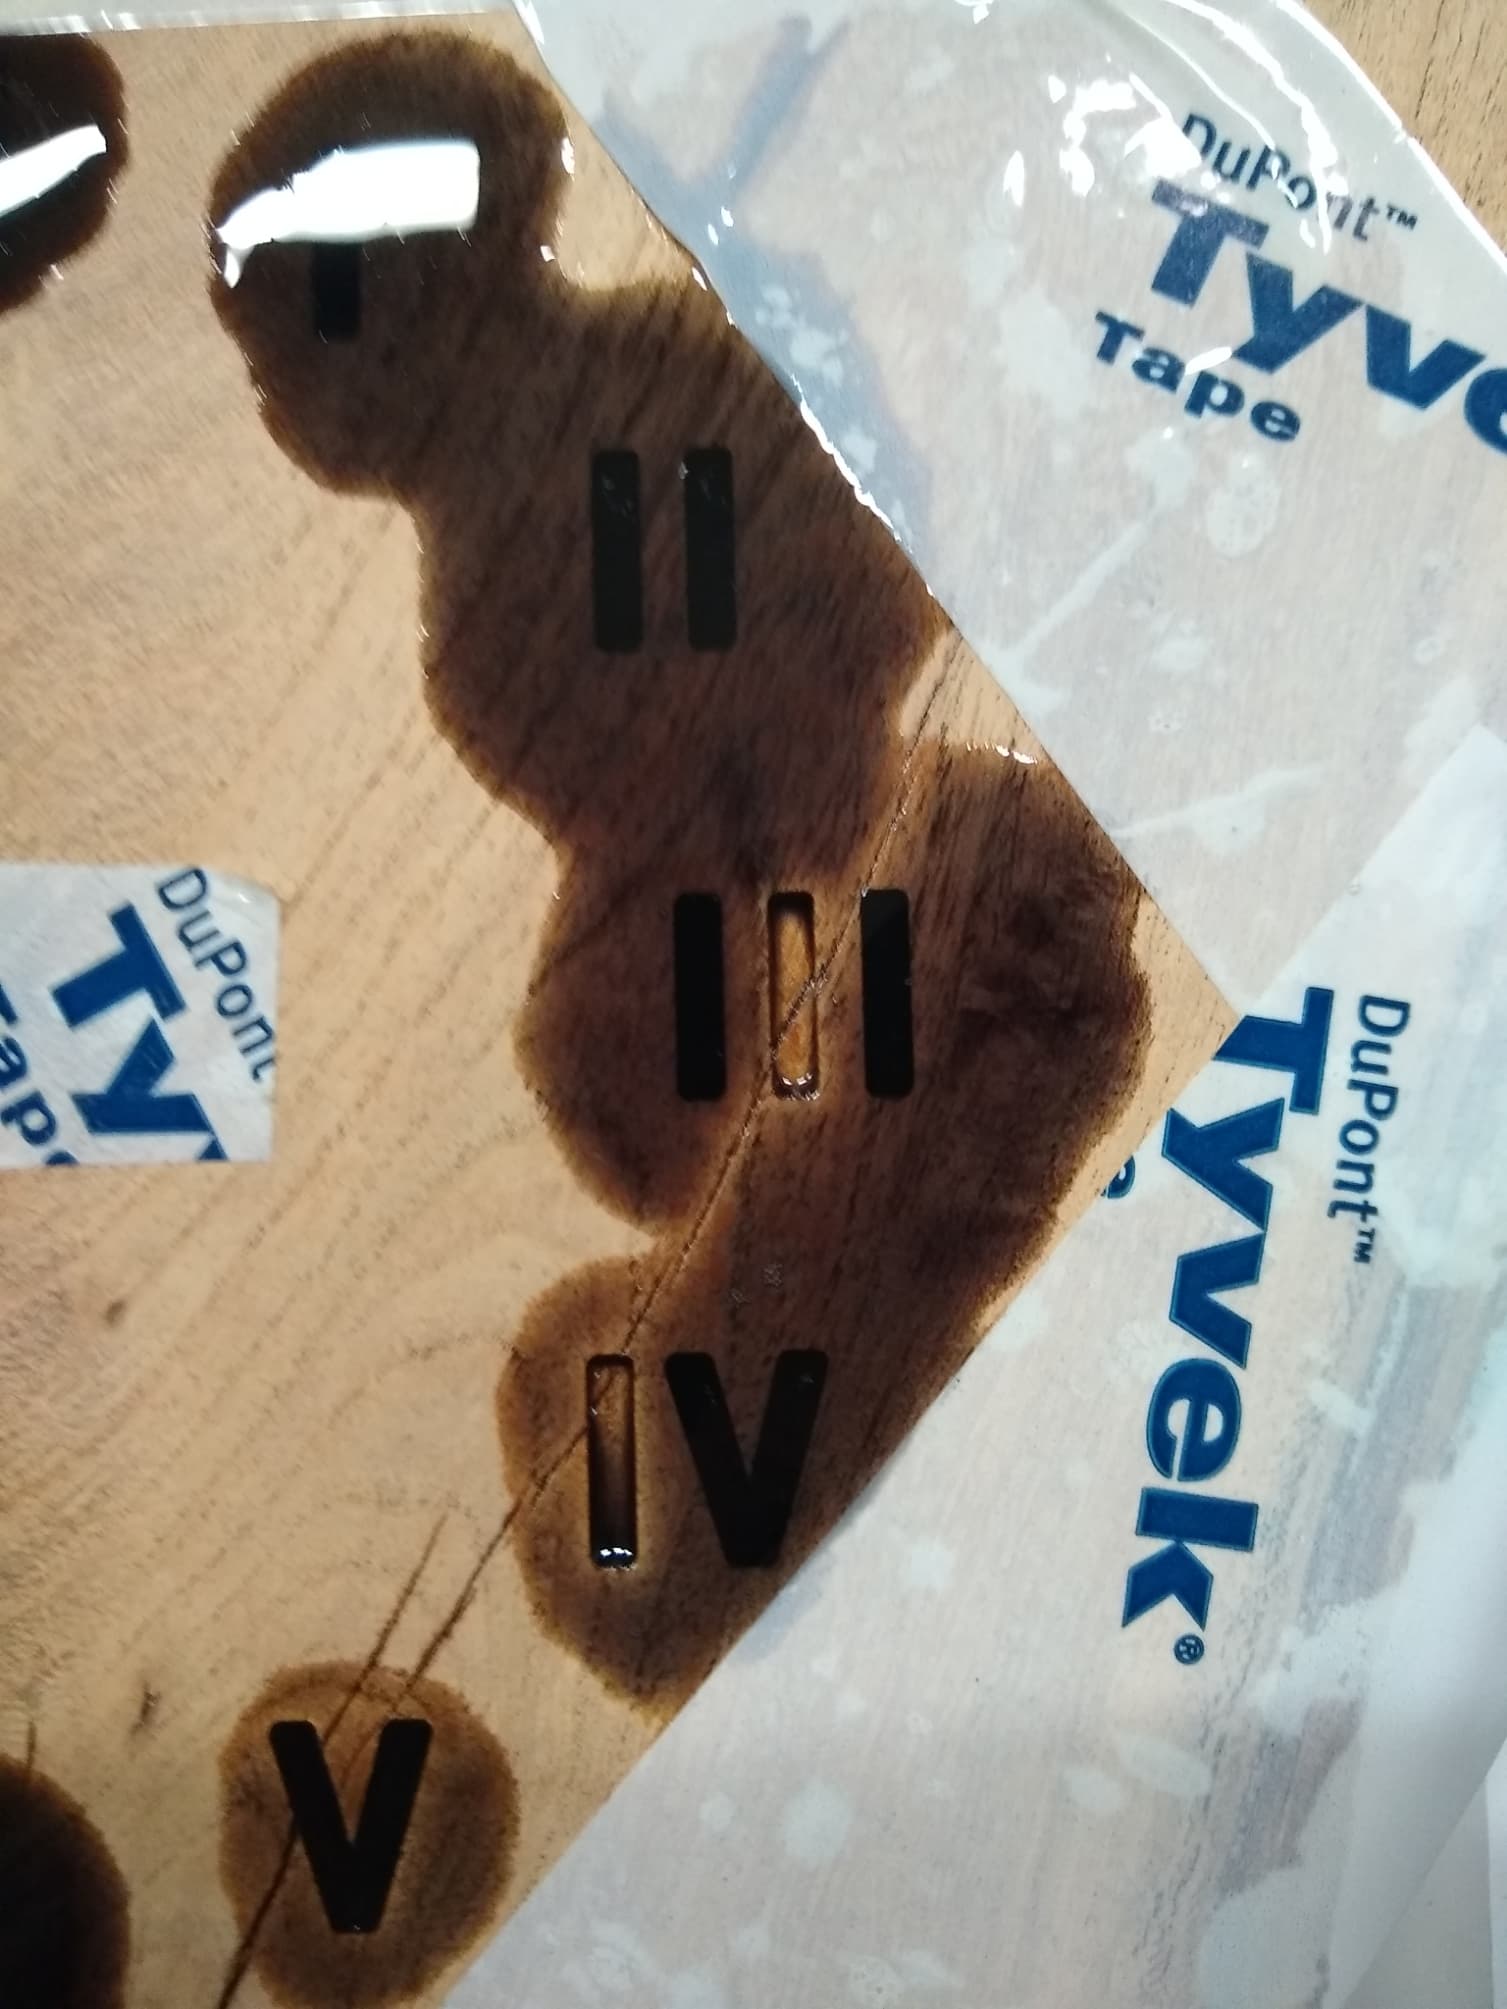
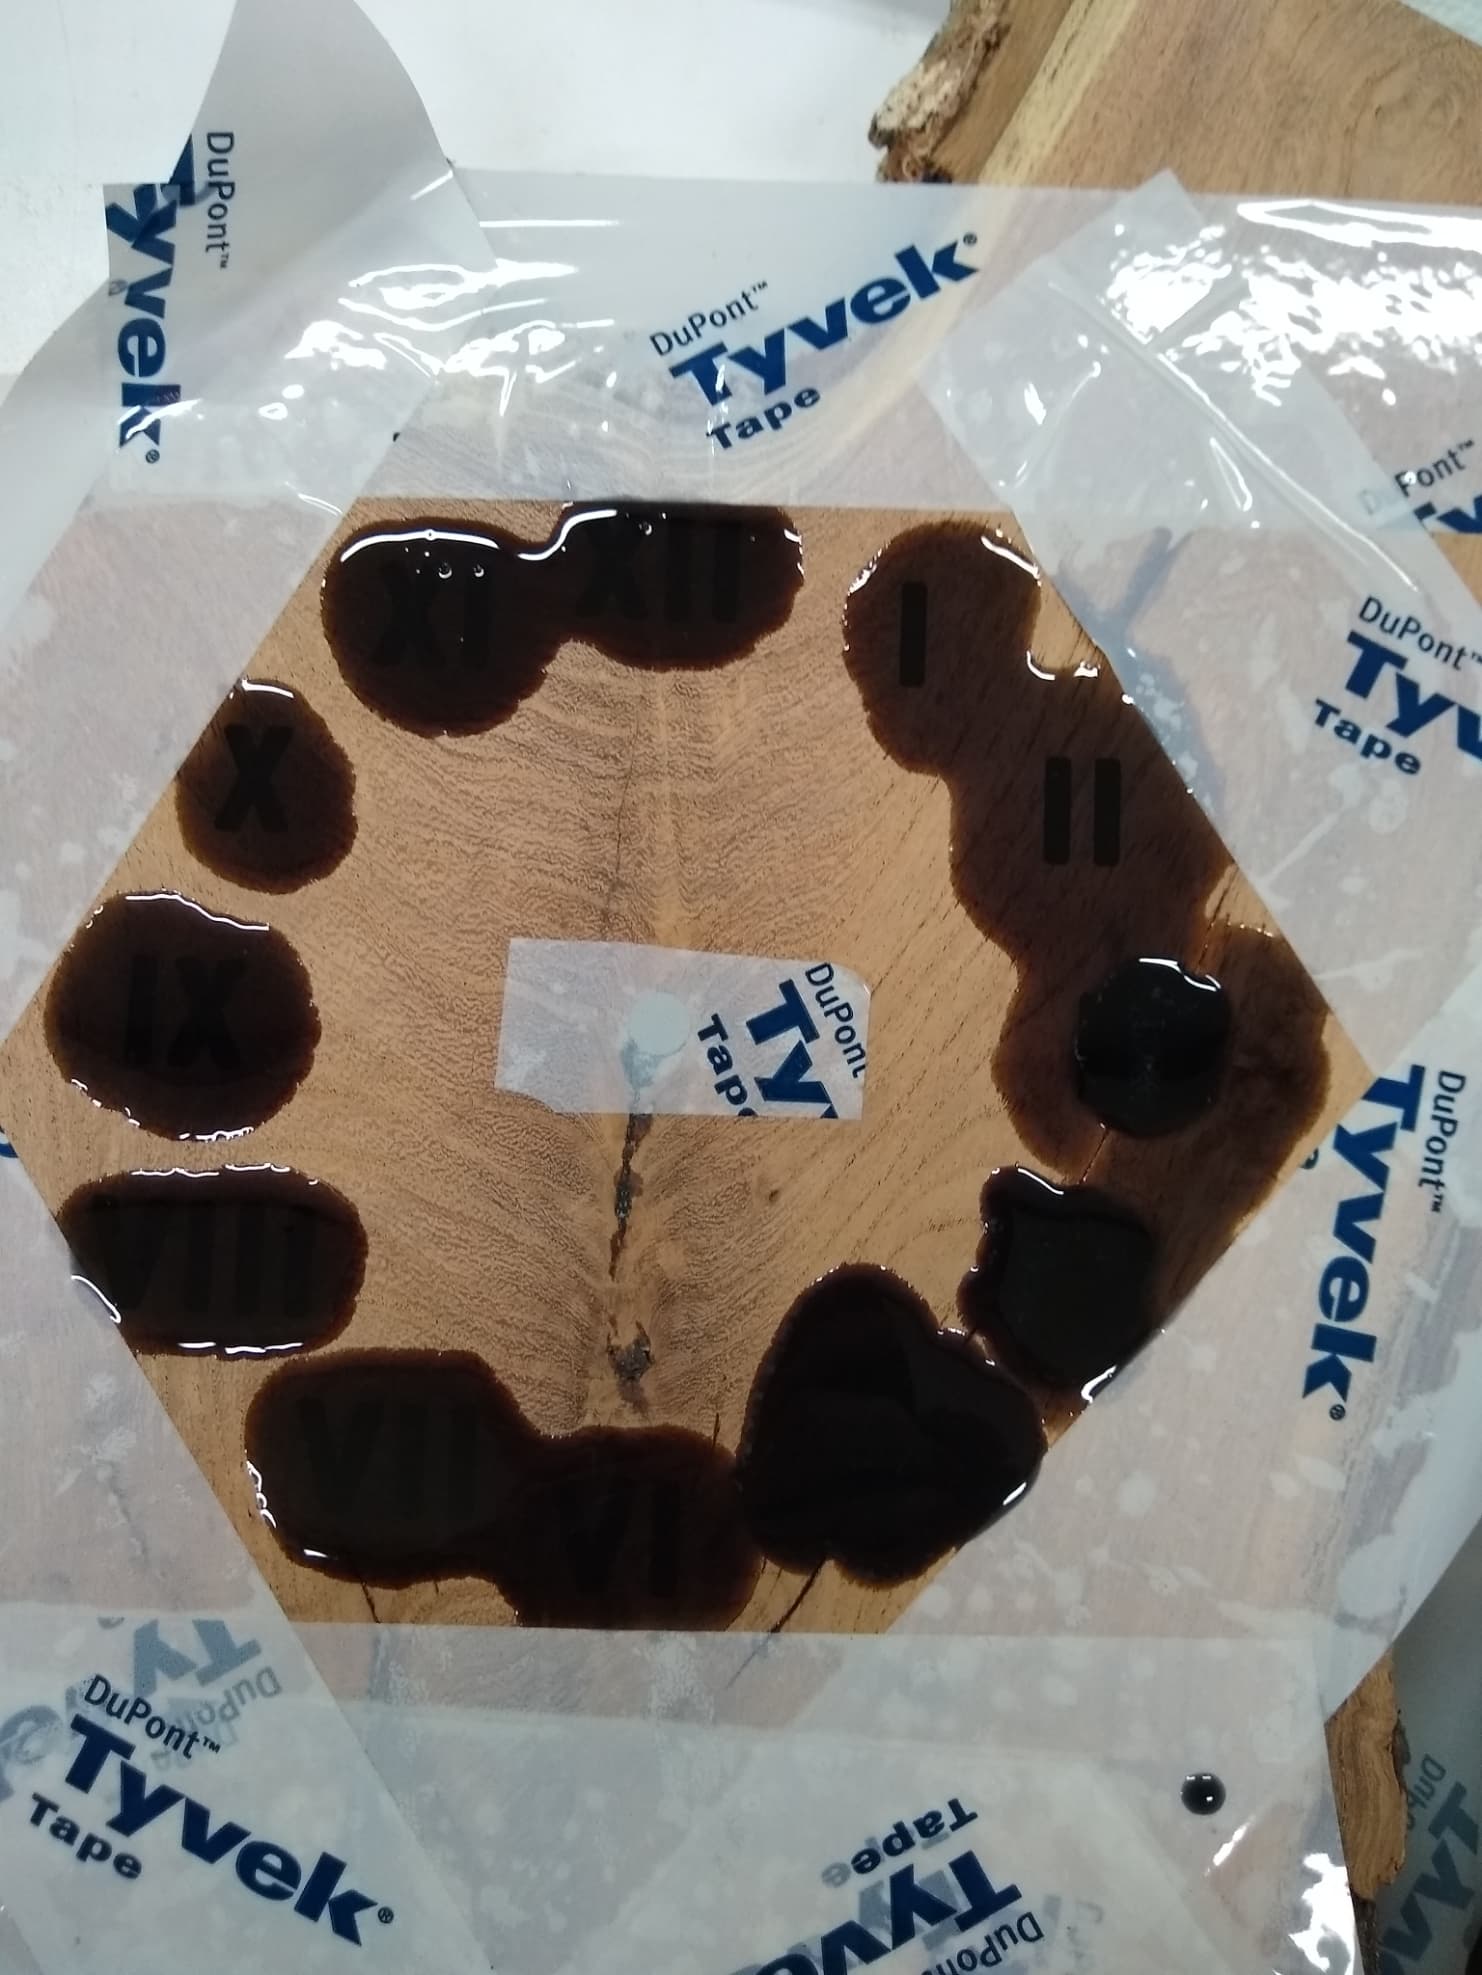
I put Roman Numerals on the face. I will likely fill them with epoxy tomorrow or maybe paint them. I am leaning toward filling them because I will pour table top epoxy over the clock to hopefully keep the bark from falling off. The mesquite bark seems firmly attached but once it gets in an air conditioned house it might start falling off. For clocks there is a debate about Roman Numerals. The debate is should the 4 be IV or IIII. The four I’s were a little too much. Very old clocks have the 4 L’s where more modern clocks have the IV.
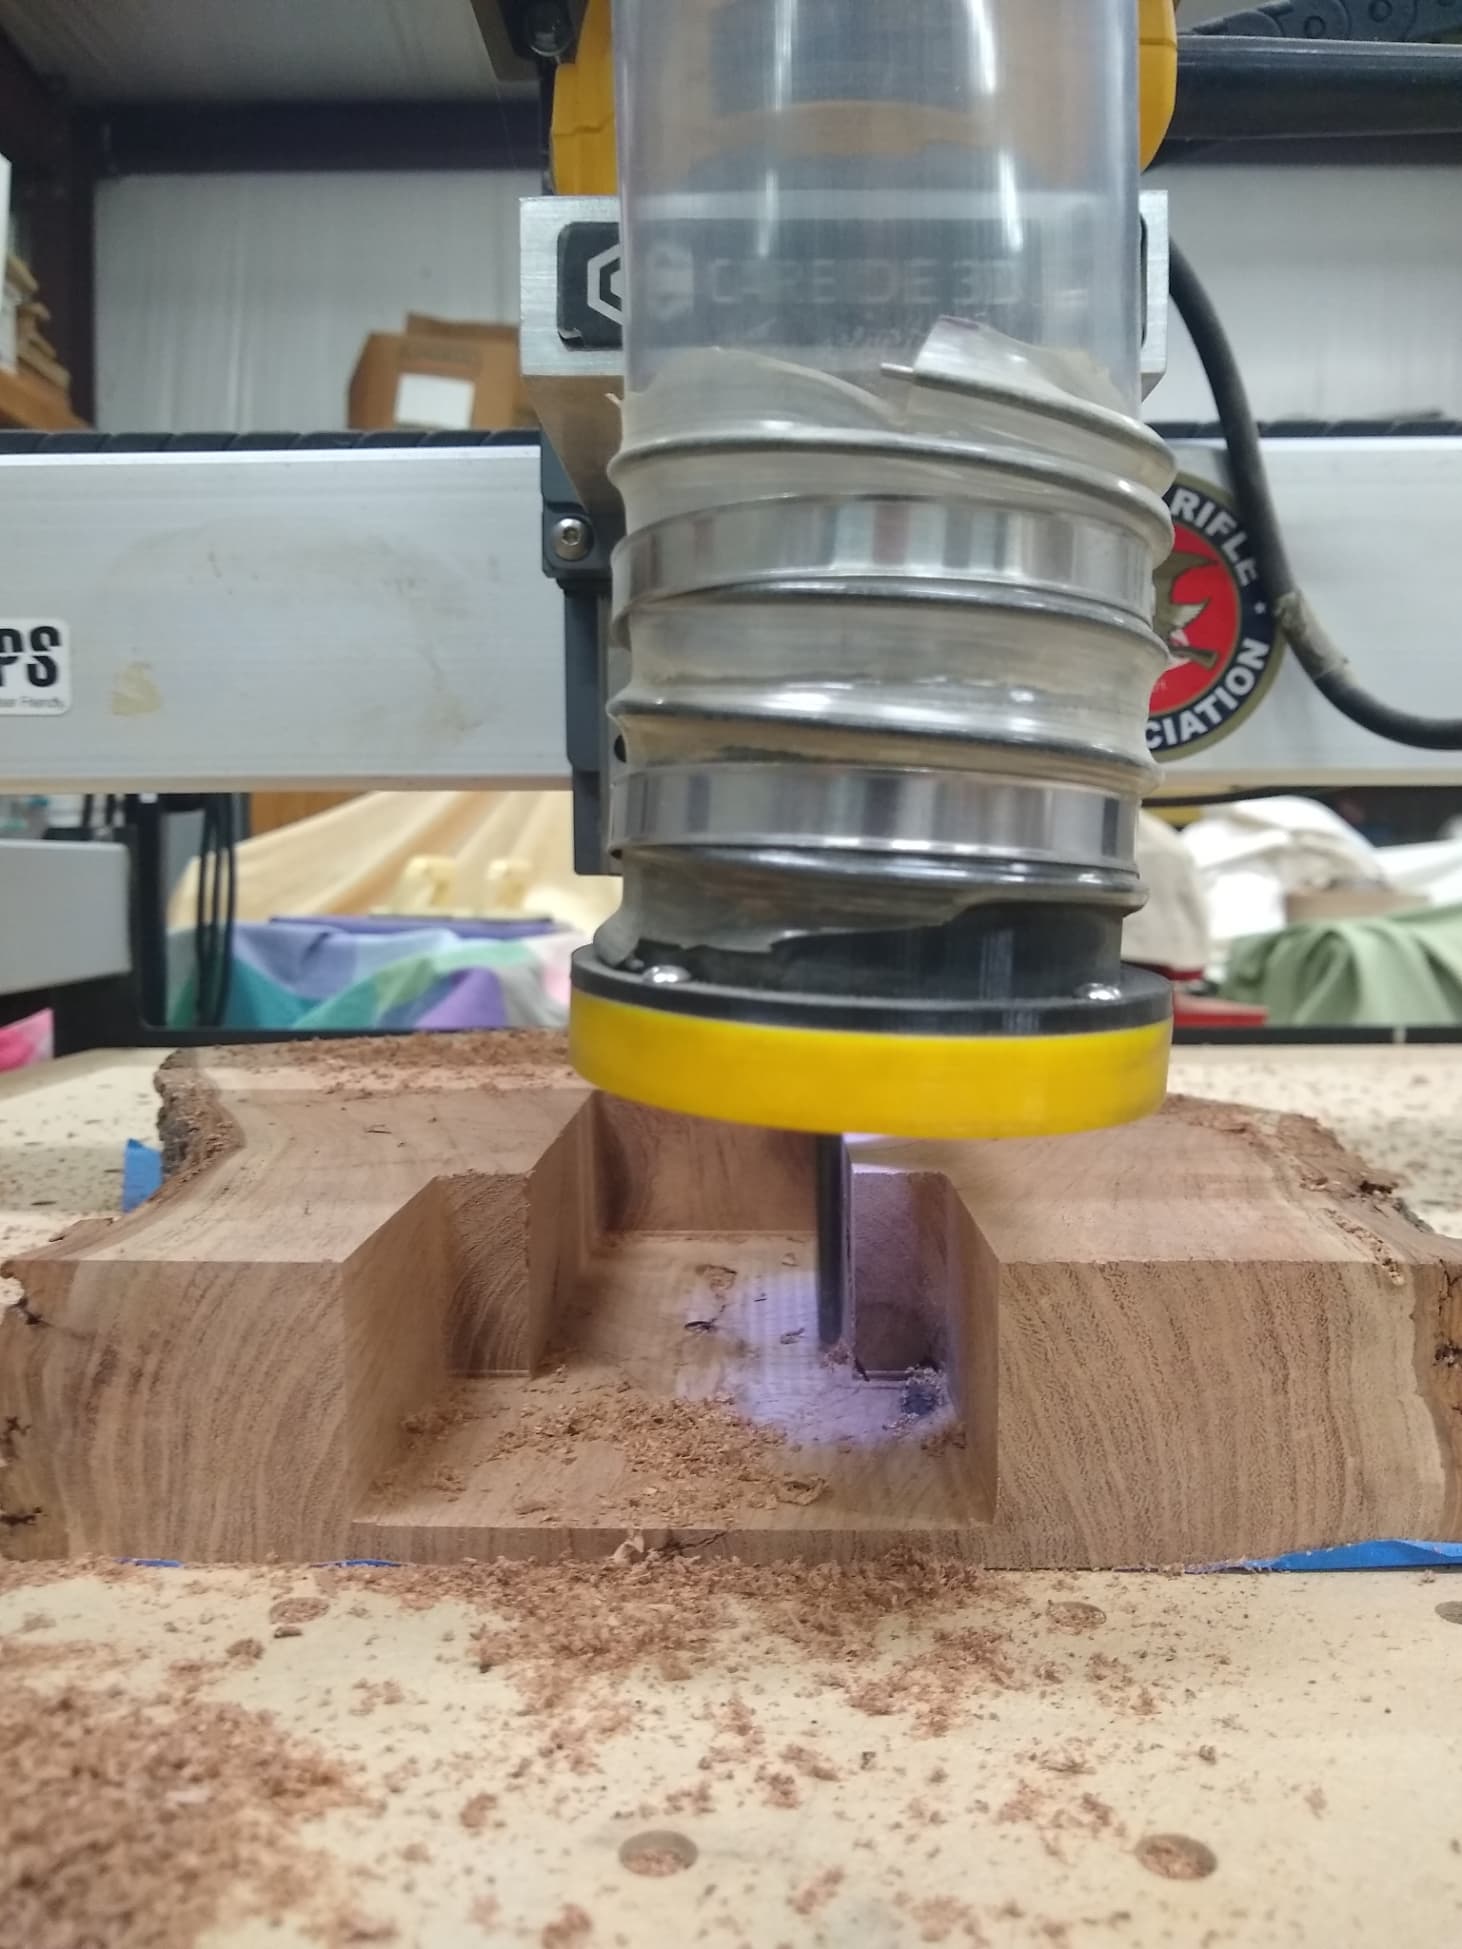
I carved out the back pocket first and had the piece held down with painters tape and super glue. I had a big L bracket in place to reference the edge of the piece. After milling out the pocket for the clock body I marked the L bracket with the two edges of the pocket to aid in lining up the project. Since I just flipped it the center was still in the Shapeoko memory and I was able to reapply the painters tape, super glue and then use the witness marks to line the project back up. The rest of the story to follow.
I told CC the bit was a #201 upcut bit. But that bit is way too short to cut 1.458" deep. I have a Melin bit that has a 1.5" cut length. It is also an upcut so I just used that. You can see the bit sticks way out so when I insert it I push it all the way up and then back down about a 1/4". The Melin bit has been used on many projects and cuts very well if you need a deep cut.
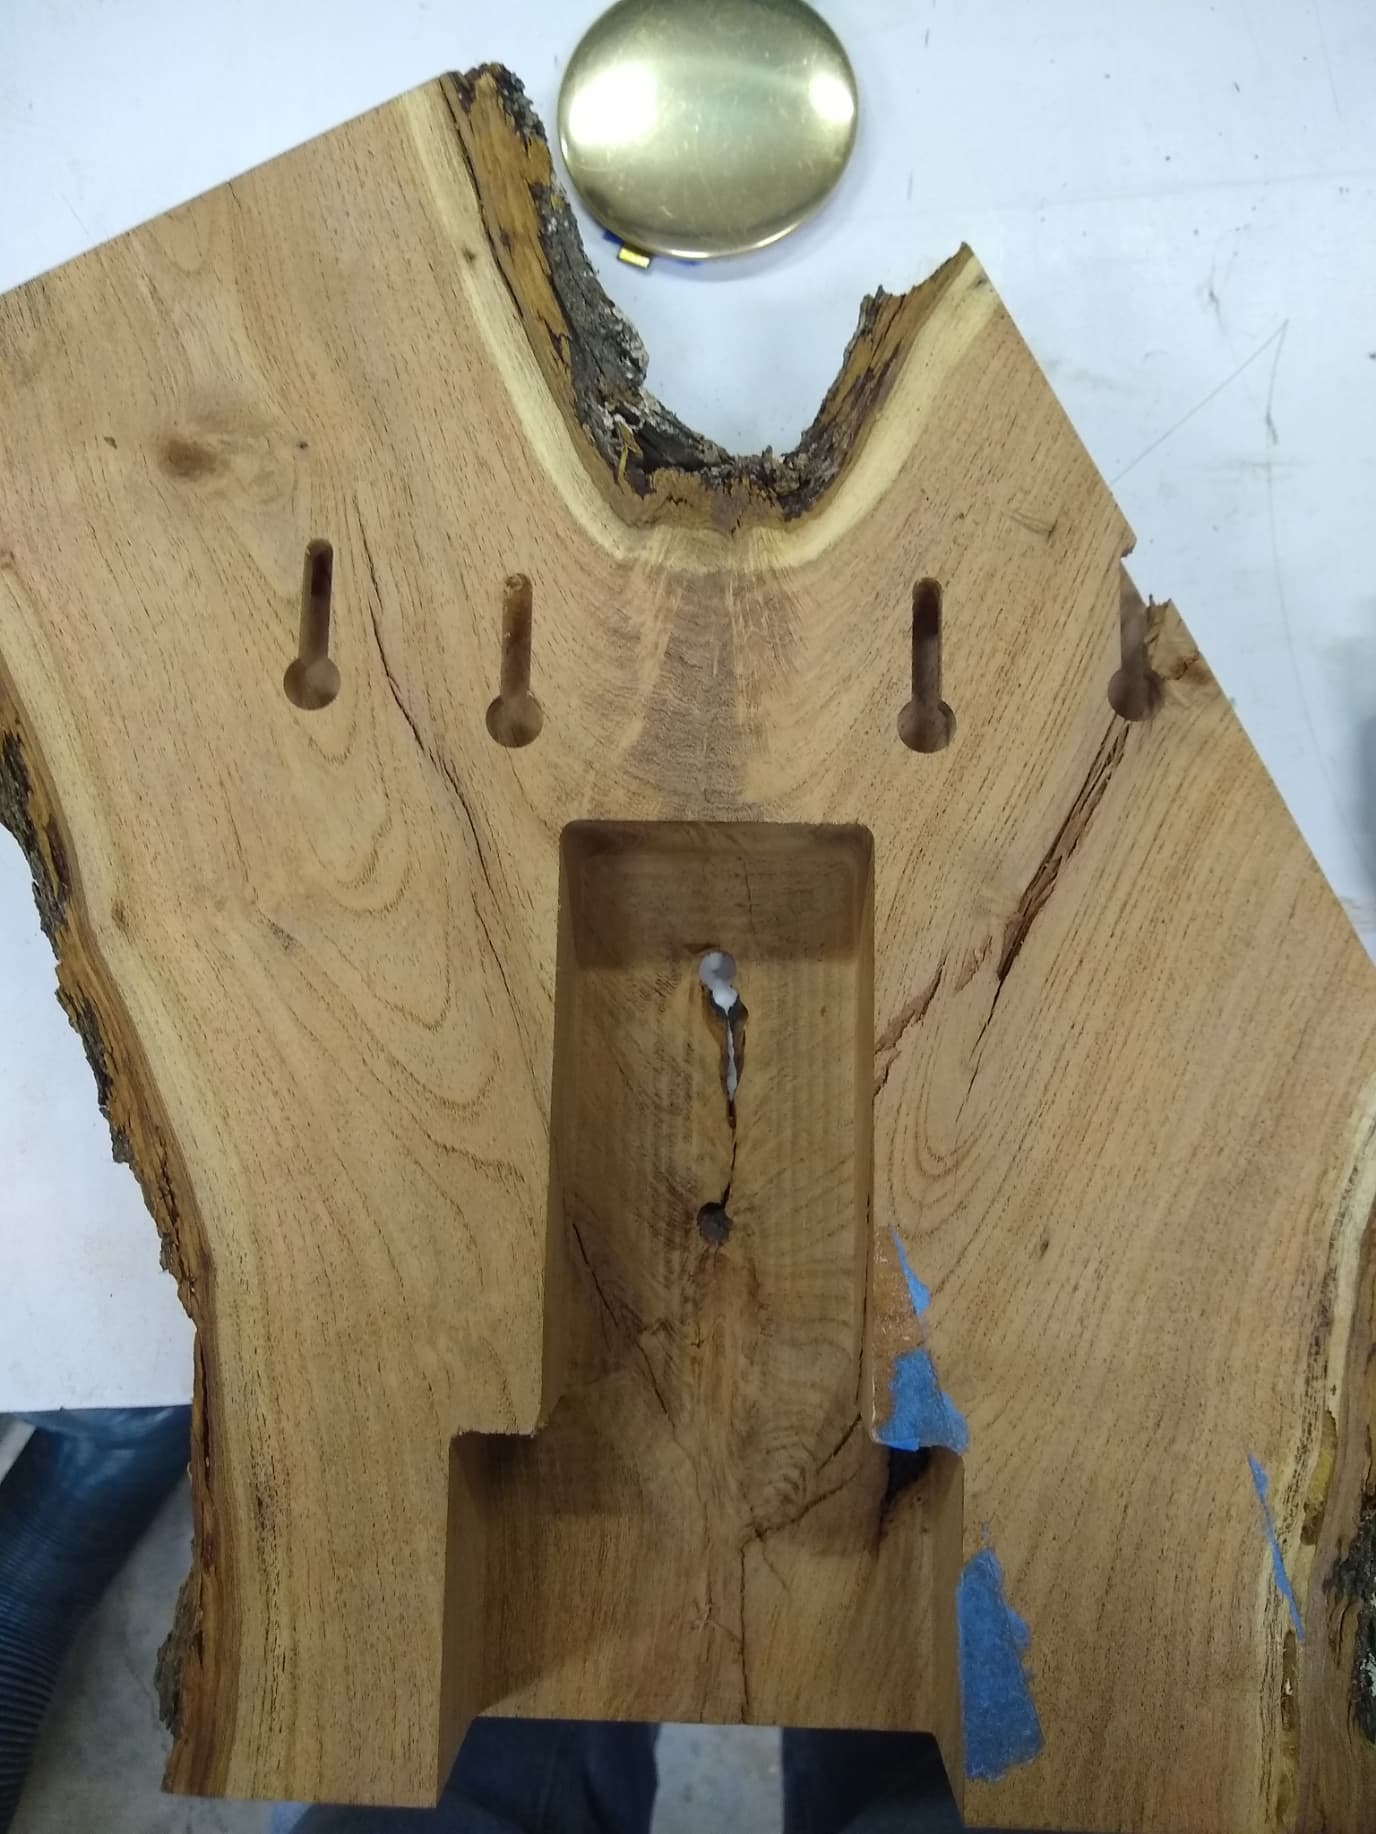
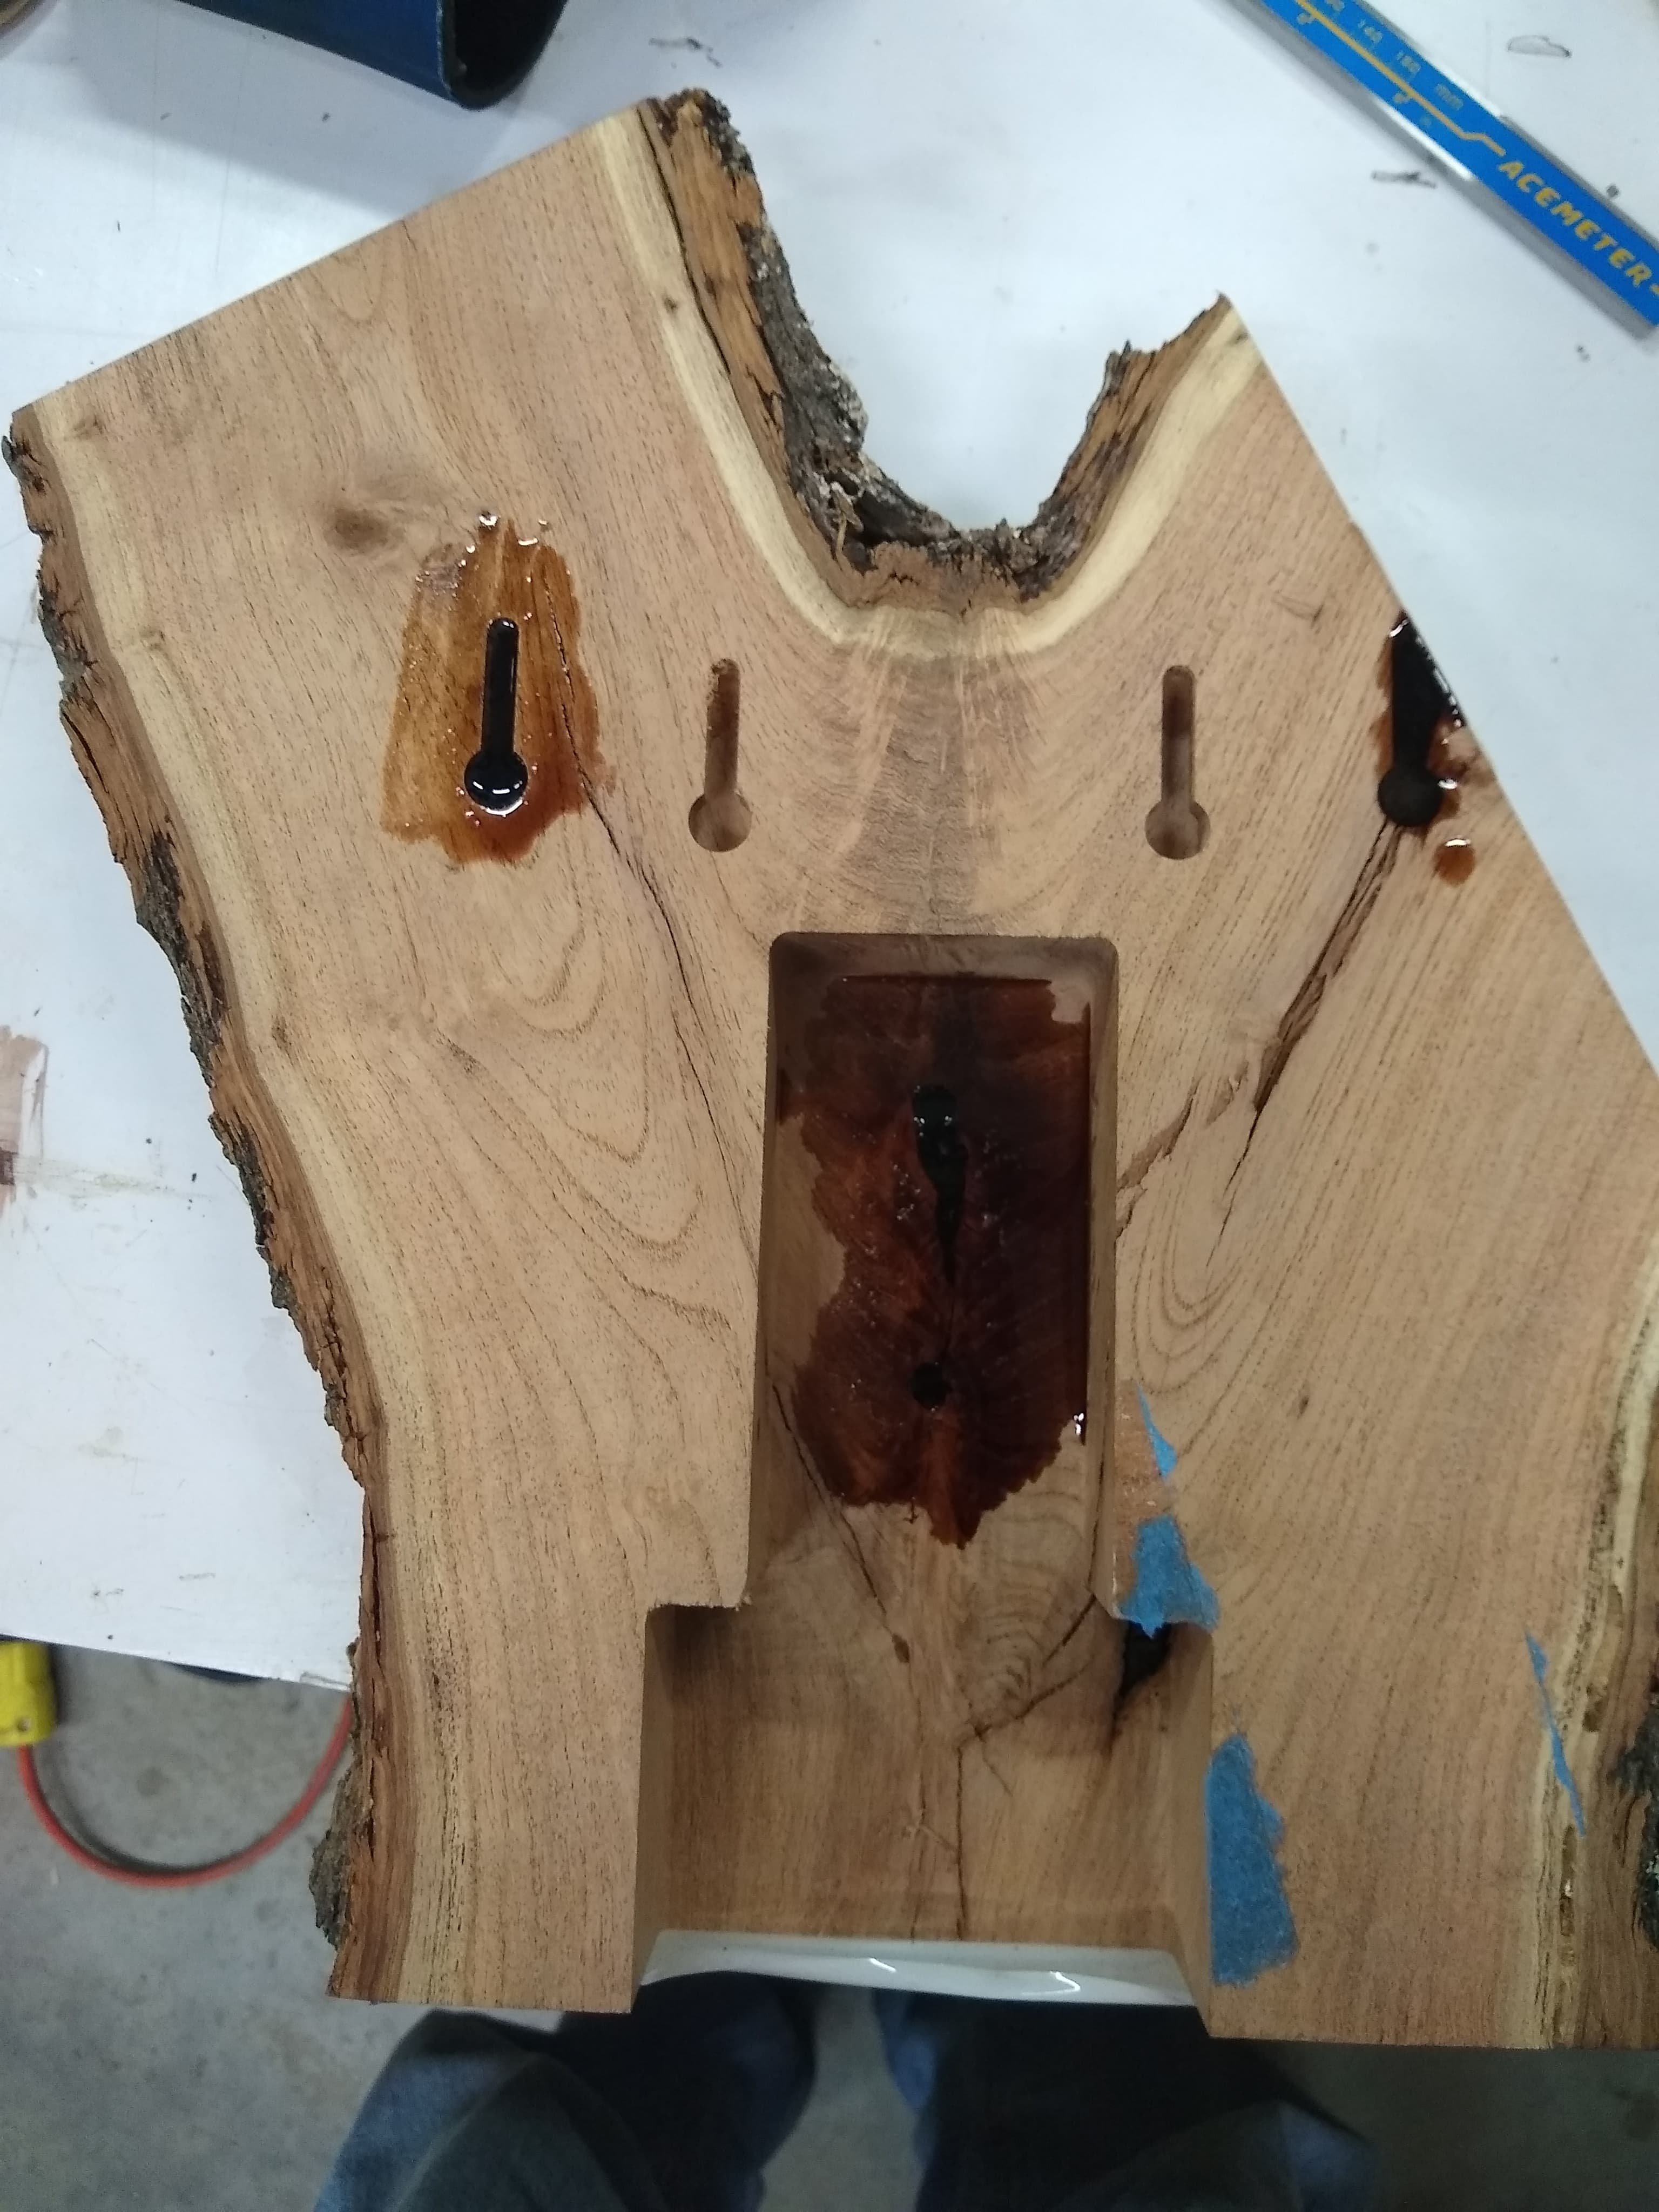
Here is the battery operated pendulum clock. The pocket at the bottom was made wide enough to allow a full swing of the pendulum and the spot where the clock is is made so the clock body fits tight in the pocket to keep it from turning during time adjustments.
I had one flub. After machining out the back I made a tool path for some key holes. I spaced them 6" apart. Unfortunately I did not take in to account that the crotch piece was not square or regular so one of the key holes came out the side of the clock. I will fix it tomorrow with some epoxy. I redid the tool path to make them 3" apart. I wanted two key holes because the piece is irregularly shaped and I did not want it to hang crooked.
After milling the pocket there is a bark inclusion inside that was not apparent from the outside. So I will put some tyvek tape on the inside and fill the thing with epoxy. I will likely fill the numbers at the same time as the defect for speed. The things that happen with wood sometimes.
I remounted the clock to cleanup the pocket. I think I will run the file as is instead of just the bottom. The reason if my remounting is only a few thousands off I could cause loss of steps and mess up the whole project. The things takes 1.5 hours to run. Santa has all the time in the world.
Moving on I had to re pocket and I discovered that the clock cavity was a little short. So I added a rectangle and did a boolean and disabled the original tool path and made a new one. I had already decided to run the whole pocket again in case I was off a little on realignment. The original center zero was carved away so I relied on the witness marks to realign and I was off a couple of thousands.
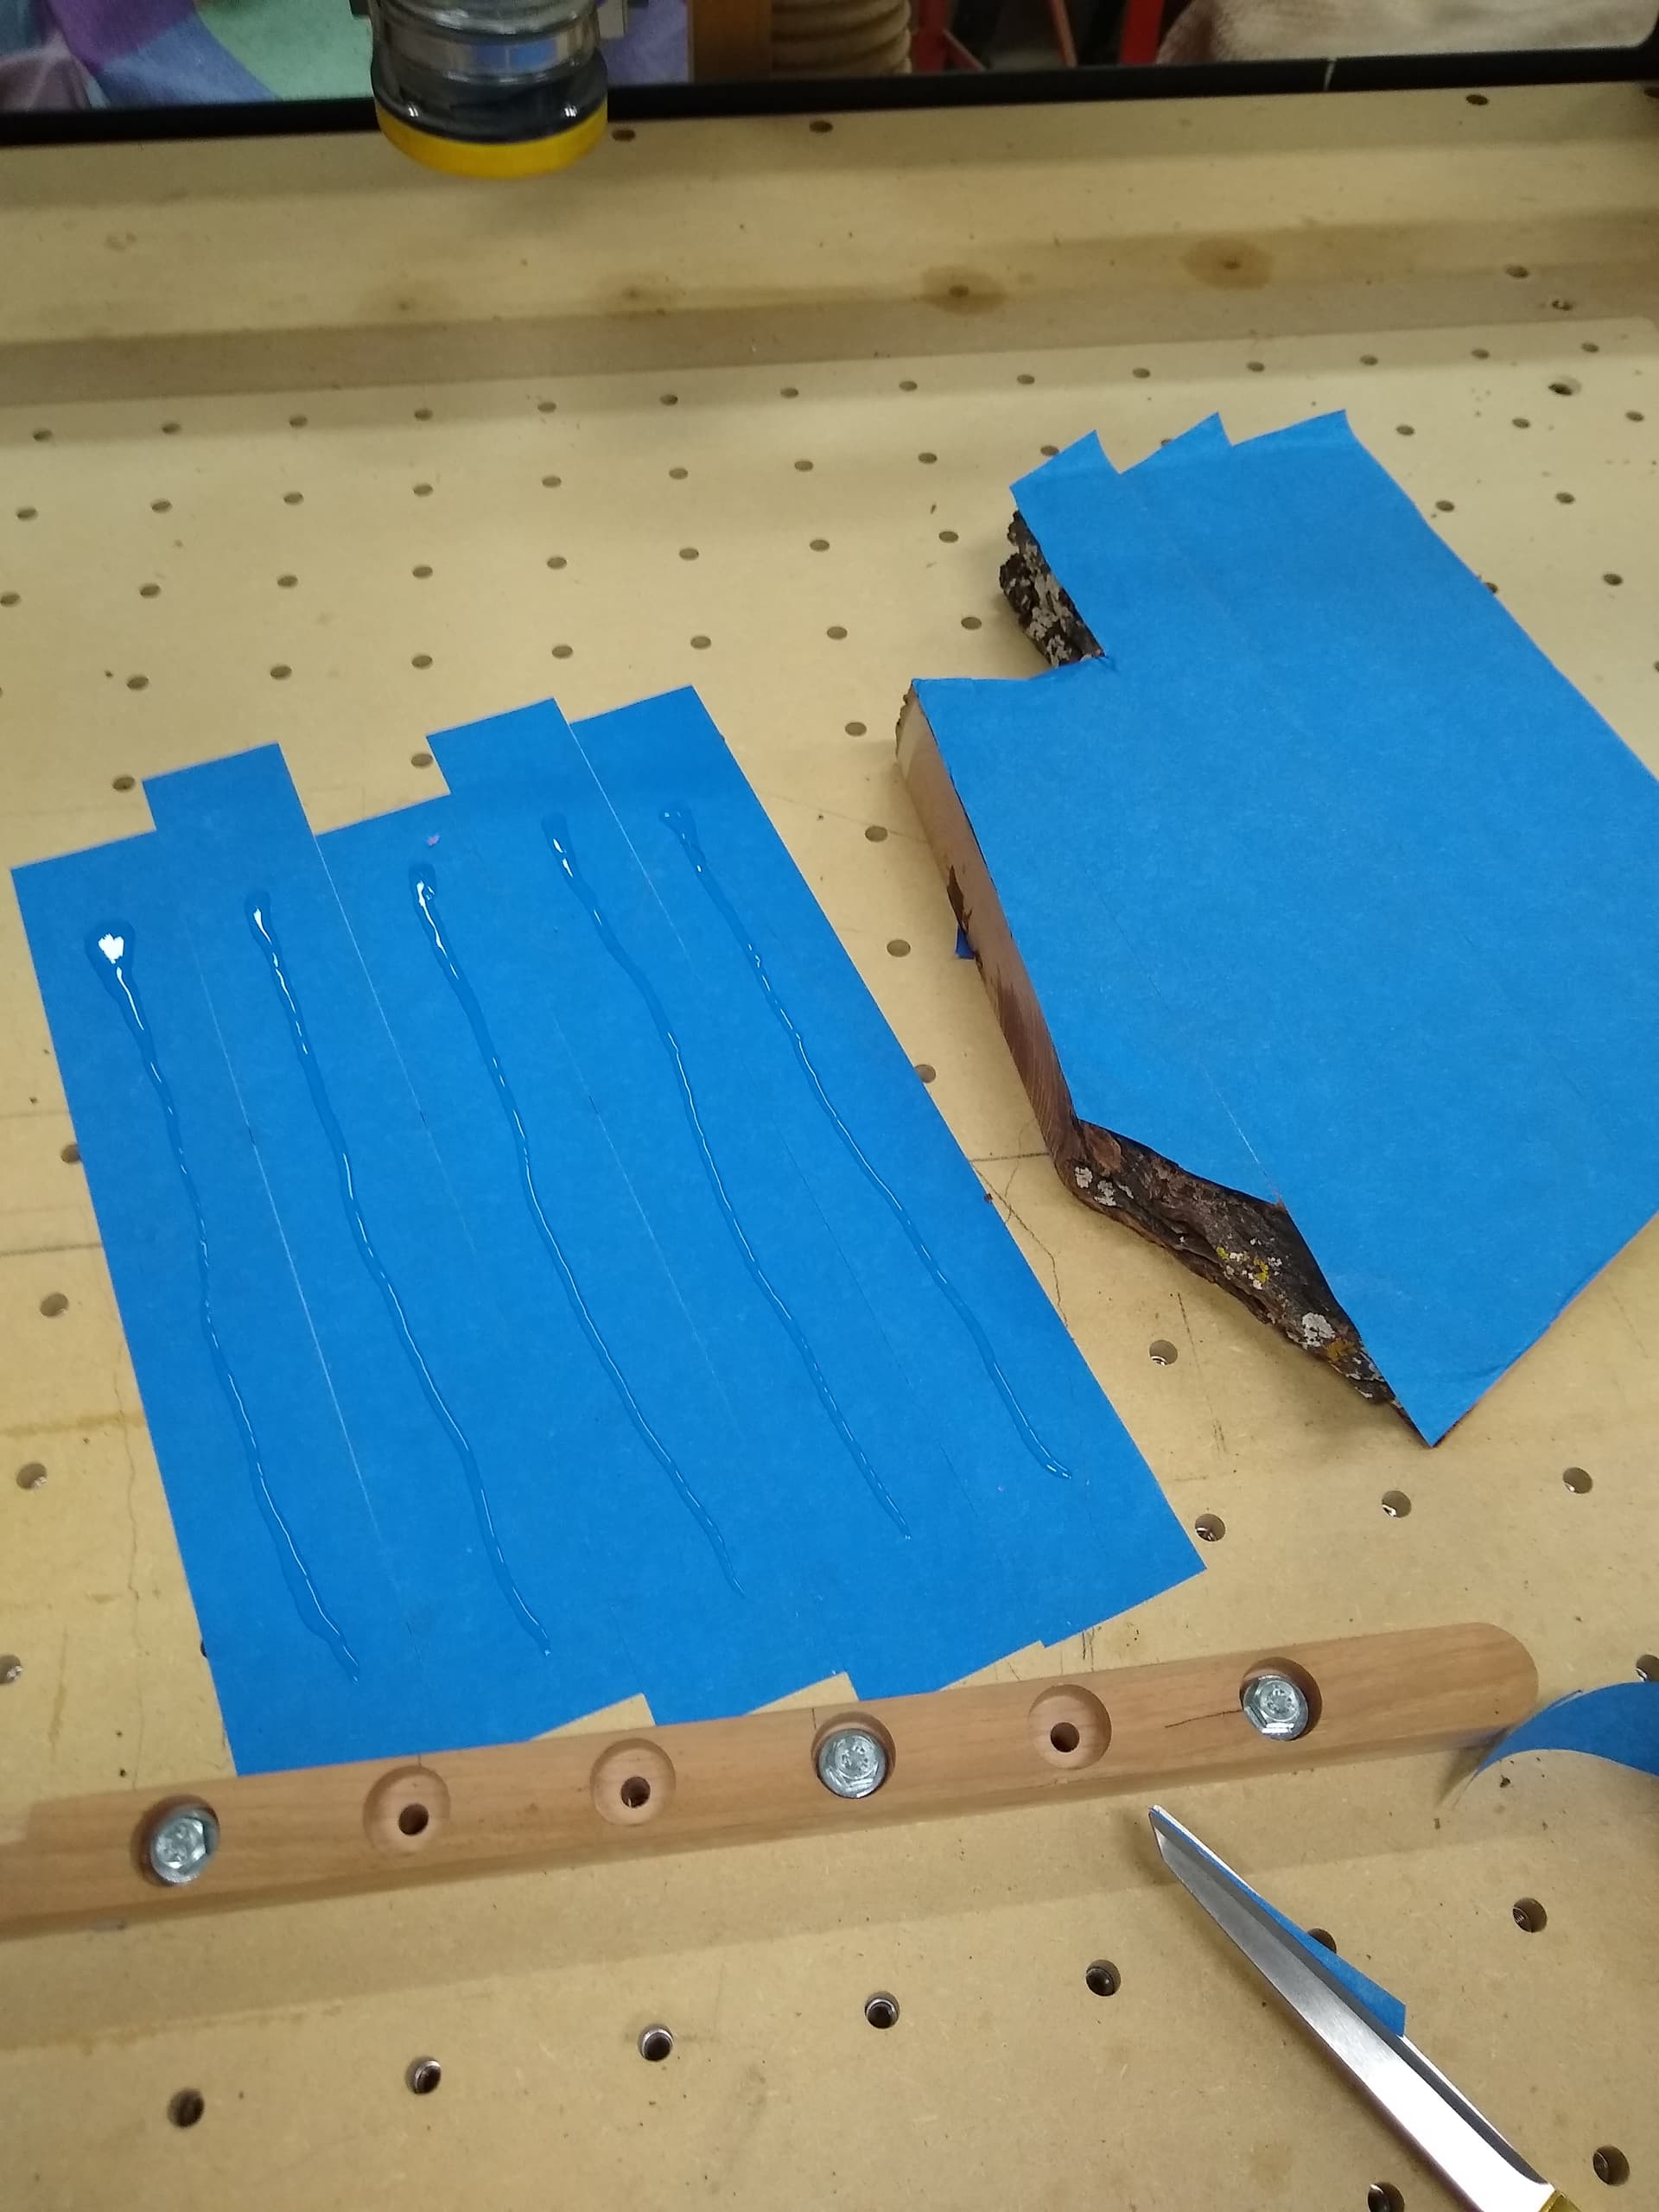
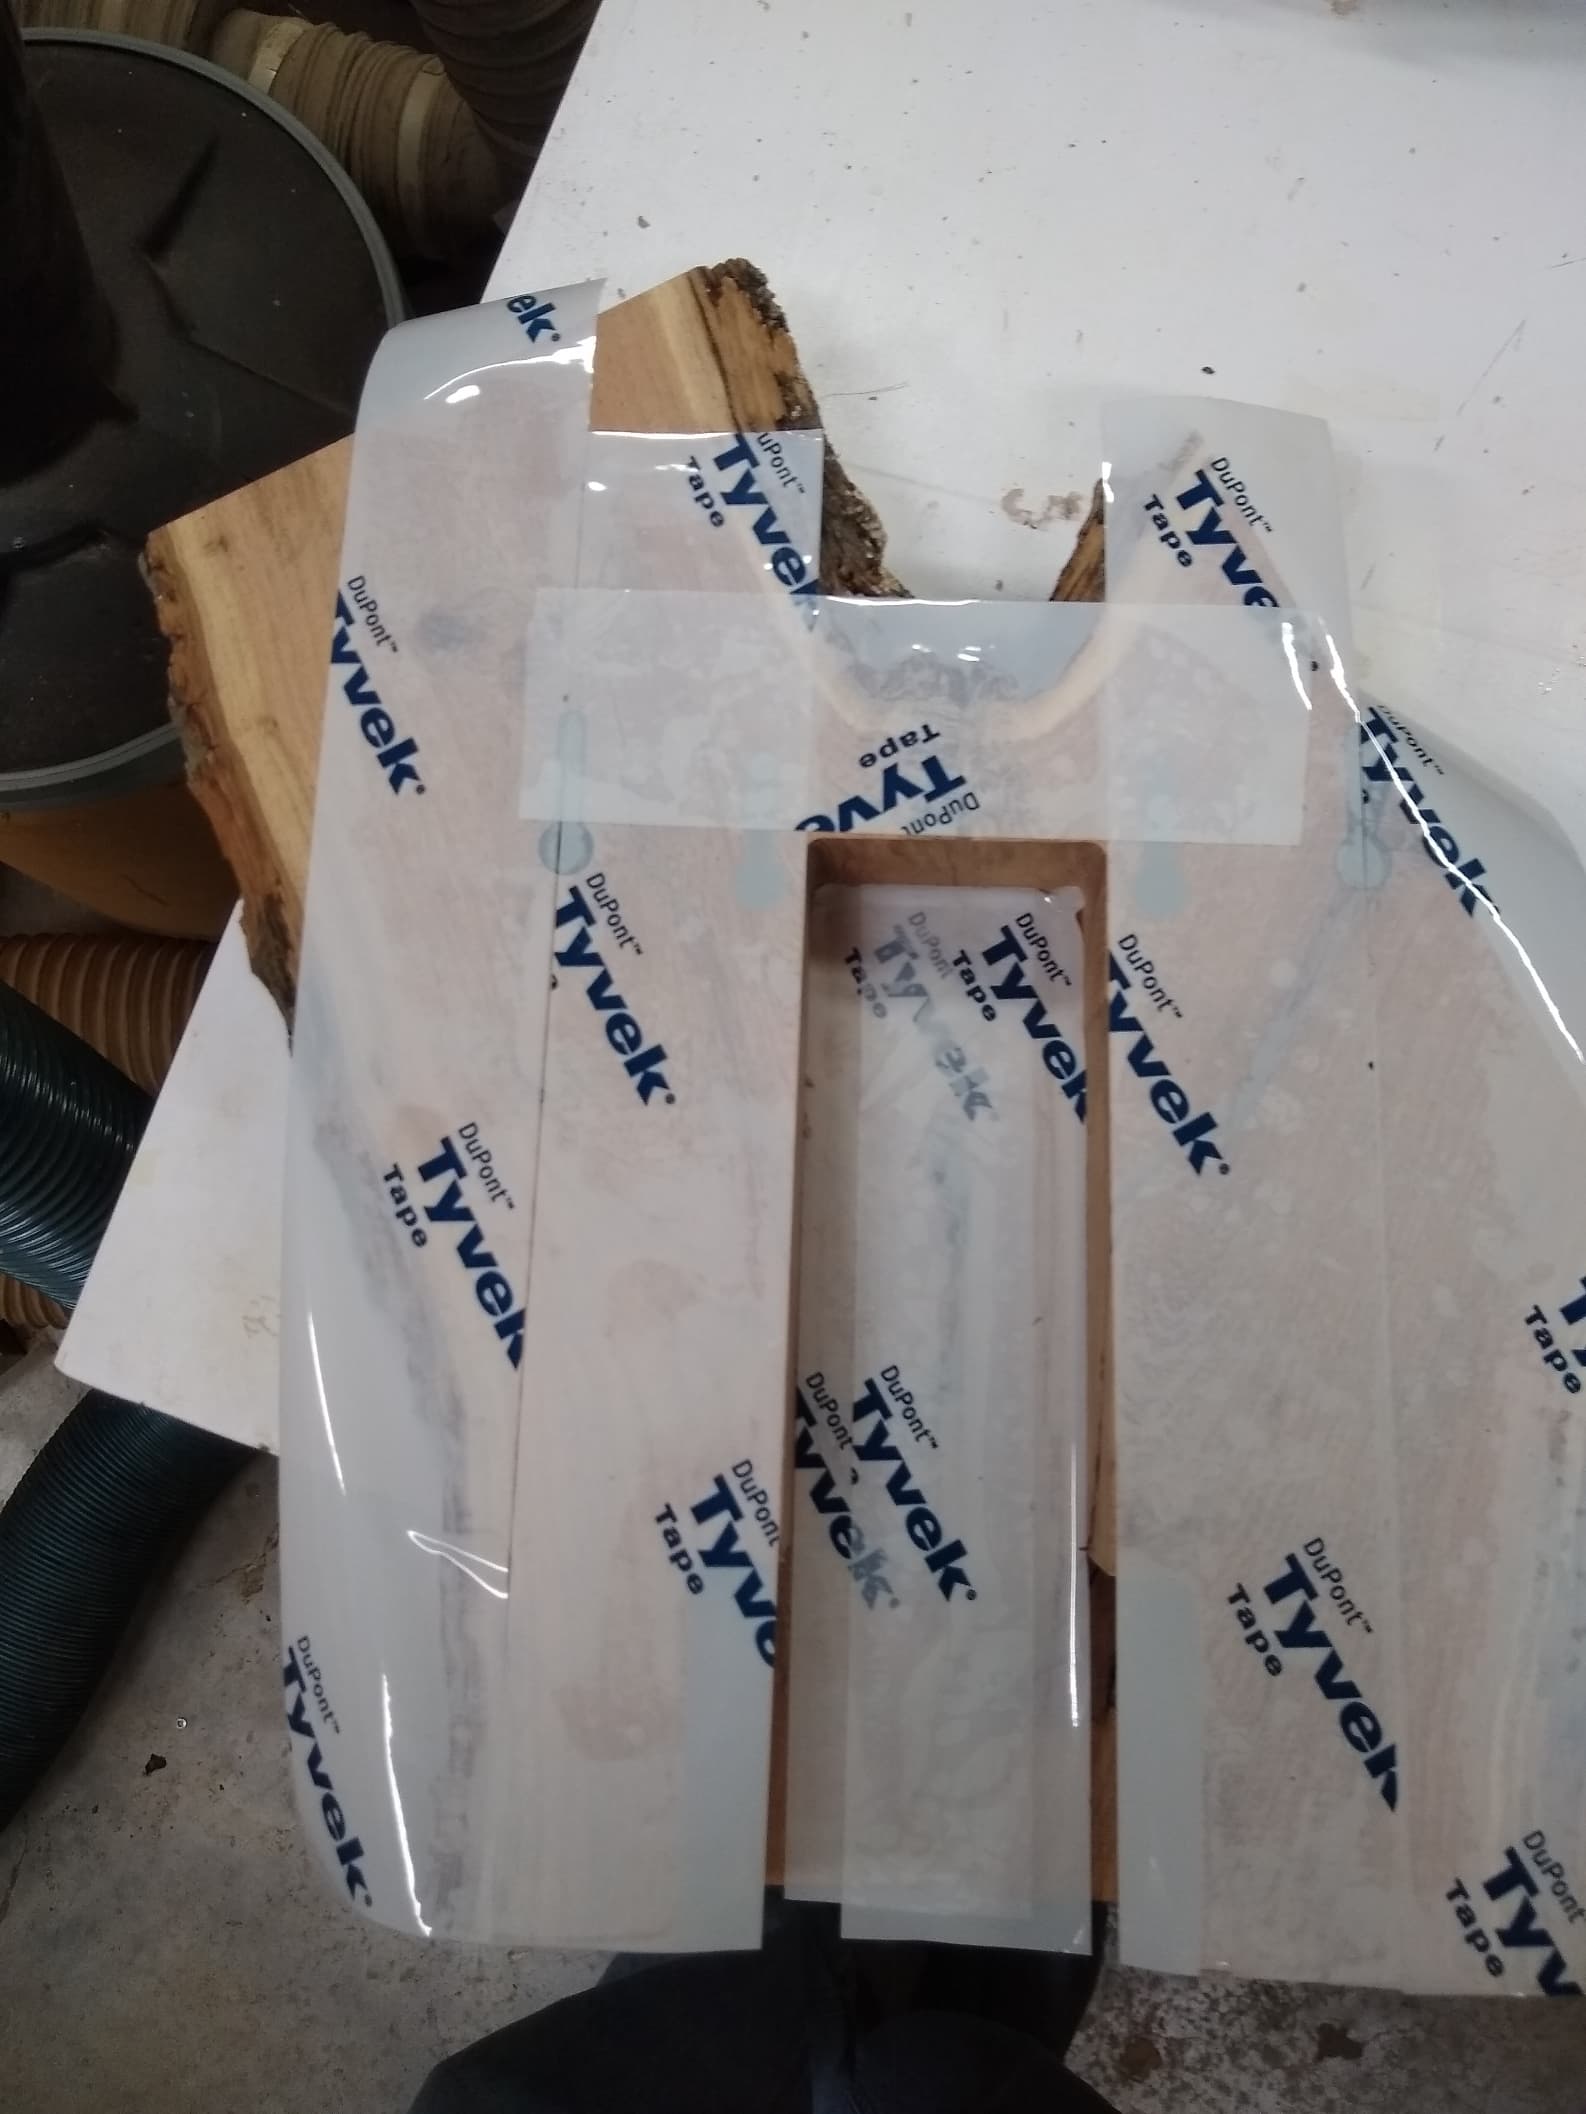
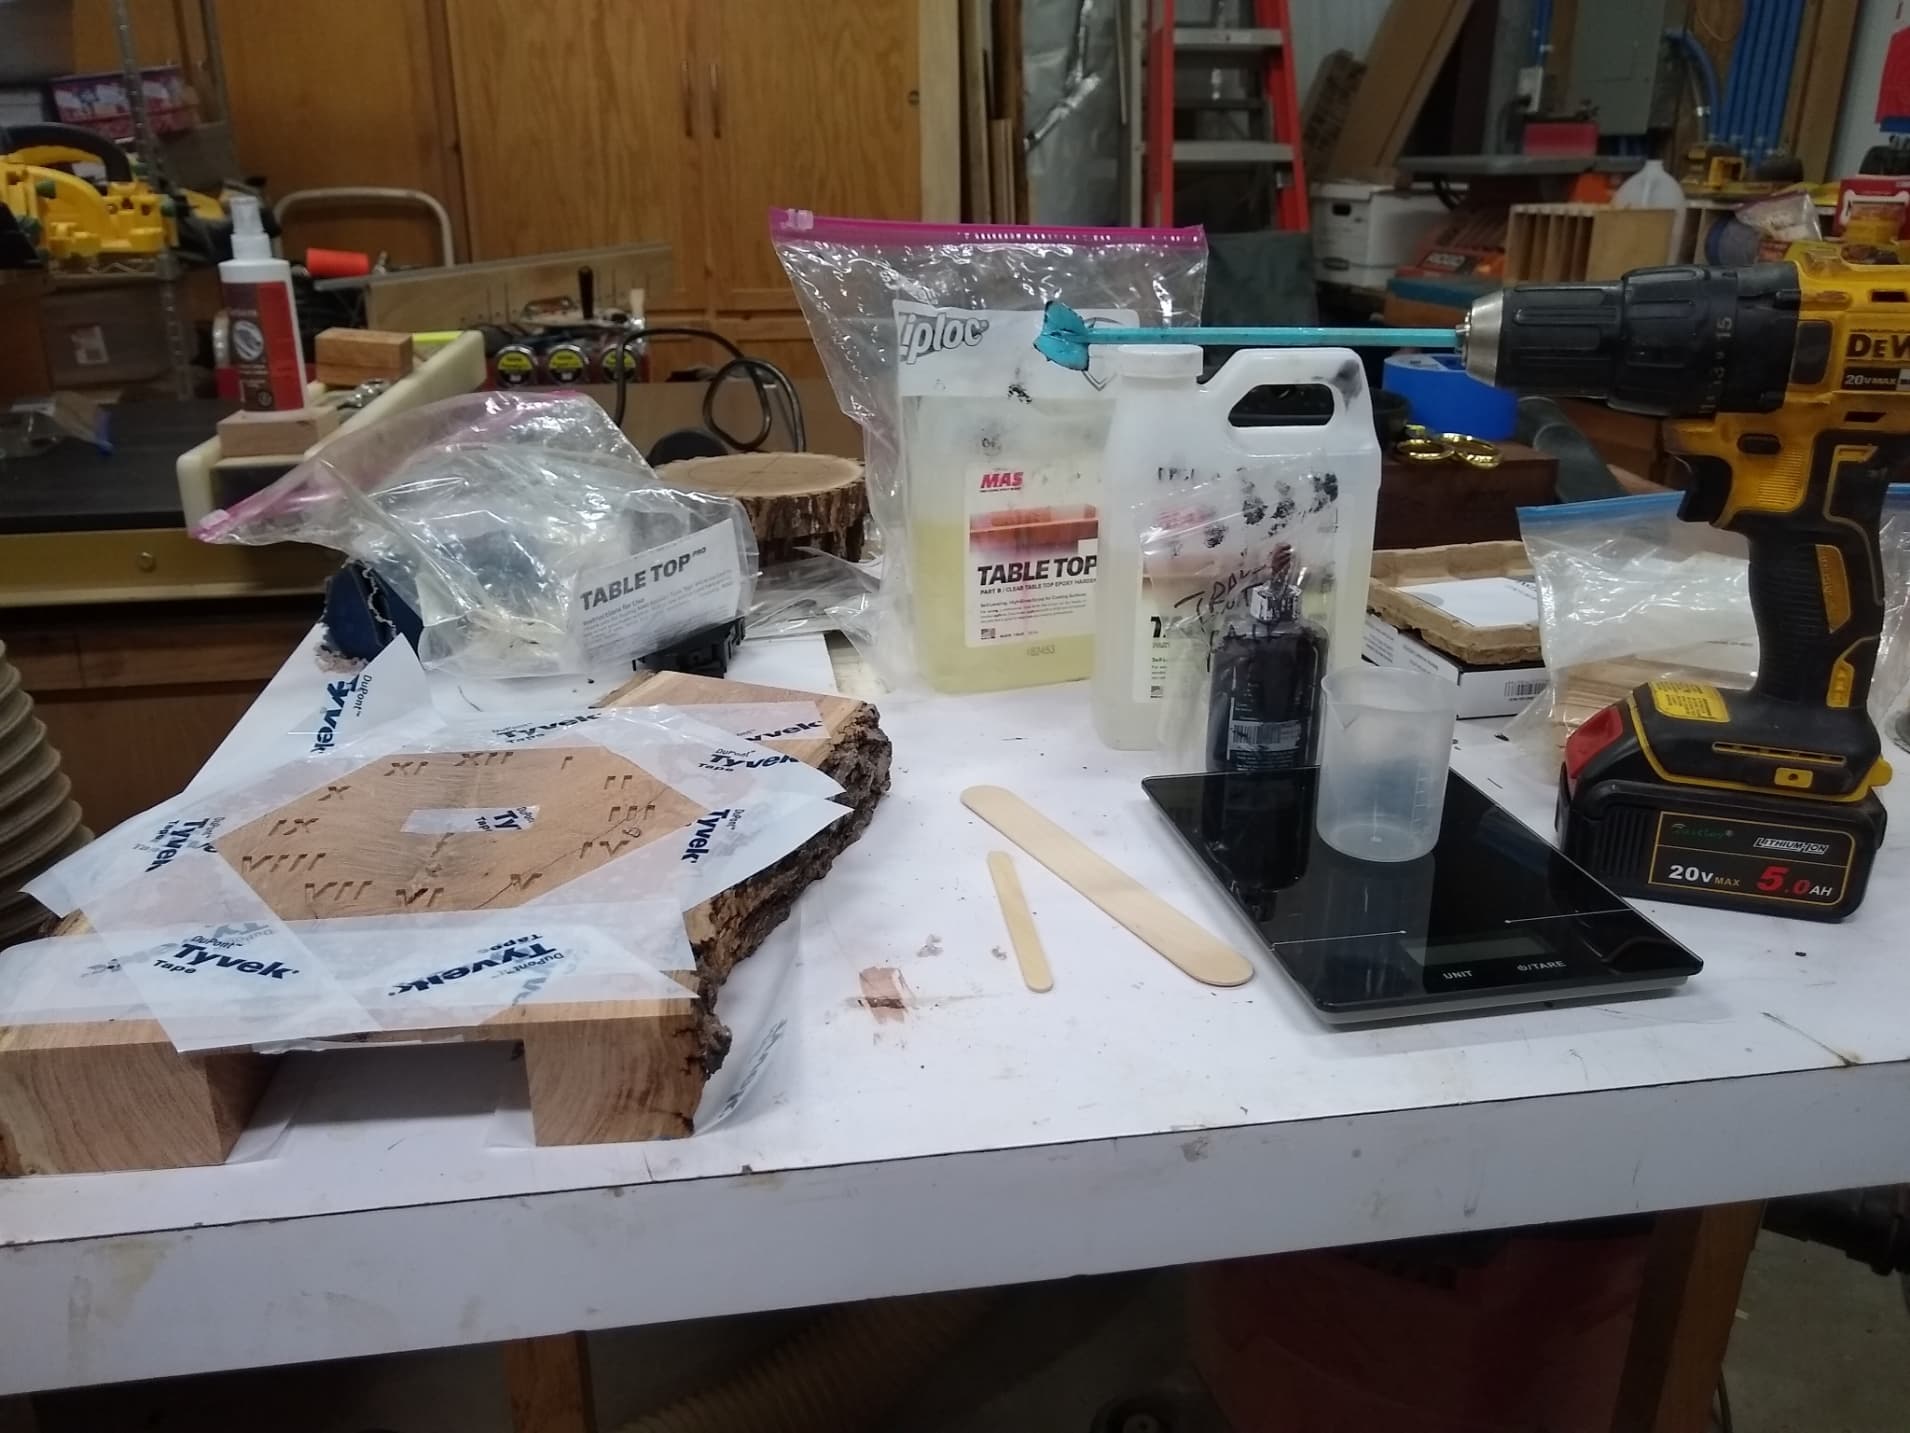
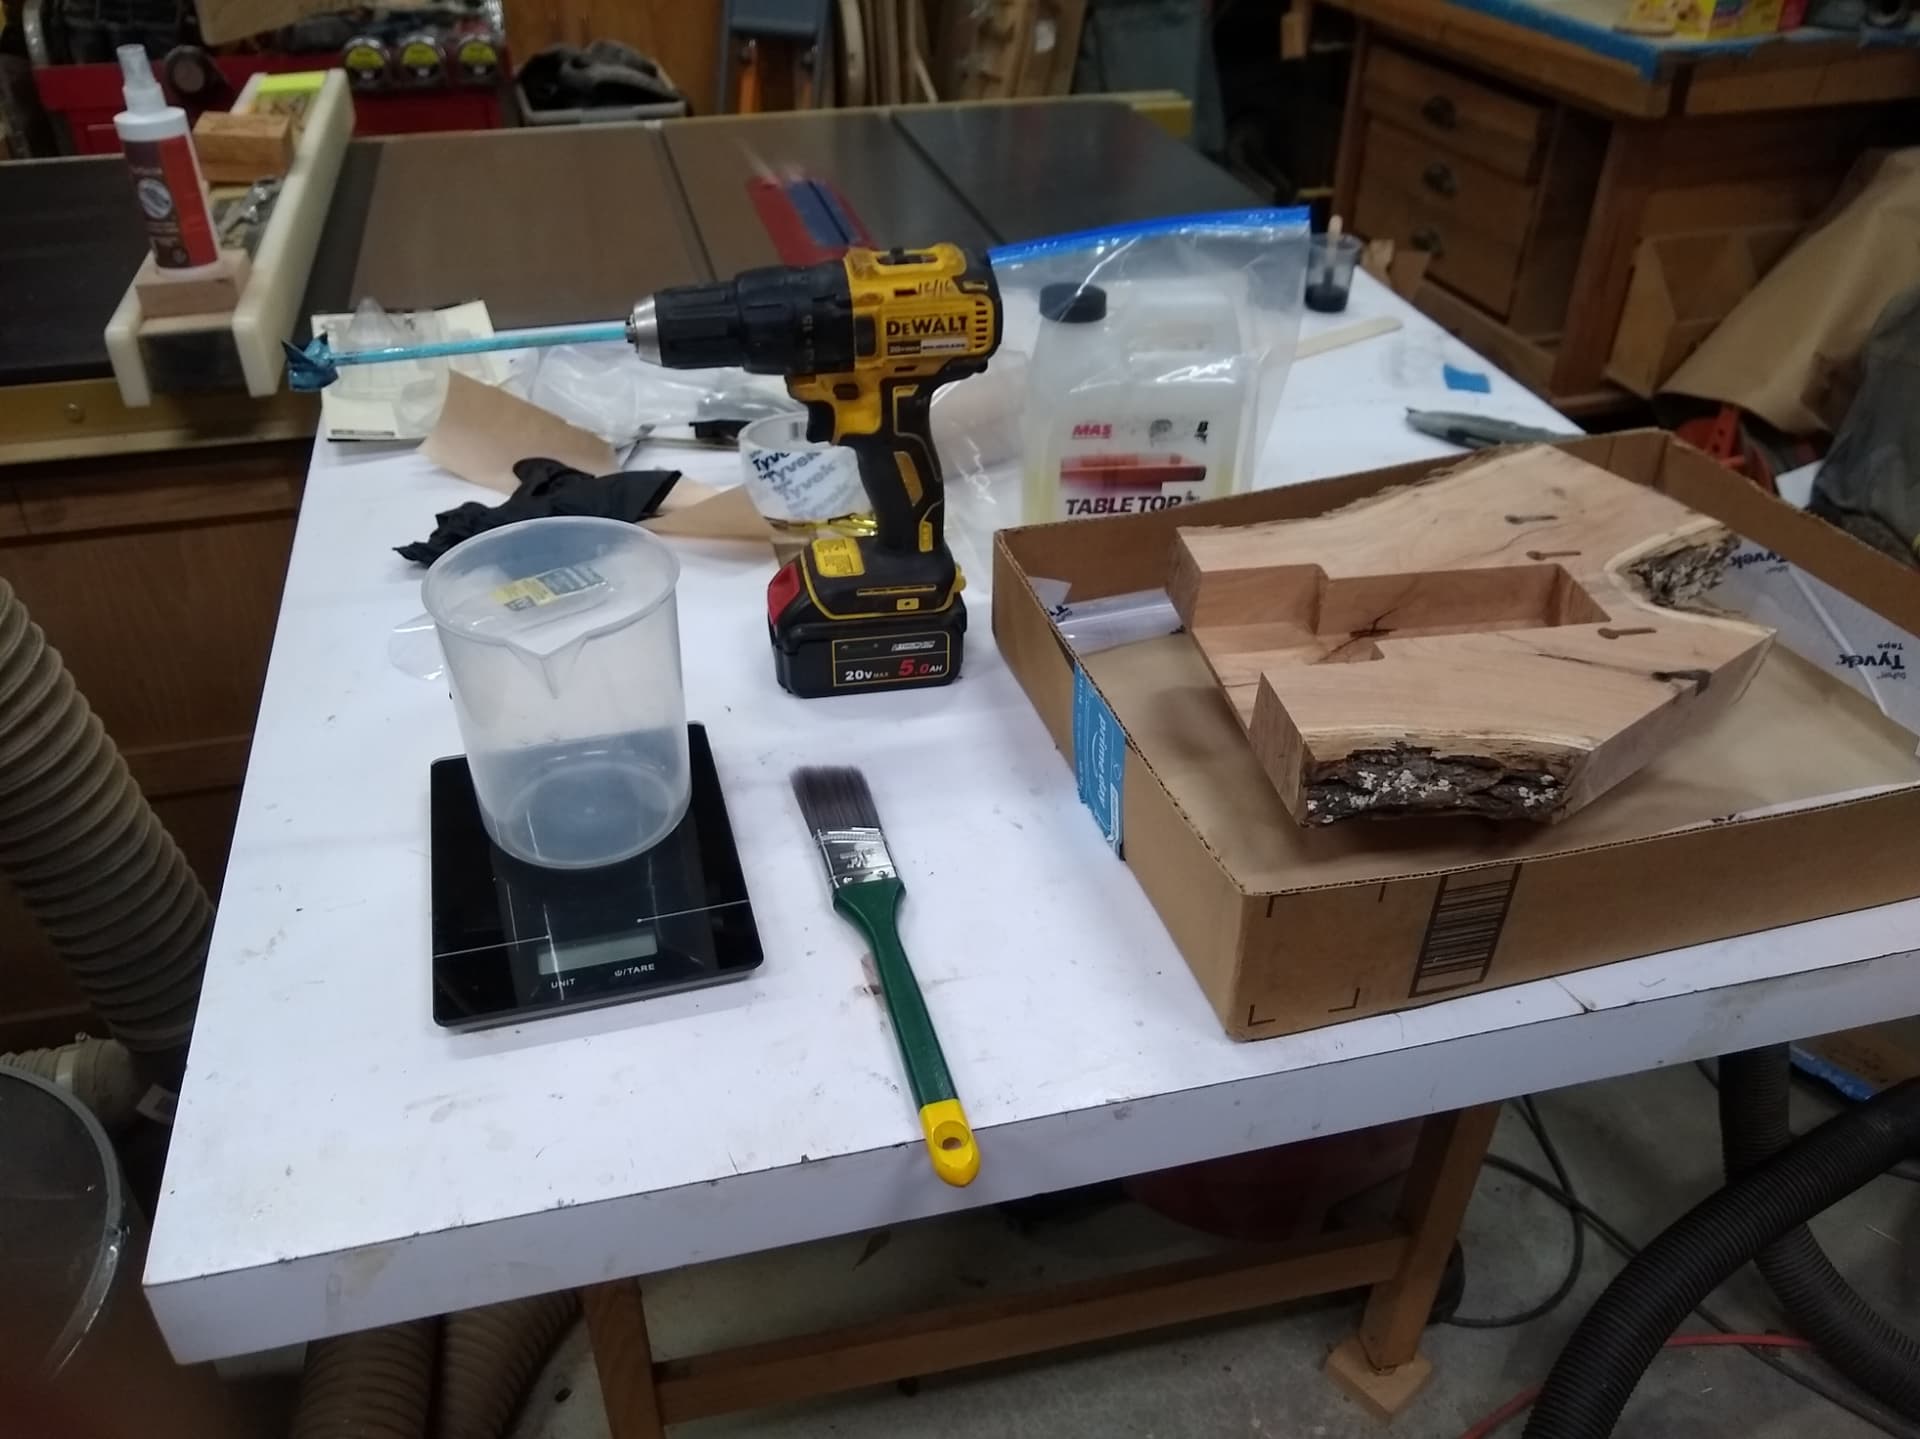
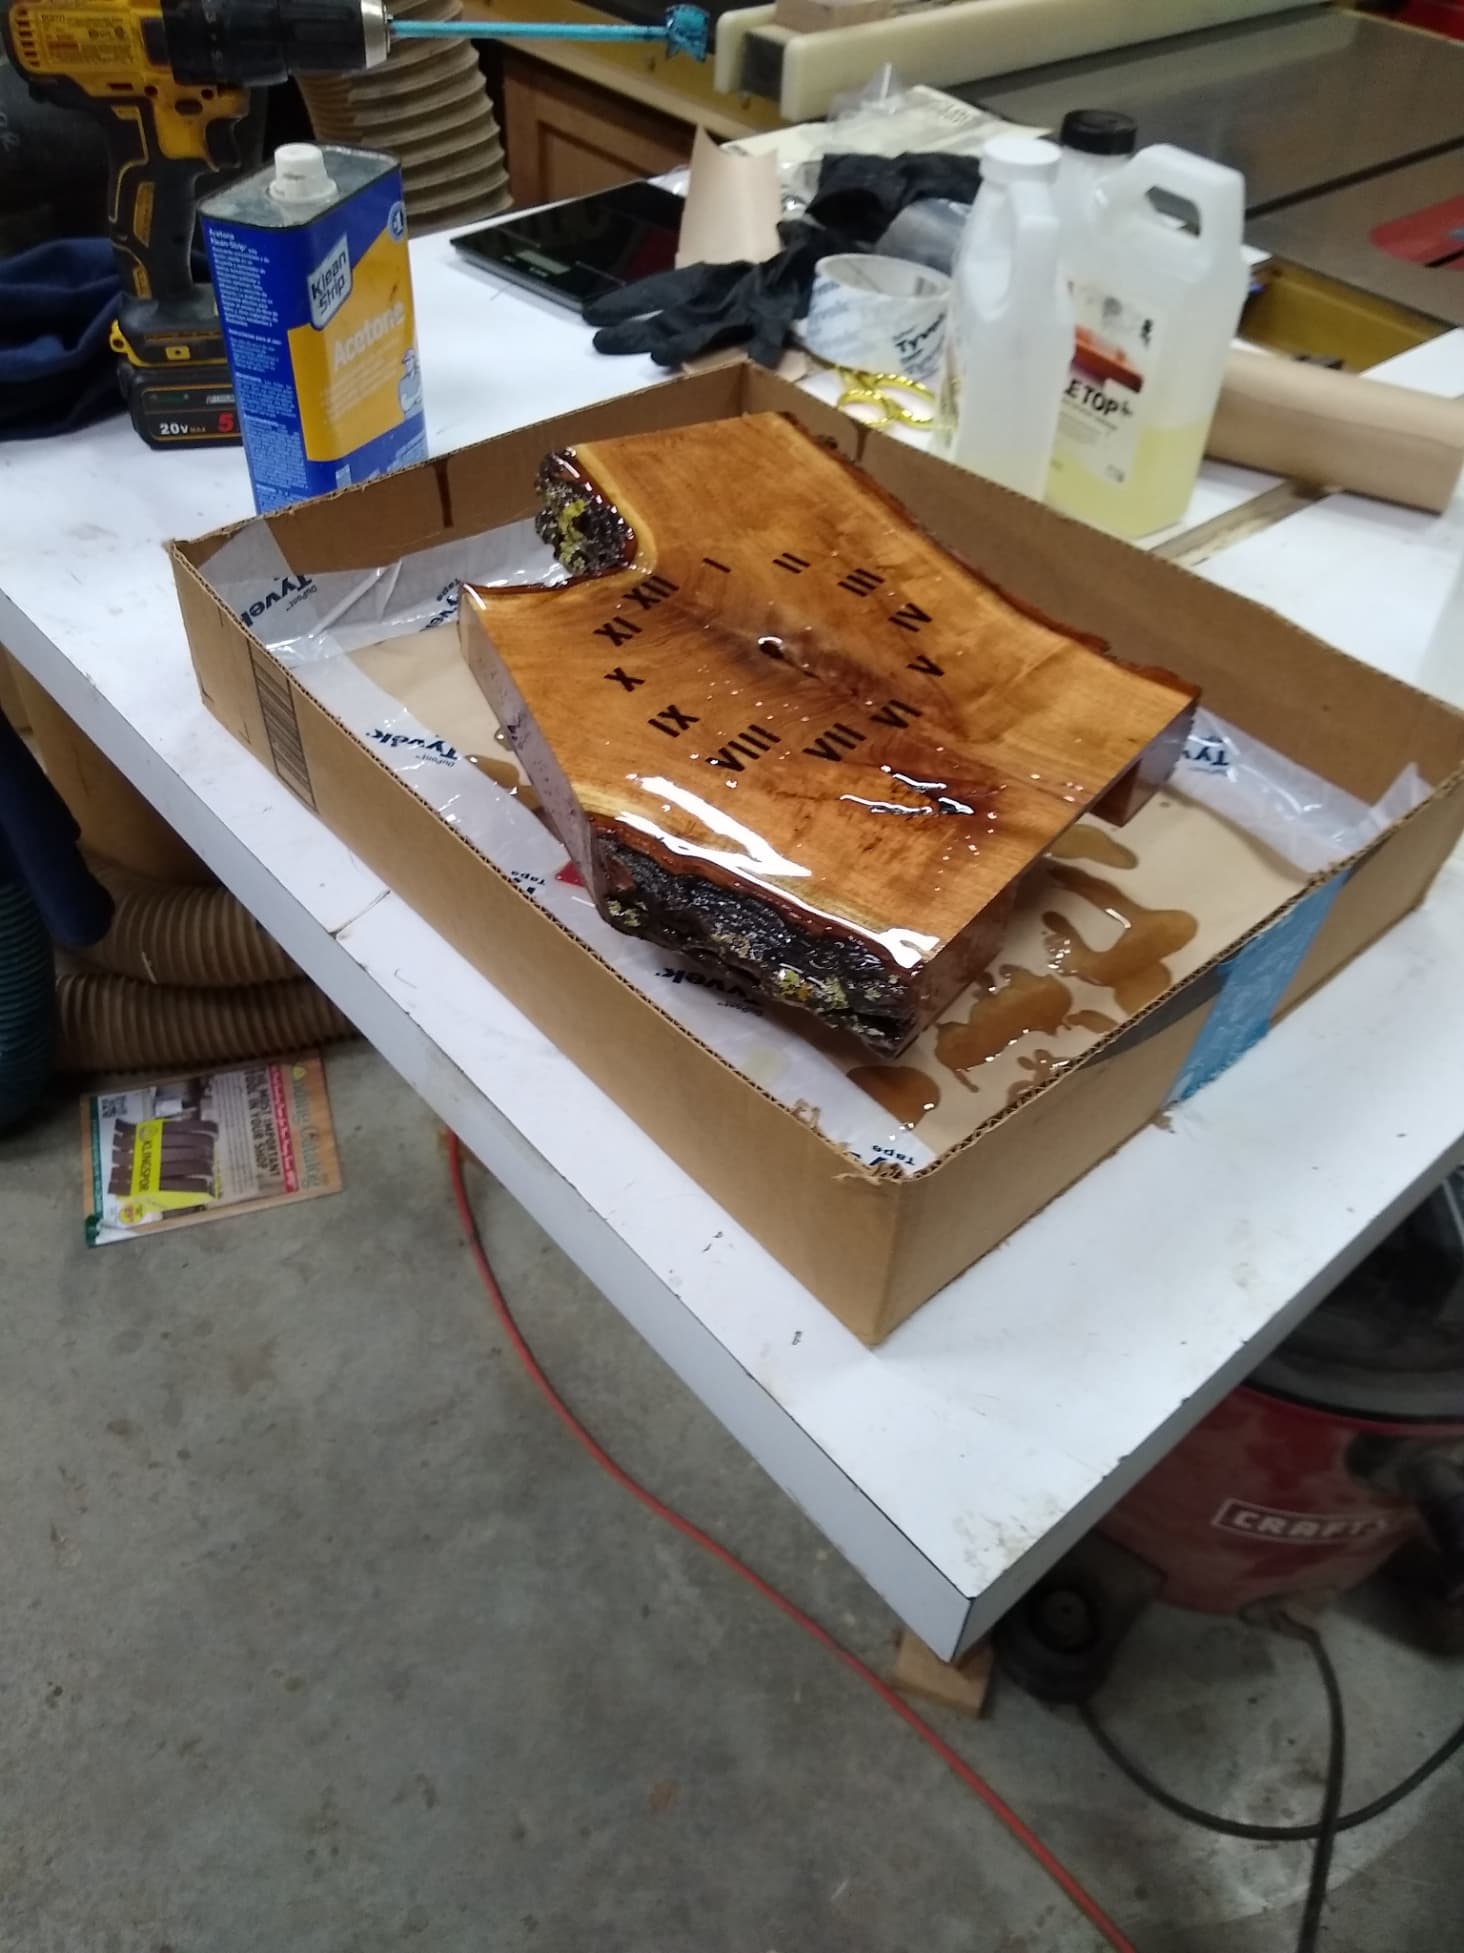
I got the bottom cleaned up and the face sanded. I put tyvek tape on the back in case any epoxy leaked through any of the cracks so I would not stick my project down to the table. I also put some tyvek tape around the outside so the epoxy would not flow too far.
I used transtint black dye and mixed up 1.4 oz of epoxy with 3 drops of black dye. Poured the epoxy and used a heat gun to pop any bubbles. I will go back in a few minutes and hit the epoxy with the heat gun. It takes about 15 minutes for this MAS table top epoxy to gel.
The tyvek tape is a little pricey but epoxy does not stick to it. You get a pretty big roll so I will have a supply for quite some time.
The next steps are to sand/surface the face. Then I will use the MAS table top epoxy in its natural clear form to brush on epoxy on the back and the bark. Then I will put the project in a tray with a liner and use painters pyramids to hold the project up. Then I will pour the table top epoxy and let it drip over the edge. After curing I will trim off any drips that hang on the back of the project.
I had put tyvek tape on the bottom of the project in case the epoxy leaked through the mesquite. Mesquite has cracks in it and this piece has some. So the epoxy did not leak out the bottom but it did get adsorbed into some surface cracks. I mixed a little more epoxy and filled them. So far the cracks seem to be filled and the low spots are not going down. I will keep my fingers crossed as well as my toes and legs. Wow this is uncomfortable.
This scenario is why I precisely measure the epoxy and the dye. In case I have to pour more the colors match.
The 5 (V) was a little low and the IV (4) and III (3) were really low.
This is MAS Table Top epoxy. It is somewhat thick when pouring but if there anyway it can escape it will. I used some Magic Resin 2" slow cure epoxy and that stuff is like water so if there is any where it can go it does. So make sure you protect your work area when using epoxy because your project can get stuck to the table.
Wood is like a box of chocolates, you never know what you will get. (AKA Forest Gump).
Well the second pour worked and the cracks were sealed enough to hold the second pour. So later today I will start sanding the epoxy off. Plus the epoxy down in the interior may help keep the piece from cracking later on. Mesquite is infamous for cracking. However the wood is quite strong so I think everything will be ok.
I will seal with dewaxed shellac to help bring out the grain in the crotch of this piece. Then my plan is to brush MAS table top epoxy on the back and the bark. Then flip it over and pour on table top epoxy. I have a cheap brush bought specifically for a one time use to spread epoxy on the bark.
We had an old Mesquite tree where I grew up on the farm near Kingsville that we played in and around. Somehow it got twisted (before my time) and split in the middle of one of the limbs that bowed down towards the ground. The split was open so far that birds would build a nest in the hole. It was still hanging in there when the farm was sold many years later. Mesquite; love it and hate it.
My friend that gave me the tree lives in Mexia. He has a bull dozer with a grubbing bit that they use to pull up the tough little mesquite trees. The cows eat the mesquite seeds and spread the mesquite trees around the pasture. The mesquite trees have long thorns that can cause hoof problems on your cattle and cost you money for fixing the problems. So the ranchers in the area try to take out the mesquite trees when ever possible plus they take up valuable water from the grass needed by the cows… However they are just every where so it takes a dedicated effort to remove them. My tree was likely over a 100 years old and blew down in a storm. So since the mesquite is so hard it is also brittle and that is why there are so many cracks caused by wind storms on the plains where they grow.
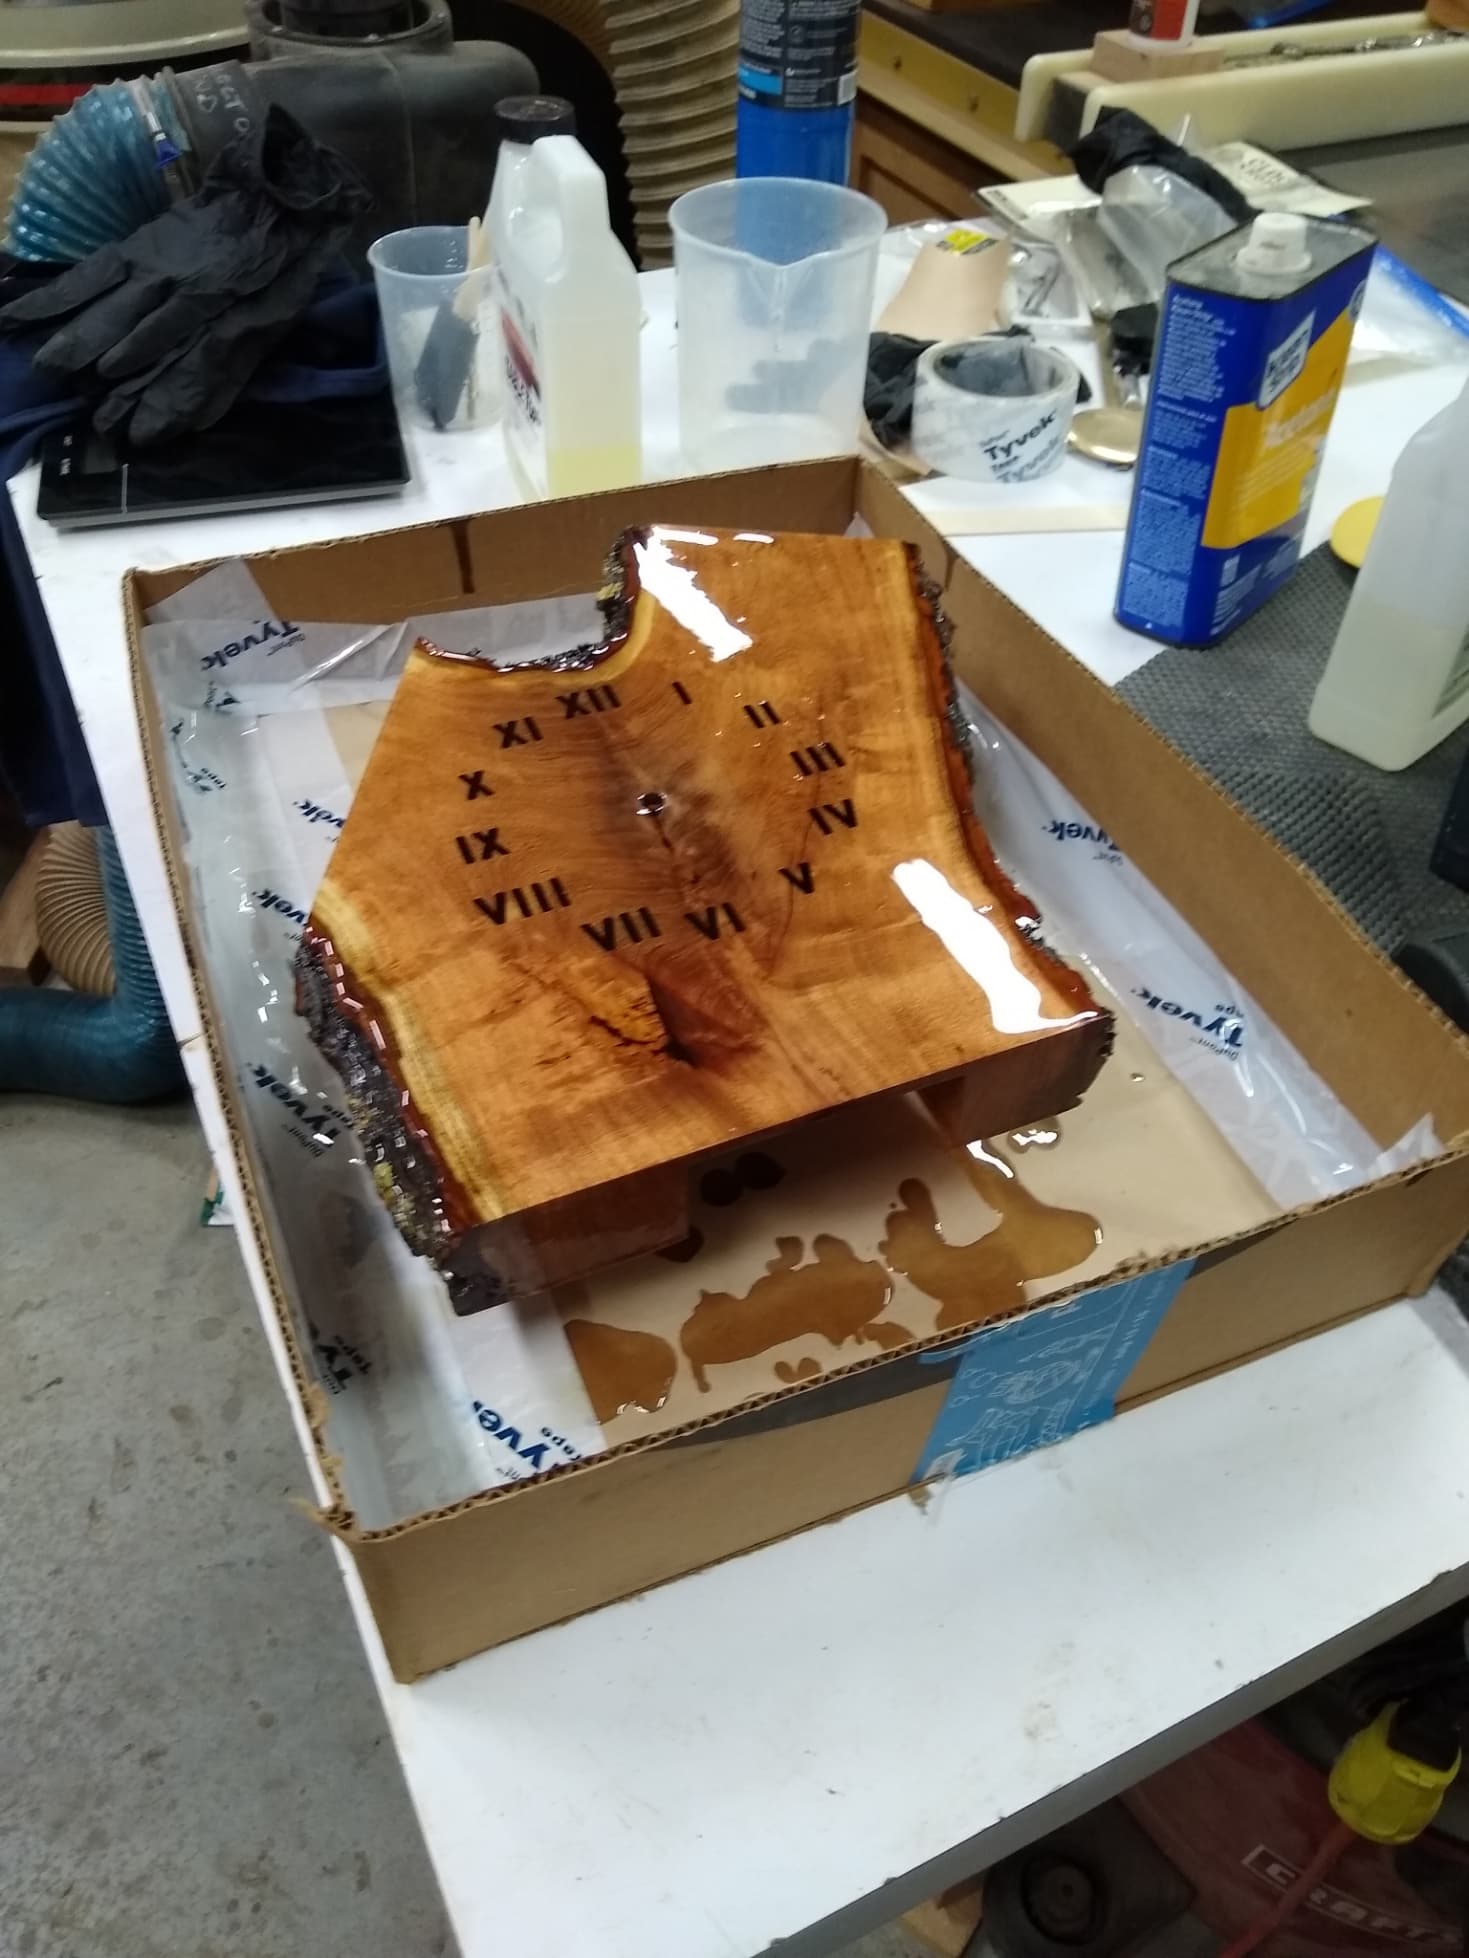
I got the clock finished sanded and cleaned and used a brush to coat the back and bark. I then poured the MAS table top epoxy over the top and touched up with a brush. Will have to let it dry and will likely need a second coat. It is early but there are a lot of air bubbles likely coming up through the wood. So I will let it dry until tomorrow and then lightly sand the top and recoat the front.
I hope the first coat seals the wood and the second coat will come out smoother. If I continue with the epoxy I will need to invest in a pressure/vacuum pot to degas the epoxy before applying it. The MAS table top is full of air bubbles. The Magic Resin 2" pour had hardly any bubbles in it during the pour. I use a heat gun to pop as many bubbles as possible but at some point the epoxy starts to gel and it is impossible to get the air bubbles out at that point. So I think the key is prevention with the pressure/vacuum.
I let the first coat dry overnight. I sanded the front to 220. The back was quite lumpy because I applied it with a brush and then flipped it over. The back I sanded with 60 grit until all most all epoxy was gone. I will address the back when I get the front done. The second coat is much better. I bought a torch to pop the air bubbles and it worked for about 5 minutes and seemed to run out of gas. So I went back to my trusty heat gun. I set a timer for every 10 minutes to go and heat it up and get the air bubbles out. Plus the blowing air from the heat gun helps to even out the surface. I left the sides alone but ran the heat gun over the sides in case any epoxy ran over from the top. I will evaluate the top when the second coat gets dry tomorrow and maybe apply a third coat. For not it looks good and maybe it will be smooth enough after it self levels. I cannot say I would recommend the MAS table top epoxy. I mixed the epoxy with a popsicle stick gently and it is still full of air bubbles. May try another brand next time. I have about a third of the MAS left and I will use it on something. I dont go around dropping $100 bills out of my pocket on purpose.
I will need to get more fuel for the torch. Seems like the torch and bottle came together does not have much fuel in it. I have a bunch of 1lb propane bottles and may try those after I read up on the torch.
I think the crotch figure came out very well. I have given advise that a purpose of a clock is to be read from across the room. I have black hands and I hope there is enough contrast for you to see the clock from across the room. If it is too little contrast I can paint the hands white. Will see later.
I bought a bunch of cups to mix the epoxy in. Some of them you can pry out the dried epoxy others you cannot. So my conclusion is to not try to clean them up and just throw them away after every pour.
This is a pretty good youtube video about the MAS epoxy on a live edge table.
I think their advise is likely good for any brand of epoxy.
The one thing I do not like about the table top epoxy is it is so glossy. Most of the finishes I apply are satin. That is a personal preference of mine and others may like the plastic looking glossy surface. Mileage varies.