Question for you veterans might save me from some trial and error. What is the reasonable cutting depth soft wood and hardwood for a 1/4 end mill. I have a Shapeoko pro 4 i’ve been reading that a proper cutting that is one times the diameter but I don’t know if the machine can handle a 1/4 cut. Also, I find that I’m making a lot of dust and my dust collection isn’t catching it, It goes straight to my shop vac bag.
I just use the settings in Carbide Create:
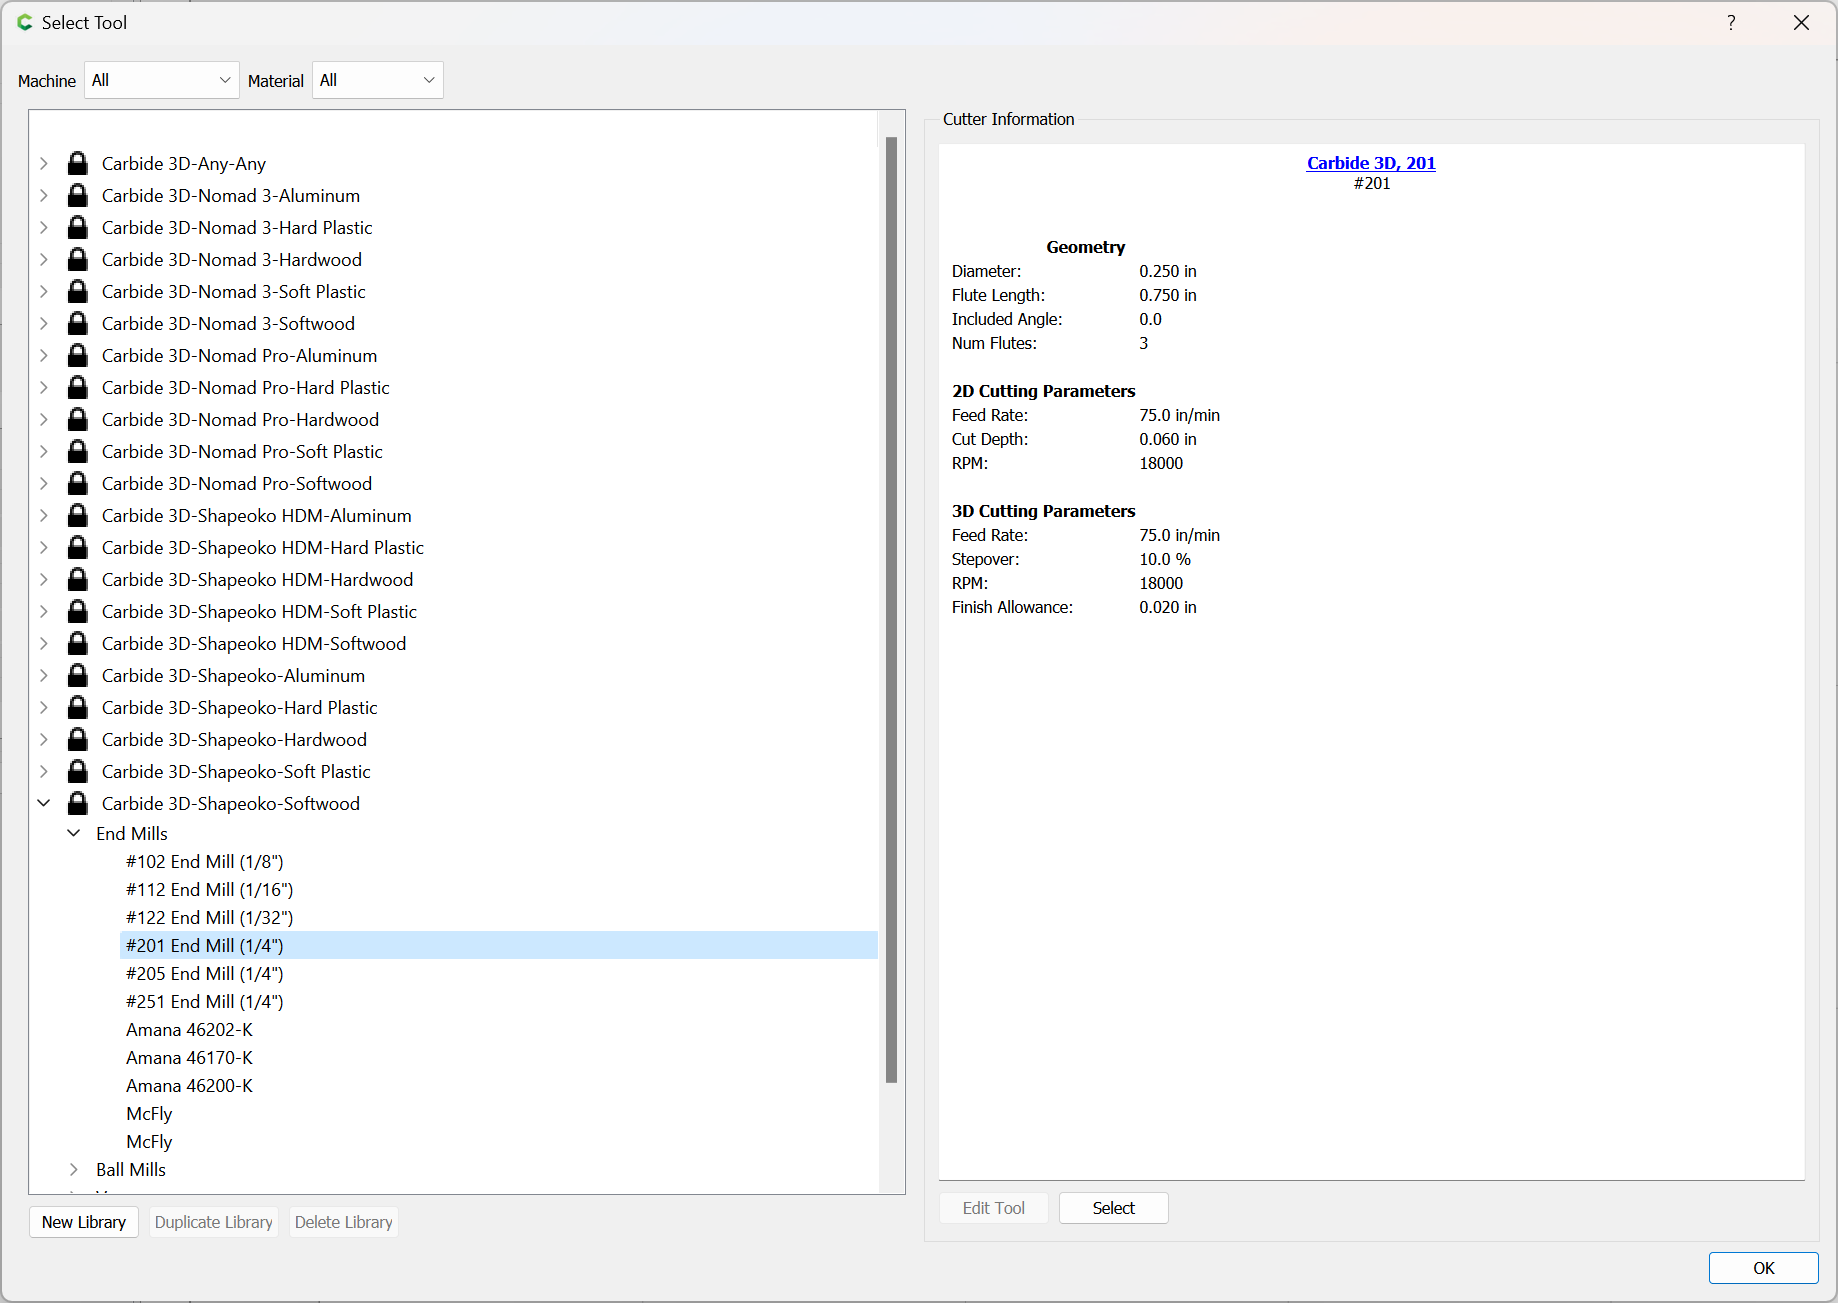
and

If you want to adjust them experiment w/ feed rate override in a piece of scrap and see:
Usually a Sweepy will do quite well at collecting dust — what sort of cuts are you making? In what thickness of material? I admit I’ll sometimes have to pause and adjust down a bit in the course of a cut. Post photos or a video showing the problem?
If I am understanding your question I think you want to know the maximum depth of cut for a 1/4" bit. The rule of thumb for a router is no more than half the depth of the router bit diameter. So for a 1/4" bit no more than 1/8" depth of cut. Now that is for a hand held or router table router. The Shapeoko can maybe handle 1/8" cut in softwood but hardwood would likely put stress on the whole machine. Most depth of cut is much less than 1/8 (.125") for any material in the default doc for C3D bits.
Now if you are asking for the maximum depth of a cut that is depending on the bit. Most bits have a maximum cutting depth. That is determined by the cutting tip and the flutes on the sides of the bit. When you go below the flutes often you get burning because the solid part of the bit is rubbing on the sides of a cut. So on some woods like cherry it burns quite easily. If you need to cut deeper than the flutes of a bit then you likely need a bit with more cutting depth on its flutes. I have a Melin 4" OAL 1/4" upcut bit that can cut up to 1.5". However that long bit puts a lot of stress on a trim router. The run out is much greater for a long bit and causes more vibration and can cause the collet nut to loosen.
So it depends on which machine you have. An SO5 can likely handle more aggressive doc than an SO3/4. The SO5 is ball screw driven with linear rails and the SO3/4 are belt driven and are not as rigid of a frame as the SO5. You can modify the conservative F&S of the builtin C3D tools but they are recommended for a reason. Although conservative they are likely to work for the material listed. Many CNC router bit companies give fantastic recommended F&S and are intended for industrial CNC machines and not hobby type CNC machines.
I really appreciate the input. I have been using the carbide create settings, but I found them very conservative. Recently bought a compression bit and the down cut flute doesn’t start until about 1/8 down the cutter. I just wasn’t sure if I could take a 1/8 cut on my machine.
There has been some discussion of using compression tooling here — the usual suggestion is to use it in adaptive/trochoidal toolpaths, or to leave a roughing clearance and take a finishing pass.
An alternative is to use two square endmills — downcut for most of the cut, then switch to an upcut for the finishing through cuts.
I’ll start by saying my setup is a Shapeoko Pro so it has linear rails and not v-wheels and the Carbide 3D spindle. As for my CAM software I’m using Fusion 360 so have access to some toolpaths that have more options to configure how the toolpath runs. For deeper pockets using 1/4" (6.35mm) tooling I’ve been using the 'Contour" toolpath with a stepover of 2mm and a depth of cut of 1 to 1.5mm (in other words a contour toolpath doing 2 laps around the pocket that widens the slot at each stepdown). I then used a toolpath called “Morphed Spiral” or “Spiral” to then clear out the pocket with a stepover of 1mm to 1.25mm (chip thinning) and a depth of cut anywhere between 8mm to 10mm which allows me to use much more of the cutter edge on an endmill. In Fusion 360 these toolpaths you can also force them to remove the material “outside” → “in” or the opposite. That said I also spend a fair amount of time in the simulation to make sure material removal occurs as I expect it to but so far this strategy has been working well for me. Haven’t used Carbide Create much so not sure if the toolpaths available would work well with this material removal strategy but I think it would (you’d have to test).
Same as you when I started I was getting finer dust in my dust deputy but improved this getting bigger chips by tunning either RPM or Feedrate so some testing/playing with settings could help you tune your settings to get chips vs. dust. I’ve been pretty happy with chips being generated with my latest strategy of clearing pockets as described above and I feel like this will extend my tool life because less stepdowns required using just the tip of the endmill.
1 Like
This topic was automatically closed after 30 days. New replies are no longer allowed.