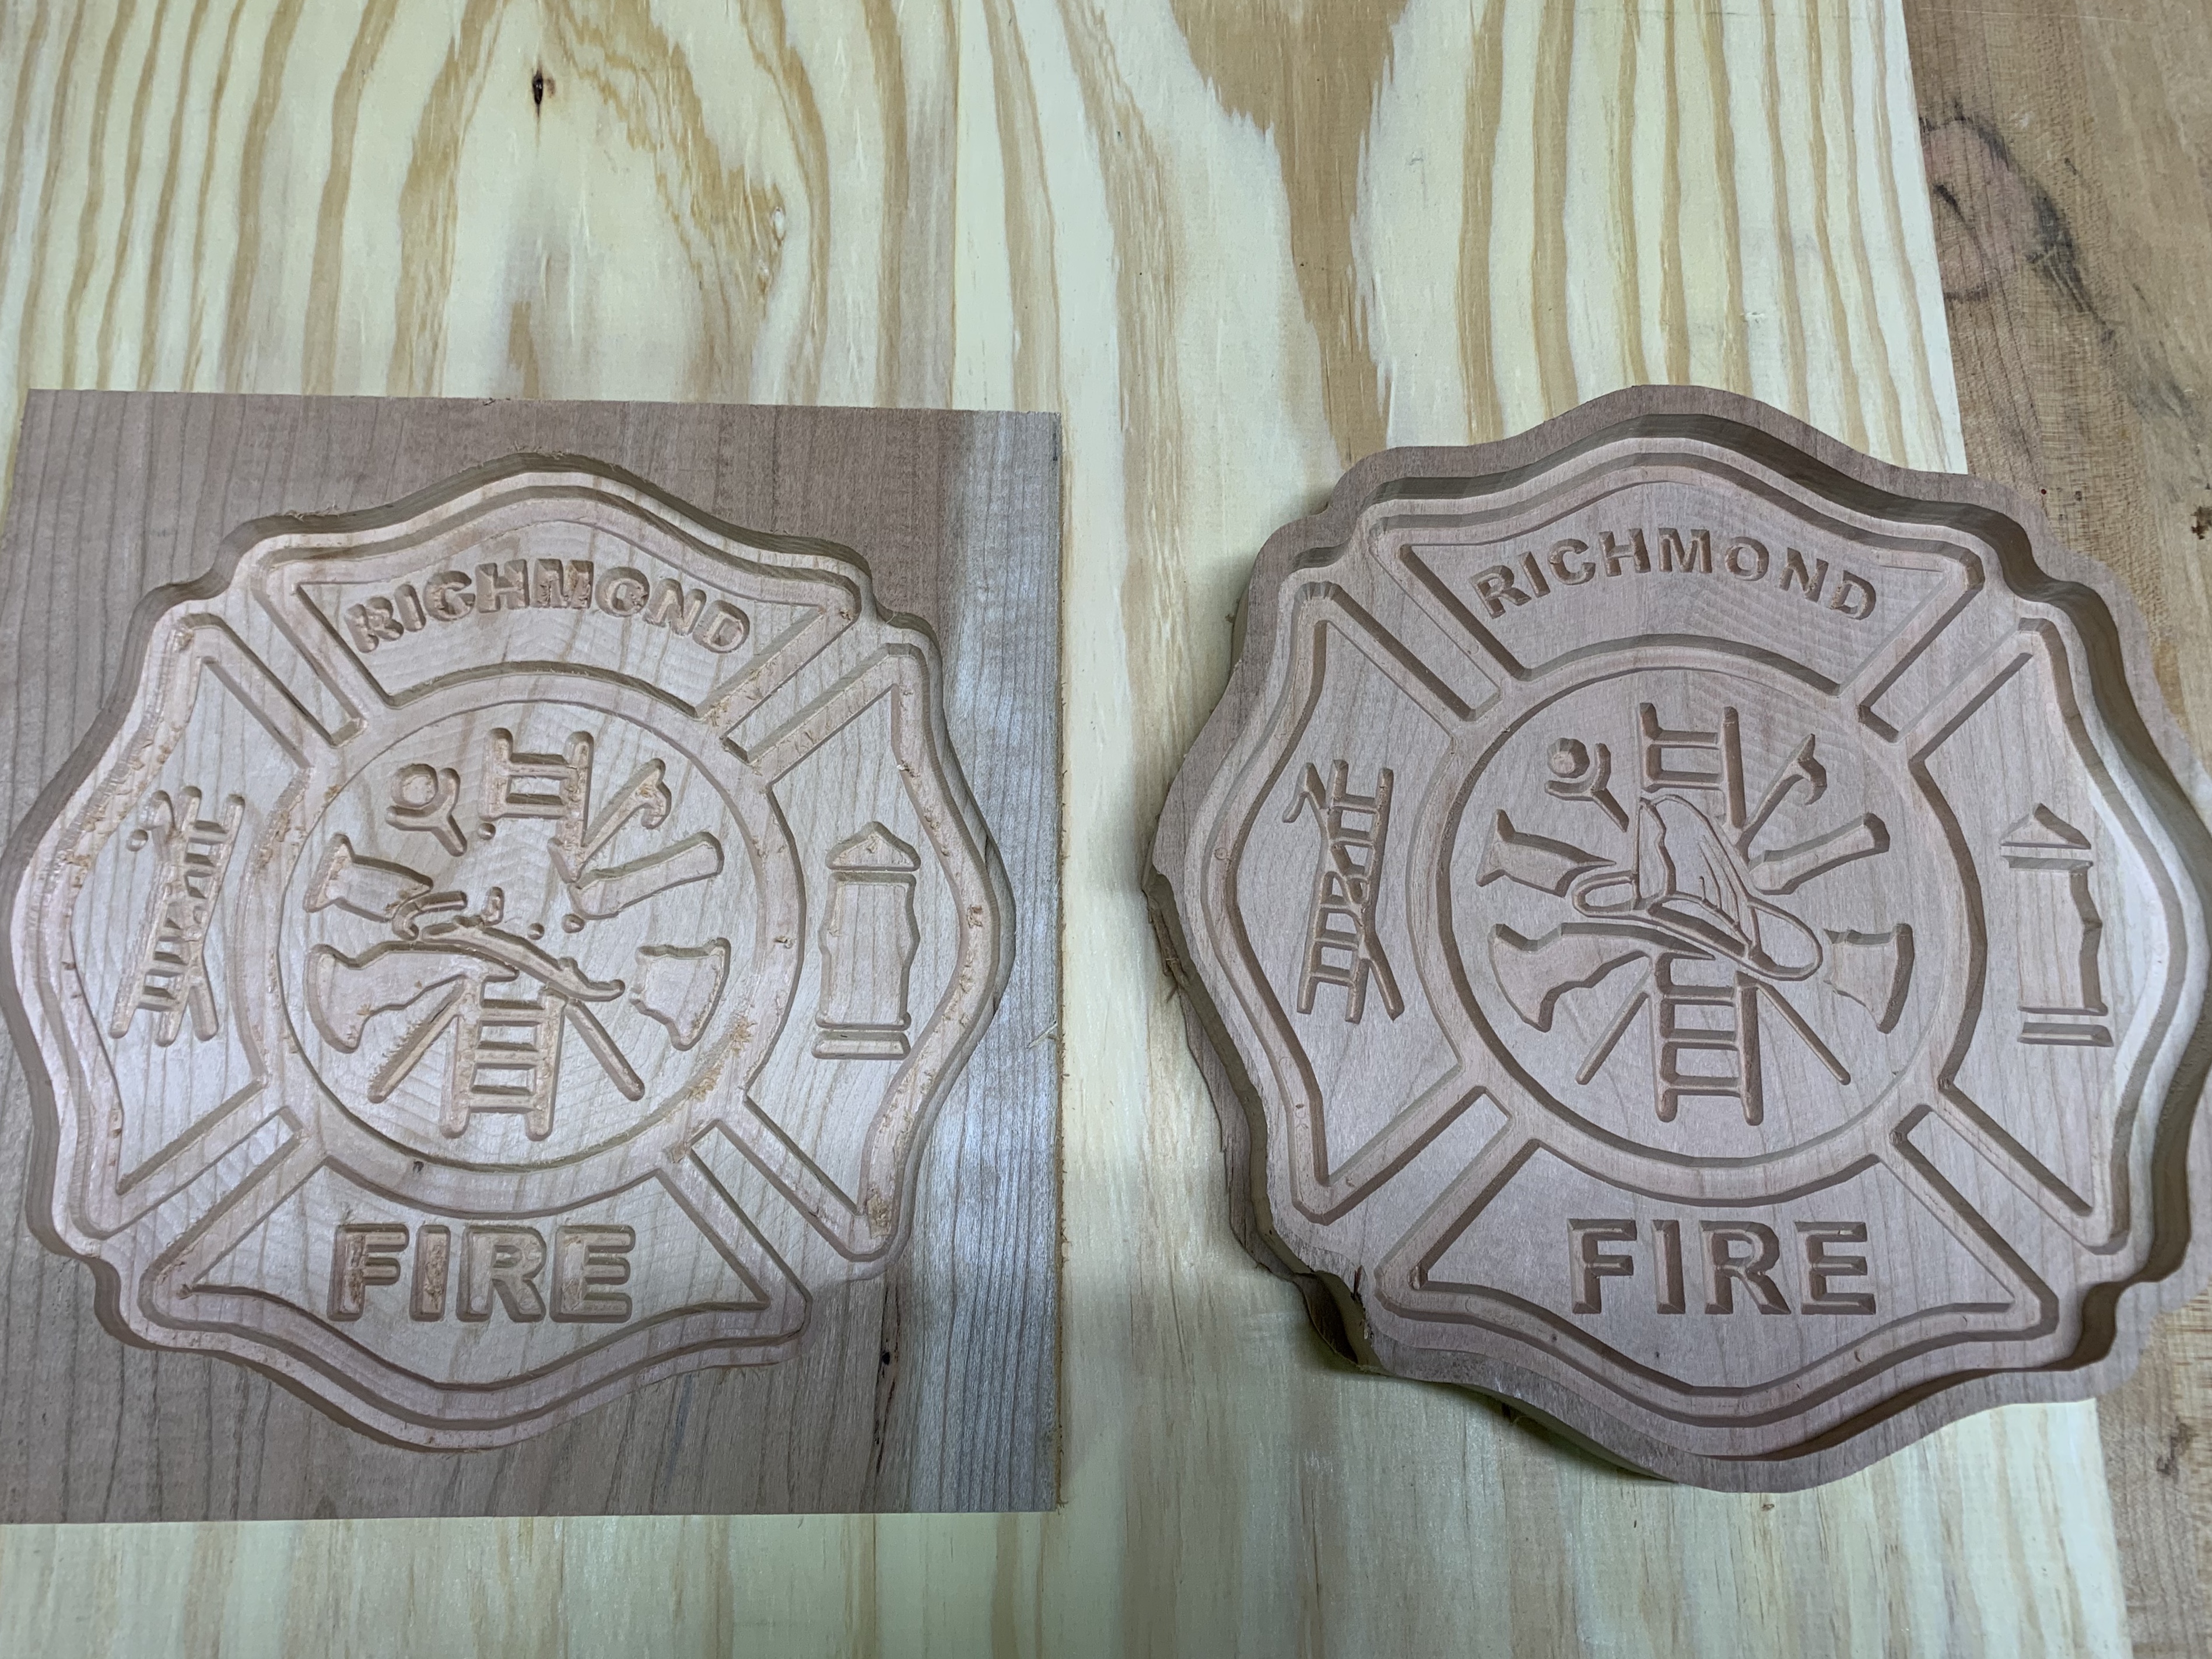
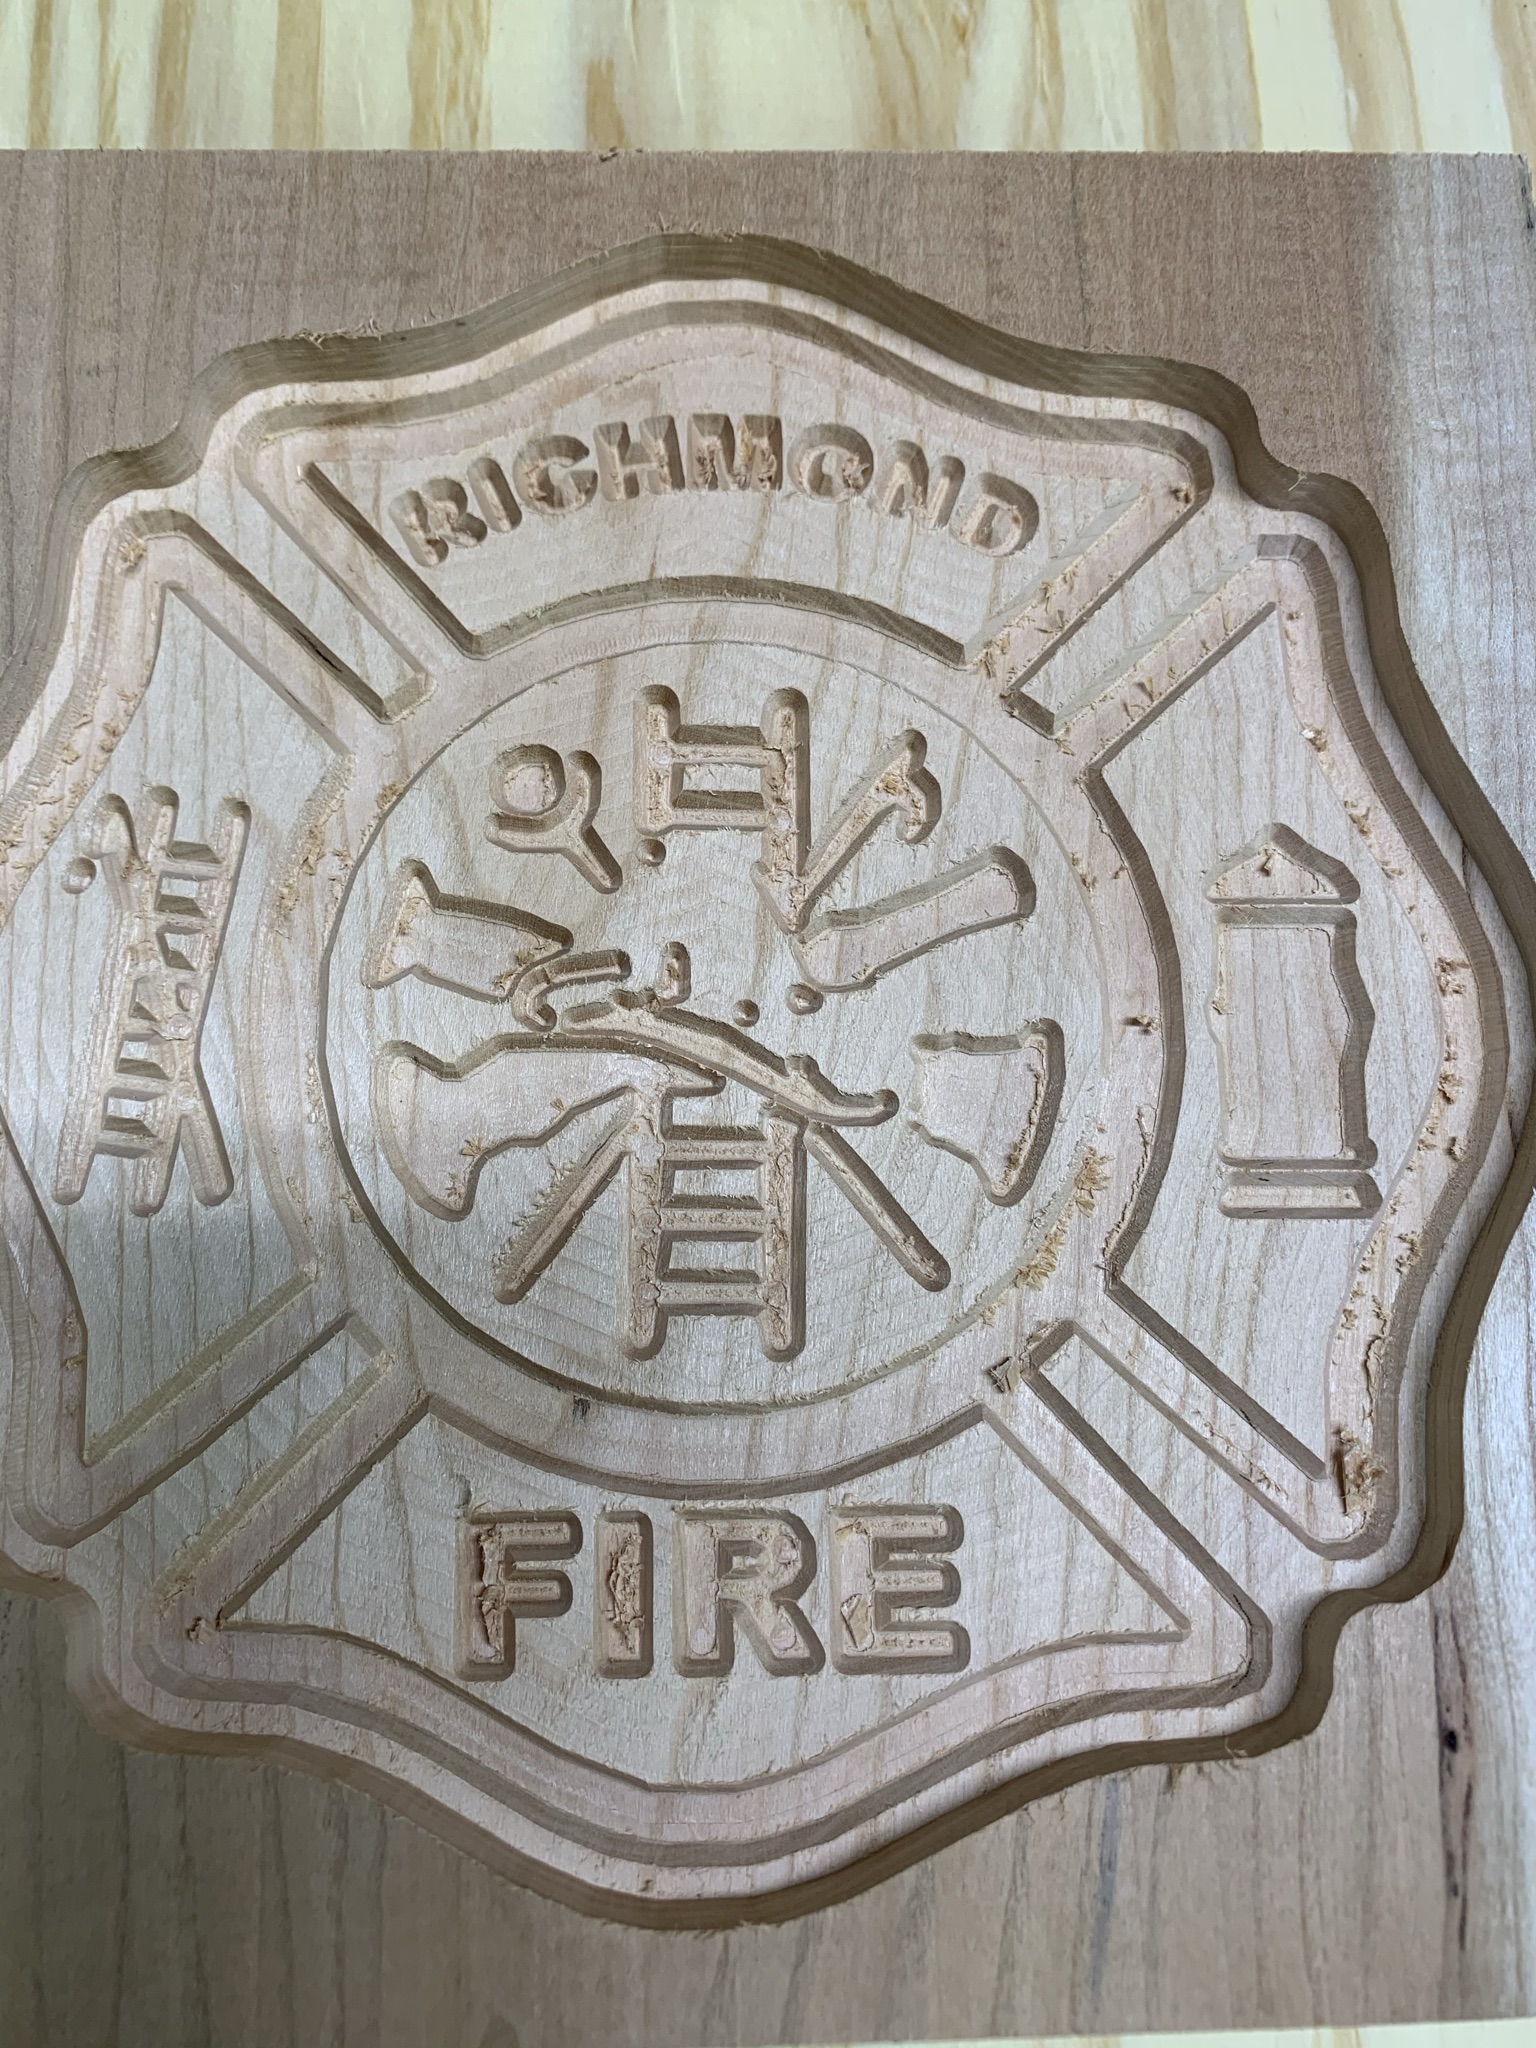
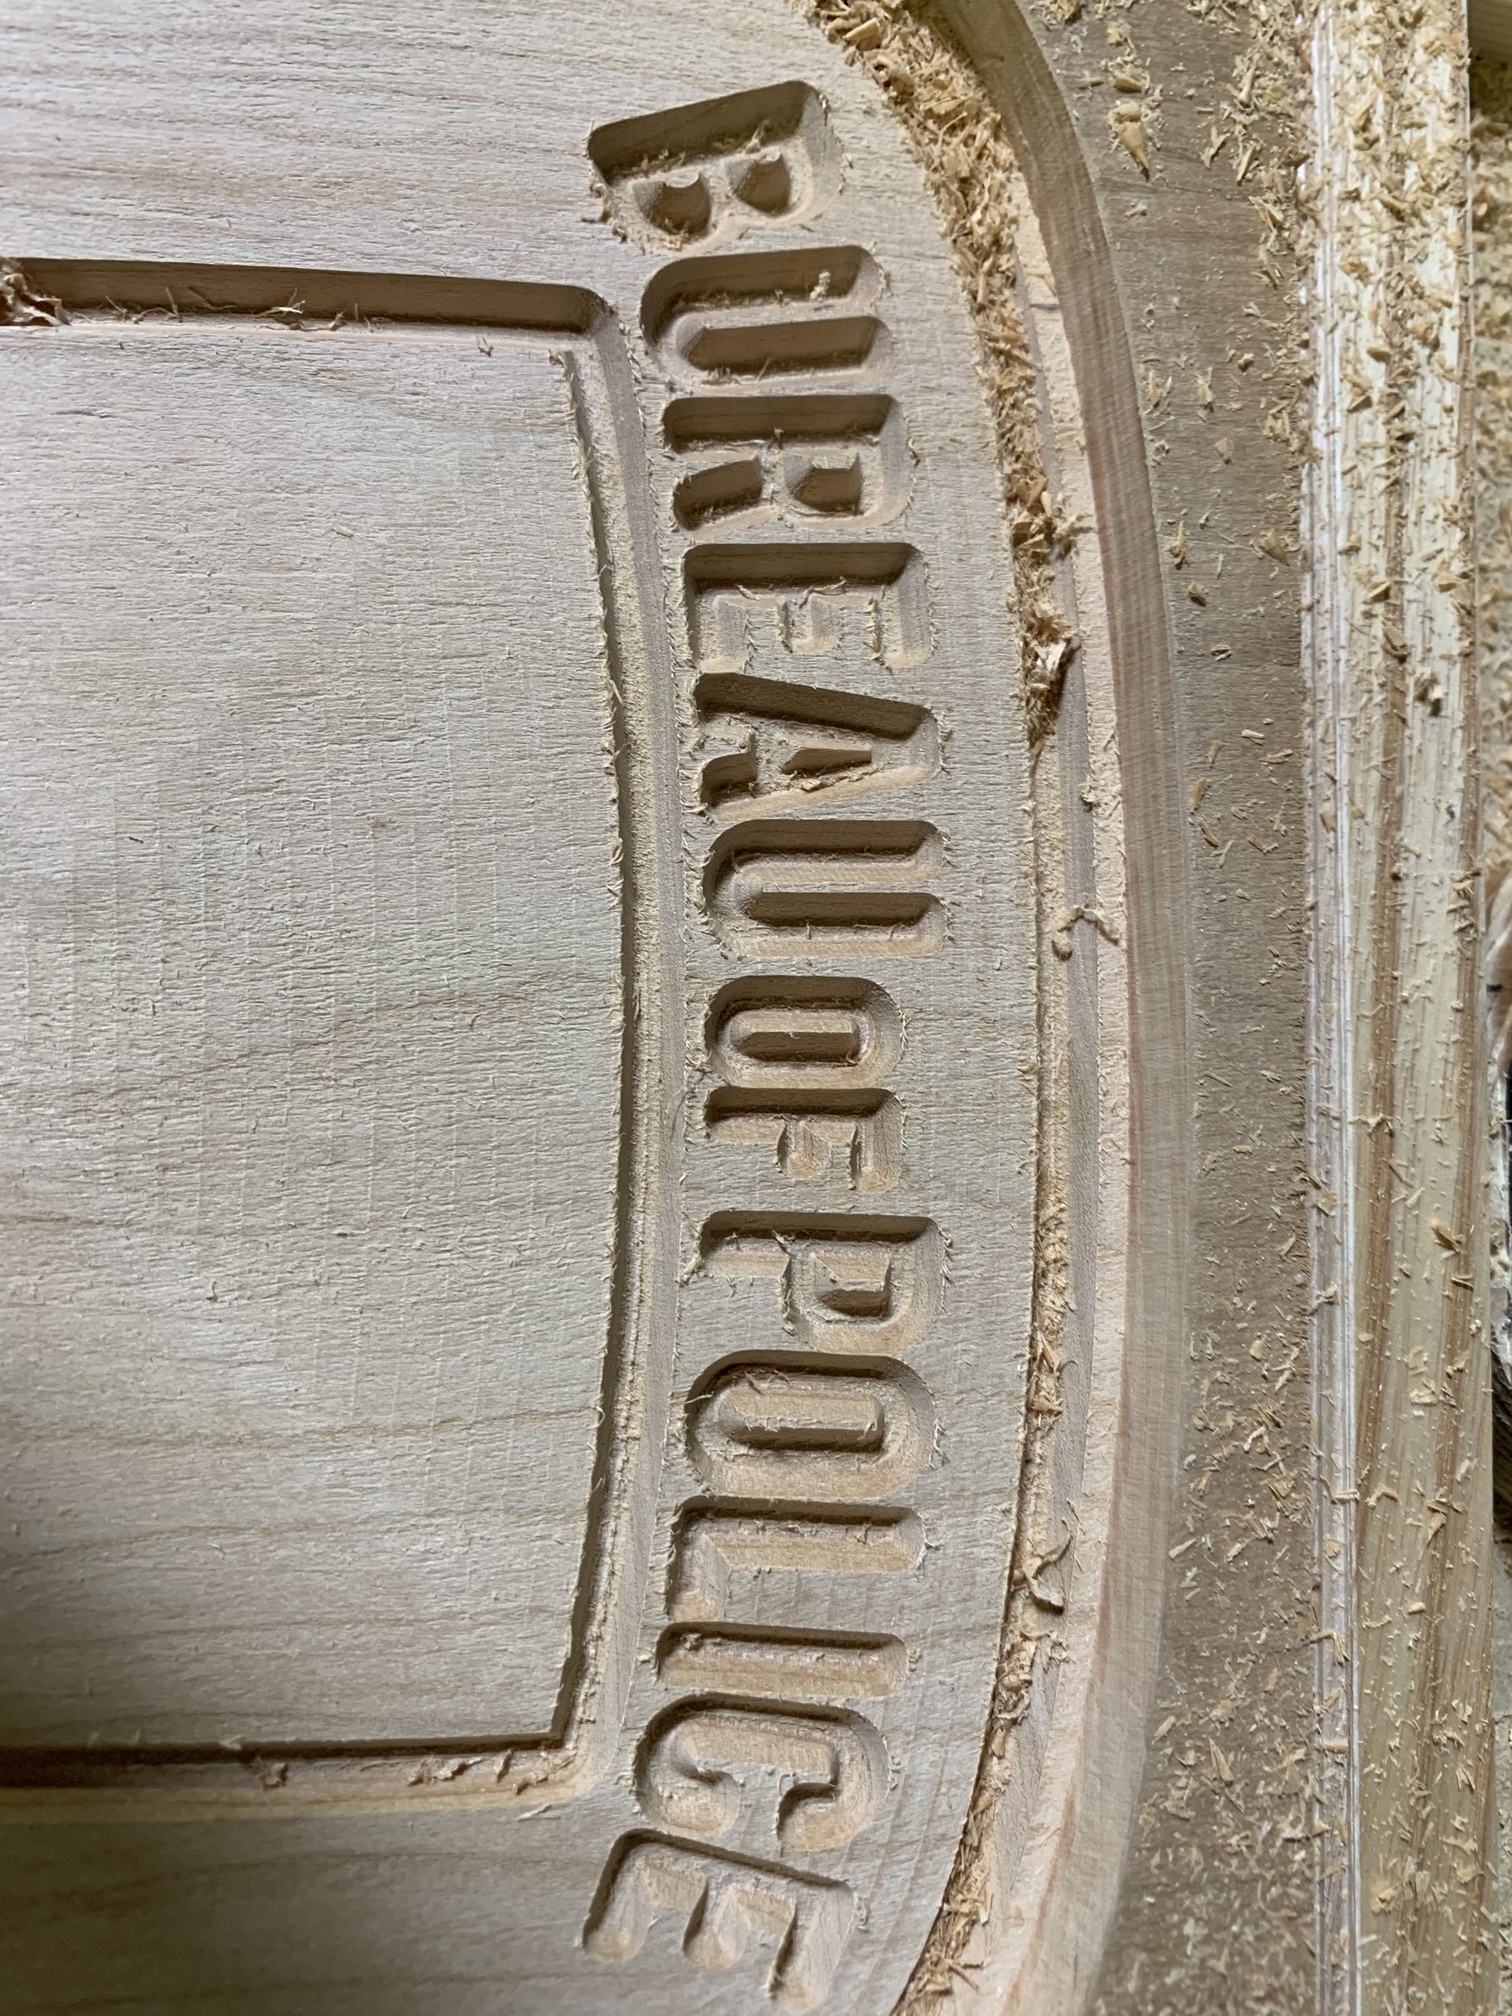
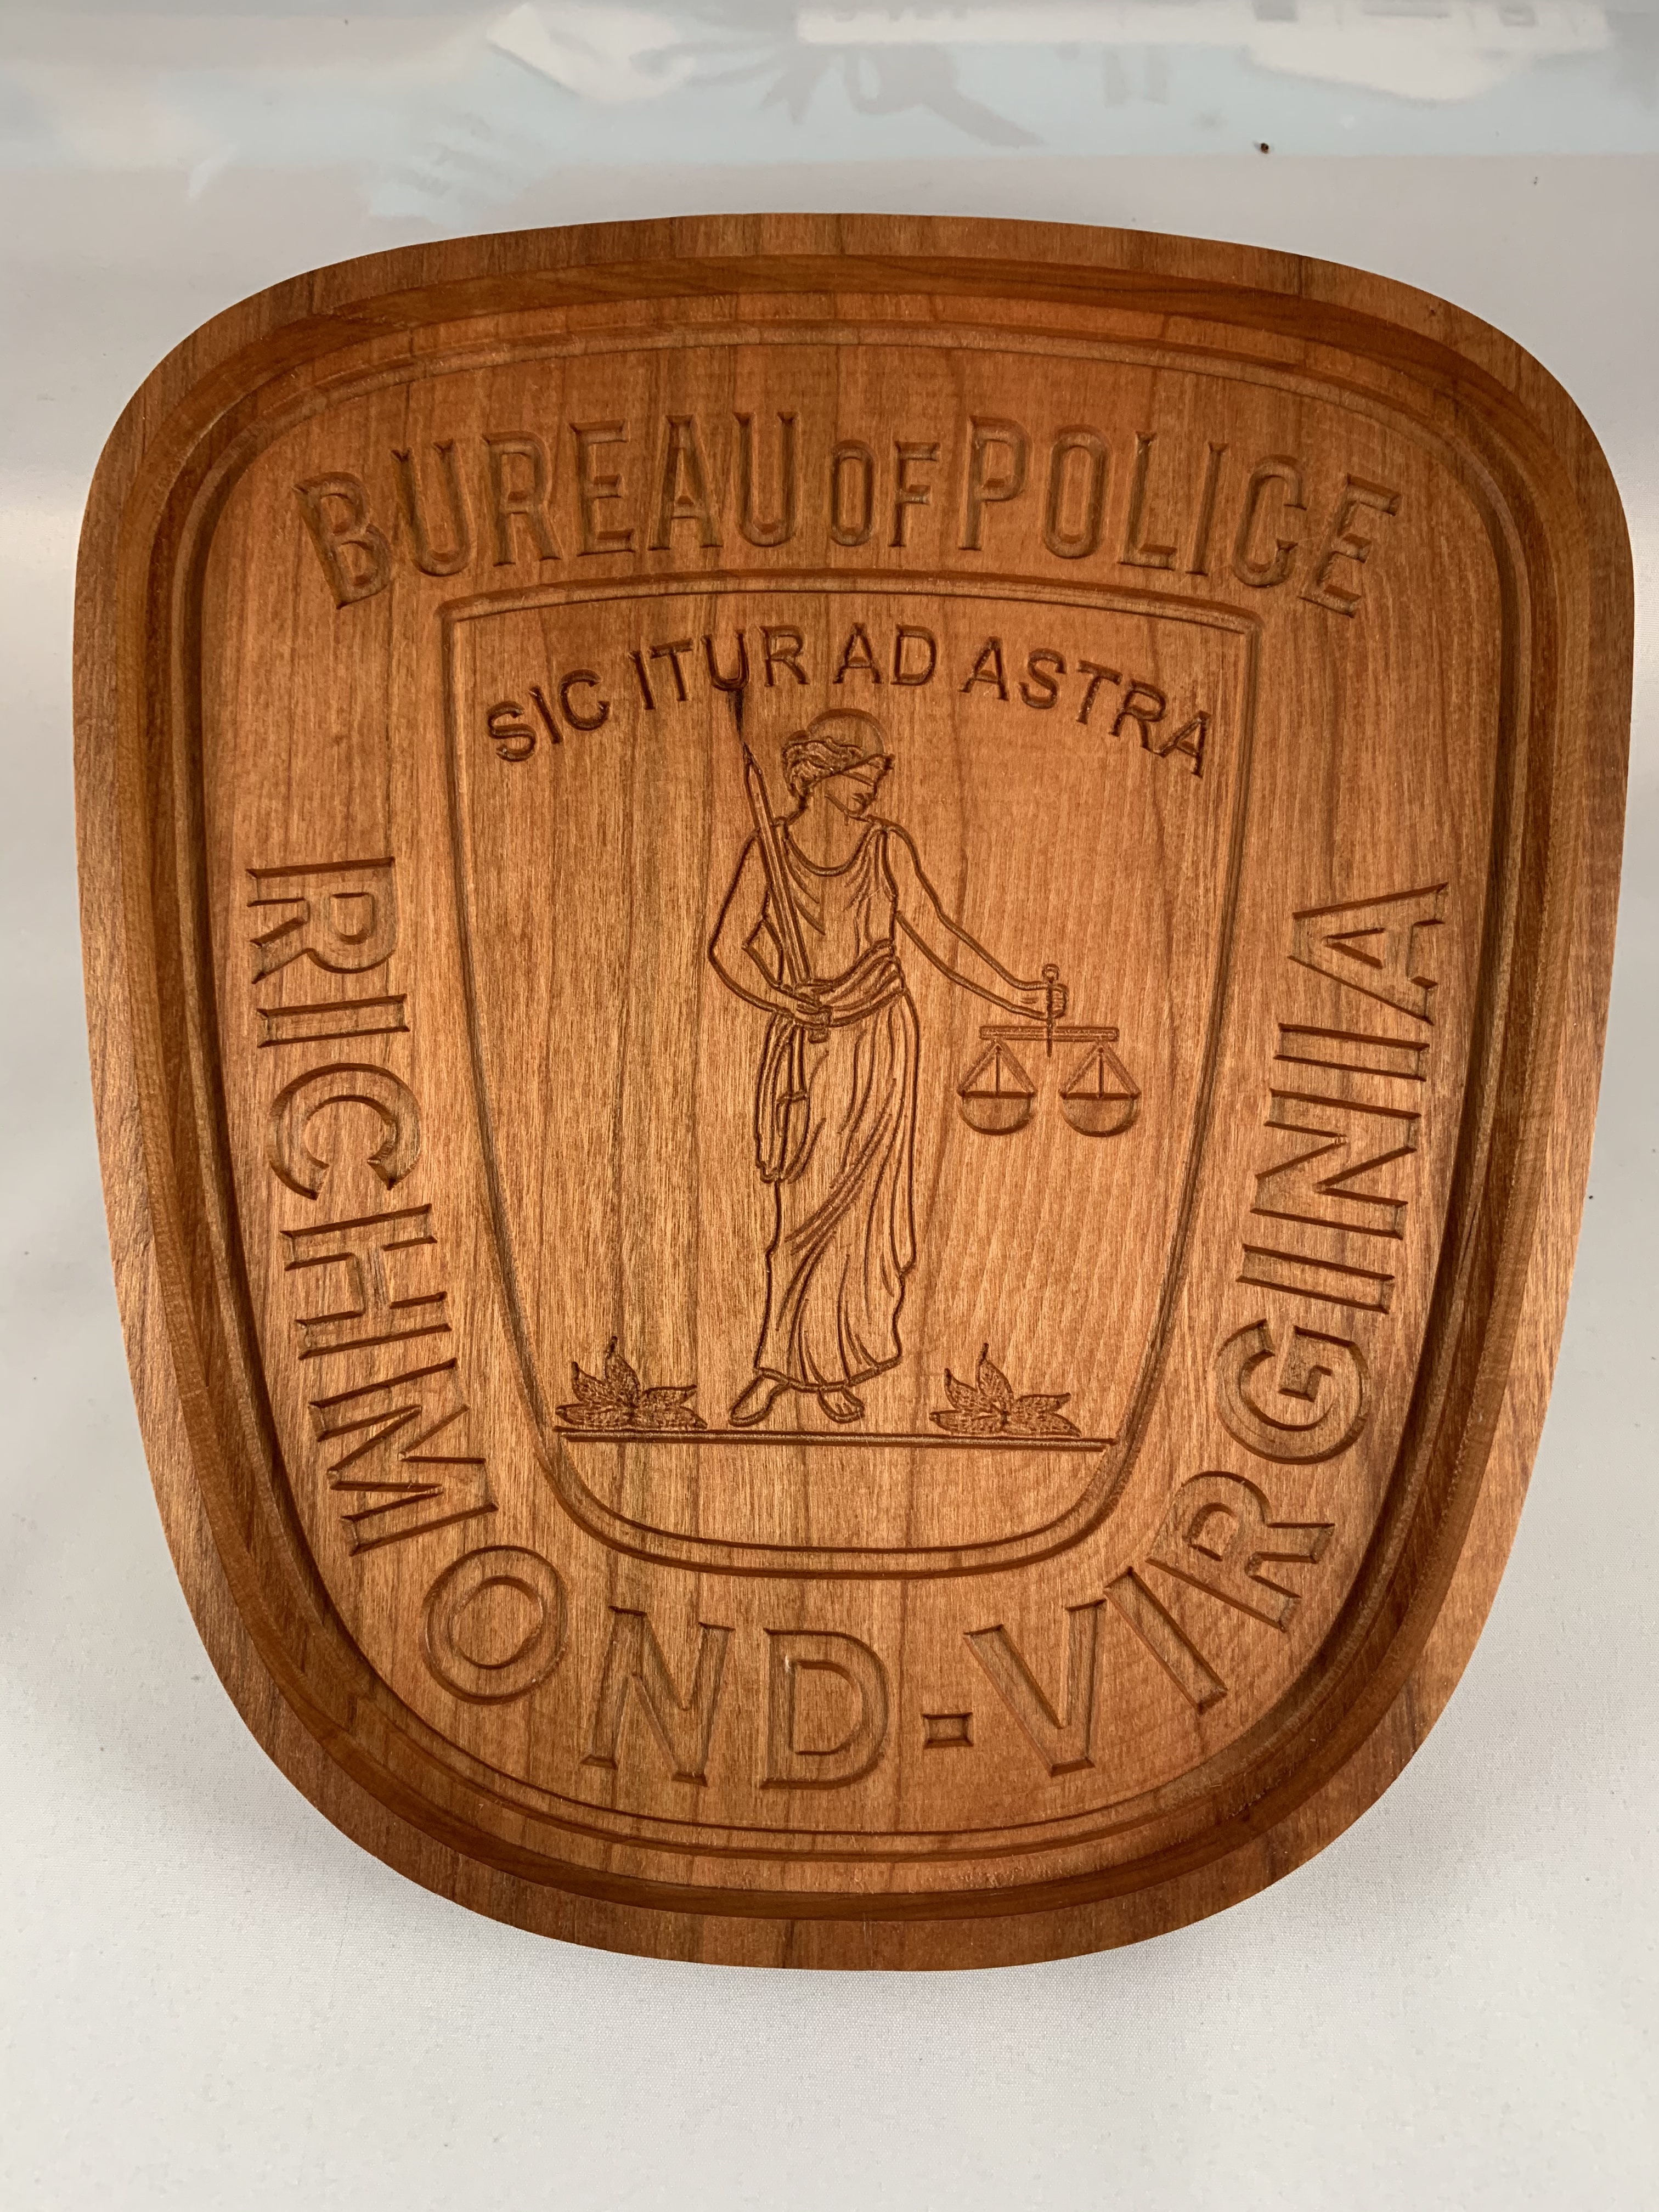
I’m back for some help with a specific file issue. I make these trays with various designs. This customer requested this fire dept logo. I cut it the first time and it turned out great, except for my human mishap at the end. On the cut out of the shape, the very last pass, I didn’t have something right and it cut through tab causing piece to move and ruined the last inch which ruined the whole piece. So I set up to do again. I did advance vcarve, and set start depth at bottom of the pocket I did which is.4 and did the depth of the advance vcarve at 5.5. It was too deep so I started over and set depth to go from.4 to .47 depth of cut. Well it didn’t turn out good. The first thing is the letters look terrible compared to the original one. Next, is it left material all throughout the cut as you see in the picture. I measured from top of pocket to the bottom of the logo carve and it is.13 deep, and should be .07 deep. I am using the carbide create beta version to design this file. The only other difference between first and this last is my first piece of wood was 9.25 wide, the last piece is 8.75 wide, so the design was shrunk just a bit. I feel like I either do not understand advance vcarve or I am doing something obvious wrong. I have done numerous trays like this and not had this depth issue. Thanks for help.

If the first carving worked, I think you understand things well.
It’s likely a mechanical issue of some sort — I would suggest setting up a really simple version of the file which has the same depths and cutting it as a test in a piece of scrap.
Cut and measure step-by-step and let us know what you find out.
Ok will do, try tomorrow
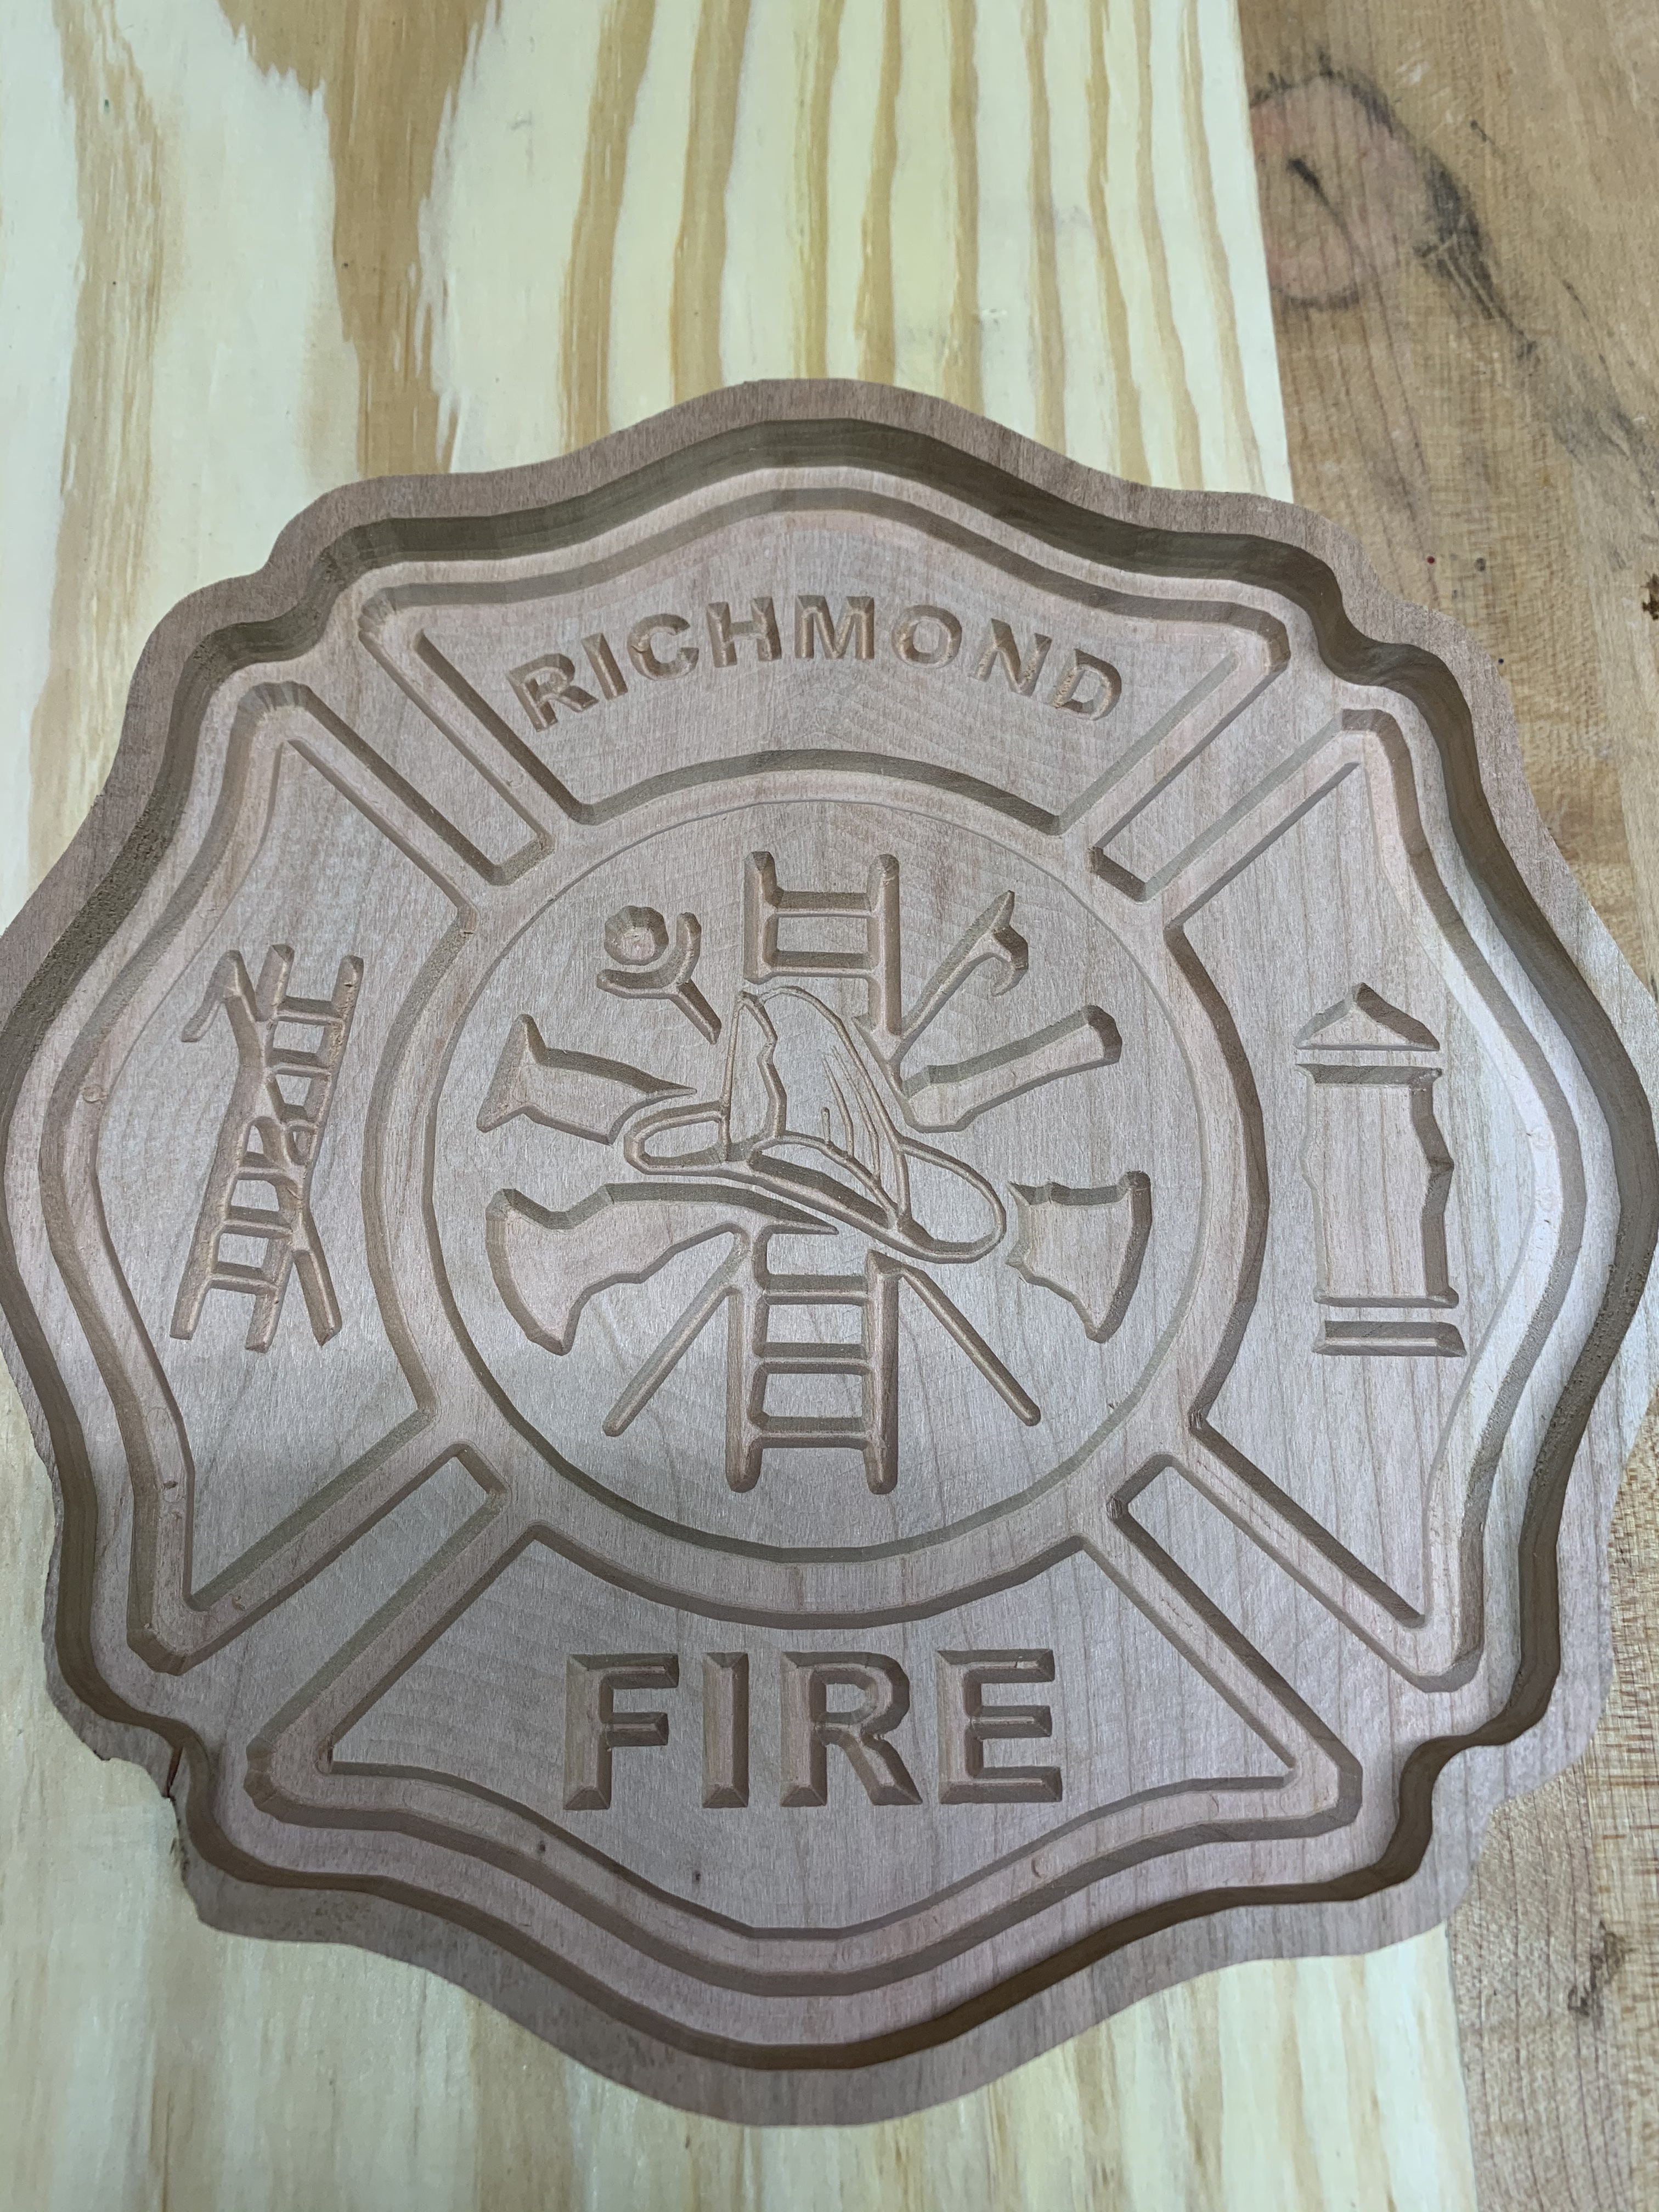
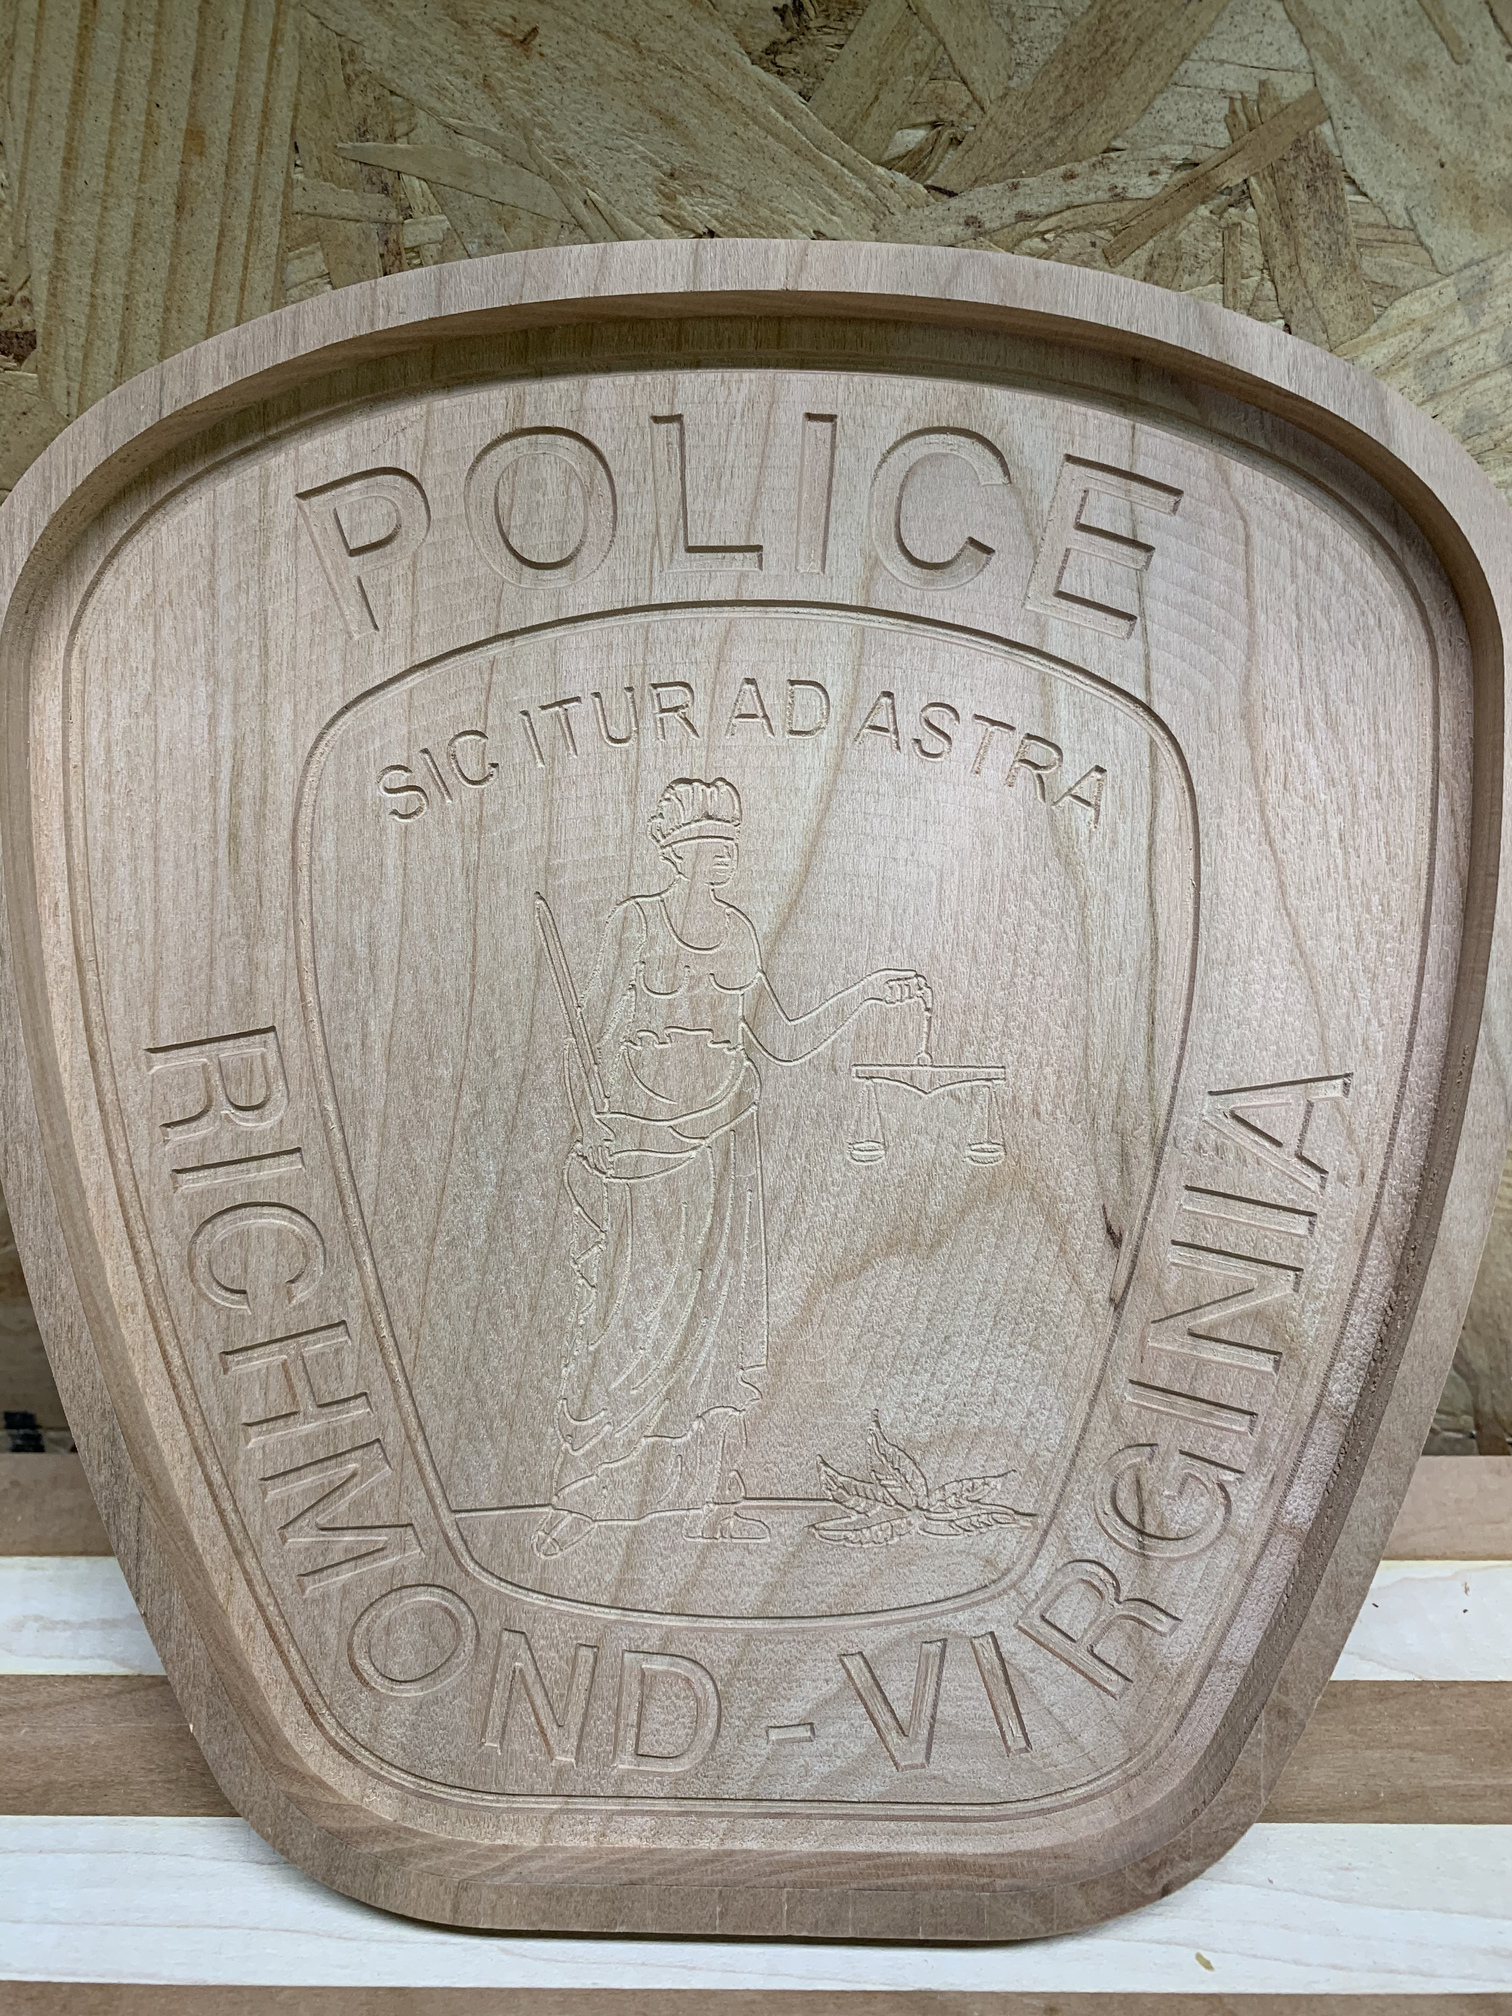
Good afternoon. I tried another cut on a scrap piece of pine. The only change I made was the depth of cut. My original cut, that looked good but I messed up, was a depth of .15. The start depth was inside the pocket but that was on the tray. The one I posted last night that cut way too deep on everything, I set the depth of cut at .07, trying for a shallower cut. Start depth was at .4, bottom of pocket, to depth of cut at .47. I got to thinking and decided to go back to the original parameters used on first tray. It worked perfect. As you can see in the picture it turned out much better. So, did I do something wrong on the second one that went too deep, or do I have an incorrect understanding of how advance v carve works. I learned to do this tray on Chris Powell’s video on you tube. I watched it again last night and a comment he made struck me. “Set the depth of cut deep enough to be as wide as the lines”. So, I thought using advance v carve allowed me to control the depth of the cut I want to make. But through this experiment I seem to not understand correctly. It turned out good, but For my learning, if I wanted this to be a shallower cut in the wood, how do I do that? Or, is all this rambling in correct and I did something wrong on the messed up cut? Thank you very much for helping me learn.
There are a couple of interactions here:
- how the origin is set in the file
- where you set zero
- how deep you set the cut
You need to make all of these things line up.
OK. I don’t really understand the problem or the fix.
- The origin? what do you mean by that.
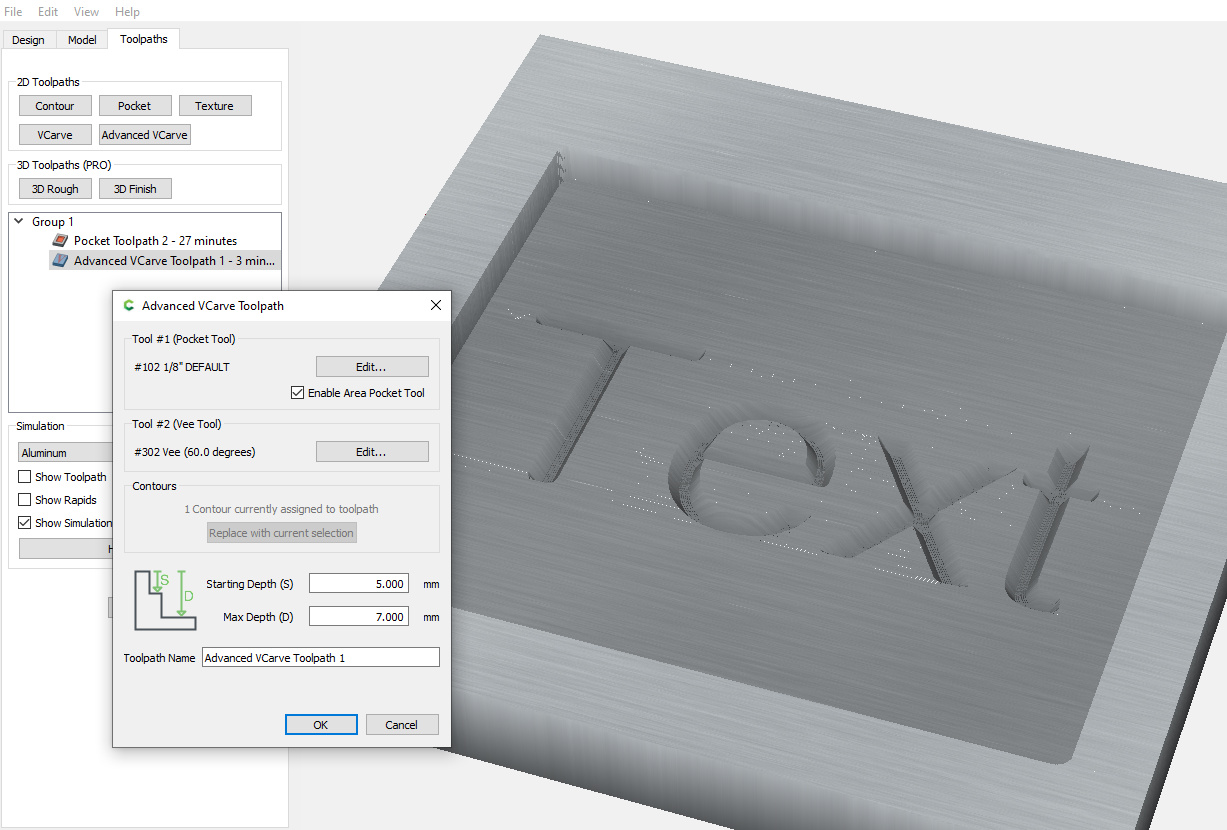
- I am setting zero on top of the board, in the center. I cut the pocket first. After the pocket I go back to the same start point in the center and same Z position and start the advanced V carve from there. The way my advance v carve is set, it goes from zero, to the bottom of the pocket at .4 and cuts to the depth of .55
- I set depth of cut at .55 from start position of .4, total of .15.
- so I do not see how it is cutting fine doing it on top of the board, but in this pocket, i am having this problem.
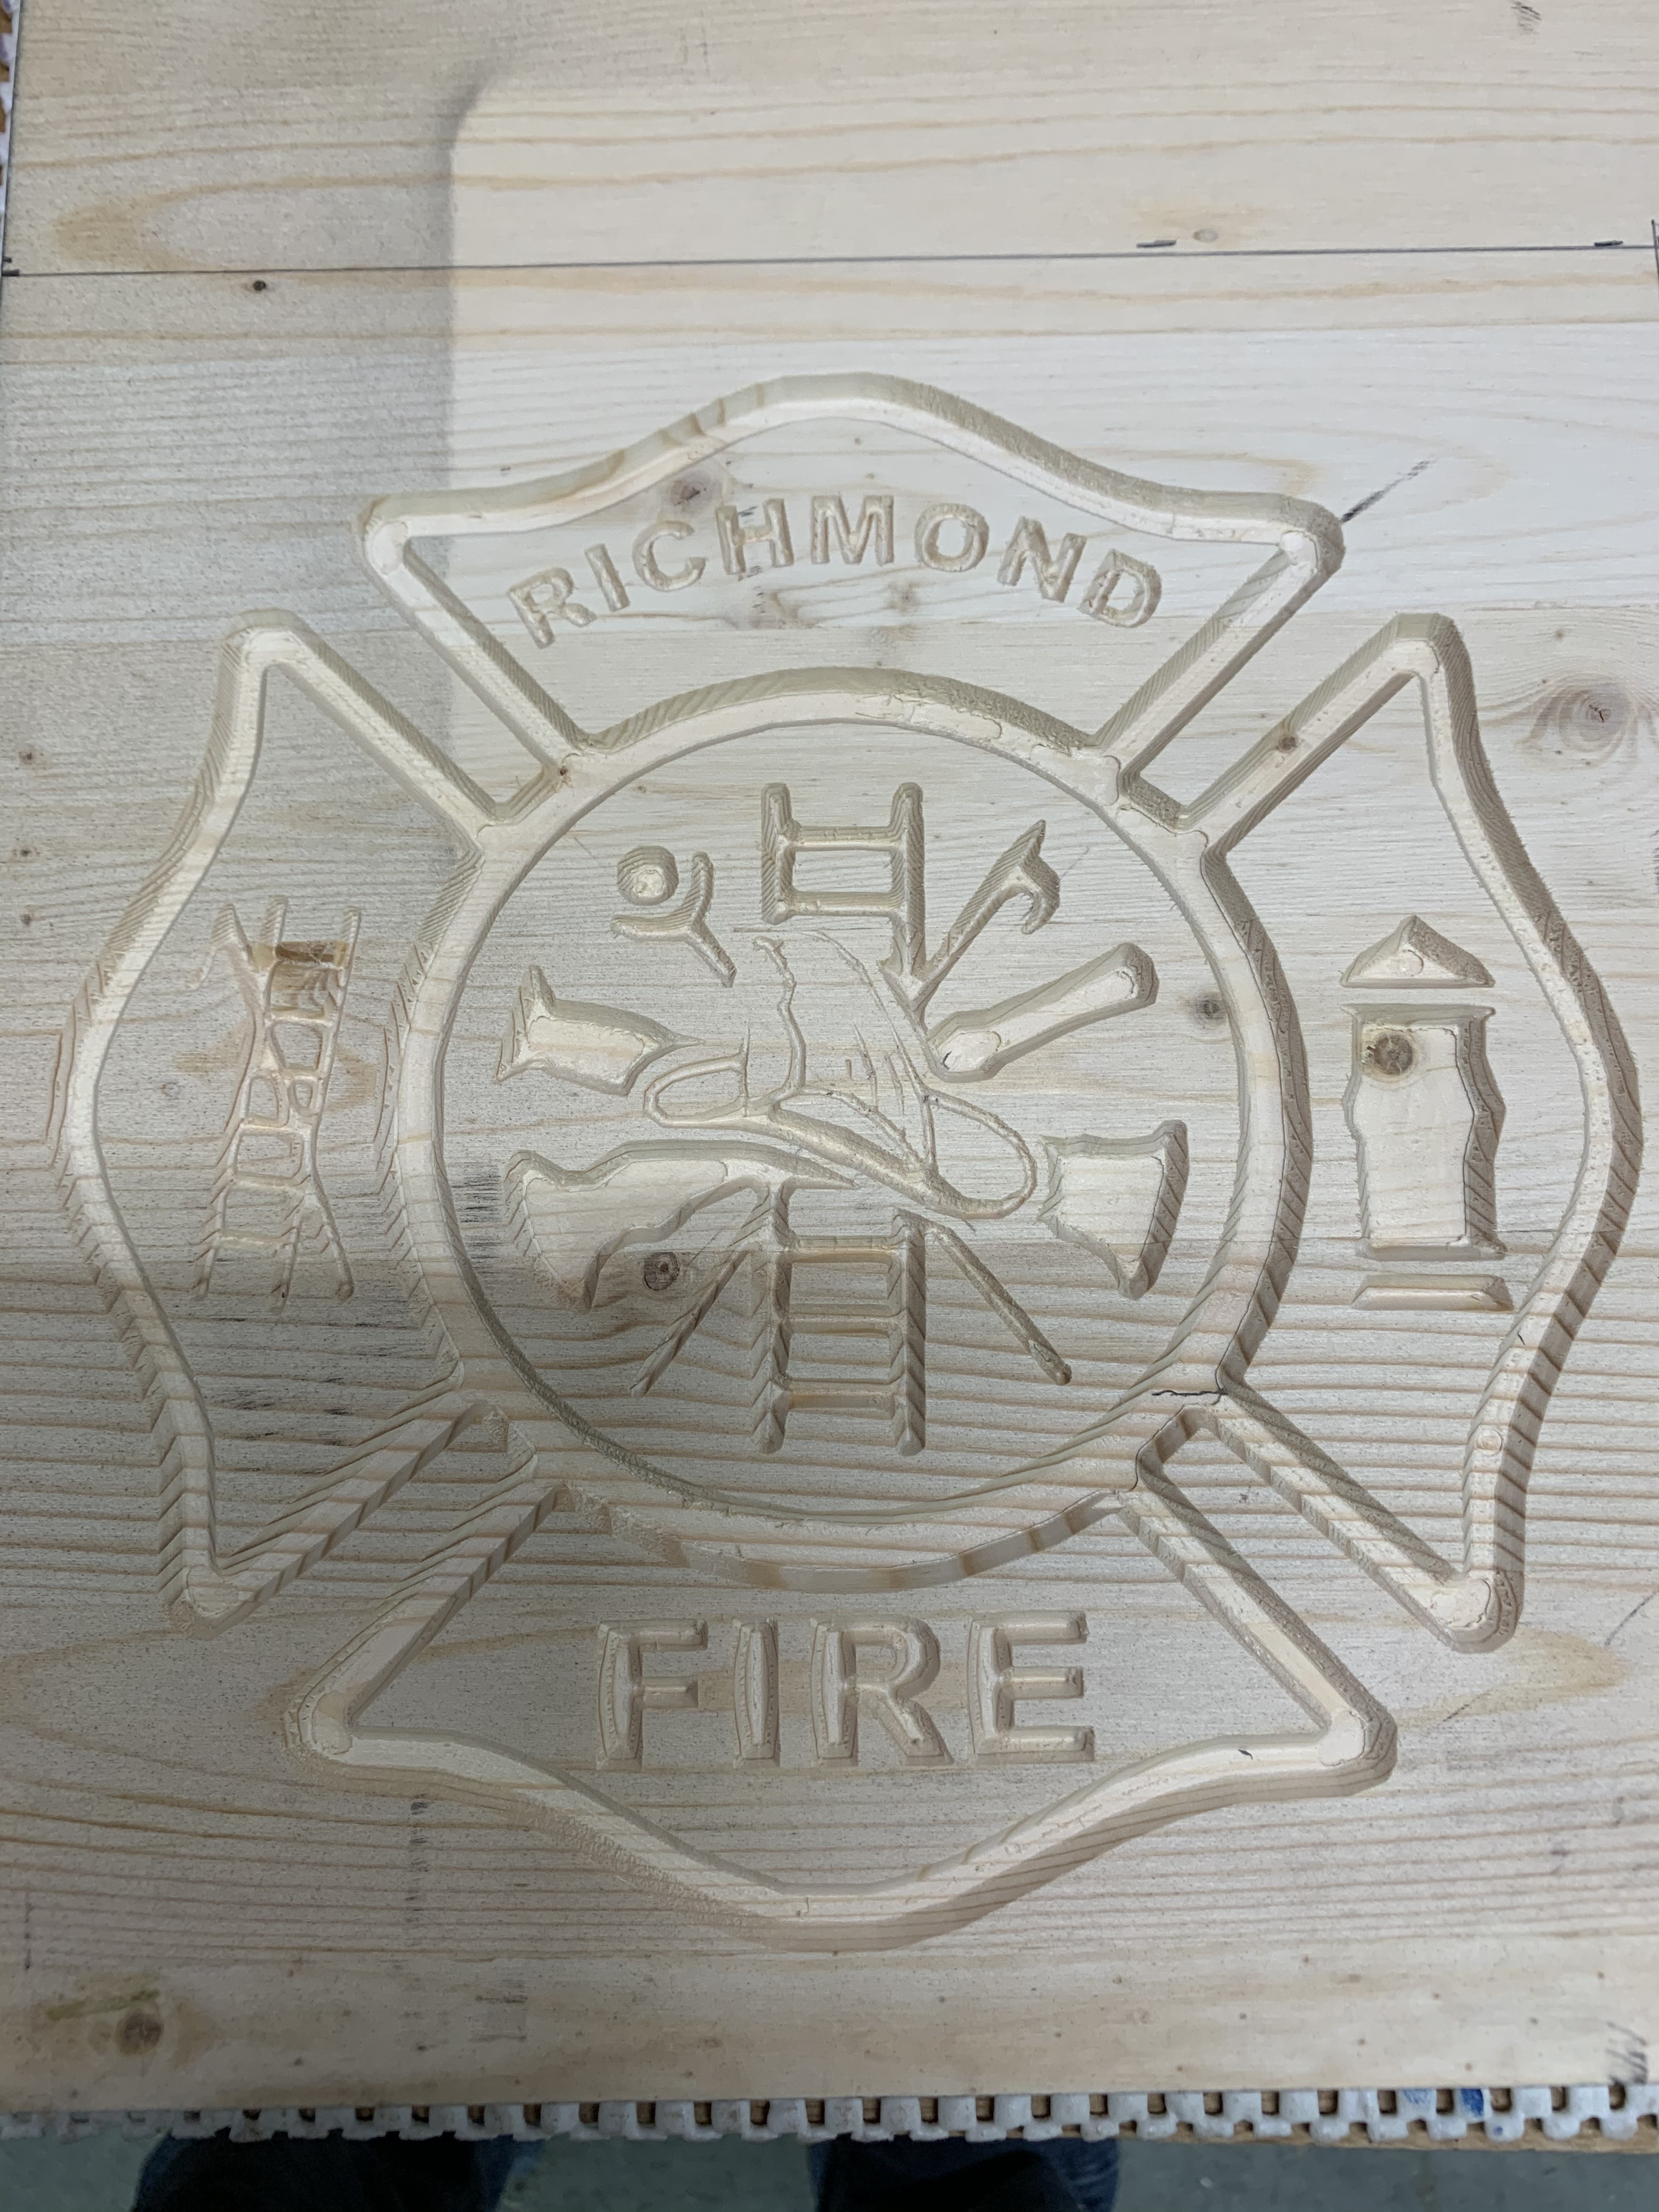
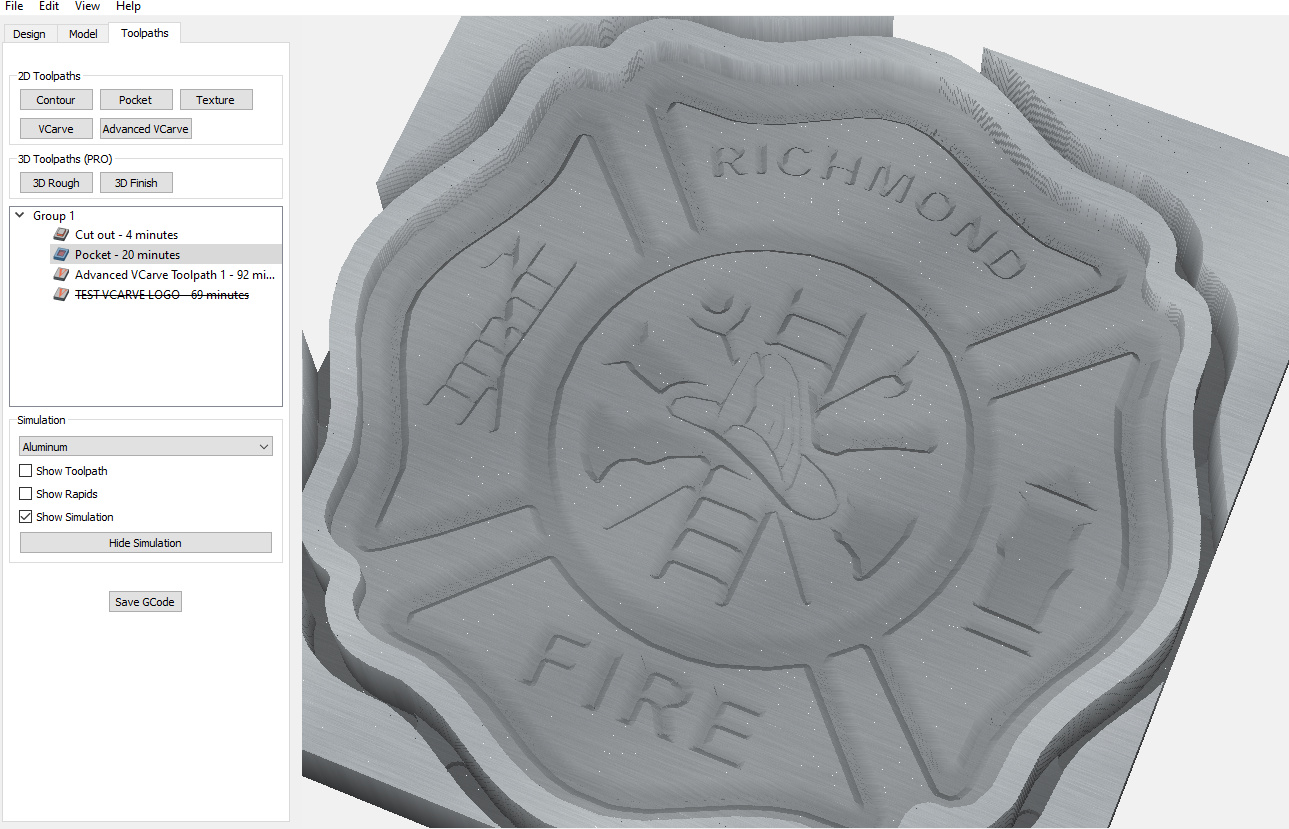
I am attaching my file. I created a test file that I ran on the pine and it ran perfect. The other one is the same cut in the pocket. What is totally weird to me is one file takes 69 minutes and the other identical file takes 92 minutes. Same exact file, one just cuts on top of the board the other in te pocket. - and last tid bit. All of this is being done in beta version. I tried setting up in 474 and even weirder, same exact file, same data, shows 2.5 hour cut time.fire catch tray cc beta.c2d (863.2 KB)
Hey Mike,
I’ll try and have a look at your file later today, but in the meantime there is something you can try that will work for sure and will (probably?) be less confusing: generate a separate G-code file for the advanced v-carve only, setting its start depth to zero just as if you were going to carve it on the top surface (which worked for you when you tried), but then after you milled the pocket and right before you run that advanced V-carve file, reset your Z zero to the bottom of the newly cut pocket. In other words, consider the bottom of the pocket as your top surface for the V-carve operation only.
Earlier this year, CC did not correctly support V-carving with a non-zero start depth, and I have not tried since then, so I’ll have a look.
Ok thank you. I will give that a try, but that’s why I am confused. I ha e done about 12 of these trays in varying designs and have not done the zero inside the pocket, but the way I ha e this one set up. Now all of a sudden it isn’t working. Thanks
So, I confirmed that there is no issue in CC with V-carving using a non-zero start depth,
It previews fine in your c2d file too,
And the generated G-code looks ok too,

But reading your earlier post I wonder: how many different g-code files are you using ? I suppose one for the pocket with the 1/4" tool, and another one for the advanced v-carve with the 1/8" clearing tool followed by the 60deg Vbit ? If so, I assume you have a bitsetter ? I wonder if the problem could be the way you change the tool between the 1/4" and the 1/8"
You nailed it, exactly how I have the file set up with the bits and everything. I do not have a bit setter, I use the stop collars, set the exact same.
I will certainly try the option you shared with zeroing it and the base of the pocket and see what it does that way. And the other thing I still don’t understand is the difference in run time between the same two files, just different start points. Thank you! I will follow up after the test run.
Don’t forget to check your retract height…
So I ran the project tonight. I ran it the way you suggested, rezeroing at bottom of the pocket, and it worked well. I was able to do complete this project without issues. Now I still don’t understand happened and can hopefully figure that out, since I do right many of these trays. Thank you for your help.
I agree, there s no reason why you shouldn’t be able to use a single file and a single zeroing on top, with your stop collar method (by the way is there any chance this might have been a stop collar moving a bit/slipping?)
Using your original approach, if you ever encounter the problem again, be sure to keep a copy of the c2d file before any further modification, the associated G-code file you ran, and notes on how your zeroed, for investigating. It’s all in the details that are easy to overlook.
Well, that was not the answer. I’m quite frustrated now, things are backing up and I am wasting material by the minute. So, I went to do 2 trays that I have done before. I made 3 of these back in September. Turned out great. I did a pocket, set the start depth at .4 and set depth of cut to .46. I did not have to rezero, I just used the same zero as I started with original height of wood. Worked great. Well, I have not touched the file since September. I opened it today, set my zero, ran the pocket and it was fine. I moved machine to same start point and ran the advanced vcarve logo inside the pocket. As soon as I heard the bit hit the wood I could tell it was too deep just by the sound. It was running the outside line of the patch so I let it go. When it did the letters, that told the story. Too deep, just like the other logo this all started with. I can’t think of anything to look at. I have not touched the file since September when it worked great, today I opened and only change I made was changing the wood size from 9.5” to 8 7/8” and resized the image to fit and saved geodes. I go to to thinking about programming. In September I was using version 414. Since then I downloaded the newest version of carbide create as well as the beta version of carbide create. After this is when the problems began. I’m not blaming, but only trying to lay out anything that has changed. When I ran this project today it was NOT in the beta version but the latest version. I will upload the file shortly, but I am truly lost and don’t know what to do and have projects piling up and wood going to waste. Please help anybody…Bureau of Police patch tray.c2d (1.7 MB)


It looks to be gradually losing steps which would seem to be something mechanical.
https://wiki.shapeoko.com/index.php/FAQ#Z-axis_plunges_too_deeply
Ok. I’m listening. But if it’s mechanical would it it do it on all of my projects? I can run the same logo on a board, which I did, but zero it and run it directly on top of the board. The problem (recently) is when I set it in advance v carve to start at the base of the pocket. No other job am I having this problem. I just ran a hour and half job, advance vcarve, and it worked just fine. However this job was done directly on top of the board top, not in a pocket like the trays.
Which Z axis do you have?
If you’re losing Z steps, it will depend on how many plunges there are. Etiher 1) the z plunge rate is too high or 2) it’s something mechanical slipping in the Z axis a little bit on each/many plunges.
Belt, original no upgrades