I recently finished a fun project for my friend — a double-sided electric guitar inspired by the Frankenstrat/Van Halen style.
Material: Edge-glued ash, sourced from upstate New York.
Design & Machining: Modeled and toolpathed in Carbide Create. I ran into a few issues translating the G-code properly, but after some tweaks it worked out.
Result: The body came out clean and solid. Ash has a nice grain for finishing, and the weight gives it a solid stage feel.
This was one of my first full-size instrument builds on the CNC, and I’m really happy with how it turned out. Still dialing in the details, but it plays and sounds great.
Happy to answer questions or share the CAD/CAM setup if anyone’s curious.
Model Import: We started with the guitar body as an STL, scaled it to size, and then brought in vector artwork from an SVG. From there we isolated the areas that needed 3D finishing versus just roughing.
Toolpaths: For 3D roughing, we ran a baseline of around 100 IPM, and in production we were able to push it closer to 150 IPM using a roughing bit. Solid ash cuts surprisingly well — the Shapeoko handled it just fine.
Zero & Indexing: You’ll want your zero point set on center, because you’ll be running two files: one for the front and one for the back. They need to be mirror opposites. After you finish one side, you flip it and index against a square (or use pins if you want higher accuracy). Since it’s wood, we just squared it up and still got accurate results. Also flip left to right not diagonal.
Finishing: Once roughing was done, we isolated those zones that needed 3D finishing and ran those passes separately.
That workflow gave us a clean carve front and back without too much hassle. 3-4hours total
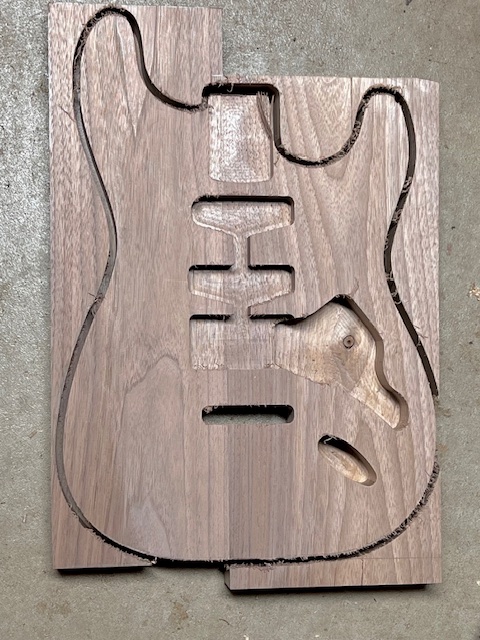
I have made several guitars (Strats and Les Pauls). I cut this one last week from some glued up walnut boards from a tree in my backyard. It will be a little heavier than most of my other guitars but the wood is cool.
I use my CNC to pocket out the holes for the hardware and to cut out the rough shape. Then I use round over bits on my router and a spindle sander to shape the front and back contours. It usually takes me about an hour to shape the guitar before I start sanding and finishing. Honestly, I can get much more complex and interesting contour shapes on the front and back using other power tools than the CNC for the final shaping and can even do the work a little faster. The CNC though is invaluable for the front and rear pockets.
That’s awesome — very cool to see a similar build! My buddy got the file online, so it’s cool to compare the process. Really love how your finish came out — that walnut looks sharp. My friend’s in the middle of finishing his right now, but if I can grab some more pics I’ll share them here. Always great to see different takes on the same style!
One trick I use is to cut out the front of the guitar first. Then I drill a small hole in the exact middle of the bridge opening. Then I use that hole as my center zeroing position for my CC file for cutting out the pockets on the back of the guitar. This way, the front and rear pockets line up perfectly and it is easy to center everything.