Dremel attachment to nomad 883

I made this today, and must share with you all.

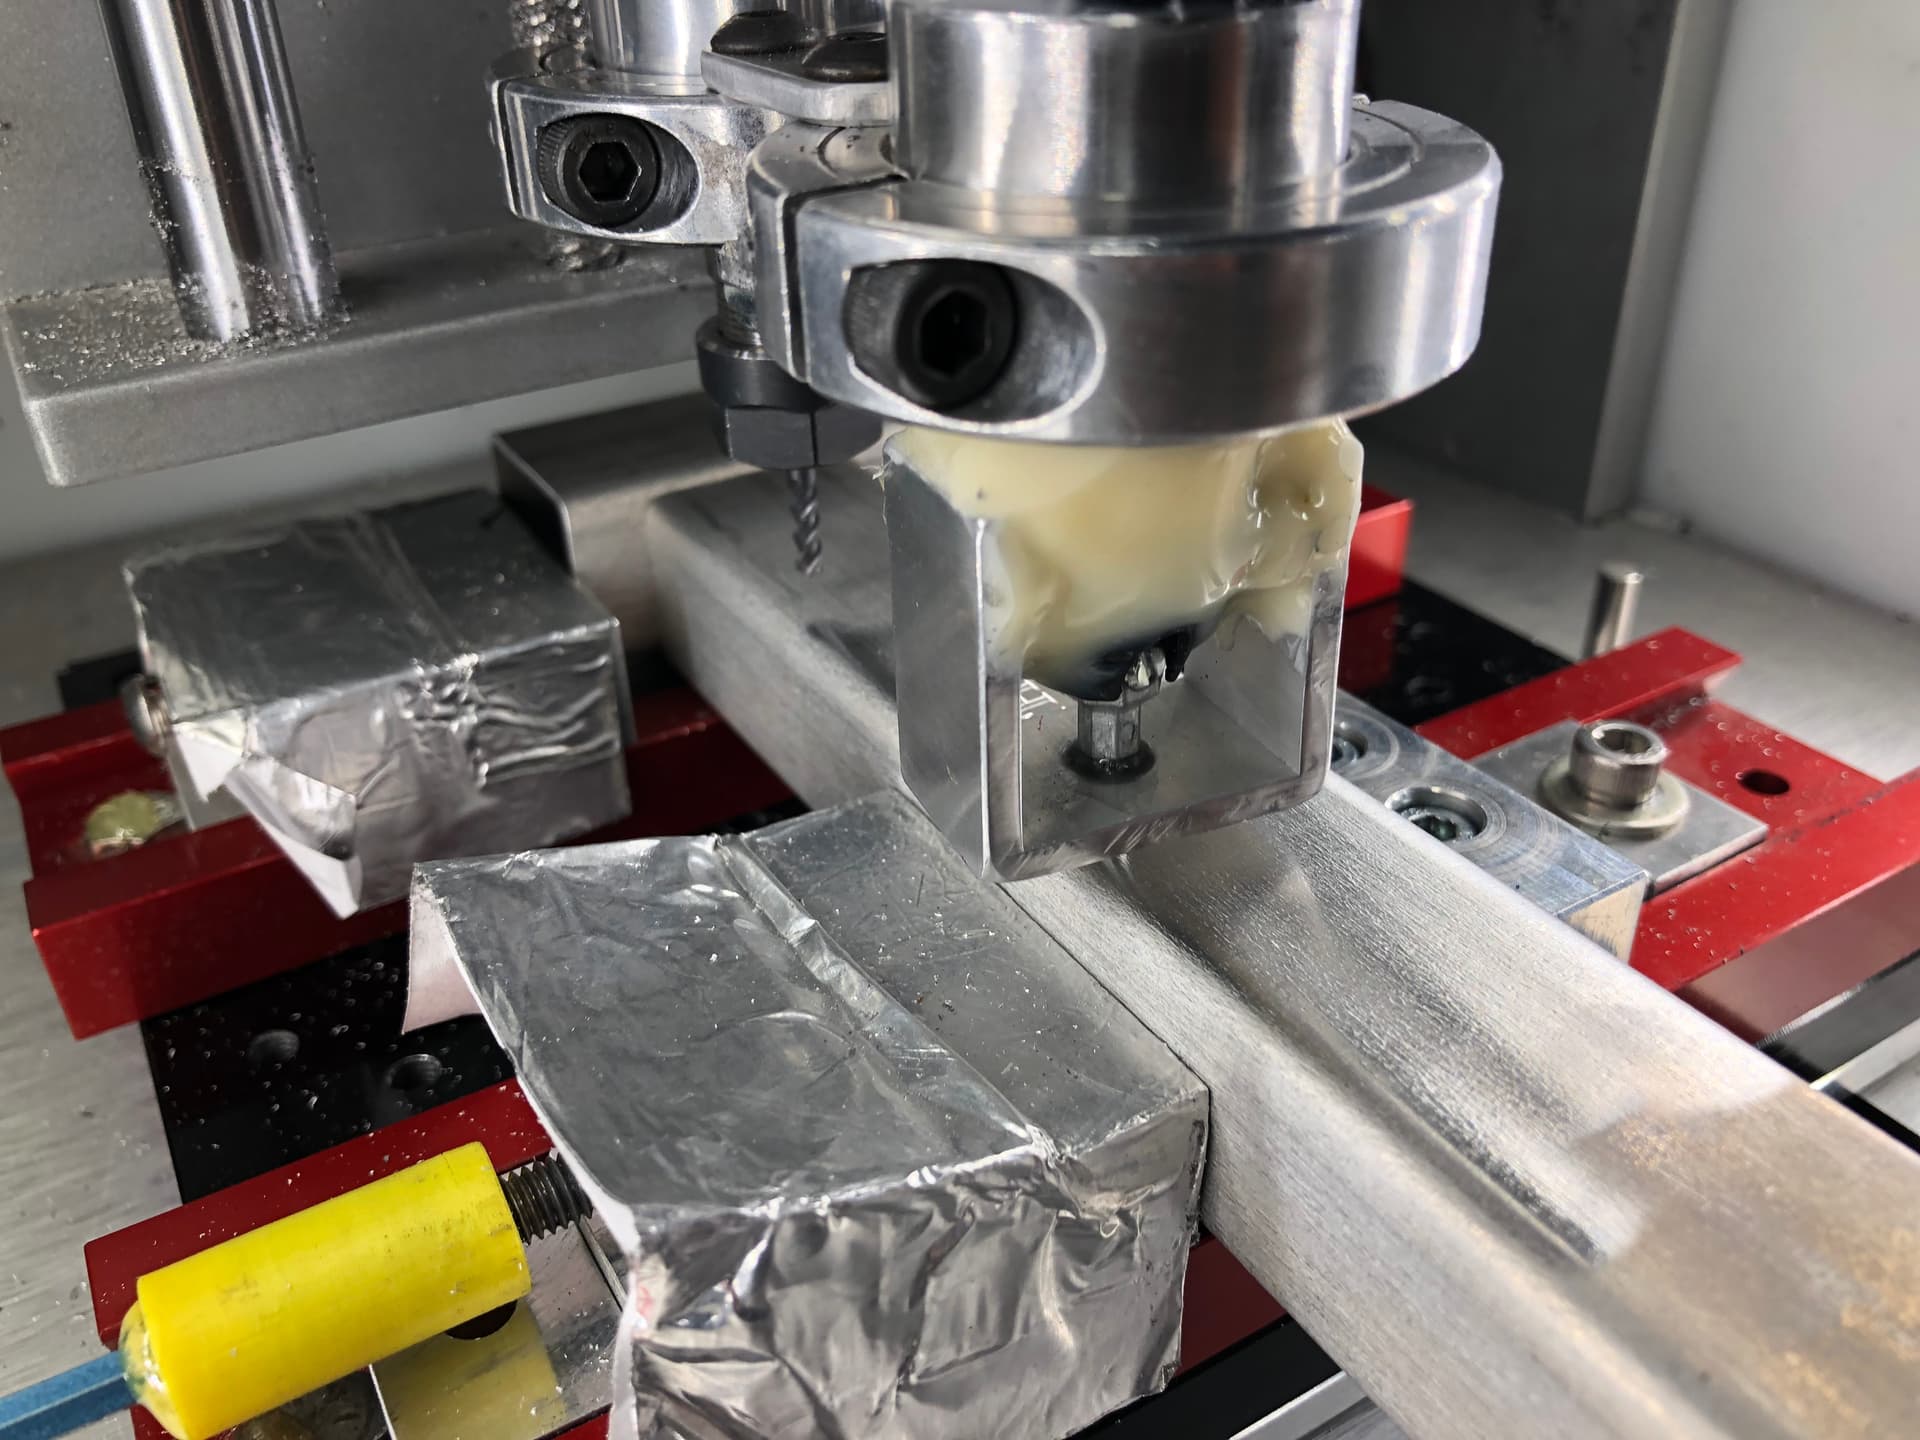
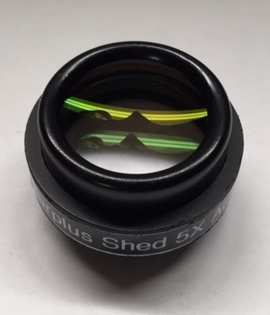
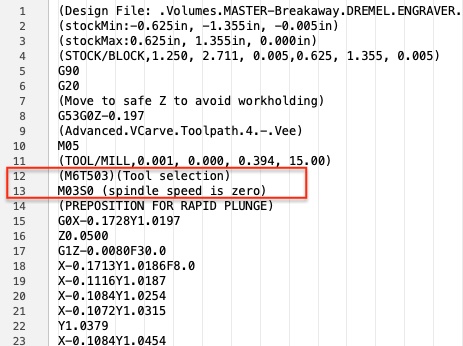
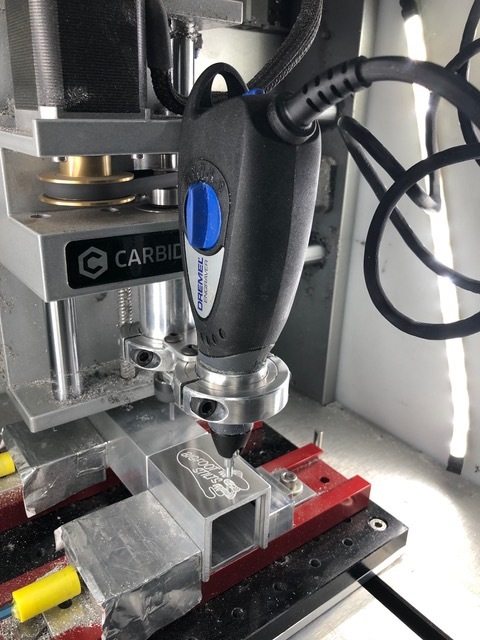
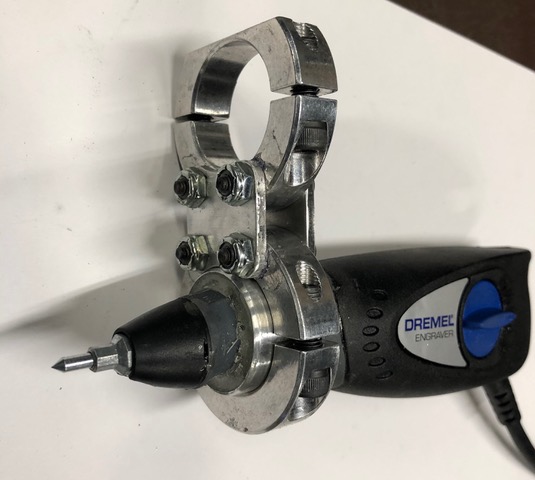
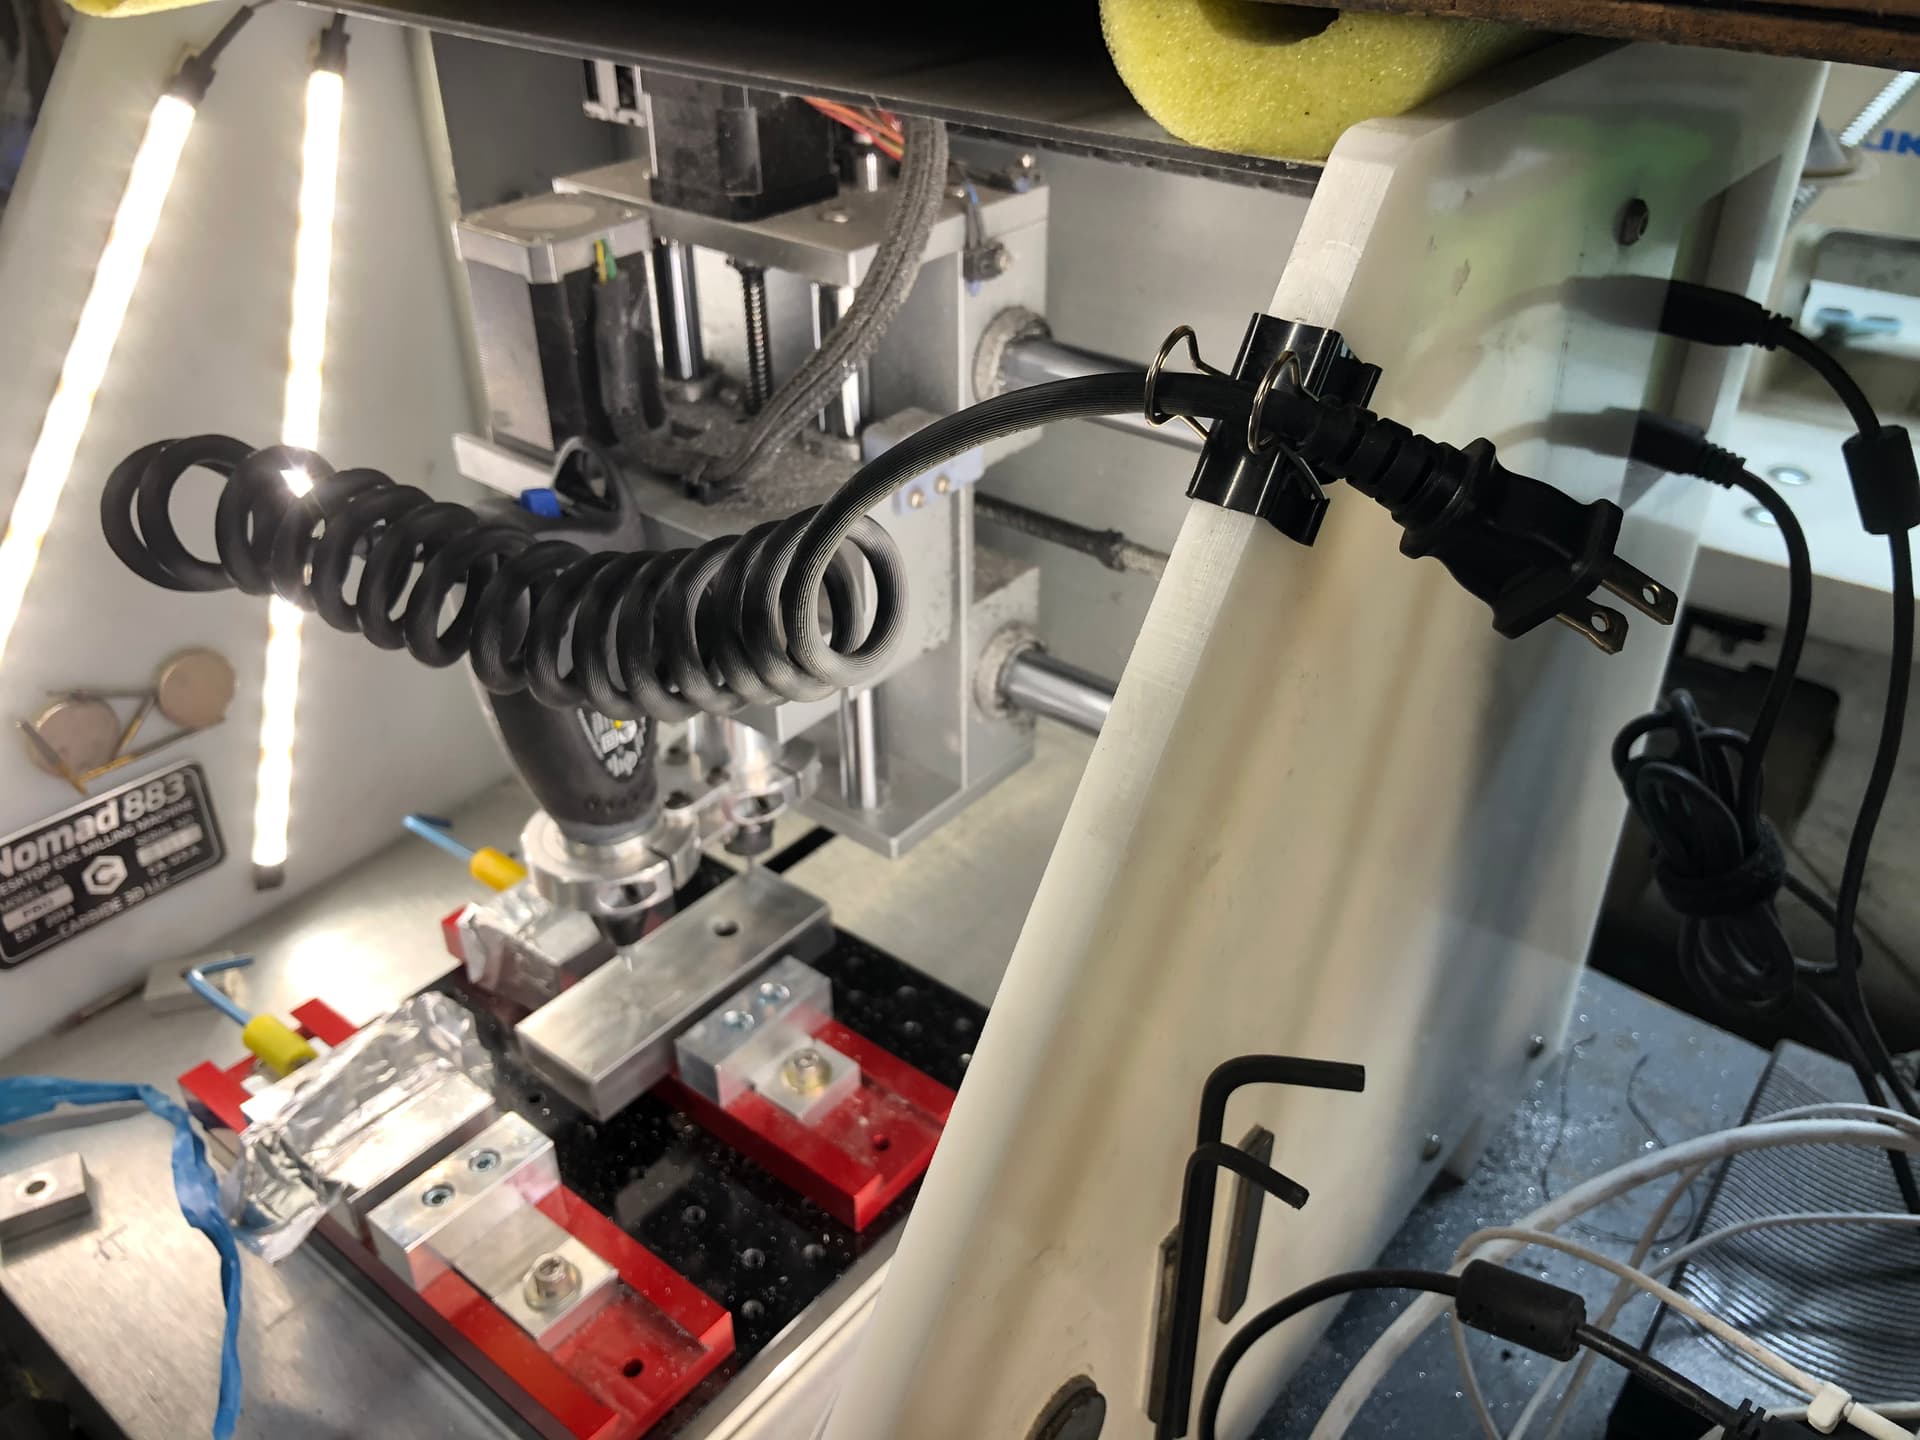
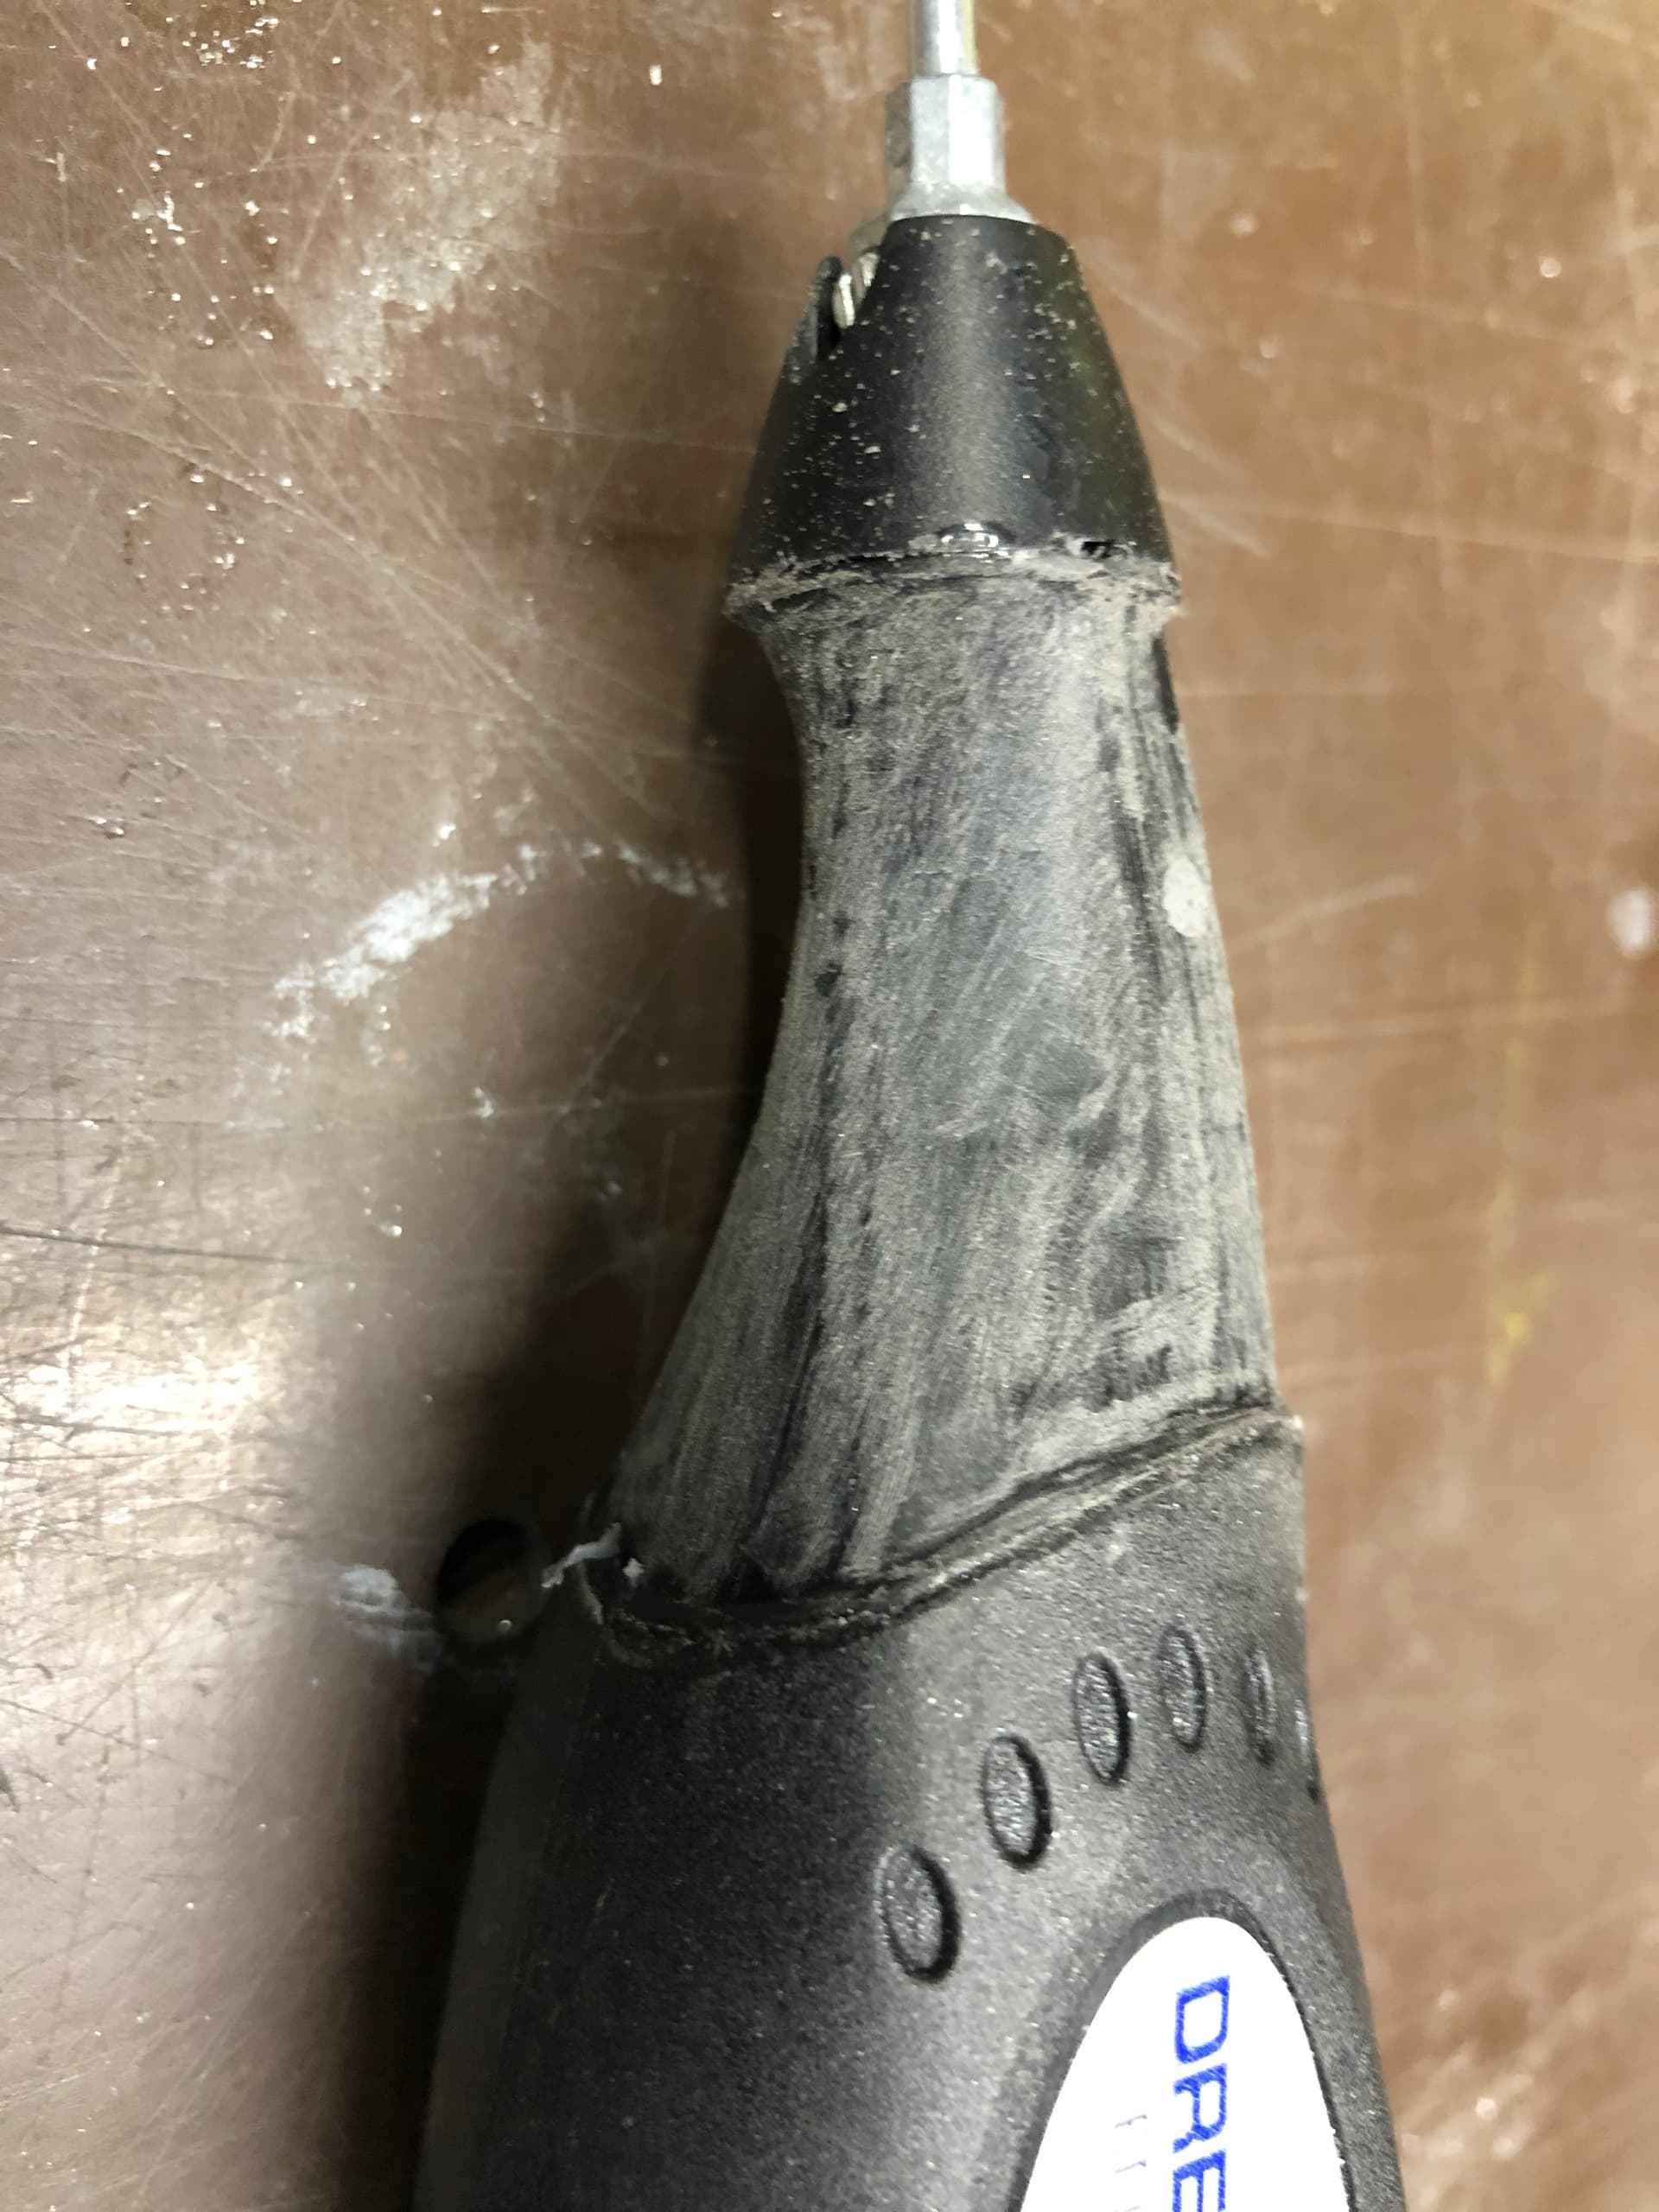
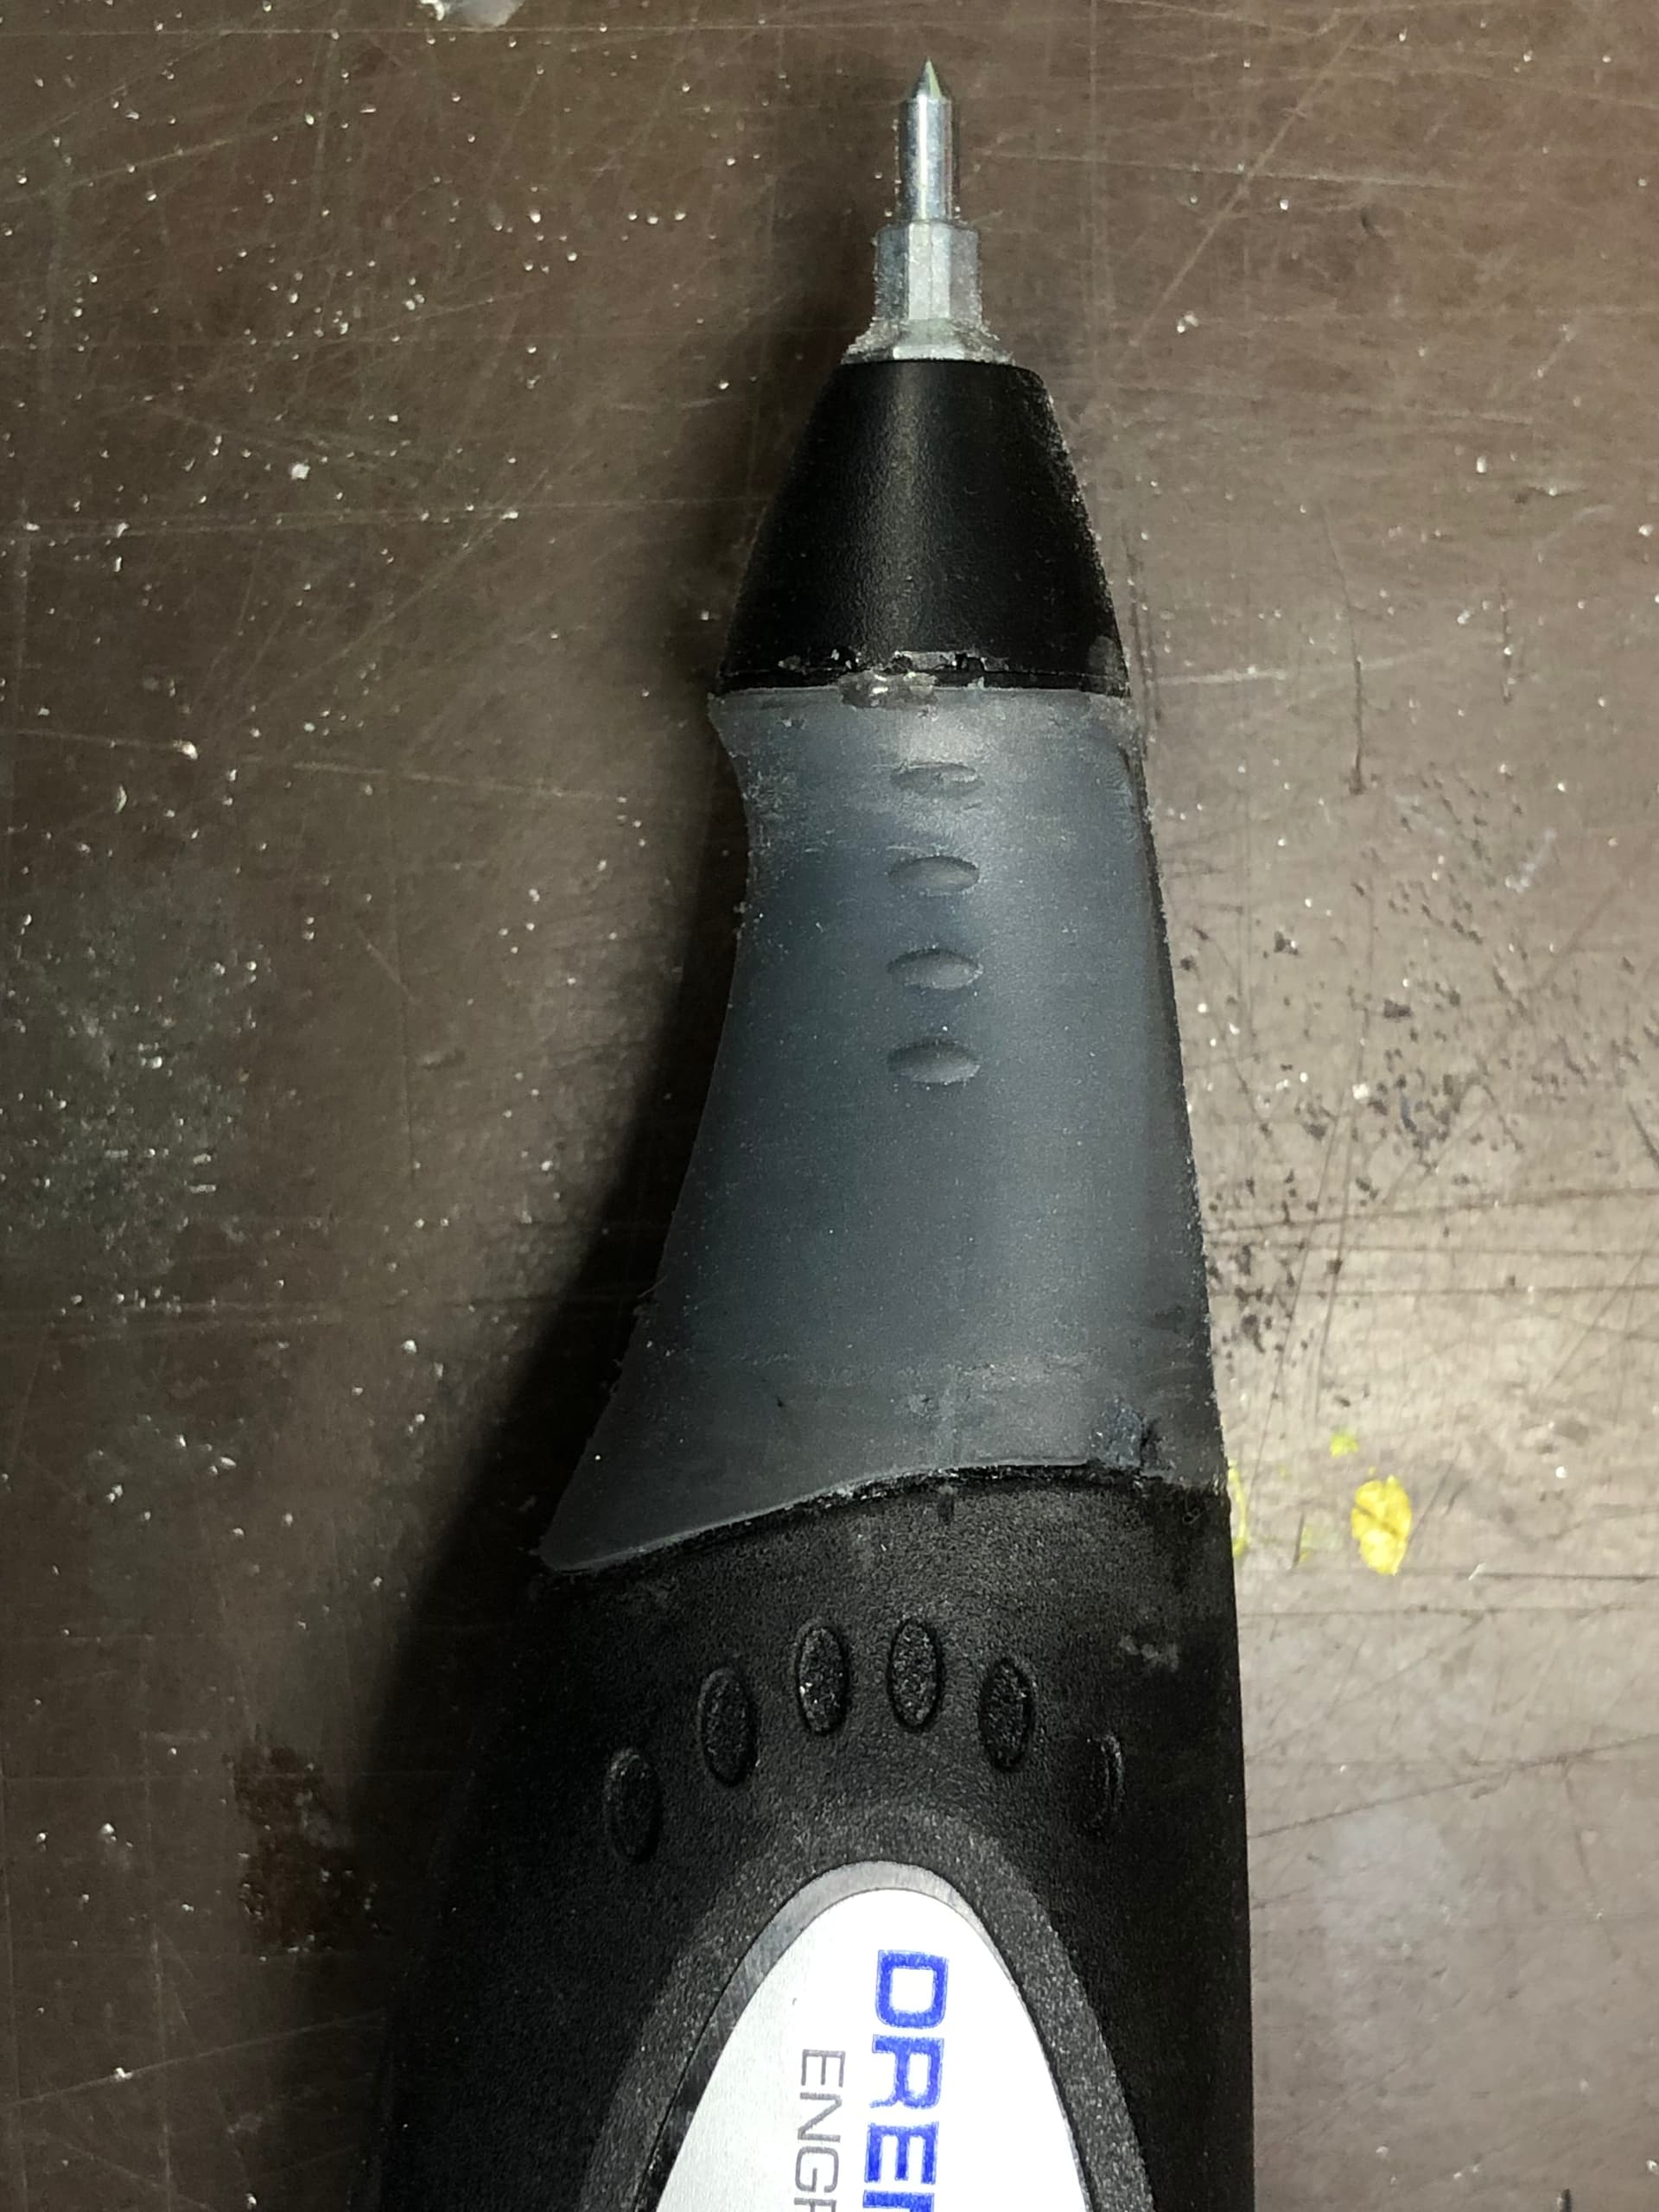
I mounted a Dremel 290-01 120-Volt Engraver to a Nomad 883. The results were amazing.

The spindle of the Nomad is 1.250” diameter. I can connect to it with 1.25” split shaft collar.

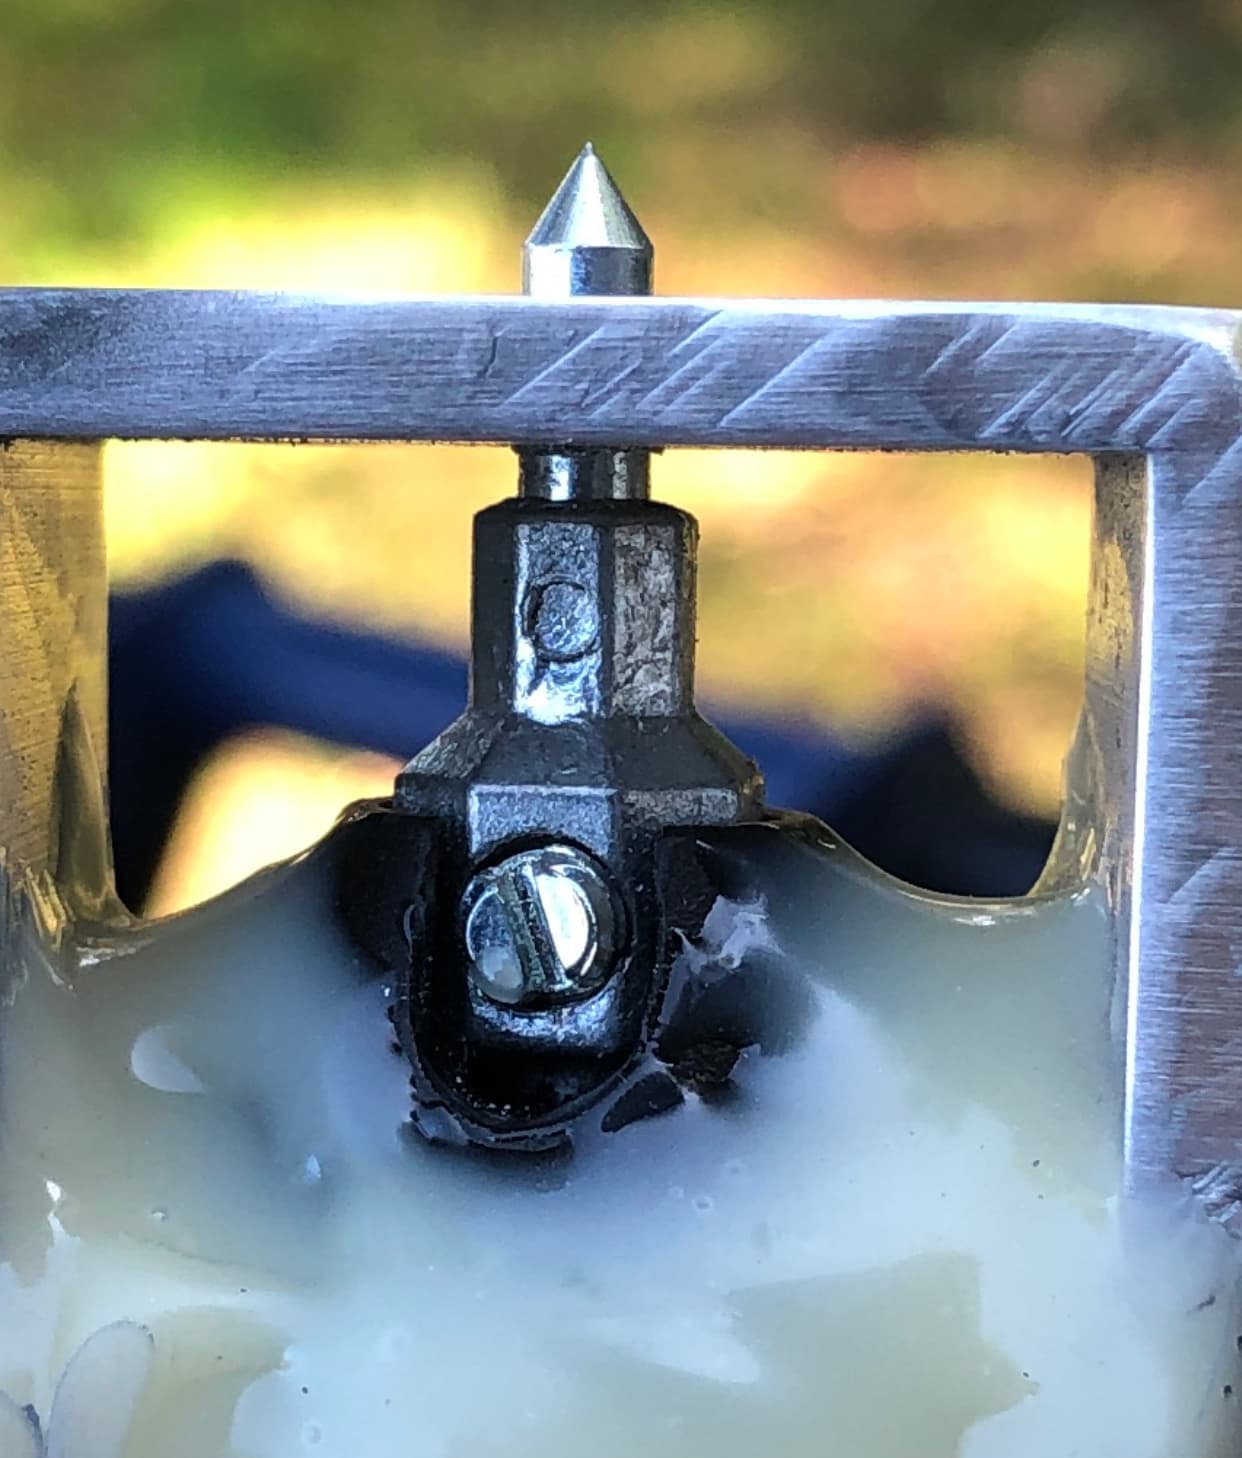
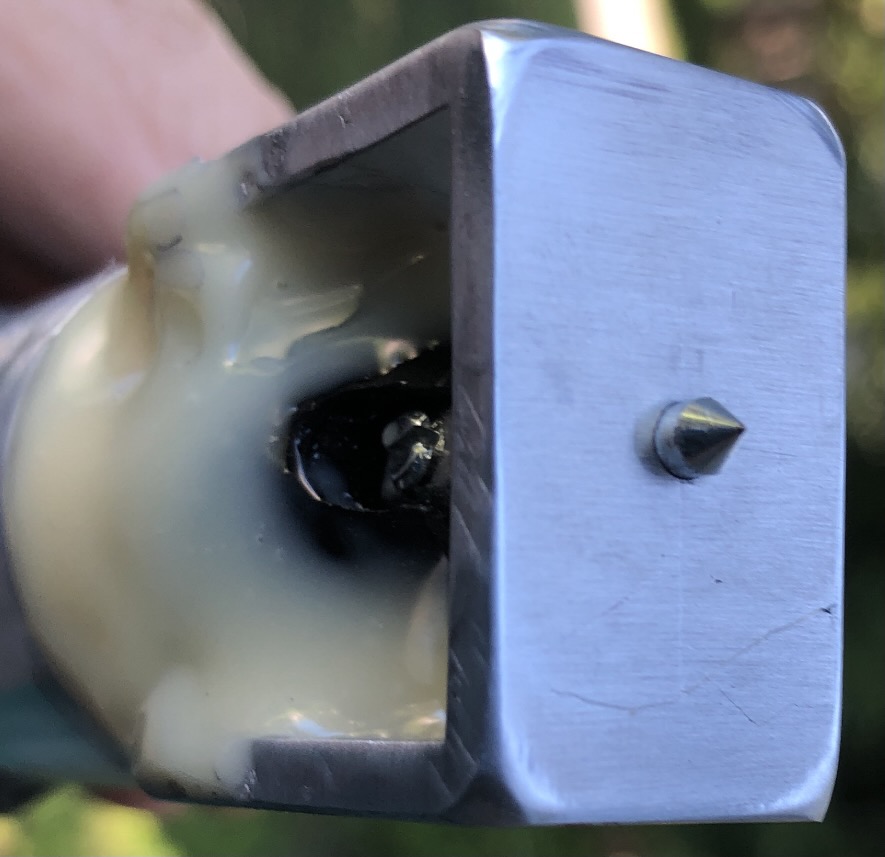
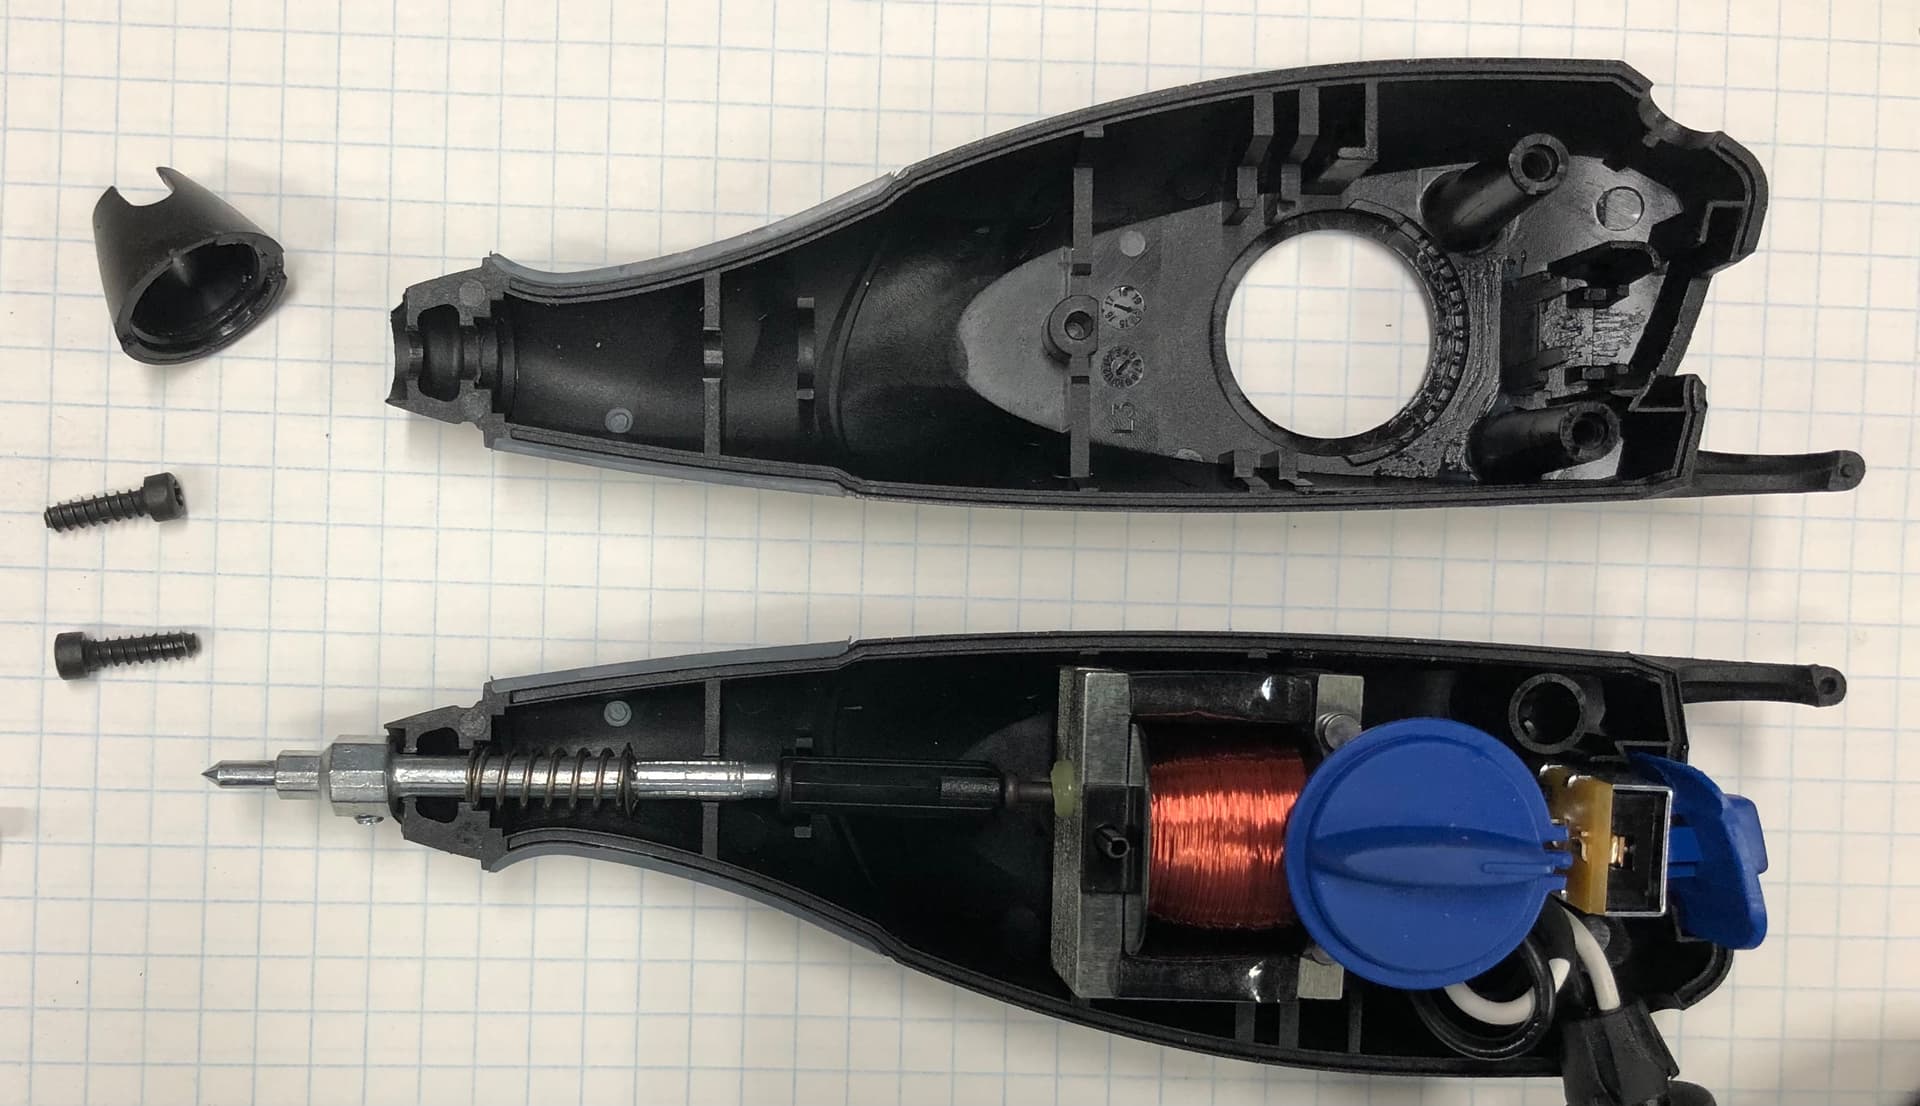
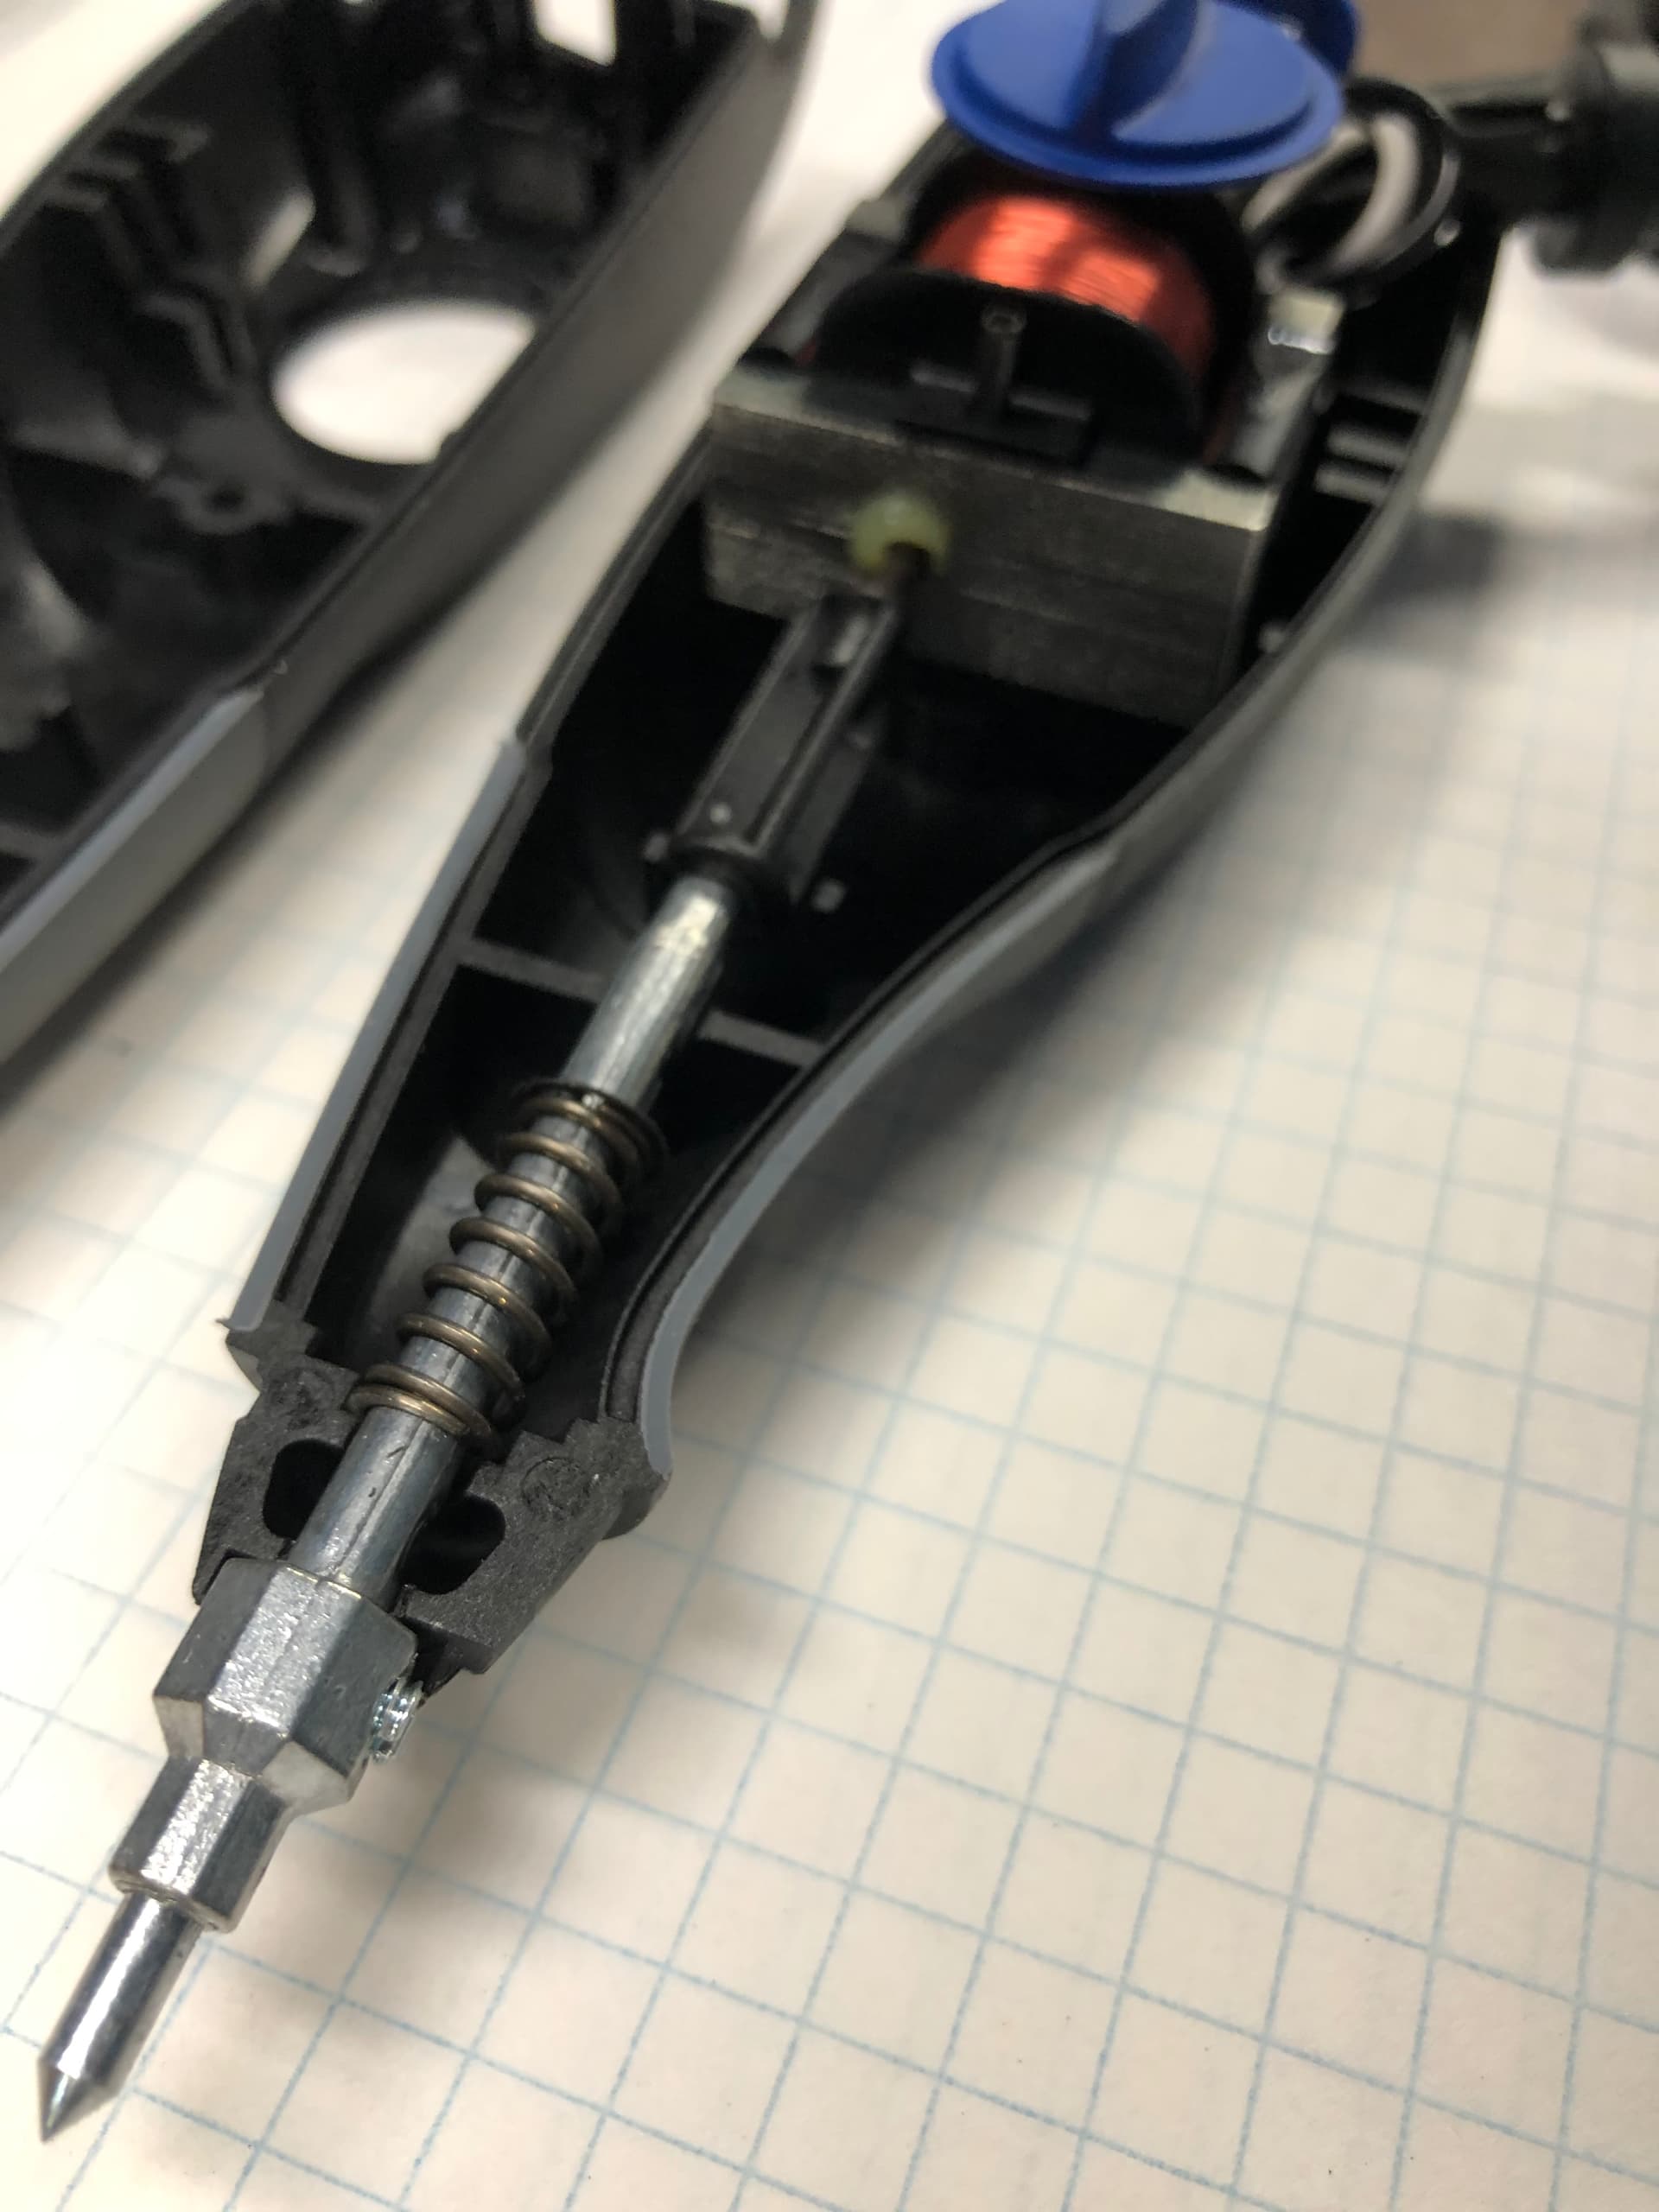
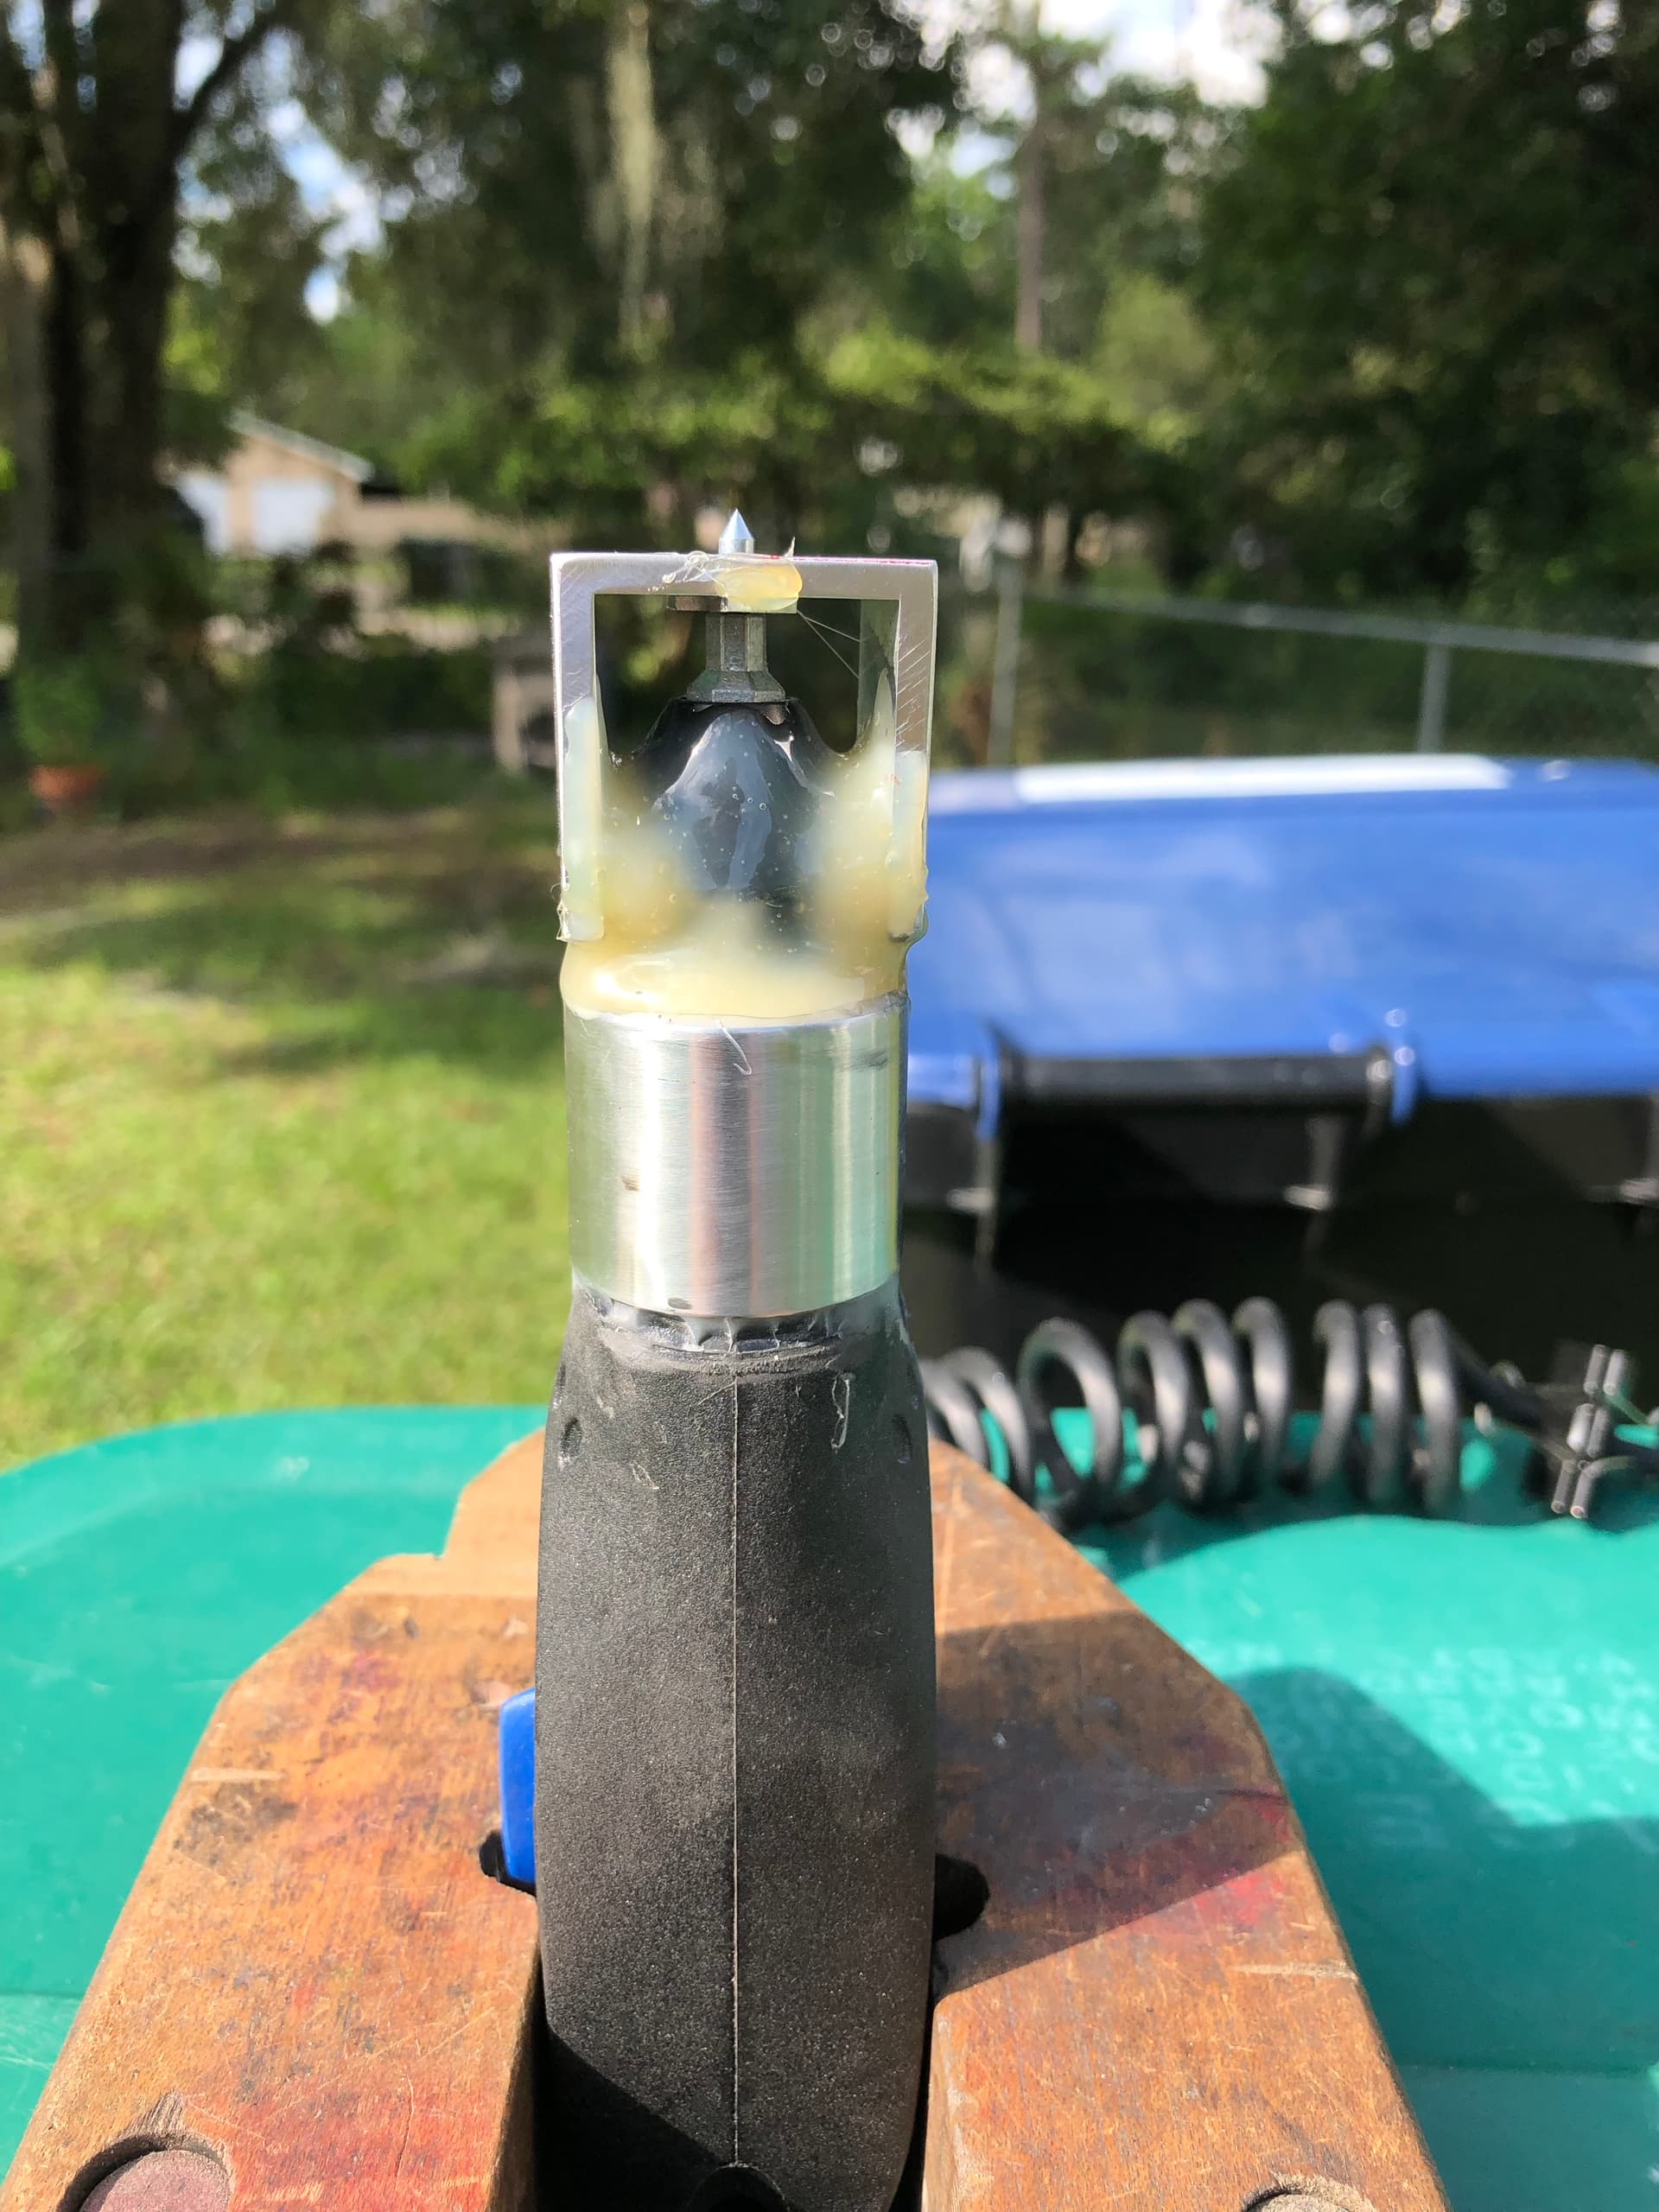
The Dremel has a convoluted ergonomic handle for the human hand. I was able to slide a 1” long piece of 1.25” thin wall aluminum tubing over the tip of the engraver and up till it stopped sliding. Covered that end with hot melt glue. Held it in a vise upright in a vise. Then poured & filled with 15 min Epoxy. Now I can connect to it with 1.25” split shaft collar.

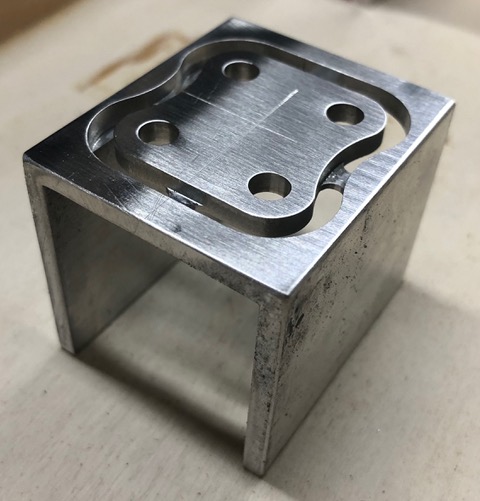
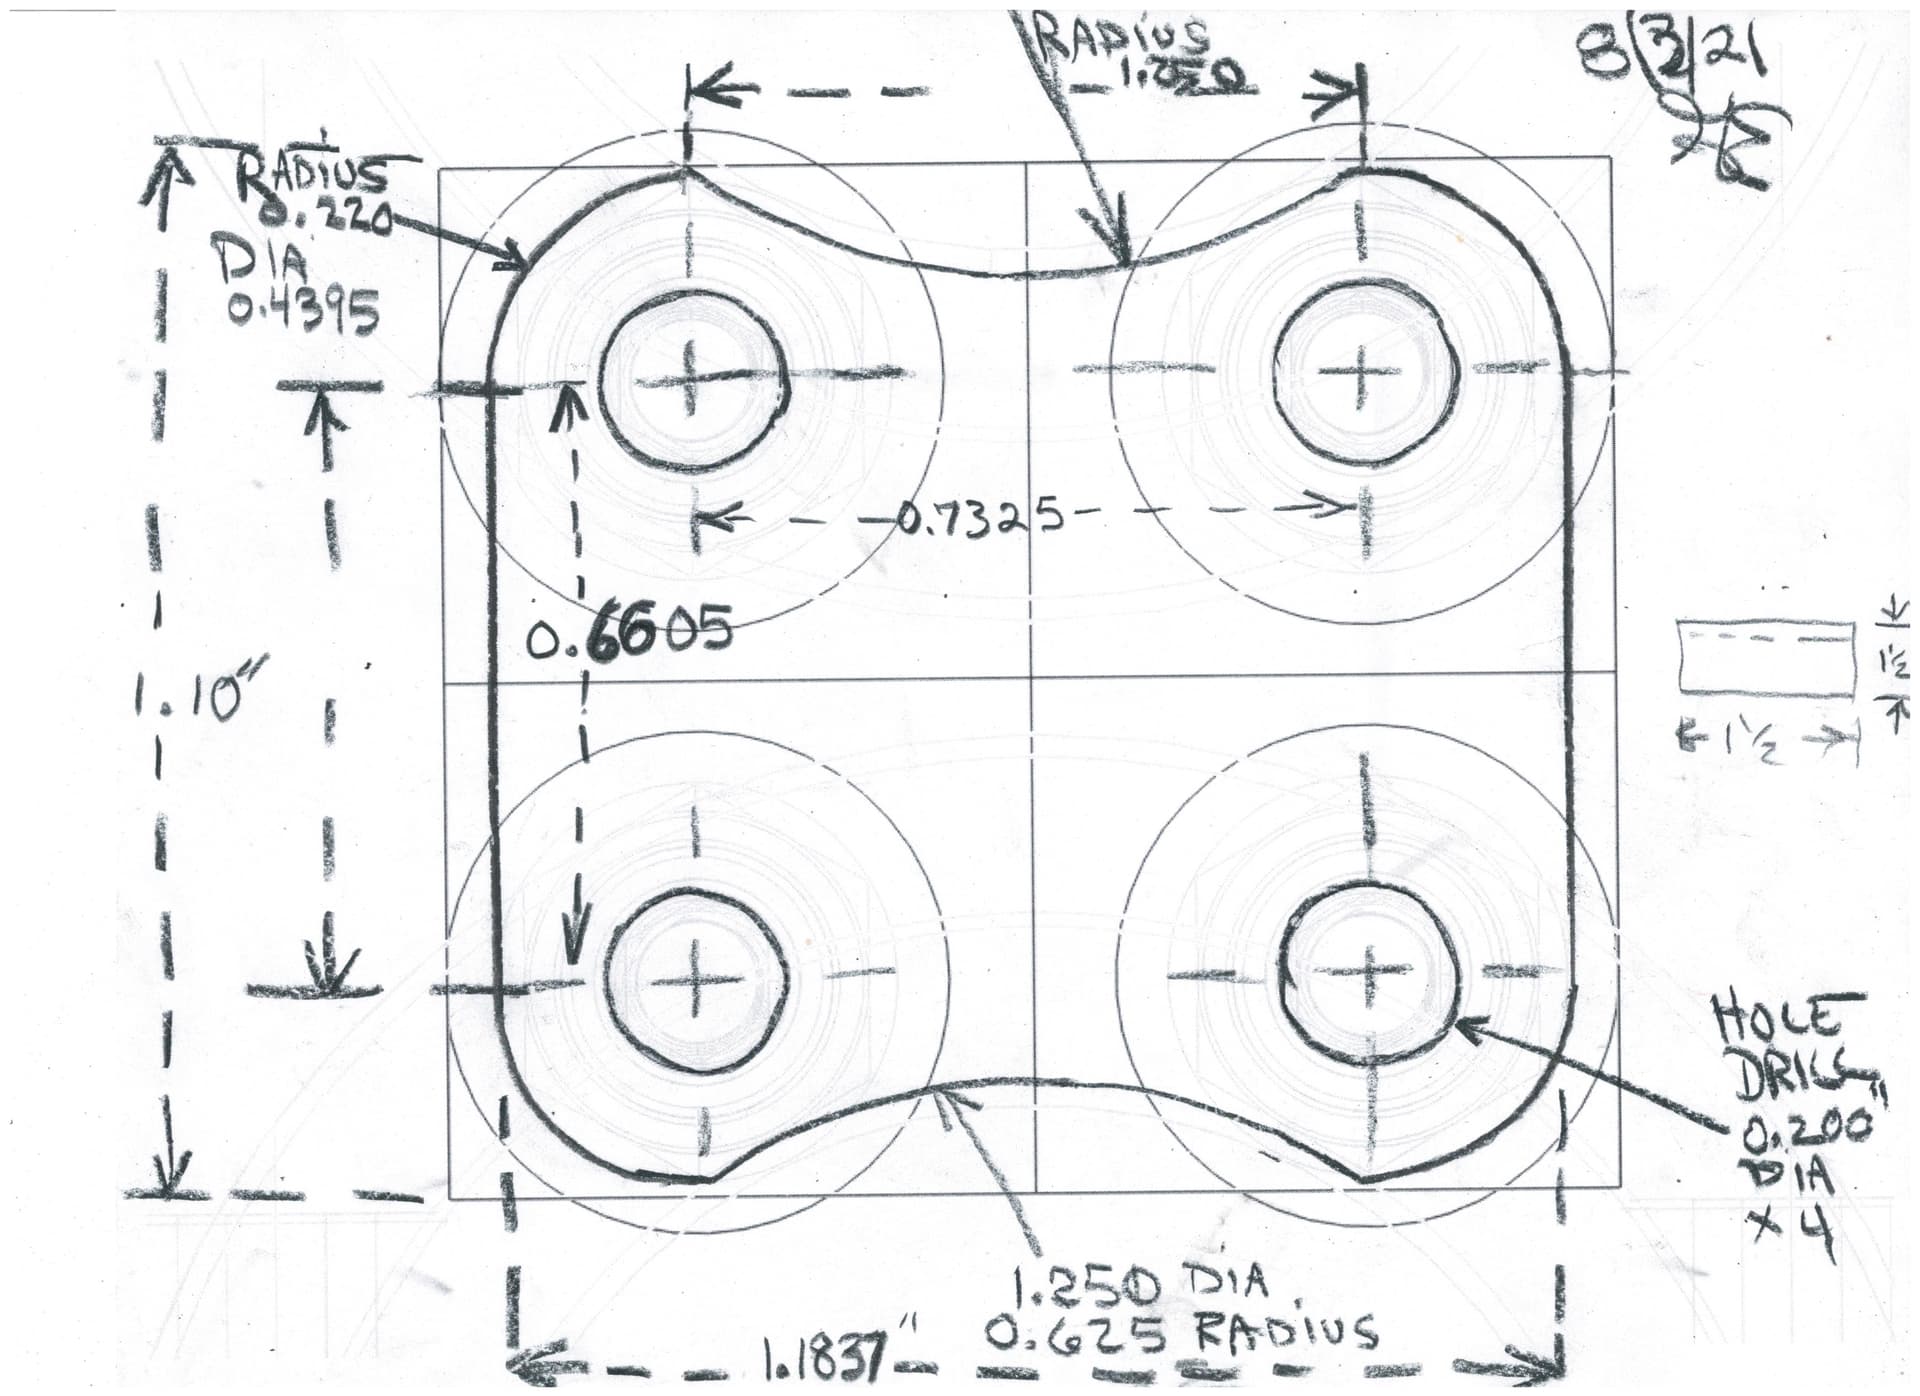
The 2 each 1.250” ID shaft collars need a separation of about 1/8”. I used SharkCAD Pro to help me with interference and positioning the 4 each #10 fastener holes pretty close to center of the wall of shaft collars as much as possible. Printed the outcome and then penciled in a profile that would fit and dimensions. Then used CAD to hide all non essential lines, export SVG.

Carbide Create has such great drawing tools. The SVG was resized to scale and Create to make mounting plates for collars.

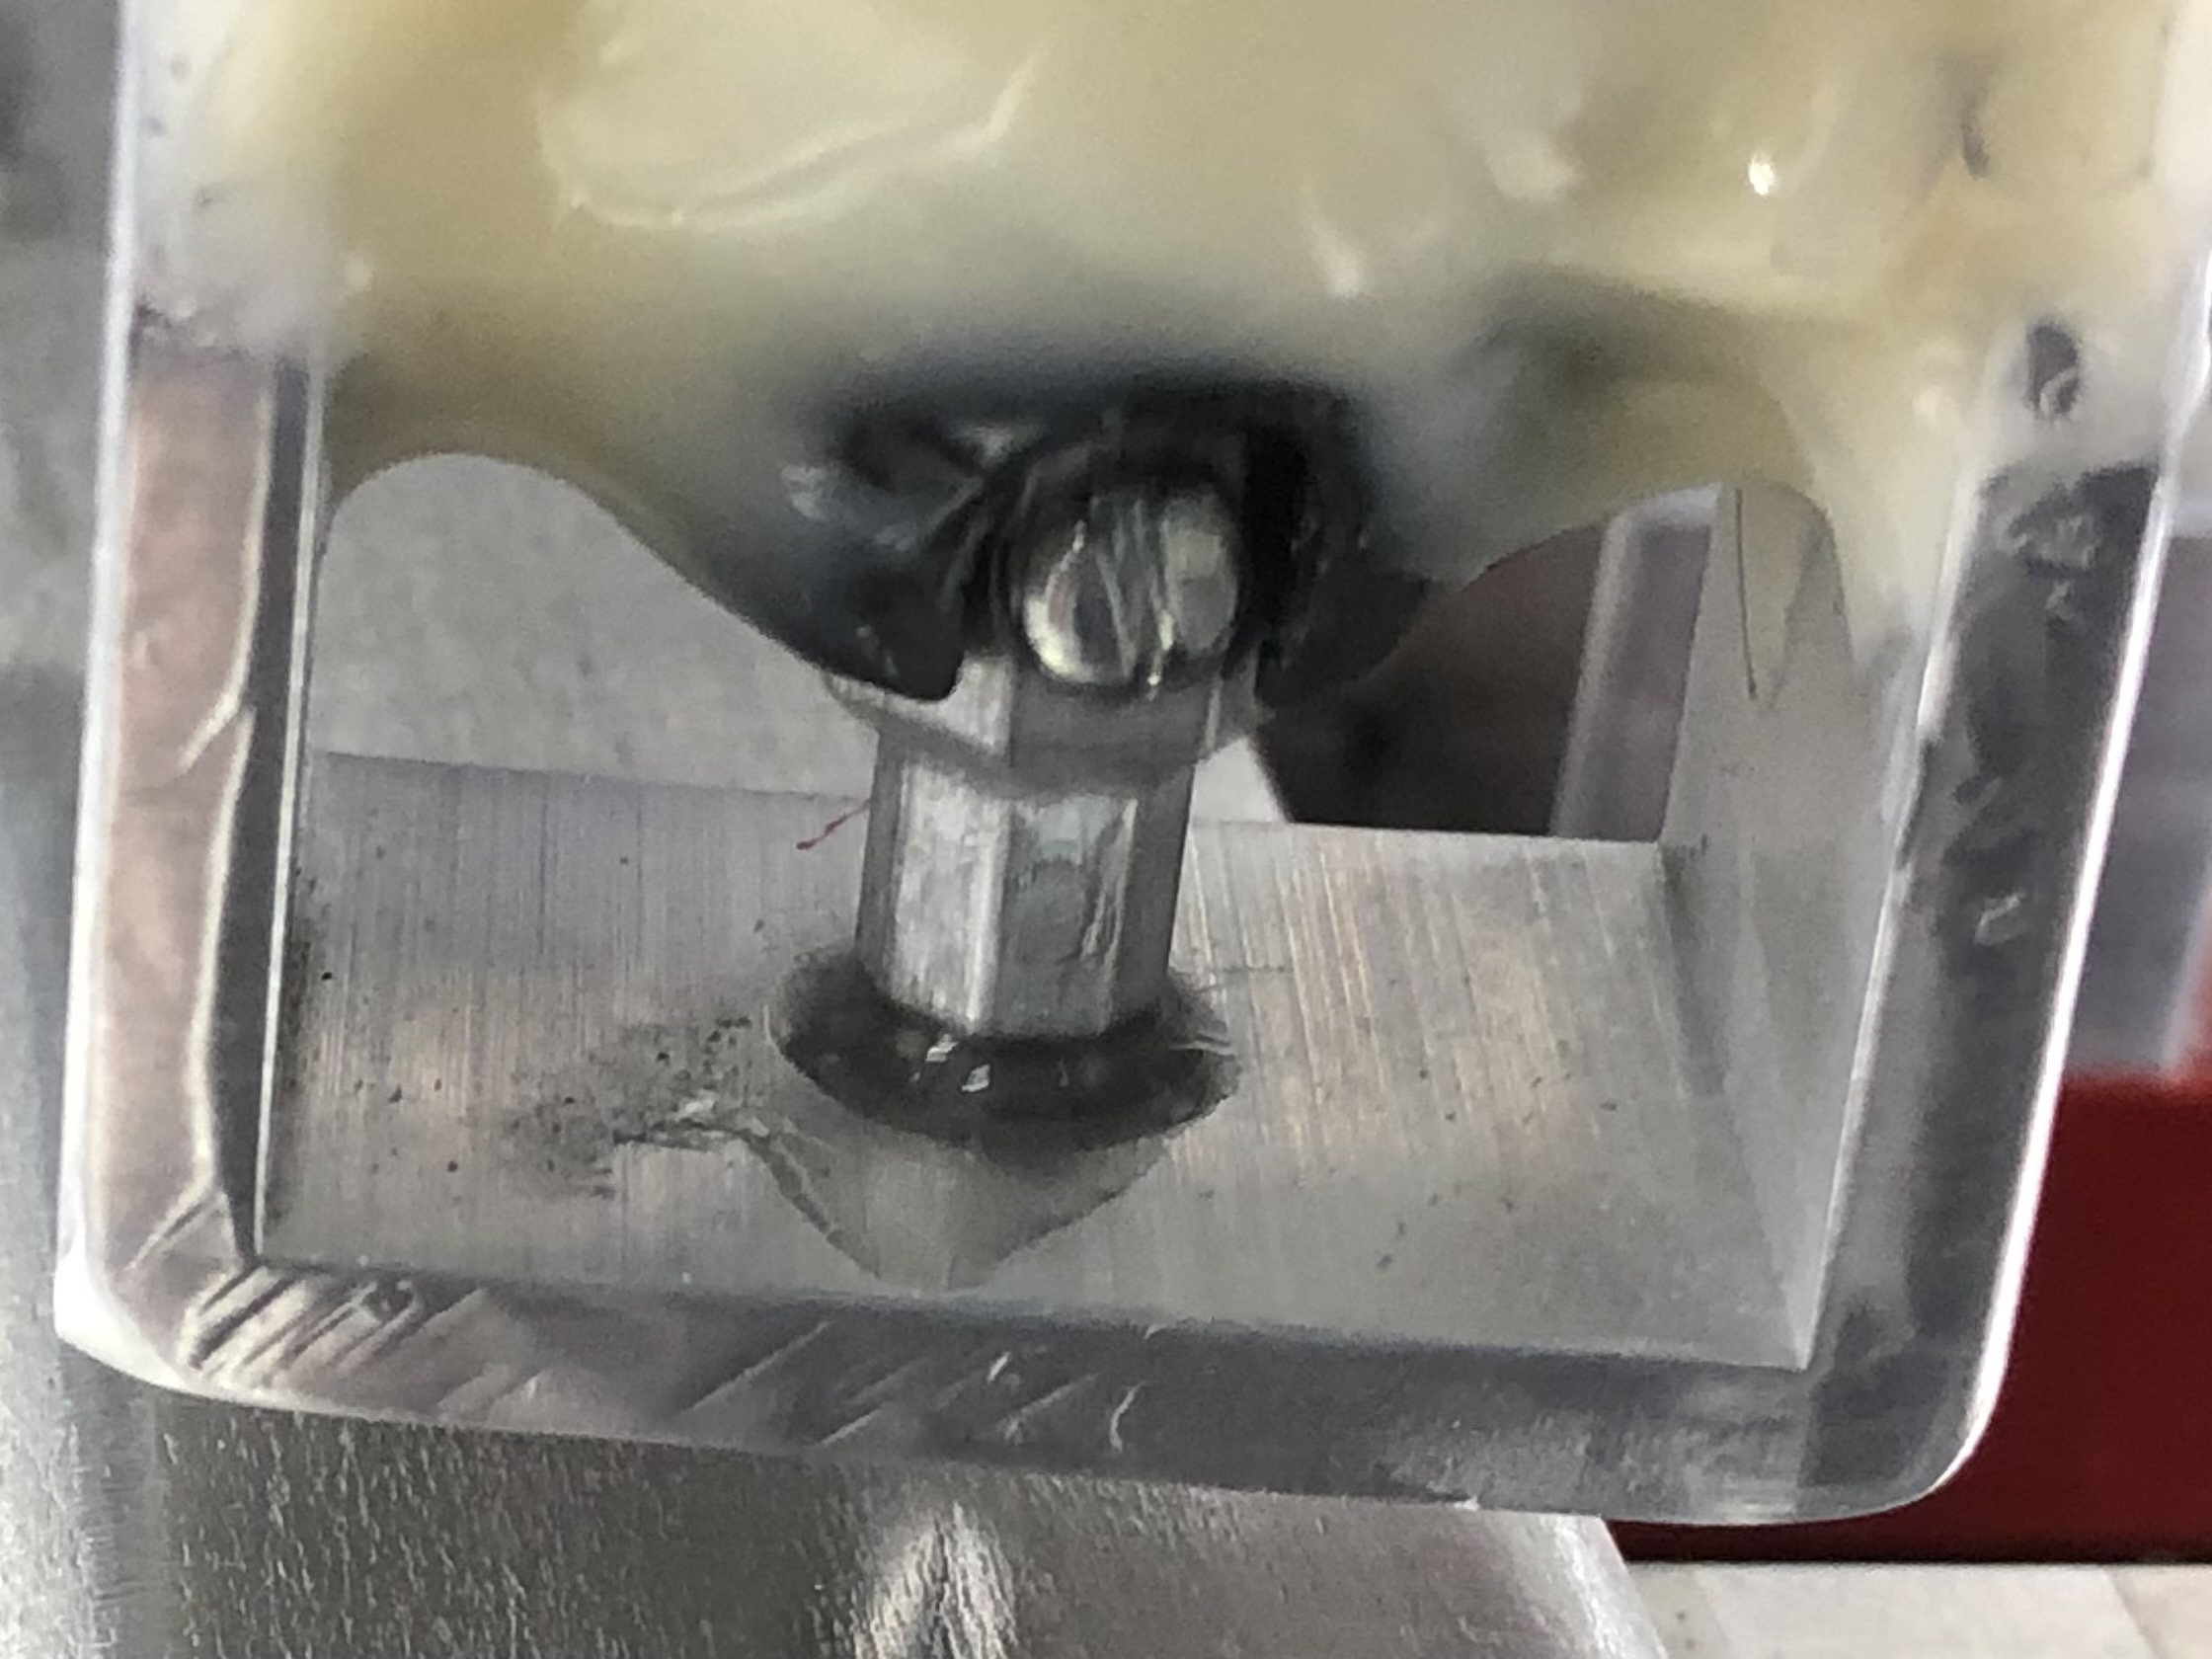
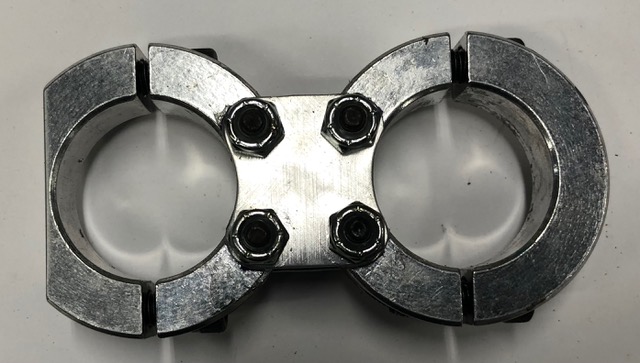
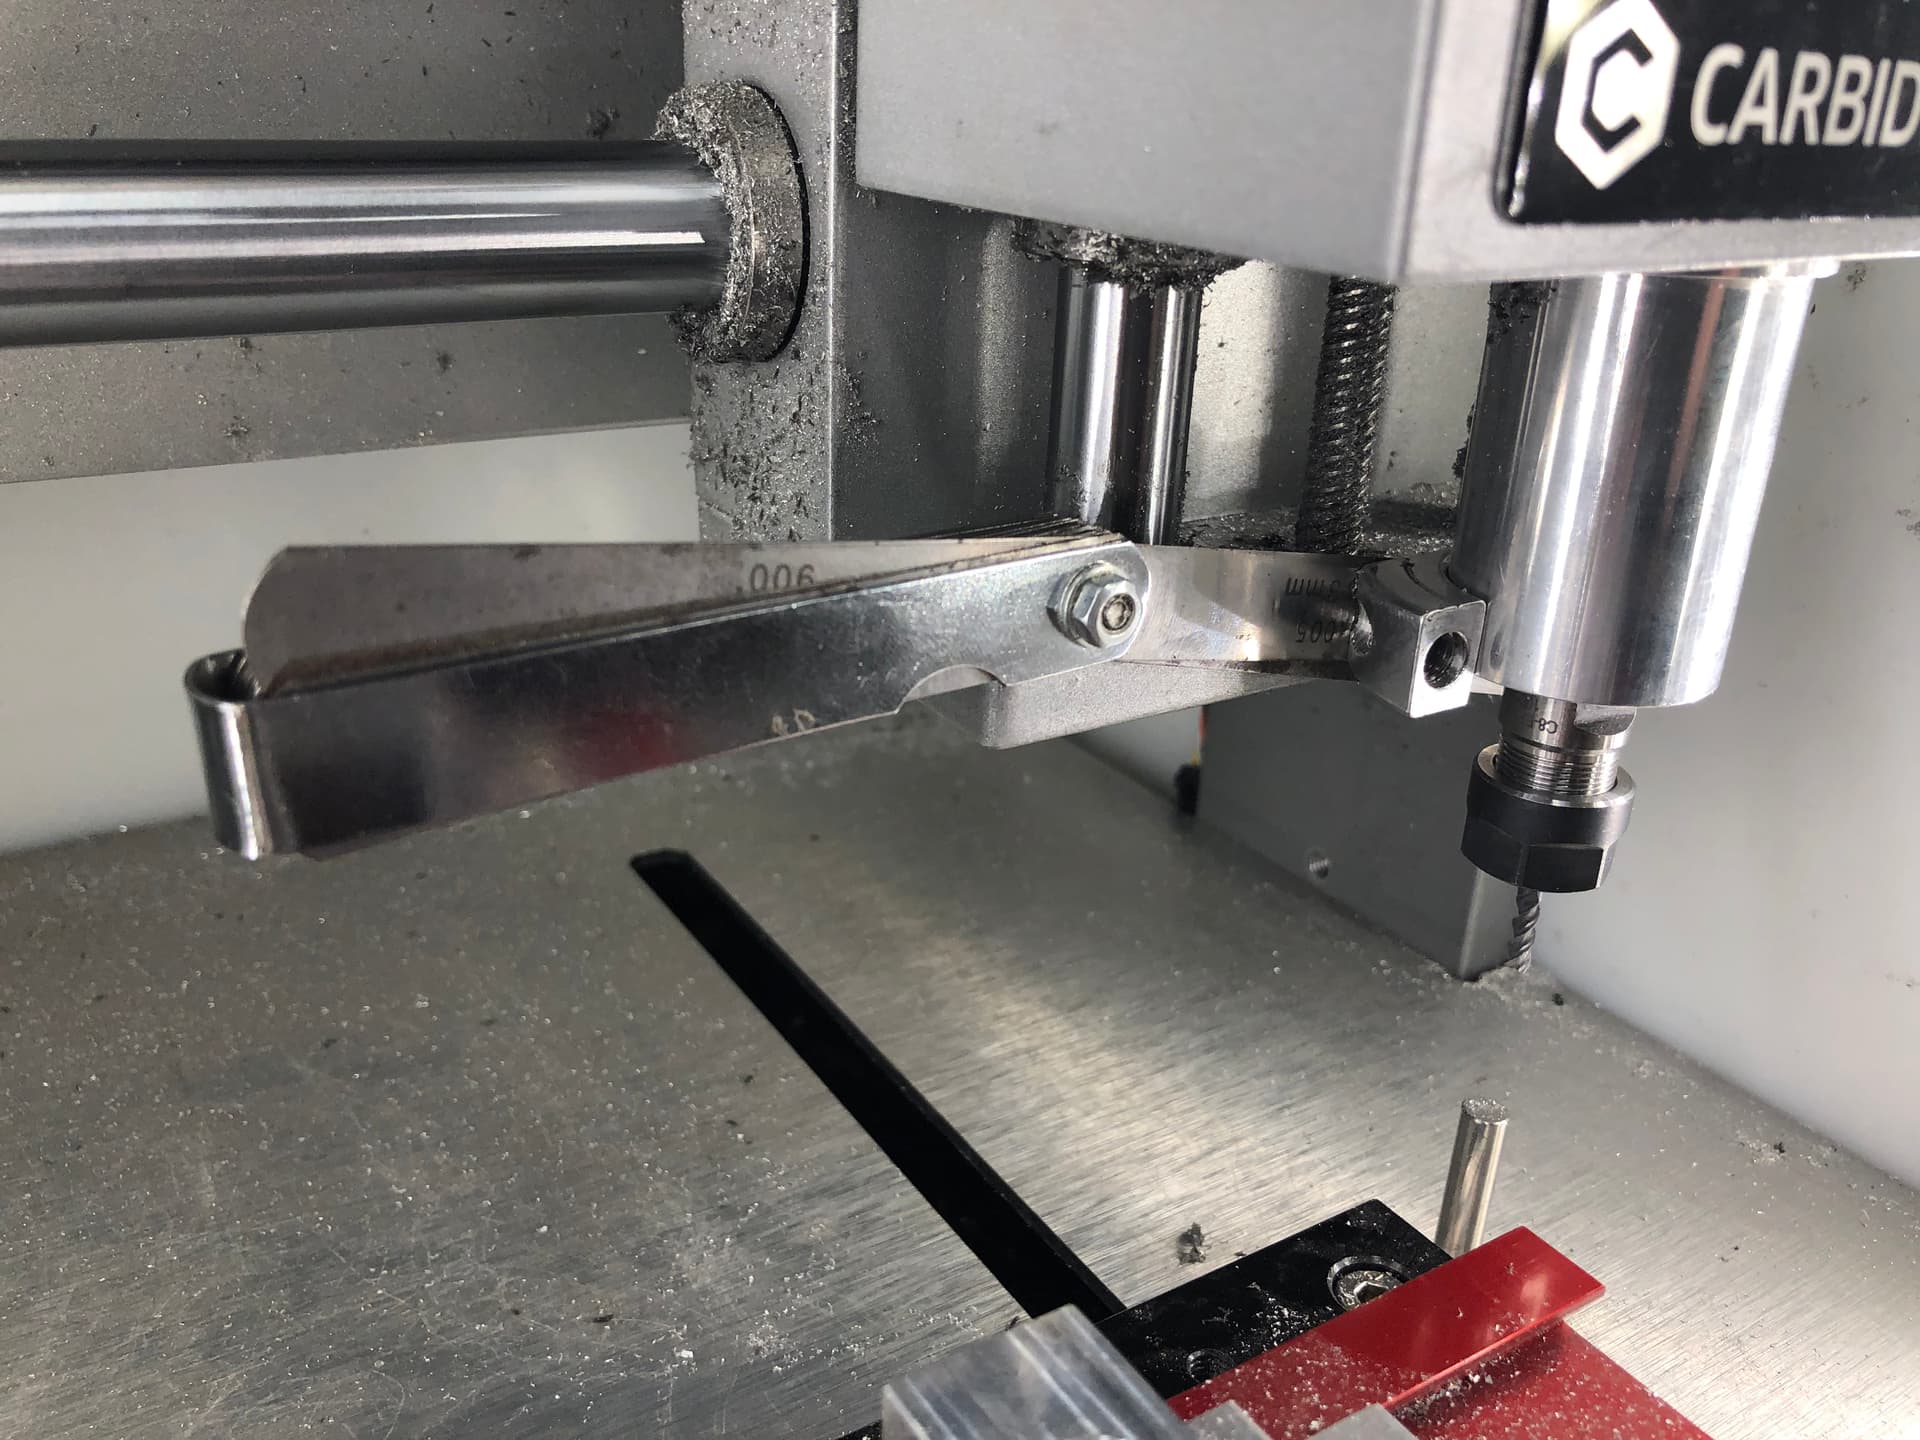
The Nomad 883 CNC to make 2 adapter plates to join 2 each 1-1/4” split shaft collars. Connected 2 plate to 1-1/4” shaft collars with #10 fasteners.

The back side of the shaft collar behind the spindle needs to be flattened. The wall thickness was 0.400”. I took it down to 0.075” using a Grizzly Milling Machine. The material removal didn’t hurt the shaft collar. This needs to be done to miss the headstock when the Nomad does a tool height calibration.

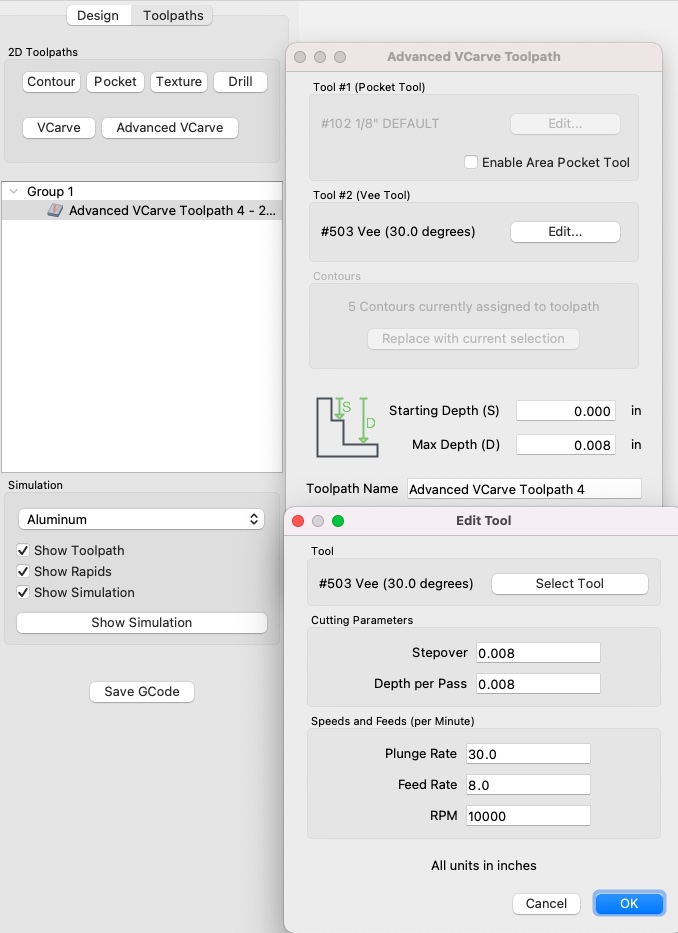
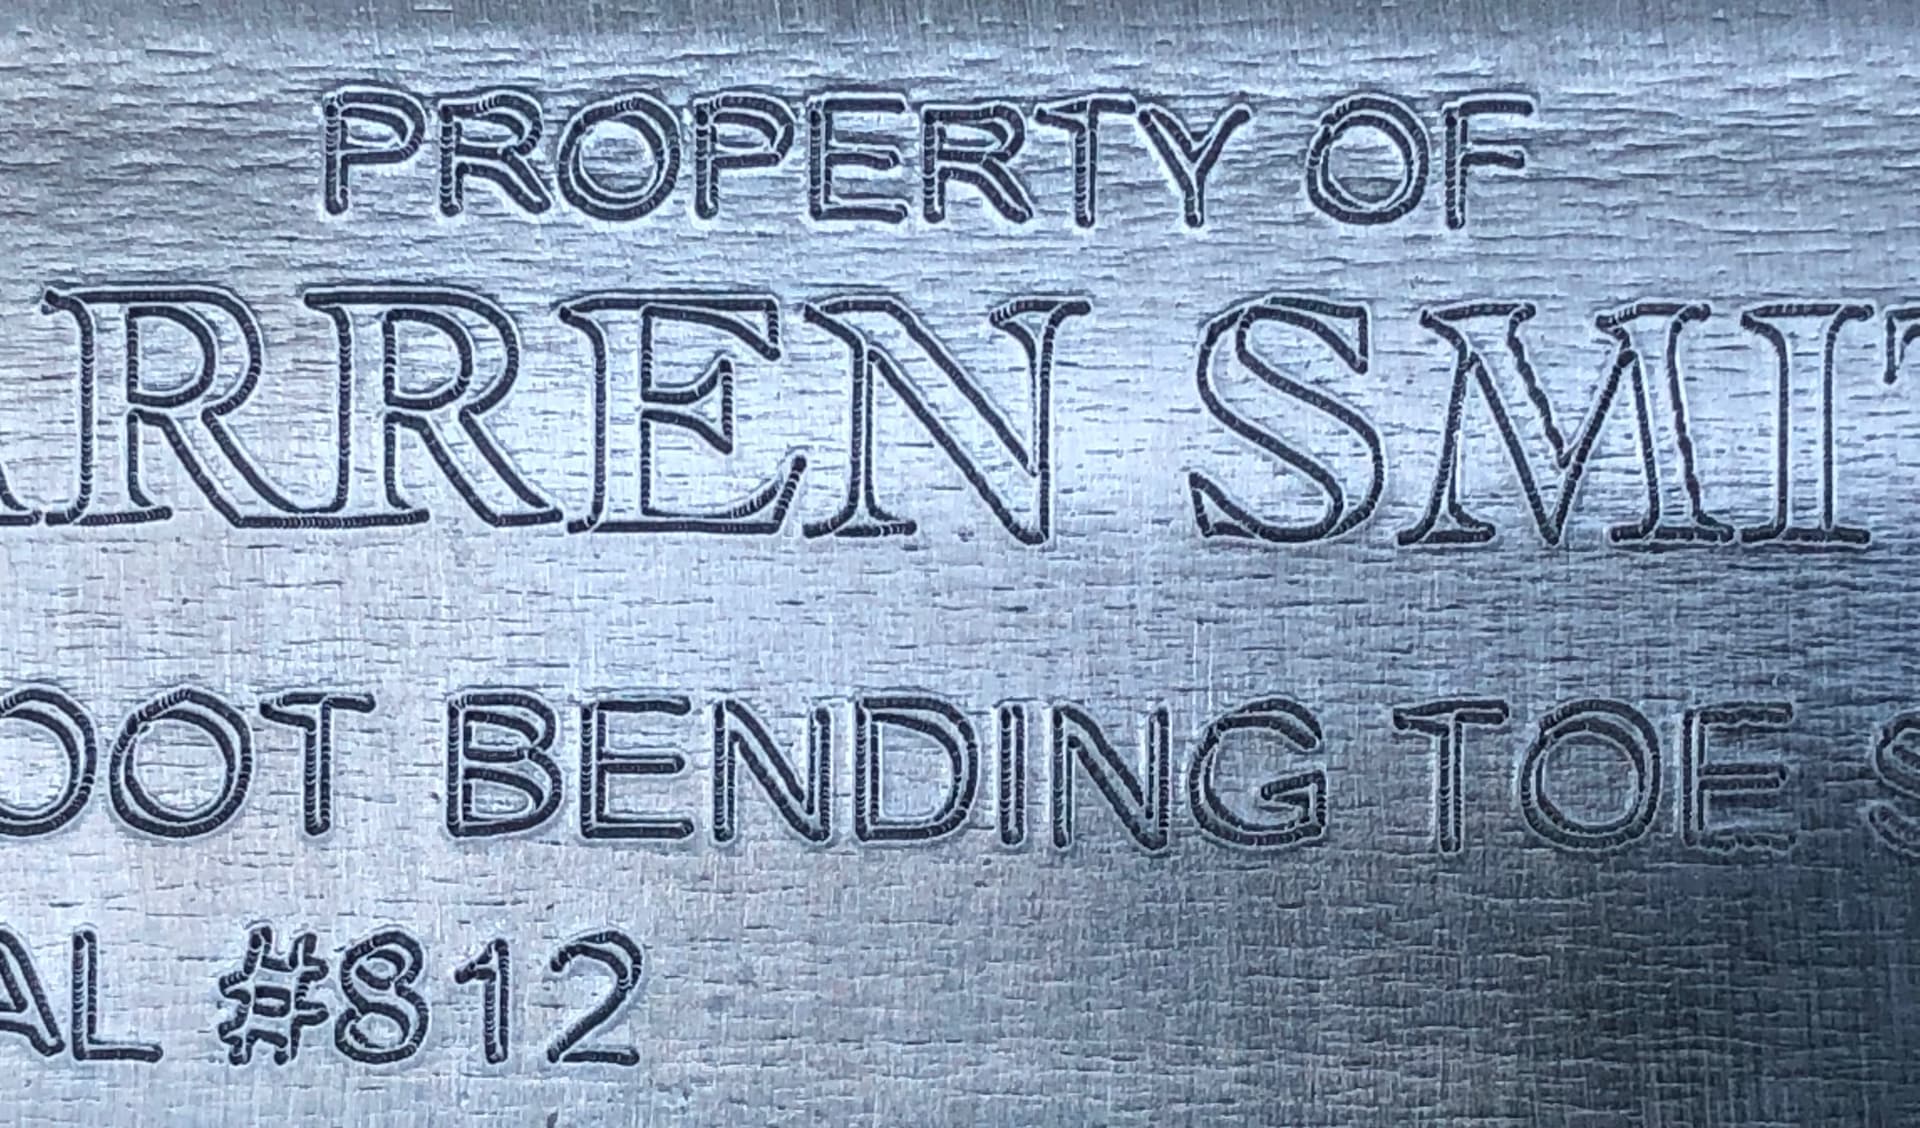
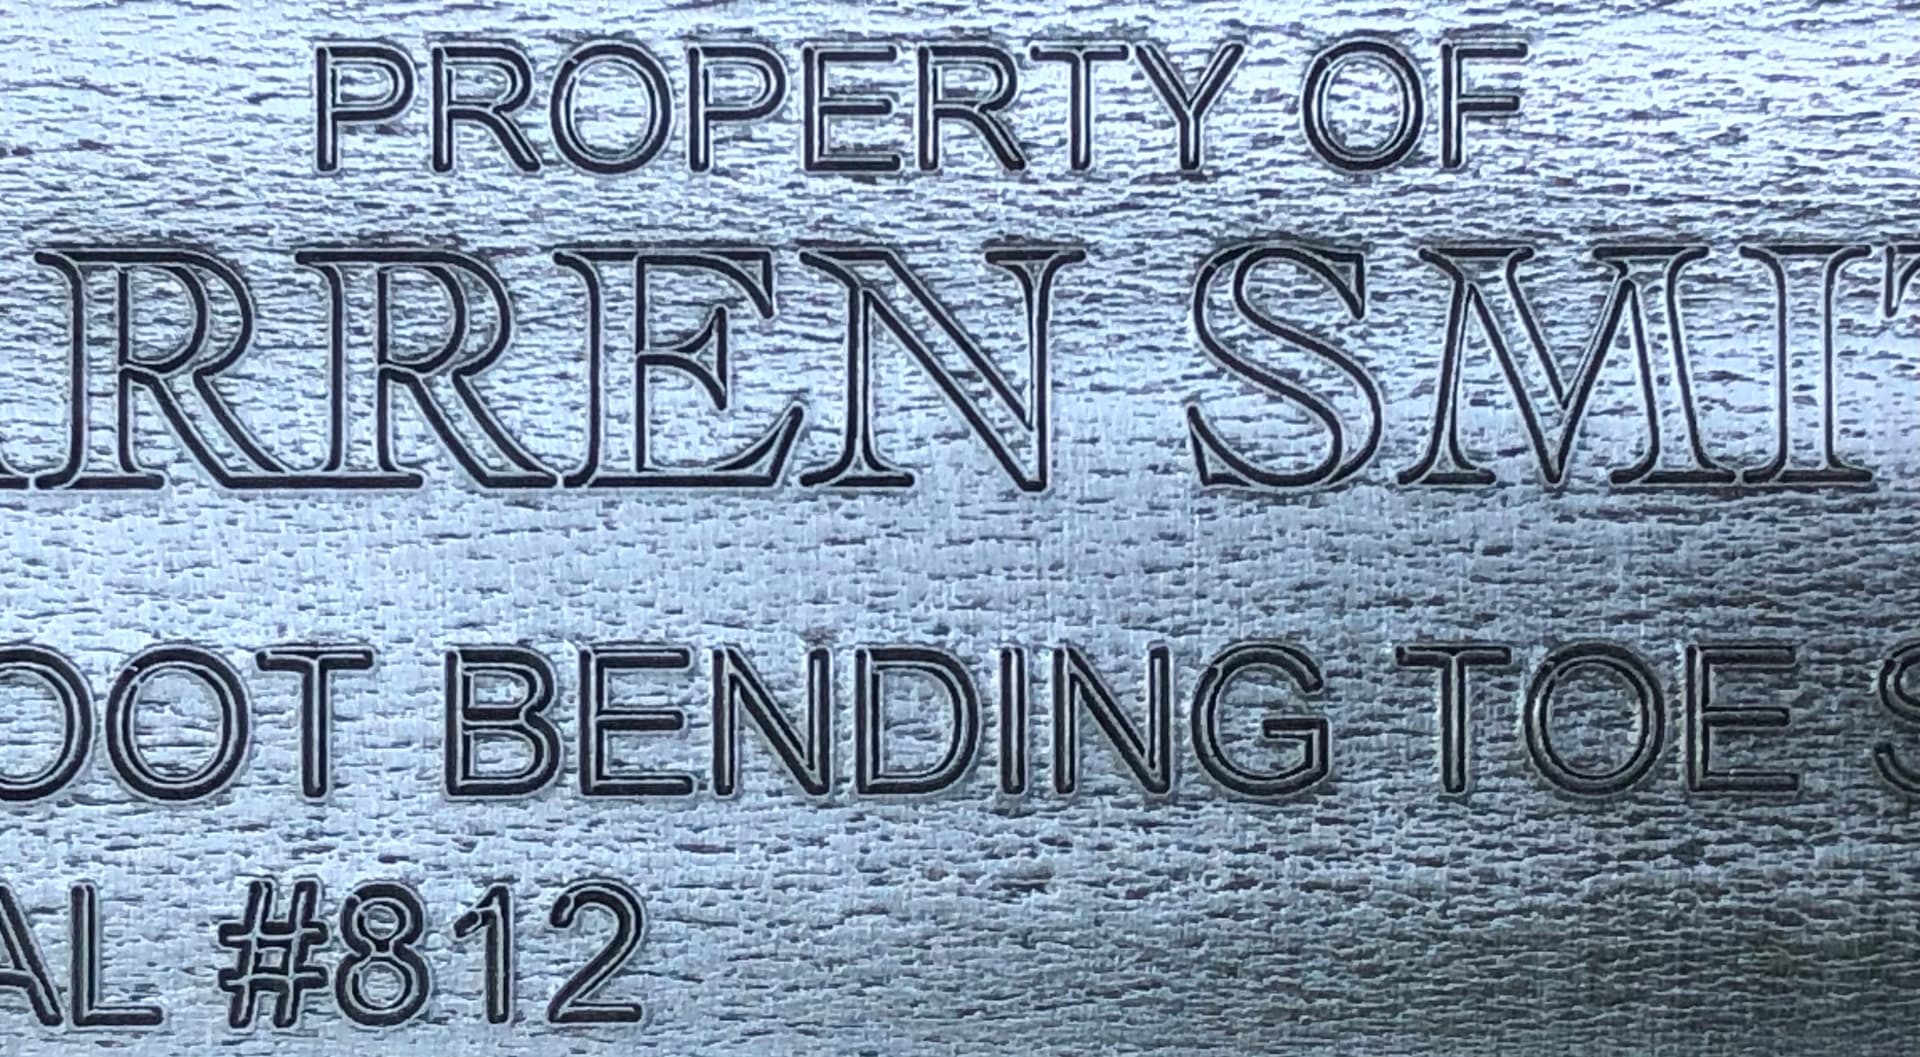
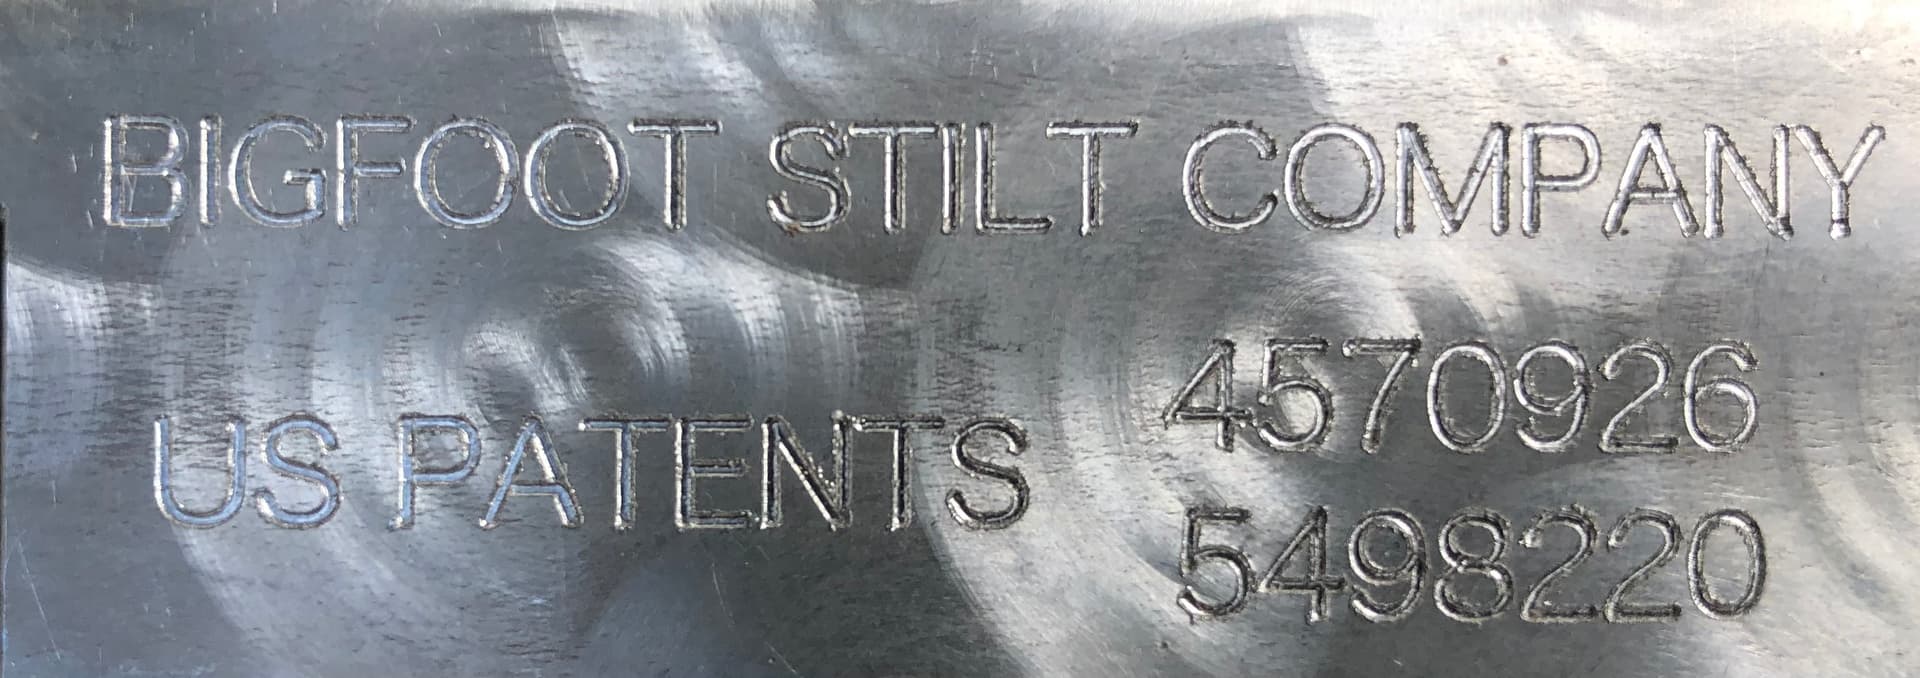
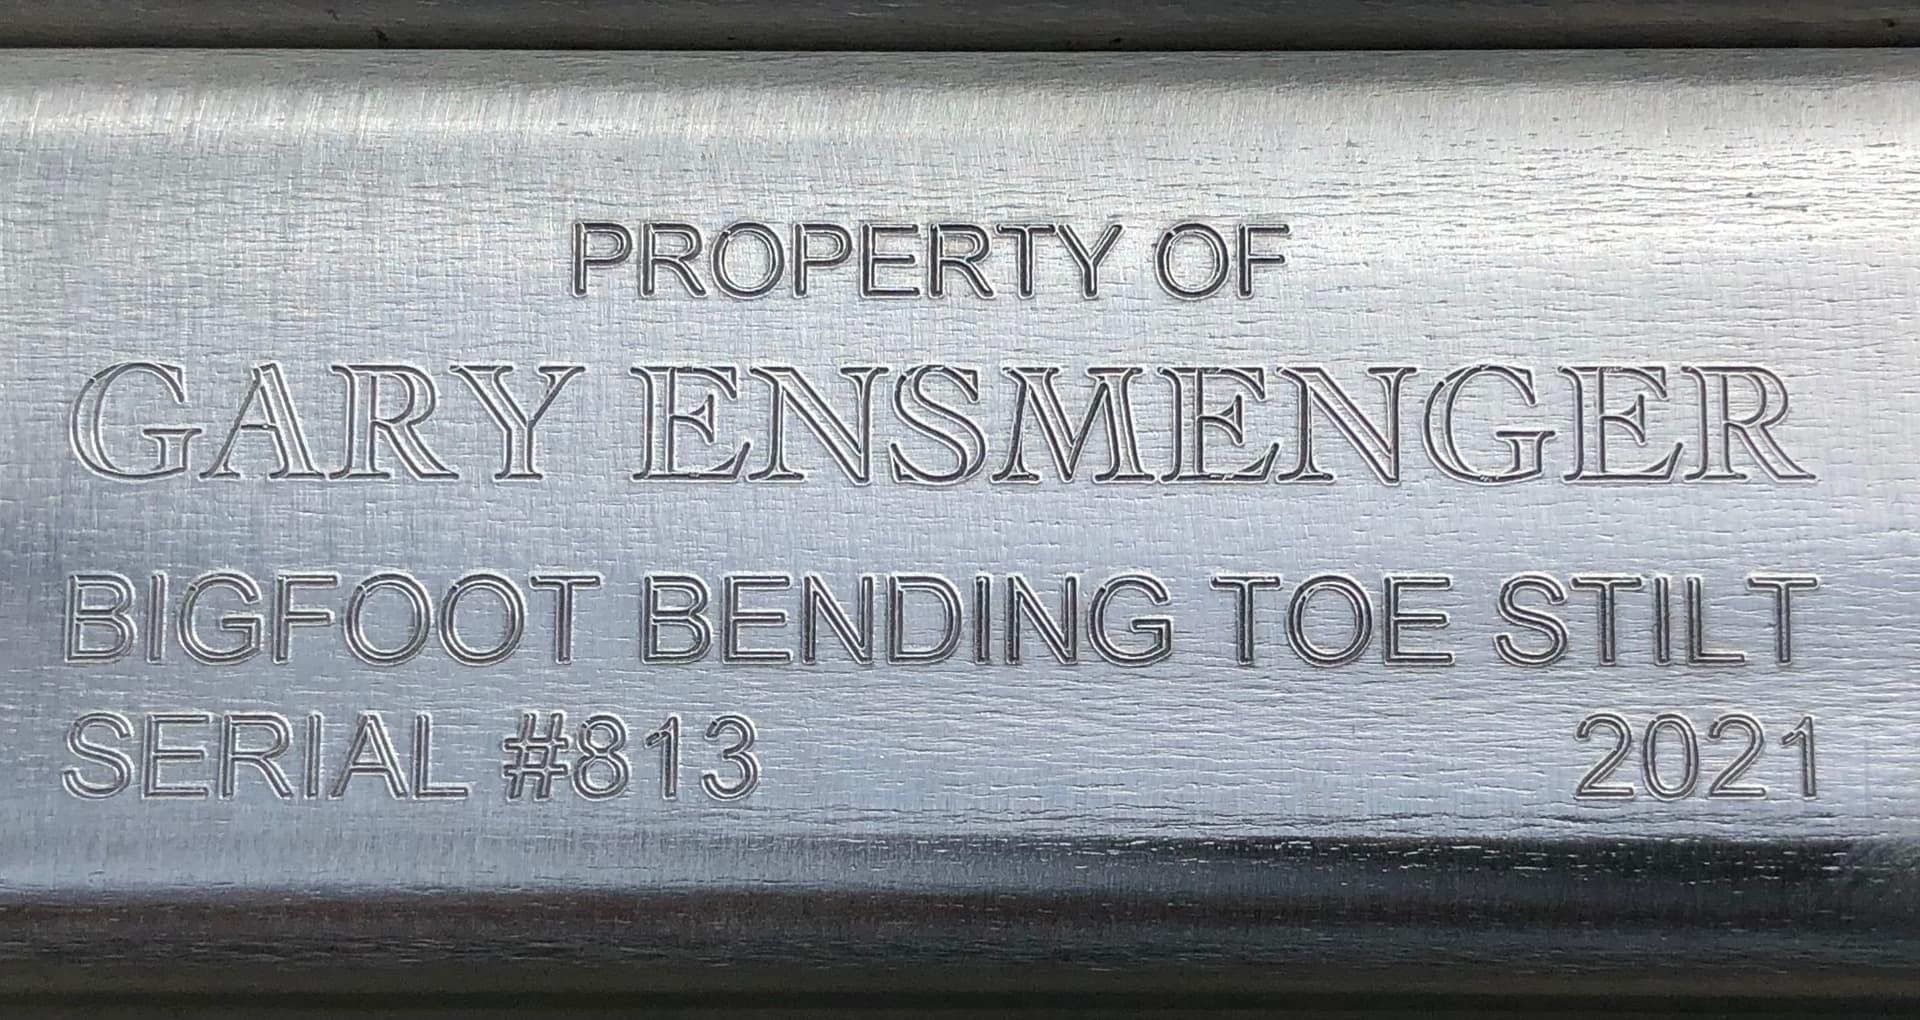
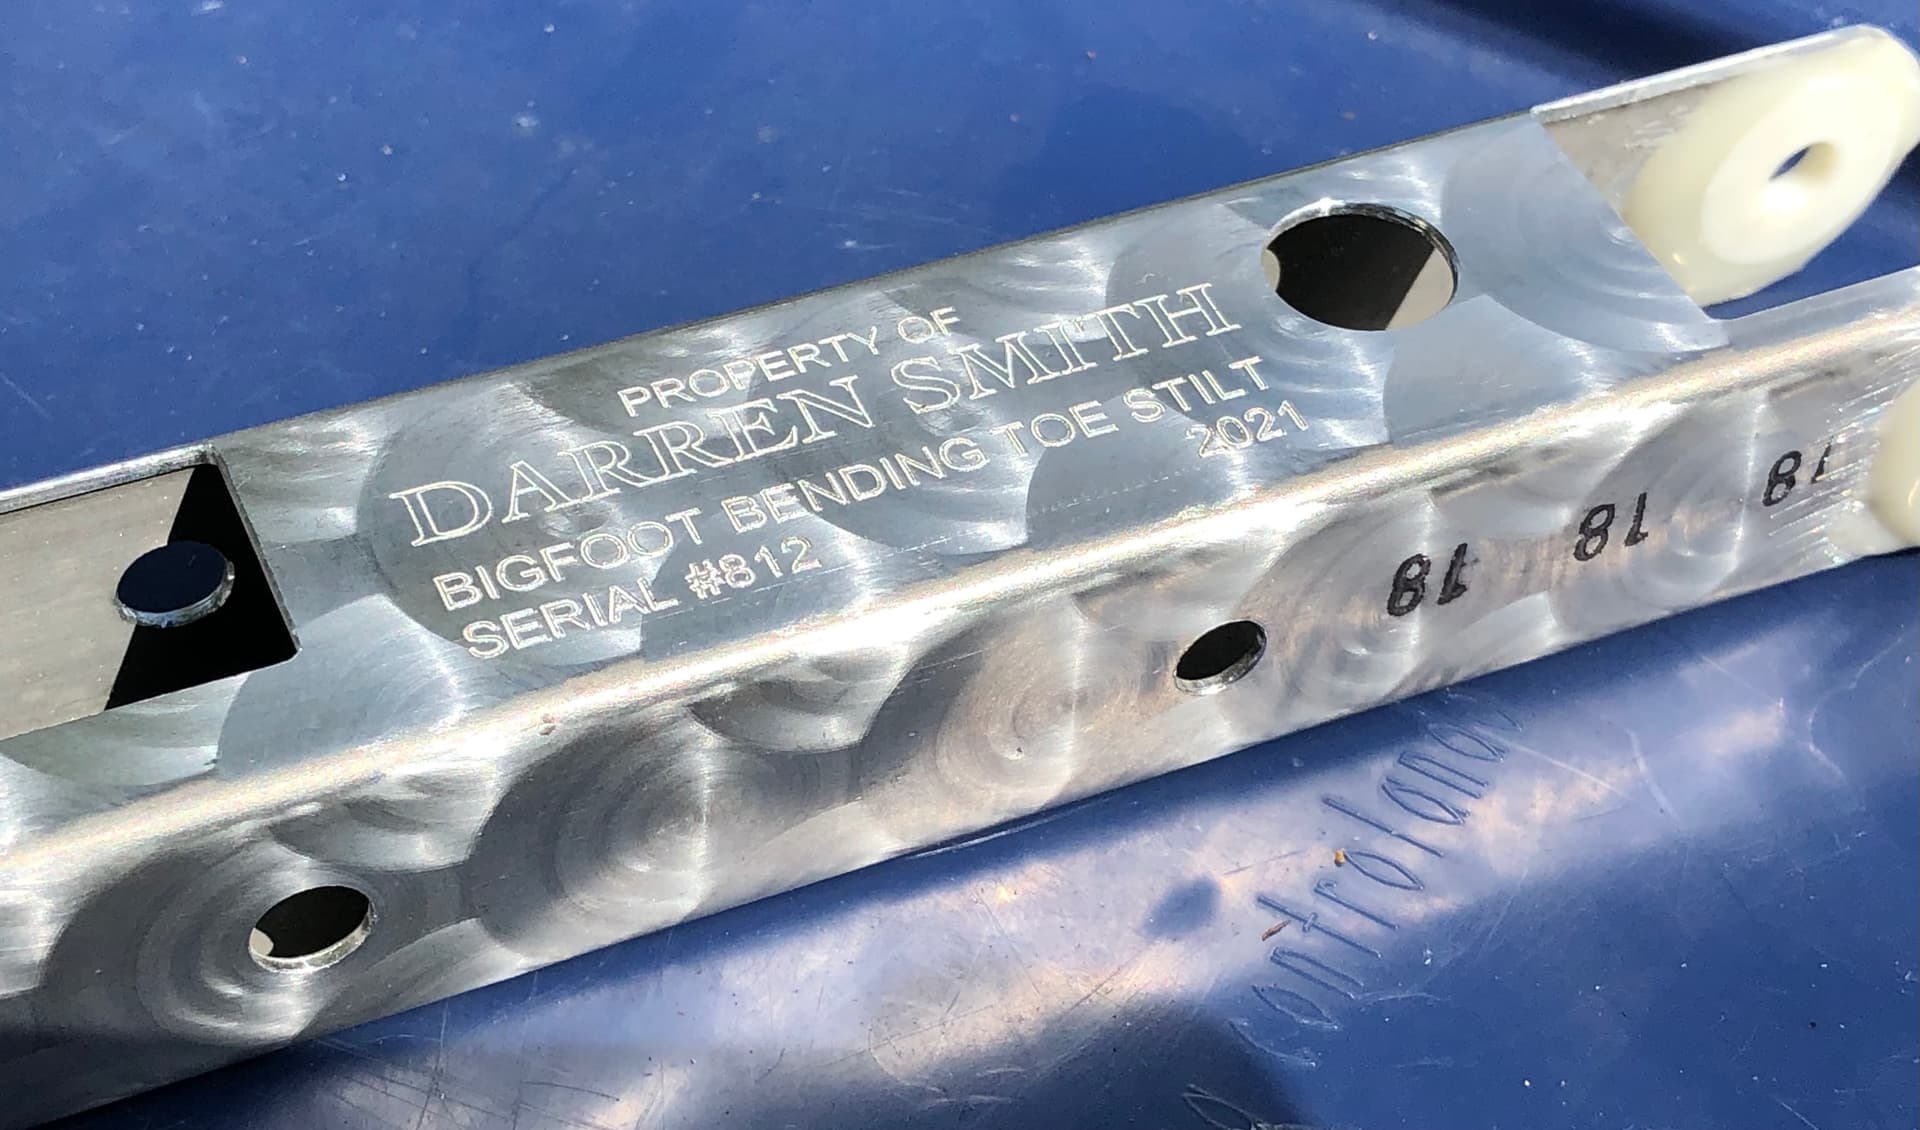
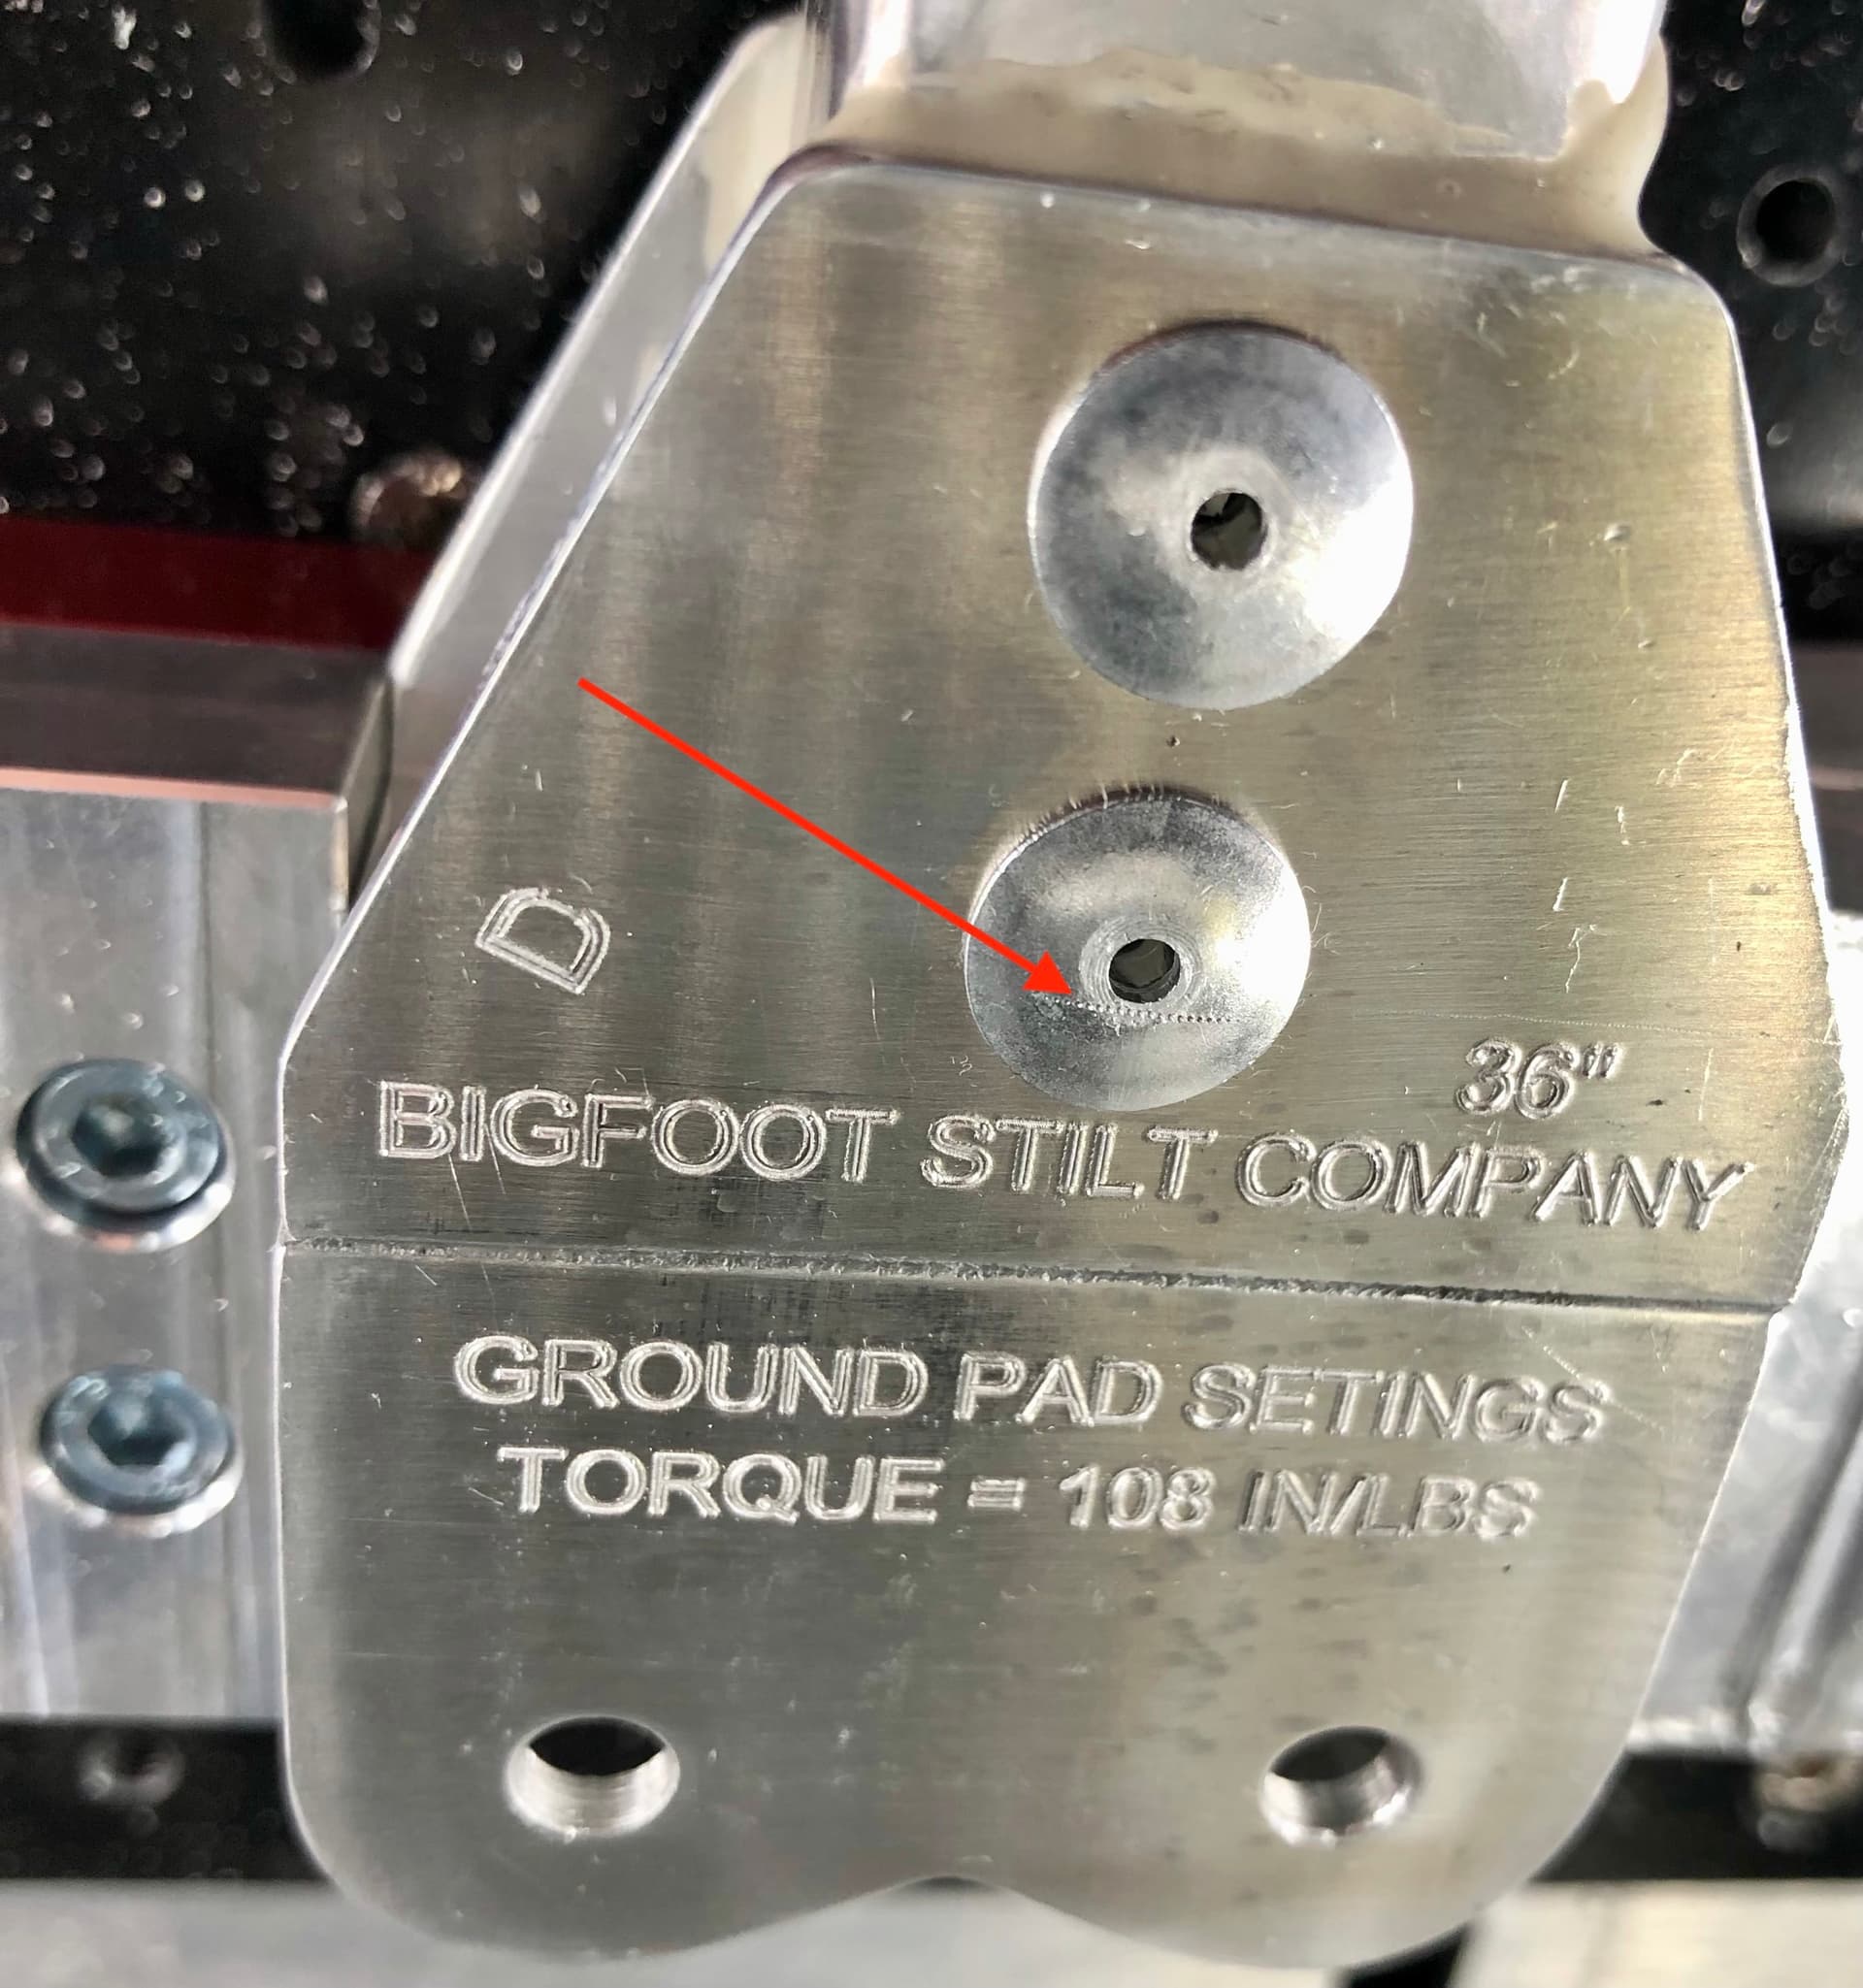
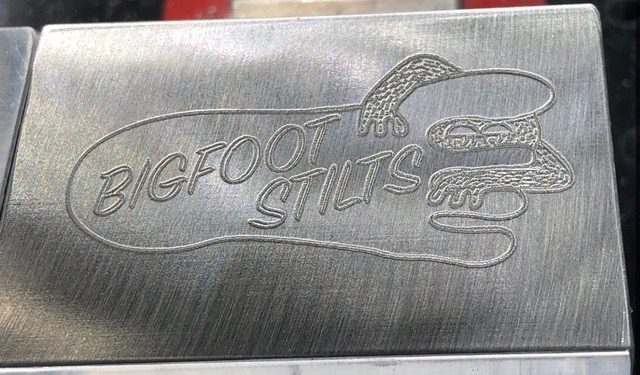
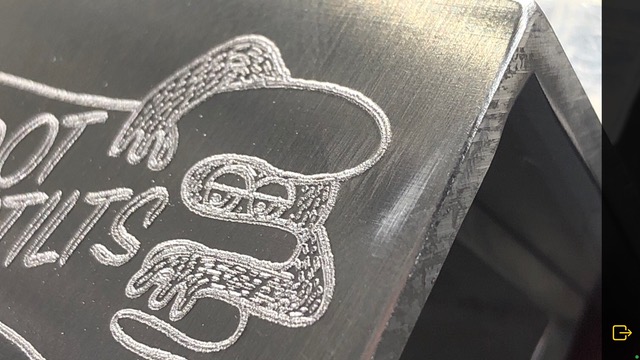
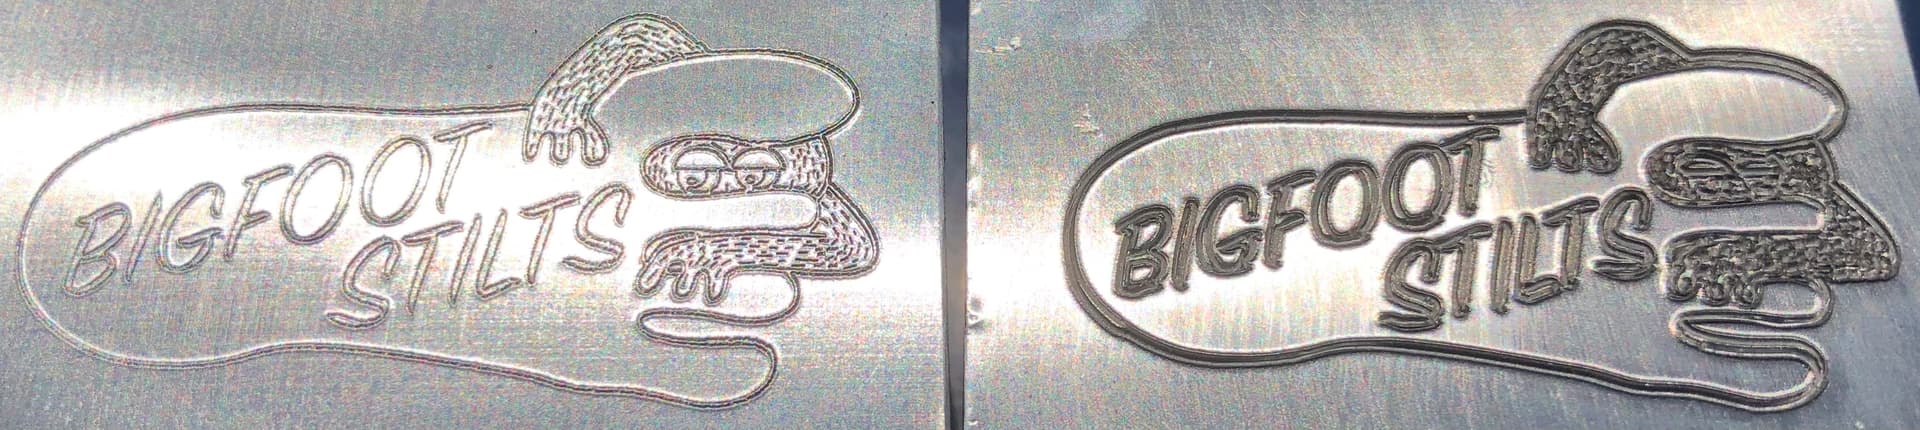
The results are hi-resolution engraving. Better than spinning VEE end mills. There is no debris. No chips. No buffing required. From now on, all engraving in this stilt shop will be done in this method. A breakthrough.

Climax Metal 2C-125-A Aluminum Two-Piece Clamping Collar, 1-1/4" Bore Size, 2-1/16" OD, With 1/4-28 x 3/4 Set Screw

[https://www.amazon.com/gp/product/B0026GSWZQ/ref=ppx_yo_dt_b_asin_title_o07_s00?ie=UTF8&psc=1](https://LINK TO 1.250" ID ALUM SPLIT COLLARS)

Dremel 290-01 120-Volt Engraver Rotary Tool with Stencils - Crafting Machine Perfect for DIY Personalizing and Engraving Leather, Metal, Glass, and Wood , Black

[Amazon.com: Dremel 290-01 120-Volt Engraver Rotary Tool with Stencils - Crafting Machine Perfect for DIY Personalizing and Engraving Leather, Metal, Glass, and Wood , Black: Home Improvement](https://LINK TO Dremel 290-01 120-Volt Engraver Rotary Tool)
IMG_4980


IMG_4961

IMG_4976
IMG_4977
IMG_4979

7 Likes

4 Likes

Here is the Create .c2d file for the coupler plates that couple the split shaft collars.
Nomad Engraver Coupler Plate.c2d (75.7 KB)

To prevent the shaft collar from colliding with the headstock, one side (threaded side) of the aluminum split shaft collars was flattened from 0.040" down to 0.075". In my opinion, a GAP of 0.025" would be has a good safety margin.

USE A FEELER GAUGE

To assemble & maintain the surfaces of Nomad headstock and flatten shaft collar are parallel, Insert 0.025" feeler gage between headstock & flatten side of shaft collar. (If the GAP is other than 0.025", the set feeler gauge accordingly).

The experiment above worked. Success to a point. I found a shortcoming of this prototype. It is a failure is gets worst every day. The Dremel’s PU (or whatever) foam ergonomic grip is working loose from the cast epoxy.

The Dremel is removed and the grey PU rubber skin must be removed. The easiest method was using my SOG Twitch pocket knife and whittle the grey off. A diamond file roughen the black plastic surface for the epoxy. So tonight I’ll cut another 1" long piece of 1-1/4" aluminum tubing and cast epoxy.

The epoxy will be cast against the housing plastic. Much better situation.

In working with this setup and getting familiar with it, here a few fun things about this:

  1. There must alway be an end mill in the Nomad’s chuck.
  2. I’ve set the height of the end mill 0.125" above the tip of the Dremel. This is an arbitrary number I used as a safe clearance to miss anything on the 8" x 8" mill table.
  3. The working area of the engraver will be 5.5"Y x 8"X.
  4. The stroke of the Dremel Engraver is 0.017".
  5. When OFF, the tip is retracted.
  6. When ON, the tip is fully extended.
  7. This means, the Engrave must be TURNED ON to find ZERO Z.
  8. I wound the engraver’s electric cord around 7/8" aluminum tubing, heated it with a heat gun, let it fully cool. Now engraver has a coiled cord. Then attached to Nomad’s side wall with a 32mm binder clip. This will relieve any pulling tension from cord.
  9. The detail of an engraved 0.001" deep line is amazing. It’s like a hair. Never was able to hand hold an engraver so close and steady.

Here’s a before and after photo of Dremel modification. Also coiled cord.


2 Likes

CUTTING DEPTH & DISPLACEMENT

The left photo is the same as shown above. The Z was set to 0.0, with Dremel Engraver powered ON. The Cutting Depth was set at 0.005". The engraving results was the best I’ve ever done on the Nomad. Usually I use VEE bits.

The right photo shows my 1st attempt at CNC Dremel engraving a graphic. FAIL. The engraver was OFF when Z was set to 0.0. The Cutting Depth was set at 0.005", as before. With the engraver’s tip extending 0.17-0.20 while vibrating, it was too deep. Even though a failure, one good thing is that the DISPLACEMENT of the aluminum is highly visible. The aluminum is moved around like clay.

Instead of cutting aluminum, we are displacing and rearranging the aluminum molecules. It obvious the detail and resolution is much improved with displacement, rather than cutting.

While setting Z to 0.0, I saw the thinnest lines produced on the Nomad. Above I described the 0.001" lines as “hairs”. The lines would better described as ANGEL HAIRS, the thinnest hairs.

A neighbor visited yesterday. I showed him these two examples. It gave him the idea to engrave the entire graphic at 0.005", and then go over the words and go another 0.005 to 0.010, for emphases. I will be trying that in the next two days.

The Dremel is setting outside in the sun curing the epoxy. My choice of epoxy was Devcon HP250. The cure time is 7 days (not a typo). However, the Florida sun can set it in about 4 hours. This industrial grade epoxy sets rock hard.

I see other advantages of engraving over VEE bit.

  • If the working surface isn’t perfectly level, the VEE bit can miss the surface, causing a rework.
  • With the vibrating tip, moving in and out approximately 0.018", there is plenty of room for work surface being out of level a couple thousands.
  • The cost of saving of replacing VEE mills.

2 Likes

Tried engraving .300" tall text on aluminum. The results were fair. The lines are not as straight as they should be. Took engrave apart. Interesting to look at.


The Dremel’s bearings, which guide the vibrating tip are pretty good top to bottom. In fact tight. However the bearings to restrict left and right movement is rather lousy. It wiggles 3/64". Nothing to be proud of. The plastic housing is also the “bearing”. Of course it’s not precision. It’s just a hand tool. We going to improve the tightness.

ADDING A ENGRAVER TIP STABILIZER.
Using 1.250" aluminum channel about 3/4" wide. Drilled 1/8" diameter hole in base center. Positioned 2 each tiny 0.050" aluminum shims to temporally (hot melt) hold inside base of channel away from tip anchor, which will be stroking about 0.018".

Use hot melt to tack down the 4 corners of channel to the Dremel’s nose housing. Then followed up with Devcon HP250 epoxy. It’s out in the sun curing.

I’m optimistic. I plan on adding a drop of oil between channel hole and steel engraver tip. Won’t last for ever.

Deal with lifespan later.

2 Likes

It is a tattoo gun for metal :laughing:.
I’ve never used an electric one, but used pneumatic ones a fair bit.
It will be interesting to see if you have any problems with the aluminium brace and the hardened steel tip.

2 Likes

image
The Metal Tattoo Gun is ready, show me your metal.

The TIP GUIDE is a slide bearing for the engraver tip. Here’s a side view of the 0.050" gap on the inside of the channel base.

Perspective view of the outside channel base, with 1/8" hole and engraver tip.

Installed on Nomad.

Note the drop of 3-IN-ONE oil. One drop and it clung around the whole tip, and STAYED on the top side! Within minutes of power ON, sparkling aluminum particles was circulating with the oil. It was like a waterfall falling downward on the outside of a vortex. It was interesting to watch with my 5X magnifier glass.

BTY - if you own a Nomad, buy this 5X MAGNIFIER, 4 ELEMENT ACHROMATIC for only $35! I can’t emphasis how many times it is used daily. I depend on it.

I’ve purchased at least 10. Gave 6 away for Christmas presents. Here’s a great magnifier. 5X power. 4 glass elements, new coated optics. Clear lens diameter is 31mm. Barrel is 48mm diameter at the center by 35mm long. Sharp color corrected images from edge to edge. :smiling_face_with_three_hearts:

Surplus Shed Magnifier Link
5X MAGNIFIER
Carbide3D should sell these with a wrap around label with their name on it.

THE RESULTS ARE IN
The engraver was set at elevation Z0.0 with Dremel Engraver turned ON power. The Dremel has a variable power dial and it was set in the middle. These are the Create 530 settings used on this initial test. Surely Feed Rate could increase and other tweaks.

This is BEFORE adding the tip guide. I have DRUNK LETTERS.

After sobering up the letters with a TIP GUIDE, the results are excellent. I’m so happy over the results. Will I ever go back to using VEE end mills? Only if necessary. However my budget for replacing broken VEE bits has gone down to zero. This is my new best choice for engraving. Replacing cutting metal to displacing metal instead.

Total cost was about $35 for this accessory for the Nomad. The biggest caution is the clearance gap between the Nomad’s headstock the modified shaft collar. Just make sure that Z travel path is clear.

This project made huge advance when the grey foam rubber on the handle was removed. This change made about 1000% improvement in the epoxy bond. The Dremel is mounted extremely rigid. It is one with the headstock. Not the tiniest of wiggle or bend.

Be Safe

5 Likes

This is awesome. Great hack and superb results!
Bravo

1 Like

The Gcode was edited.

edit Gcode

  • Line 12 - Tool selection commented out.

  • Line 13 - Spindle speed set to zero.

  • Line numbers will vary. Delete almost the last half of Gcode. This last half is the DOTTING of the end of every letter. I find this useless and time consuming. Identifying difference between a letter and a dot is easy. Here’s an example.

This is a letter

This is about 10 dots.

1 Like

First photo is VEE bit milling.

Second photo is Dremel Engraver.

4 Likes

The fancy font that was engraved is called Cochin.ttc. Carbide Create 530 does not list Cochin as available font.

The install is easy. Drag the Cochin font from the System folder and drop it into Create Font folder. Reboot computer. Now, you’re newly added font appears at the top of the list. Thank you for that Carbide3D.

Cochin font is at the top. Nice.
available fonts

I think if you buff and polish the Vee bit milled version it will look much better than the somewhat ugly double-lines of the Dremel version (naturally this is my opinion and so the assertion is correct for me :D)

EDIT: You’d get the effect of the first one - clean and neat without the jagged edges - if you used single-line fonts, a profile path, and a tapered 0.25mm ball endmill.

2 Likes

IT’S ABOUT SAVING THE BEAUTIFUL ENGINE TURNING

Thanks for the input Gerry. Do you have a particular tapered 0.25mm ball end mill that you like?

Buffing after engraving is not an option because of the layers of surface treatment.

The Workflow in general:

  1. Tubing cut to 40" lengths.
  2. Both edges & all 4 sides of the aluminum aircraft tubing are quickly hit with a convoluted wheel to knock off aluminum oxide from heat treatment and sharp edges.
  3. Mount 40" tubes on Shapeoko XXL, at 45º to get maximum lengths.
  4. All 4 sides in 40 inch lengths are ENGINE TURNED.
  5. Parts are cut to shorter lengths and contour profiles are milled on Nomads.
  6. The part is inventoried.
  7. When a customer purchases a pair of stilts, the parts are taken out of inventory .
  8. The Serial # and Customers Name is engraved on both left and right stilt.
  9. Add bearings.

Any attempt to clean the ragged edges from milling must be done without damaging the beautiful ENGINE TURNING. I don’t think such a process exist.

That’s why the Dremel Engraver is a perfect fit for this workflow.

I want to thank my Crack Production Crew for posing for a picture this morning. They can be an earful. :hear_with_hearing_aid:

5 Likes

There’s a few .25mm tapered bits on Amazon that work well for this sort of engraving.

I applaud your effort and enjoyed your post a great deal!

It is just preference but I am not a fan of the smooshed metal and the little ridges that seem to form. But it looks nice from a distance :slight_smile:

1 Like

Here’s a trick your end mills can’t do.

WHEN THE DREMEL ENGRAVER POWER IS TURNED OFF, IT ENABLES “AIR MILLING” IN MID FLIGHT

Minor collision detected at 77% into the engraving, I discovered the engraver ran across the head of this rivet. Hit PAUSE & STOP. Reset RETRACT height from 0.050" to .0100". Fixed.

With Engraver’s Power Switch OFF, ran file at 200% override speed. Basically scrubbing the file.

When Motion hit 77%, I quickly hit RESET FEEDRATE button & turned on the engraver. It picked up perfectly where I paused it. Yippee!

I did not have to OVER WRITE, (over engrave) what was already engraved. (Which might have had unexpected results).

This was not an anticipated benefit of this setup. (No rivets were harmed in this operation.)

1 Like

Unless I’m missing something, if it was an endmill you would do the same thing. The endmill won’t cut what it’s already cut and overengraving is a safe operation.

(Imagine lots of capitals where they would suit - I’m not so good at that)

1 Like

Running a file with the end mill hovering over the part to prove the file is good and it matches the part to be machined is a good thing. Can prevent broken end mills and collisions.

Air Engraving (new word?) requires no extra mouse movements & clicks. It’s the default. When it’s time to engrave, 1 click Power ON.

Air Milling with end mills requires at least 6 extra mouse movements and clicks. How many mouse clicks will that cost you?

  • Remember you have to visited the JOG menu 2 times,
  • 1,2, or 3 clicks on increments button,
  • raise the Z axis
  • lower the Z axis

Looks like you have all the answers. Well done.

1 Like